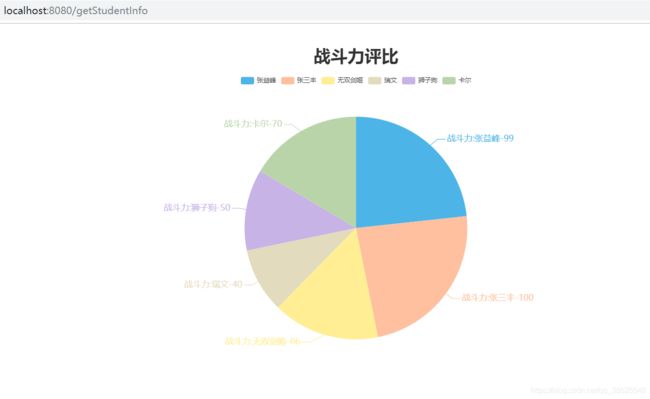
SpringBoot+mybatis连接oracle数据库Web开发入门实例
各位看官大家好,本人小白一枚,最近才开始接触研究比较火热的SpringBoot框架,并自己做了一些简单的整合:SpringBoot+mybatis连接oracle数据库,并整合Echarts显示数据,在此与大家分享一下在此过程中遇到的问题,最后附上完整的实例代码,废话不多说直接上图贴代码:
- 使用Eclipse创建Maven项目(创建过程不再赘述),pom文件导入相关依赖:
  4.0.0
  springboot
  com.springboot-mybatis2
  war
  0.0.1-SNAPSHOT
  com.springboot-mybatis2 Maven Webapp
  http://maven.apache.org


		org.springframework.boot
		spring-boot-starter-parent
		1.5.2.RELEASE


      junit
      junit


		org.springframework.boot
		spring-boot-starter-test


		org.springframework.boot
		spring-boot-starter-web


	    org.springframework.boot
	    spring-boot-devtools
	    true


		org.mybatis.spring.boot
		mybatis-spring-boot-starter
		1.3.2


	    com.oracle
	    ojdbc7
	    12.1.0.2


	    net.sf.json-lib
	    json-lib
	    2.4
	    jdk15


	    javax.servlet
	    javax.servlet-api
	    provided


	    javax.servlet
	    jstl


	    org.apache.tomcat.embed
	    tomcat-embed-jasper
	    provided


	    org.webjars.bower
	    echarts
	    4.0.4


	    org.webjars
	    jquery
	    3.3.1


    com.springboot-mybatis2
注:导入orale相关依赖步骤:
先复制oracle连接的jar包在电脑某个路径下,如:E:\ojdbc7.jar
在DOS窗口下执行以下命令,窗口提示:BUILD SUCESS表示成功,再引入oracle依赖即可;
mvn install:install-file -DgroupId=com.oracle -DartifactId=ojdbc7 -Dversion=12.1.0.2 -Dpackaging=jar -Dfile=E:\ojdbc7.jar项目结构树如下所示:
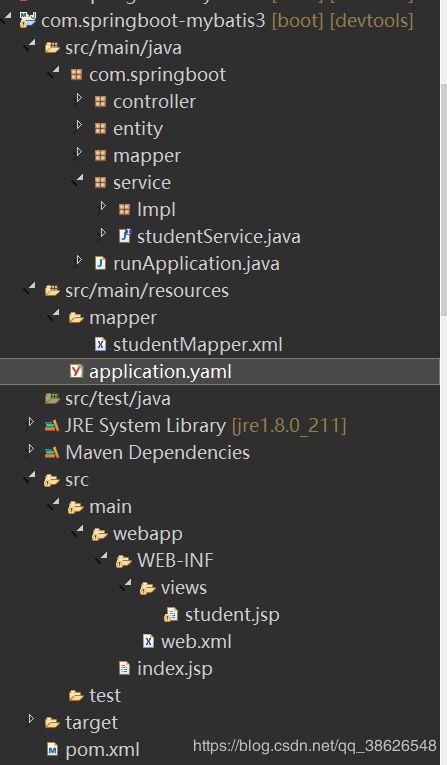
2. 在com.springboot包下新建entity包,在entity包下新建一个实体类:student,快捷键Alt+Shift+S,然后选择Generate Getter and Setter
package com.springboot.entity;

public class student {
	private String name;
	private String math;
	private String chinese;
	private String language;
	public String getName() {
		return name;
	}
	public void setName(String name) {
		this.name = name;
	}
	public String getMath() {
		return math;
	}
	public void setMath(String math) {
		this.math = math;
	}
	public String getChinese() {
		return chinese;
	}
	public void setChinese(String chinese) {
		this.chinese = chinese;
	}
	public String getLanguage() {
		return language;
	}
	public void setLanguage(String language) {
		this.language = language;
	}
	@Override
	public String toString() {
		return "student [name=" + name + ", math=" + math + ", chinese=" + chinese + ",
             language=" + language + "]";
	}
}
3.在com.springboot包下新建mapper包,在mapper包下新建studentMapper接口(注意接口下面的方法名必须与后面配置的mapper文件的SQL下面的id保持一致):
package com.springboot.mapper;

import java.util.List;
import org.apache.ibatis.annotations.Mapper;
import com.springboot.entity.student;

@Mapper
public interface studentMapper {
	public List getStudentInfo();
}
4.在com.springboo包下新建Service包,在Service包下新建:studentSerice接口:
package com.springboot.service;
import java.util.List;
import com.springboot.entity.student;

public interface studentService {
	public List getStudentInfo();

}
5.在Service包下新建Imp包,并在Impl包下新建:studentServiceImpl类(相关注解不可少):
package com.springboot.service.Impl;

import java.util.List;
import org.springframework.beans.factory.annotation.Autowired;
import org.springframework.stereotype.Service;
import com.springboot.entity.student;
import com.springboot.mapper.studentMapper;
import com.springboot.service.studentService;

@Service
public class studentServiceImpl implements studentService {
	@Autowired
	studentMapper stuMapper;

	public List getStudentInfo() {
		return stuMapper.getStudentInfo();
	}
}
6.在com.springboot包下新建Controller包,并新建studentController类:
package com.springboot.controller;

import java.util.List;

import org.springframework.beans.factory.annotation.Autowired;
import org.springframework.stereotype.Controller;
import org.springframework.ui.Model;
import org.springframework.web.bind.annotation.RequestMapping;
import com.springboot.entity.student;
import com.springboot.service.studentService;
import net.sf.json.JSONArray;
import net.sf.json.JSONObject;

@Controller
public class studentController {
	@Autowired
	studentService stuService;

	@RequestMapping("/getStudentInfo")
	public String getInfo(Model model) {
		JSONObject obj = new JSONObject();
		JSONArray arr = new JSONArray();
		List list = stuService.getStudentInfo();
		for(int i=0;i
这边使用通过Model接口将Json数据传到前端JSP界面,return直接返回"student.jsp":
7.com.springboot包下新建启动类:runApplication:
package com.springboot;

import org.springframework.boot.SpringApplication;
import org.springframework.boot.autoconfigure.SpringBootApplication;

@SpringBootApplication
public class runApplication {
	public static void main(String[] args) {
		SpringApplication.run(runApplication.class, args);
	}
}
8.在/com.springboot-mybatis3/src/main/resources下准备配置文件:application.yaml(配置文件在理解的情况下直接复制粘贴,手打有时候出错):
spring:
   mvc:
      view:
         prefix: /WEB-INF/views/
         suffix: .jsp
   datasource:
      url: jdbc:oracle:thin:@数据库服务器IP地址:1521:ylorcl
      username: 名称
      password: 密码
      driver-class-name: oracle.jdbc.OracleDriver
mybatis:
   mapper-locations: classpath:mapper/*Mapper.xml
type-aliases-package: com.springboot.entity.student9.在/com.springboot-mybatis3/src/main/resources新建mapper文件夹,在该文件夹下新建studenMapper.xml配置文件(注意:在select标签的id必须与上文第3点下studentMapper接口的方法名一致,使用resultMap标签而非resultType标签,result标签下的property的值对应实体类下的变量,column的值对应数据库这张表的字段)
10.最后在/com.springboot-mybatis3/src/main/webapp/WEB-INF目录下views文件夹(该位置与application.yaml配置的路径一致),在该文件夹下新建JSP文件:student.jsp
<%@ page language="java" contentType="text/html; charset=UTF-8"
pageEncoding="UTF-8"%>
<%@ taglib uri="http://java.sun.com/jsp/jstl/core" prefix="c" %>
超神学生信息列表
在Chrome浏览器输入:http://localhost:8080/getStudentInfo,效果图如下: