centos 安装Deepo记录
centos 安装Deepo记录
Deepo官方文档[https://github.com/ufoym/deepo?tdsourcetag=s_pctim_aiomsg]
背景检查
1.系统版本
此次安装均根据官方文档进行安装。
Get Docker CE for Centos[https://docs.docker.com/install/linux/docker-ce/centos/]
Prerequisites
Docker EE customers
To install Docker Enterprise Edition (Docker EE), go to Get Docker EE for CentOS instead of this topic.
To learn more about Docker EE, see Docker Enterprise Edition.
OS requirements
To install Docker CE, you need a maintained version of CentOS 7. Archived versions aren’t supported or tested.
The centos-extras repository must be enabled. This repository is enabled by default, but if you have disabled it, you need to re-enable it.
The overlay2 storage driver is recommended.
大致意思为:centos的版本需要为Centos7,centos-extras在centos7中为默认启动,存储驱动推荐使用overlay2.
查看系统版本:
[root@localhost ~]# uname -r
3.10.0-957.1.3.el7.x86_64
[root@localhost ~]# cat /etc/redhat-release
CentOS Linux release 7.6.1810 (Core)
系统版本为Centos7,且内核的版本为3.10
2.查看是否曾经安装过docker相关
docker早期在系统中安装被称作docker或者docker-engine。使用以下命令,来删除系统中曾经安装的docker:
[root@localhost ~]# sudo yum remove docker \
>                   docker-client \
>                   docker-client-latest \
>                   docker-common \
>                   docker-latest \
>                   docker-latest-logrotate \
>                   docker-logrotate \
>                   docker-engine
Loaded plugins: fastestmirror
No Match for argument: docker
No Match for argument: docker-client
No Match for argument: docker-client-latest
No Match for argument: docker-common
No Match for argument: docker-latest
No Match for argument: docker-latest-logrotate
No Match for argument: docker-logrotate
No Match for argument: docker-engine
No Packages marked for removal
如果yum返回为空,则表明之前没有安装过;否则,将卸载old version。
3.查看GPU和nvidia驱动版本
nvidia-docker安装界面[https://github.com/NVIDIA/nvidia-docker]
在该安装界面,提到安装的预备条件中包括:
GNU/Linux x86_64 with kernel version > 3.10 (maintained)
Docker >= 1.12 (will be)
NVIDIA GPU with Architecture > Fermi (2.1)
NVIDIA drivers ~= 361.93 (untested on older versions)
接下来,使用如下命令,查看后两个条件是否满足:
[root@localhost ~]# nvidia-smi
Thu Jan 17 22:31:26 2019
+-----------------------------------------------------------------------------+
| NVIDIA-SMI 390.87                 Driver Version: 390.87                    |
|-------------------------------+----------------------+----------------------+
| GPU  Name        Persistence-M| Bus-Id        Disp.A | Volatile Uncorr. ECC |
| Fan  Temp  Perf  Pwr:Usage/Cap|         Memory-Usage | GPU-Util  Compute M. |
|===============================+======================+======================|
|   0  GeForce GTX 108...  Off  | 00000000:04:00.0 Off |                  N/A |
| 23%   35C    P0    55W / 250W |      0MiB / 11178MiB |      0%      Default |
+-------------------------------+----------------------+----------------------+
|   1  GeForce GTX 108...  Off  | 00000000:0B:00.0 Off |                  N/A |
|  0%   33C    P0    54W / 250W |      0MiB / 11178MiB |      3%      Default |
+-------------------------------+----------------------+----------------------+

+-----------------------------------------------------------------------------+
| Processes:                                                       GPU Memory |
|  GPU       PID   Type   Process name                             Usage      |
|=============================================================================|
|  No running processes found                                                 |
+-----------------------------------------------------------------------------+
可以看到,Nvidia的驱动版本为390,满足条件。
安装docker
官方文档中给出了三种方法,选择最推荐的第一种:使用docker仓库安装。
由于本人安装时为root用户,故命令开头为#,且不需要使用sudo命令。可自行添加。
[root@localhost ~]# yum install -y yum-utils device-mapper-persistent-data lvm2
Complete!
[root@localhost ~]# yum-config-manager --add-repo https://download.docker.com/linux/centos/docker-ce.repo
repo saved to /etc/yum.repos.d/docker-ce.repo
[root@localhost ~]# yum-config-manager --add-repo http://mirrors.aliyun.com/docker-ce/linux/centos/docker-ce.repo
repo saved to /etc/yum.repos.d/docker-ce.repo
由于使用docker自带源一直提示超时,改用阿里云的源。
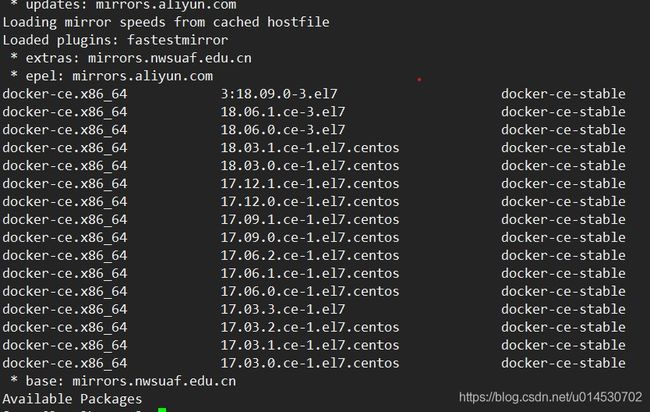
查看可以安装的docker版本
[root@localhost ~]# yum list docker-ce --showduplicates | sort -r
[root@localhost ~]#yum install docker-ce-18.09.0.ce-1.el7
Complete!
至此安装成功,启动docker并验证!
[root@localhost ~]# systemctl start docker
[root@localhost ~]# docker run hello-world
Unable to find image 'hello-world:latest' locally
latest: Pulling from library/hello-world
1b930d010525: Pull complete
Status: Downloaded newer image for hello-world:latest

Hello from Docker!
This message shows that your installation appears to be working correctly.
安装nvidia-docker
1.卸载old version的nvidia-docker
按照安装文档步骤:
$docker volume ls -q -f driver=nvidia-docker | xargs -r -I{} -n1 docker ps -q -a -f volume={} | xargs -r docker rm -f
$sudo yum remove nvidia-docker
2.安装nvidia-docker
由于我的系统是centos7.redhat7.4,故使用:
CentOS 7 (docker-ce), RHEL 7.4/7.5 (docker-ce), Amazon Linux 1/2
# If you have nvidia-docker 1.0 installed: we need to remove it and all existing GPU containers
docker volume ls -q -f driver=nvidia-docker | xargs -r -I{} -n1 docker ps -q -a -f volume={} | xargs -r docker rm -f
sudo yum remove nvidia-docker

# Add the package repositories
distribution=$(. /etc/os-release;echo $ID$VERSION_ID)
curl -s -L https://nvidia.github.io/nvidia-docker/$distribution/nvidia-docker.repo | \
  sudo tee /etc/yum.repos.d/nvidia-docker.repo
当输入以下命令时:
# Install nvidia-docker2 and reload the Docker daemon configuration
sudo yum install -y nvidia-docker2
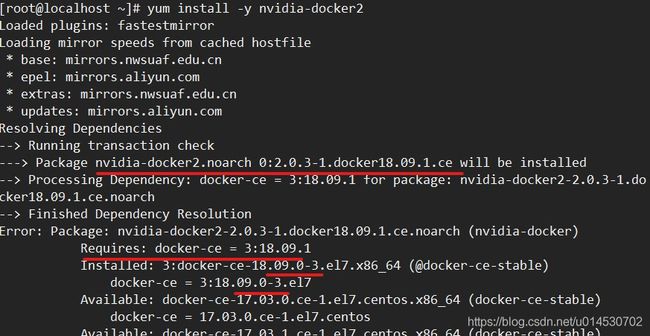
有可能会提示错误,这是由于如果你的系统中没有安装docker-ce,此时会自动下载对应的版本,但是如果你已经下载了,此时的nvidia-docker会自动寻找最新的版本下载,有可能与你的docker-ce版本不兼容。

根据错误提示信息,需要进行更正,经过多方面错误测试,最终安装的命令改为:
# yum install -y nvidia-docker2-2.0.3-1.docker18.09.0.ce.noarch

Installed:
  nvidia-docker2.noarch 0:2.0.3-1.docker18.09.0.ce

Dependency Installed:
  nvidia-container-runtime.x86_64 0:2.0.0-1.docker18.09.0
  nvidia-container-runtime-hook.x86_64 0:1.4.0-2

Complete!
直接指定对应的docker版本为已经安装过的版本,在安装过程中会自动下载nvidia-container-runtime和nvidia-container-runtime-hook两个依赖包,他们的版本与docker-ce版本相对应!
sudo pkill -SIGHUP dockerd

# Test nvidia-smi with the latest official CUDA image
docker run --runtime=nvidia --rm nvidia/cuda:9.0-base nvidia-smi


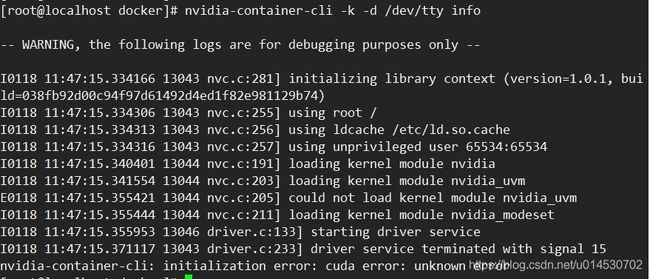
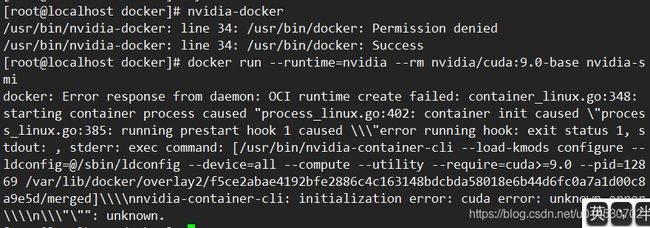
这里遇到了一点问题,以至于nvidia-smi命令已经无法识别GPU。
排查后发现是由于安装过程中不小心动了GPU驱动版本,且nvidia-docker2版本中支持cuda10,于是把驱动和cuda升级到了10,且只挂载了一个GPU。
目前:
[root@localhost ~]# nvidia-smi
Mon Jan 21 07:21:35 2019
+-----------------------------------------------------------------------------+
| NVIDIA-SMI 410.78       Driver Version: 410.78       CUDA Version: 10.0     |
|-------------------------------+----------------------+----------------------+
| GPU  Name        Persistence-M| Bus-Id        Disp.A | Volatile Uncorr. ECC |
| Fan  Temp  Perf  Pwr:Usage/Cap|         Memory-Usage | GPU-Util  Compute M. |
|===============================+======================+======================|
|   0  GeForce GTX 108...  Off  | 00000000:0B:00.0 Off |                  N/A |
| 18%   35C    P0    55W / 250W |      0MiB / 11178MiB |      0%      Default |
+-------------------------------+----------------------+----------------------+

+-----------------------------------------------------------------------------+
| Processes:                                                       GPU Memory |
|  GPU       PID   Type   Process name                             Usage      |
|=============================================================================|
|  No running processes found                                                 |
+-----------------------------------------------------------------------------+
此时,再运行命令,就可以正常运行了。
[root@localhost ~]# docker run --runtime=nvidia --rm nvidia/cuda:9.0-base nvidia-smi
Mon Jan 21 12:23:11 2019
+-----------------------------------------------------------------------------+
| NVIDIA-SMI 410.78       Driver Version: 410.78       CUDA Version: 10.0     |
|-------------------------------+----------------------+----------------------+
| GPU  Name        Persistence-M| Bus-Id        Disp.A | Volatile Uncorr. ECC |
| Fan  Temp  Perf  Pwr:Usage/Cap|         Memory-Usage | GPU-Util  Compute M. |
|===============================+======================+======================|
|   0  GeForce GTX 108...  Off  | 00000000:0B:00.0 Off |                  N/A |
| 18%   35C    P0    55W / 250W |      0MiB / 11178MiB |      0%      Default |
+-------------------------------+----------------------+----------------------+

+-----------------------------------------------------------------------------+
| Processes:                                                       GPU Memory |
|  GPU       PID   Type   Process name                             Usage      |
|=============================================================================|
|  No running processes found                                                 |
+-----------------------------------------------------------------------------+
下载ufoym/deepo深度学习Docker image
基础使用
在这里我们选择使用GPU版本,根据github页面使用说明进行操作:
- 安装docker和nvidia-docker(已安装)
- 从Docker Hub中pull镜像
docker pull ufoym/deepo
pull到本地后可以使用docker image list来查看目前的镜像列表。
[root@localhost ~]# docker image list
REPOSITORY                   TAG                 IMAGE ID            CREATED             SIZE
ufoym/deepo                  latest              7df5ba2f4ed7        10 days ago         9.32GB
hello-world                  latest              fce289e99eb9        2 weeks ago         1.84kB
nvidia/cuda                  9.0-base            74f5aea45cf6        2 months ago        134MB
ufoym/deepo                  all-py36-jupyter    ca53b1635705        8 months ago        9.41GB
在deepo页面中列出的使用方法,当我们根据提示输入后,会出现:
/usr/bin/nvidia-docker: line 34: /usr/bin/docker: Permission denied
/usr/bin/nvidia-docker: line 34: /usr/bin/docker: Success
具体原因目前不是很明白。
如果有其他问题可以使用命令journalctl -n -u nvidia-docker来查看错误信息。
将使用命令改为docker run --runtime=nvidia -it ufoym/deepo bash
也就是:
nvidia-docker => docker run --runtime=nvidia
[option] -it(根据不同的参数启用不同的功能)
ufoym/deepo(镜像ID或者name)
bash(命令)
即进入bash交互界面。
[root@localhost ~]# docker run --runtime=nvidia -it ufoym/deepo bash
root@667354a89652:/#
进入之后,就可以开始尽情的使用啦!可以查看下已安装的python库,可以进入ipython进行交互。
Jupyter支持
该镜像好还好在支持jupyter notebook,同样从docker hub上pull镜像,并使用命令操作,运行镜像。
但这里有版本问题,pip版本在10.0,mxnet版本也在1.0,需要人为更新。或者在刚pull下来的deepo中安装jupyter后commit。
docker pull ufoym/deepo:all-py36-jupyter
docker run --runtime=nvidia -it -p 8888:8888 --pc=host ufoym/deepo:all-py36-jupyter jupyter notebook --no-browser --ip=0.0.0.0 --allow-root --NotebookApp.token='0010' --notebook-dir='/root'
即可以使用该系统的ip进行远程访问http://ip:8888/?token=
deepo同样支持自己创建dockerfile。
如果docker中pip一直安装失败,提示read time out,可尝试重启docker服务。
