【matplotlib】【绘制股票数据】子图的绘制、子图标签设置、双y轴
最近在使用matplotlib,把我自己遇到过的问题总结一下叭~
绘图步骤
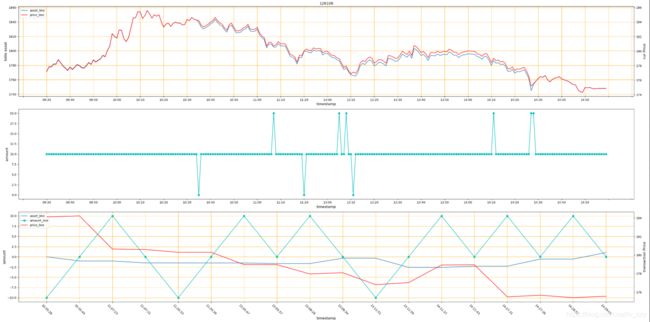
- 效果图
- 设置画布
- 画图
- 画线
- 展示各条线的情况legent
- x轴标签旋转
- x轴标签(间隔)选取
- 画网格
- 对图像设置数字标签
- 存储
- 完整代码
效果图
设置画布
fig = plt.figure(figsize=(30,15))
画图
我要画的是3行,1列共三个图
第一个子图(双y轴子图)
host = fig.add_subplot(311) #311表示3行1列里的第一个图
host.set_title(title)
host.set_xlabel("timestamp",fontsize =12)
host.set_ylabel("totle asset",fontsize =12)
如果第一个图是 双y轴,则:
par = host.twinx()
par.set_ylabel("cur Price",fontsize =12) #设置x、y标签的操作和主轴一样
第二个子图
ax2 = fig.add_subplot(312)
ax2.set_xlabel("timestamp",fontsize =12)
ax2.set_ylabel("amount",fontsize =12)
第三个子图
    ax3 = fig.add_subplot(313)
    ax3.set_xlabel("timestamp",fontsize =12)
    ax3.set_ylabel("amount",fontsize =12)
    par_3 = ax3.twinx()
    par_3.set_ylabel("transaction Price",fontsize =12)
画线
    asset_line_1, = host.plot(x,y1,label='asset_line')
    price_line_1, = par.plot(x,y2, color='red',label='price_line')
    host.legend(handles=[asset_line_1,price_line_1], labels=['asset_line','price_line'], loc=2)

    amount_line_2, = ax2.plot(x,amount,'co-',label='amount_line')

    asset_line_3, = ax3.plot(timestamp_3,asset_list_3,label='asset_line')
    amount_line_3, = ax3.plot(timestamp_3,amount_3,'co-',label='amount_line')
    price_line_3, = par_3.plot(timestamp_3,price_3, color='red',label='price_line')
展示各条线的情况legent
host.legend(handles=[asset_line_1,price_line_1], labels=['asset_line','price_line'], loc=2)
ax3.legend(handles=[asset_line_3, amount_line_3,price_line_3], labels=['asset_line','amount_line','price_line'], loc=2)
x轴标签旋转
for xtick in ax3.get_xticklabels():
    xtick.set_rotation(-45)
x轴标签(间隔)选取
host.xaxis.set_major_locator(plt.MultipleLocator(10))
ax2.xaxis.set_major_locator(plt.MultipleLocator(10))
画网格
plt.tight_layout()#紧凑布局
host.grid(which='major',axis="both",linewidth=0.75,linestyle='-',color='orange')
host.grid(which='minor',axis="both",linewidth=0.25,linestyle='-',color='orange')

ax3.grid(which='major',axis="both",linewidth=0.75,linestyle='-',color='orange')
ax3.grid(which='minor',axis="both",linewidth=0.25,linestyle='-',color='orange')
对图像设置数字标签
设置数字标签
for a, b in zip(x, y1):
    host.text(a, b, "%.5f" % b, ha='center', va='bottom', fontsize=10)
for a, b in zip(x, y2):
    par.text(a, b, "%.5f" % b, ha='center', va='bottom', fontsize=10)
for a, b in zip(x, amount):
    host.text(a, b, b, ha='center', va='bottom', fontsize=10)
存储
plt.savefig(output_name)
完整代码
    #图片窗口
    fig = plt.figure(figsize=(30,15))

    host = fig.add_subplot(311)
    host.set_title(title)
    host.set_xlabel("timestamp",fontsize =12)
    host.set_ylabel("totle asset",fontsize =12)
    par = host.twinx()
    par.set_ylabel("cur Price",fontsize =12)

    ax2 = fig.add_subplot(312)
    ax2.set_xlabel("timestamp",fontsize =12)
    ax2.set_ylabel("amount",fontsize =12)

    ax3 = fig.add_subplot(313)
    ax3.set_xlabel("timestamp",fontsize =12)
    ax3.set_ylabel("amount",fontsize =12)
    par_3 = ax3.twinx()
    par_3.set_ylabel("transaction Price",fontsize =12)

    #画线
    asset_line_1, = host.plot(x,y1,label='asset_line')
    price_line_1, = par.plot(x,y2, color='red',label='price_line')
    host.legend(handles=[asset_line_1,price_line_1], labels=['asset_line','price_line'], loc=2)

    amount_line_2, = ax2.plot(x,amount,'co-',label='amount_line')

    asset_line_3, = ax3.plot(timestamp_3,asset_list_3,label='asset_line')
    amount_line_3, = ax3.plot(timestamp_3,amount_3,'co-',label='amount_line')
    price_line_3, = par_3.plot(timestamp_3,price_3, color='red',label='price_line')
    ax3.legend(handles=[asset_line_3, amount_line_3,price_line_3], labels=['asset_line','amount_line','price_line'], loc=2)

    # #设置坐标轴
    # host.set_xticklabels(labels=trade_date, fontsize=10,rotation=-90)
    for xtick in ax3.get_xticklabels():
        xtick.set_rotation(-45)

    #画网格
    # ax = plt.gca()
    host.xaxis.set_major_locator(plt.MultipleLocator(10))
    ax2.xaxis.set_major_locator(plt.MultipleLocator(10))
    # ax.xaxis.set_major_locator(ticker.MultipleLocator(2))
    # ax.xaxis.set_minor_locator(plt.MultipleLocator(.1))
    # ax.yaxis.set_major_locator(plt.MultipleLocator(1.0))
    # ax.yaxis.set_minor_locator(plt.MultipleLocator(.1))
    plt.tight_layout()#紧凑布局
    host.grid(which='major',axis="both",linewidth=0.75,linestyle='-',color='orange')
    host.grid(which='minor',axis="both",linewidth=0.25,linestyle='-',color='orange')

    ax3.grid(which='major',axis="both",linewidth=0.75,linestyle='-',color='orange')
    ax3.grid(which='minor',axis="both",linewidth=0.25,linestyle='-',color='orange')


    # # 设置数字标签
    # for a, b in zip(x, y1):
    #     host.text(a, b, "%.5f" % b, ha='center', va='bottom', fontsize=10)
    # for a, b in zip(x, y2):
    #     par.text(a, b, "%.5f" % b, ha='center', va='bottom', fontsize=10)
    # for a, b in zip(x, amount):
    #     host.text(a, b, b, ha='center', va='bottom', fontsize=10)
    # a = ScrollableWindow(fig)
    plt.savefig(output_name)
