Unity 3.Adventure Game tutorial(事件系统、动画状态机、库存、条件、反应、交互、游戏状态)

双语机翻视频:

https://www.bilibili.com/video/av34383045/

在官网asset Store下载了完整工程,和pdf

asset Store:https://assetstore.unity.com/account/assets

pdf:https://unity3d.com/cn/learn/tutorials/projects/adventure-game-tutorial

在AssetStore上下载资源并导入项目:(my Asset入口)

https://jingyan.baidu.com/article/4f34706e758caee387b56d3e.html

导入后说Animation Clip __preview__Take 001有负time keys,无法压缩,可能看起来异常

Lighting data asset ‘LightingData’ 与当前版本不兼容。Please use Generate Lighting to rebuild the lighting data.(需要rebuild lighting data)Realtime Global Illumination cannot be used until the lighting data is rebuilt.(否则实时全局光照Realtime Global Illumination不能使用)


目录

Player Control(点击行走)

         Build a click to move animated character using:

• EventSystem

• NavMesh

• Animator

• Prefabs

Inventory(库存)

Build a UI and Item Management System for Player Inventory

• UI System

• Editor Scripting

Interaction System(交互系统)

Build a system allowing the Player to interact with the game

• Conditions

    Create a system to check the current game state

• Scripting Patterns

• Scriptable Objects

• Generic Classes(泛型类)

• Inheritance(继承)

• Extension Methods(扩展方法)

• Reactions

    Create a system to perform actions based on condition state

• Polymorphism(多态)

• Further editor scripting

• Serialization(序列化)

• Interactables

    Create a system to define what the player can interact with

• Interactable Geometry

• EventSystem

• Interaction System Summary

Game State(游戏状态、改变场景)

         Creating a system to load scenes while preserving game state

• Scene Manager

• ScriptableObjects as temporary runtime data storage(脚本化对象作为临时的运行时数据存储)

• Delegates(委托)

• Lambda Expressions(表达式)

The Player

Event System:点击、对话

Navmesh(导航网格)

Animator(行走动画)

Goal

INTERACTABLE互动,通过检测条件触发不同事件

Scene Management:Load Scene ,Maintain Inventory & Scene State(加载场景并保存库存和场景状态)


Understanding the architecture(体系结构) of Scene Loading

Persistent(持久) Sceneà Load Level Additive-Scene 1à Unload Scene- Scene 1

                          à Load Level Additive-Scene 2à Set Active Scene-Scene 2

持久场景load 、unload其他场景


Interact:

When the user clicks on the ground, the character must move to that location(点击地面,角色移动到地点)

Interactable objects in the scene will be provided to our team for our character to interact with.

When an Interactable is clicked on, the character should approach the interactionLocation of the Interactable (点击交互对象,到达交互地点)

interactionLocation is a Transform value saved as part of the Interactable

On arrival, the character should match the position and rotation of the interactionLocation and call the Interact function of the Interactable(角色匹配坐标与旋转,调用交互函数)

When required, the character must play various animations in response to trigger parameters sent by the Interactables; specifically the supplied trigger parameters: HighTake, MedTake, LowTake and AttemptTake

The character cannot be allowed to move while these animations are playing(动画播放时,角色不能移动)

P94

The Approach:

NavMesh :to define the walkable areas in the levels(导航网格:定义可行走区域)

Event Systems: to detect and handle user input and scripted interaction(事件系统:检测处理用户输入,脚本交互)

Animator state machine :to control and play all of the character animations; including idle(闲置), walking and interaction(动画状态机:控制、播放所有角色动画)

Prefab system :to save the character so it can be easily added and used in any scene in the game(可以保存角色,并放到任意场景)

The Steps

打开项目

1. With the correct Asset Store package imported:

 1/6 - Adventure Tutorial - The Player

2. Navigate to the Project window(project窗口)

3. Expand the Scenes folder(Scenes文件夹)

4. Open the SecurityRoom scene(双击打开场景)


将场景中room对象设为静态:

1. Navigate to the Hierarchy window(层级窗口)

2. Expand(展开) the SecurityRoom GameObject and select

the SecurityRoomEnvironment GameObject

3. Check the Static checkbox(在Inspector窗口名字旁边选择Static复选框设为静态场景:在上面创建导航网格nav mesh,不移动这些几何体)

4. Select Yes, change children(将该对象与其子对象全部设为静态)


将一些影响光照的子对象取消静态(不能走到这些东西上):

1. Expand the SecurityRoomEnvironment

2. Multi-Select the children called:

• BlackUnlit

• FloorLightGlow

• HologramLight

• HologramLight02

• SecurityGateBeams

3. Uncheck the Static checkbox


设置nav mesh

1. Open the Navigation window(window-navigation打开navigation窗口,可以在场景视图中看到蓝色网格)

2. Select the Bake panel

3. Set the Max Slope to 1

4. Set the Step Height to 0.2

5. Under ‘Advanced’ set Height Mesh to true(nav mesh、high mesh可以估测每个部分的高度,更精确地走过颠簸)

6. Press the Bake button(在右下角保存)


1. Navigate to the Inspector window(切换视图)

2. Save the scene(保存场景)


Event Systems

We need to be able to interact with our environment

• An event system has 3 requirements.(事件系统需要:发送、接收、管理) Something to -

1. Send events

Physics Raycaster component(触发事件:物理射线投射组件。附加在camera上,每一帧重新投射进场景,寻找基础物理对象)

2. Receive events

Colliders & Event Triggers(碰撞器和事件触发器,碰撞器hip with Raycaster后,向事件触发器发出信号)

3. Manage events

The EventSystem


创建EventSystem管理事件(Manage events):

1. Navigate to the Hierarchy

2. Create > UI > Event System(添加Event System对象)

3. Add an AudioListener component(在该对象上添加组件,作为event system的监听者。在实际项目中放在持久性场景,监听所有场景,而不在每个场景中建立 )

4. Save the scene


创建Send events:

1. Expand the SecurityRoom and CameraRig GameObjects

2. Select the Camera GameObject

3. Add a Physics Raycaster component.(在相机上添加Physics Raycaster组件,查找组件:Phy或在event目录下)- Make sure this is not a Physics 2D Raycaster


创建Receive events:

1. Select the SecurityRoom GameObject

2. Add a MeshCollider component(在SecurityRoom增加网格碰撞器)

3. Set the Mesh property to SecurityRoomMeshCollider(设置组件下的网格属性,为该资源)

1. Add an EventTrigger component(在SecurityRoom增加事件触发器)

2. Click Add New Event Type and select (创建Pointer Click类型的Event)

3. Click the + button to add an event(添加新事件留着引用脚本)

4. Leave the event empty!

5. Save the scene

Animator State Machine

处理玩家本身和它的动画状态


添加Animator Controller:

1. Navigate to the Project window

2. With the Animators > Player folder selected, create an Animator Controller

(在工程窗口的Animators >Player文件夹创建动画控制器(Animator Controller))

3. Name it ClickToMove


创建参数

1. Open the Animator window(双击Animator Controller文件)

2. Select the Parameters panel

3. To create a new Parameter, select the + dropdown menu

4. Create a float parameter and name it Speed

1. Create 4 trigger parameters and name them:

• AttemptTake

• HighTake

• MedTake

• LowTake

Animator Controller决定什么时候,播放哪些动画,移动速度

参数拼写很重要,将匹配其他脚本和material


1. Navigate to the Layout area(指网格区域)

2. Right-click on the background (在空白处右击)and select:

 Create State > From New Blend Tree(融合树)

3. Select the new Blend Tree

4. In the Inspector window, name the state Walking

5. Double click on the state to edit the blend tree


1. Click on BlendTree

2. Rename BlendTree to WalkingBlendTree

3. To make a new Motion Field, click the + button and

select Add Motion Field

4. Repeat this 2 more times to make a total of

3 Motion Fields in all


1. Using Circle Select find & assign:(圆形按钮,添加引用)

• PlayerIdleBlender

• PlayerWalk

• PlayerRun

(当速度低于行走速度阈值时,将行走于闲置融合)


1. Uncheck Automate Thresholds(取消下方自动处理阈值复选框)2. Click on the Compute Thresholds dropdown menu

3. Select Speed(不是设置,而是一次计算,改变值后可再一次选择它计算,选择Automate Thresholds相当于重置)4. Return to Base Layer using Breadcrumb

Route motion 路线运动:每个animation也可以让角色移动

速度speed可以控制动画播放的速度


添加动画:

1. Navigate to the Project window

2. Expand the Animations > Player folder

1. Select Idle, TakeObjectAttempt & TakeObjects(同时选择这三个文件)

2. Drag these into Animator window(拖进网格窗口)

3. Arrange Animations as shown:

Unity 3.Adventure Game tutorial(事件系统、动画状态机、库存、条件、反应、交互、游戏状态)_第1张图片

添加状态转变Transition:

1. Right click on Walking

2. Select Make Transition(右击新建状态转变)

3. Left click on PlayerIdle

This makes a Transition from Walking to PlayerIdle

4. Make a Transition from PlayerIdle back to Walking

1. Make Transitions from Any State to each of the

PlayerTakeObject... states:

• Attempt

• High

• Mid

• Low

2. Make Transitions from each of the PlayerTakeObject...states to Walking


设置Transition触发条件:

1. Select the Transition from Walking to PlayerIdle

2. Uncheck has exit time(动画完成退出时间)

3. Under the condition list click the + button to add a

condition and set the parameters as:(添加速度范围作为条件)

• Speed (already set)

• Less

• 0.1

1. Select the Transition from PlayerIdle to Walking

2. Uncheck has exit time

3. Under the condition list click the + button to add a

condition

• Speed (already set)

• Greater (already set)

• 0.1

1. Select each of the Transitions from Any State to each of the PlayerTakeObject... states

2. Add a new condition and set the parameter the appropriate trigger using the parameter dropdown:(发生事件时触发,默认播放完毕后自动转为walking)

• AttemptTake

• HighTake

• MedTake

• LowTake


1. Select PlayerIdle

2. Set the tag to Locomotion(移动)

3. Select Walking

4. Set the tag to Locomotion

5. Navigate to the Scene window

6. Save the scene

Player Prefab

拿出player模型:

1. Navigate to the Project window

2. Expand the Models folder

3. Drag the Player model asset into the Hierarchy

4. Set the Layer on the Player GameObject to Character(Layer属性在Tag右侧)

5. Set Position -0.7, 0.0, 3.5

6. Set the Rotation 0.0, 180, 0.0


设置Animator组件属性:

1. Using Circle select - set Controller to ClickToMove(在Animator组件的Controller属性框)

2. Add a new component: NavMeshAgent

3. Change the Speed property to 2

4. Change the Acceleration(加速度) property to 20

5. Change the Stopping Distance to 0.15(到目的地前的减速距离)


添加脚本,放入预制件:

1. Select and Drag the Player GameObject to the Project window > Prefabs folder

2. Navigate to Scripts/Monobehaviours/Player folder

3. Create a new C# Script called PlayerMovement

4. Drag the PlayerMovement script onto the Player Prefab

5. Open the PlayerMovement script for editing


PlayerMovement script

https://www.bilibili.com/video/av34383045/?p=2

pdf:P139

Scripts/Monobehaviours/Player folder

创建PlayerMovement脚本,添加到Player(预制件,而非场景中的示例)

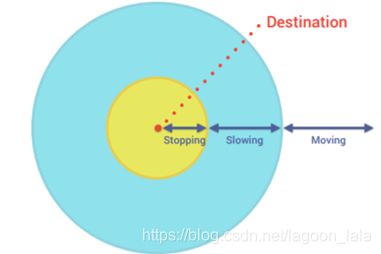
脚本控制Player瞄准目的地移动, 由导航网格(nac mesh驱动)

同时控制动画,在接近目的地时放慢

Unity 3.Adventure Game tutorial(事件系统、动画状态机、库存、条件、反应、交互、游戏状态)_第2张图片

编写脚本:

需要包含一个新的namespace:using UnityEngine.EventSystems;

(在Unity5.5之后,需要加上: using UnityEngine.AI;

需要引用一个animator、nav mesh agent(导航网格代理)

需要知道要到多远去

不允许agent旋转角色:agent.updateRotation = false;

在互动时禁止移动:co-routine

确定角色要等待多久

确定玩家目的地:存储玩家目的地位置的Vector3

靠近目的地时停止,在那时的第一帧将速度设为很小


新建控制角色如何移动的函数:OnAnimatorMove

结合animator与网格代理的移动:基于动画播放速度,设置导航网格代理的速度-route motion:

agent.velocity = animator.deltaPosition / Time.deltaTime;

.deltaPosition:角色这一帧移动距离

.deltaTime:两帧之间时间差

V=s/t


还需要slowing、stopping

确定是否要停止:调用private void Stopping

需要控制的参数:(out float speed)


类似地,函数Slowing需要传入out float speed,

需要判断目的地距离,传入float distanceToDestination

旋转角色:private void Moving ()


在Update函数中:

agent.pathPending代表网格代理正在计算path。这时直接返回

否则已经有path

需要知道沿path走多快

Agent有两个速度:实际、将要

float speed = agent.desiredVelocity.magnitude;

magnitude(幅度)

依次检查是否需要停止、减速、移动

确定停止距离比例常量:private const float stopDistanceProportion = 0.1f;

if (agent.remainingDistance <= agent.stoppingDistance * stopDistanceProportion)

            Stopping (out speed);

确保转身之前速度够快:speed > turnSpeedThreshold

(转身速度阈值)


需要设置Animator速度(需要字符串匹配,可以用整数代替)

声明只读整数(只读整数为哈希值):private readonly int hashSpeedPara = Animator.StringToHash("Speed");

Speed要匹配animator中的参数

设定变速时间(Damp time of speed)默认值:public float speedDampTime = 0.1f;

animator.SetFloat(hashSpeedPara, speed, speedDampTime, Time.deltaTime);


Stopping函数中:

停止网格代理:agent.Stop();

固定精确位置:transform.position = destinationPosition;

设置速度:speed = 0f;


Slowing函数中:

停止网格代理,

自己定义对位置的控制,渐渐移动:Vector3.MoveTowards(当前位,目标位,速度)

transform.position = Vector3.MoveTowards(transform.position, destinationPosition, slowingSpeed * Time.deltaTime);

定义slowingSpeed


计算速度:????????

比例(1-距/停止距):float proportionalDistance = 1f - distanceToDestination / agent.stoppingDistance;

线性插值:speed = Mathf.Lerp(slowingSpeed, 0f, proportionalDistance);


Moving函数:

完成旋转

得到目标旋转值:Quaternion targetRotation = Quaternion.LookRotation(agent.desiredVelocity);

在当前、目标旋转值间以速度旋转transform.rotation = Quaternion.Lerp(transform.rotation, targetRotation, turnSmoothing * Time.deltaTime);


OnGroundClick函数:

处理点击地面-public void OnGroundClick(BaseEventData data)

BaseEventData有此次点击时发生事件的数据

转换类型:PointerEventData pData = (PointerEventData)data;

在导航网格上找到最接近点击处的点:

需要距离private const float navMeshSampleDistance = 4f:

NavMesh.SamplePosition (pData.pointerCurrentRaycast.worldPosition, out hit, navMeshSampleDistance, NavMesh.AllAreas)

参数:欲到达的世界坐标系中一个点,返回所有信息的接收变量,sample结束的距离,导航网格中可以用的区域

设定目标位置为hit位置:destinationPosition = hit.position;

若无hit位置则为最接近的位:destinationPosition = pData.pointerCurrentRaycast.worldPosition;

让导航网格代理使用该位置:agent.SetDestination(destinationPosition);

恢复代理(之前用.Stop停止过):agent.Resume ();


Interact交互变量还未使用


1. Select the Player Prefab

2. On the PlayerMovement component:

• Setup the reference to the Player's Animator

• Setup the reference to the Player's NavMeshAgent

在预制件中的Player的PlayerMovement组件中填充animator、agent引用预制件中的Player


1. Navigate to the Hierarchy

2. Select SecurityRoom GameObject

3. Find the Event Trigger

4. Drag the Player GameObject from the Hierarchy onto

the object field of the Event Trigger

5. Select PlayerMovement.OnGroundClick()

Event trigger引用:

在层级目录中,SecurityRoom的组件Event trigger,使用player的实例,调用PlayerMovement中的OnGroundClick

room的碰撞器将触发Event Trigger,找到玩家和该方法


Test


在前往时,确定什么是可互动的(interactable)

创建变量存储他们:private Interactable currentInteractable;

当到达目的地时,使用他们互动


Stopping函数中:

判断可互动

if (currentInteractable)

        {

面朝交互方向:transform.rotation = currentInteractable.interactionLocation.rotation;

            currentInteractable.Interact();

确保互动只被调用一次:currentInteractable = null;

            StartCoroutine (WaitForInteraction ());

        }


Bool handleInput只有在互动时才处理输入

判断是否可以移动,动画机是否在运动状态(locomotion)

-使用哈希方法:

private readonly int hashLocomotionTag = Animator.StringToHash("Locomotion");


协程处理要交互发生需等待时间:

private IEnumerator WaitForInteraction ()

    {

等待时不获取任何输入:handleInput = false;

单位为秒:yield return inputHoldWait;

当不在运动状态就等待,(0为基础层),与缓存的运动标签不同,则等待一帧:while (animator.GetCurrentAnimatorStateInfo (0).tagHash != hashLocomotionTag)

        {

            yield return null;

        }

        handleInput = true;

    }


Stop中调用协程:StartCoroutine (WaitForInteraction ());

Slowing中平滑改变选择角度(而不在Stop中突然改变):

如果是可交互的,旋转,否则维持当前旋转角度:Quaternion targetRotation =

 currentInteractable ? currentInteractable.interactionLocation.rotation : transform.rotation;

transform.rotation =

 Quaternion.Lerp(transform.rotation, targetRotation, proportionalDistance);


点击可交互物体时:

public void OnInteractableClick(Interactable interactable)

    {

保证可处理输入:if(!handleInput)

            return;

存储当前物品的可交互性:currentInteractable = interactable;

设置目的地:destinationPosition = currentInteractable.interactionLocation.position;

使用导航代理:agent.SetDestination(destinationPosition);

        agent.Resume ();

}


在OnGroundClick中:

无法处理输入时,点击地面同样无效果:if(!handleInput) return;

当点击可互动物后,又点击地面,改变主意:currentInteractable = null;

Working with Interactables

1. Interactables, along with Conditions and Reactions,(可交互物,有条件、反应)

have been supplied to our team

2. We simply need to set them up to work with our new Player click to move system

3. Note: We will be taking on the role of developing these systems later in the session


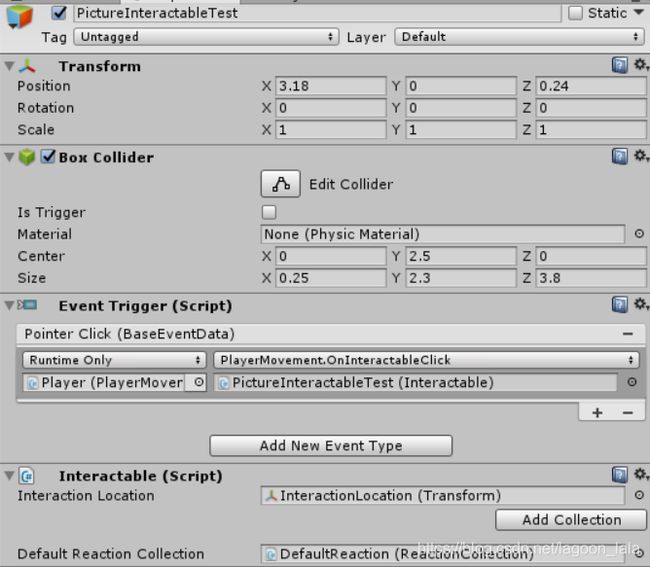
设置Event Trigger:

1. Select PictureInteractable(在层级目录中)

2. Find the Event Trigger component

3. Drag the Player GameObject from the Hierarchy onto the

object field of the Event Trigger

4. Select PlayerMovement.OnInteractableClick()

触发的事件与地面不同

5. Drag the Interactable GameObject or the Interactable

component below onto the EventTrigger's Parameter field

(OnInteractableClick需要传入参数,将下方的脚本拽入参数字段)

PlayerMovement.cs:

using System.Collections;
using UnityEngine;
using UnityEngine.AI;
using UnityEngine.EventSystems;
public class PlayerMovement : MonoBehaviour
{
    public Animator animator;
    public NavMeshAgent agent;
    public float turnSmoothing = 15f;
    public float speedDampTime = 0.1f;
    public float slowingSpeed = 0.175f;
    public float turnSpeedThreshold = 0.5f;
    public float inputHoldDelay = 0.5f;
    
    private Interactable currentInteractable;
    private Vector3 destinationPosition;
    private bool handleInput = true;
    private WaitForSeconds inputHoldWait;
    private readonly int hashSpeedPara = Animator.StringToHash("Speed");
    private readonly int hashLocomotionTag = Animator.StringToHash("Locomotion");
    public const string startingPositionKey = "starting position";
    private const float stopDistanceProportion = 0.1f;
    private const float navMeshSampleDistance = 4f;
    private void Start()
    {
        agent.updateRotation = false;
        inputHoldWait = new WaitForSeconds (inputHoldDelay);
        destinationPosition = transform.position;
    }
    private void OnAnimatorMove()
    {
        agent.velocity = animator.deltaPosition / Time.deltaTime;
    }
    private void Update()
    {
        if (agent.pathPending)
            return;
        float speed = agent.desiredVelocity.magnitude;
        
        if (agent.remainingDistance <= agent.stoppingDistance * stopDistanceProportion)
            Stopping (out speed);
        else if (agent.remainingDistance <= agent.stoppingDistance)
            Slowing(out speed, agent.remainingDistance);
        else if (speed > turnSpeedThreshold)
            Moving ();
        
        animator.SetFloat(hashSpeedPara, speed, speedDampTime, Time.deltaTime);
    }
    private void Stopping (out float speed)
    {
        agent.Stop();
        transform.position = destinationPosition;
        speed = 0f;
        if (currentInteractable)
        {
            transform.rotation = currentInteractable.interactionLocation.rotation;
            currentInteractable.Interact();
            currentInteractable = null;
            StartCoroutine (WaitForInteraction ());
        }
    }
    private void Slowing (out float speed, float distanceToDestination)
    {
        agent.Stop();
        float proportionalDistance = 1f - distanceToDestination / agent.stoppingDistance;
        Quaternion targetRotation = currentInteractable ? currentInteractable.interactionLocation.rotation : transform.rotation;
        transform.rotation = Quaternion.Lerp(transform.rotation, targetRotation, proportionalDistance);
        transform.position = Vector3.MoveTowards(transform.position, destinationPosition, slowingSpeed * Time.deltaTime);
        speed = Mathf.Lerp(slowingSpeed, 0f, proportionalDistance);
    }
    private void Moving ()
    {
        Quaternion targetRotation = Quaternion.LookRotation(agent.desiredVelocity);
        transform.rotation = Quaternion.Lerp(transform.rotation, targetRotation, turnSmoothing * Time.deltaTime);
    }
    public void OnGroundClick(BaseEventData data)
    {
        if(!handleInput)
            return;
        
        currentInteractable = null;
        PointerEventData pData = (PointerEventData)data;
        NavMeshHit hit;
        if (NavMesh.SamplePosition (pData.pointerCurrentRaycast.worldPosition, out hit, navMeshSampleDistance, NavMesh.AllAreas))
            destinationPosition = hit.position;
        else
            destinationPosition = pData.pointerCurrentRaycast.worldPosition;
        agent.SetDestination(destinationPosition);
        agent.Resume ();
    }
    public void OnInteractableClick(Interactable interactable)
    {
        if(!handleInput)
            return;
        currentInteractable = interactable;
        destinationPosition = currentInteractable.interactionLocation.position;
        agent.SetDestination(destinationPosition);
        agent.Resume ();
    }
    private IEnumerator WaitForInteraction ()
    {
        handleInput = false;
        yield return inputHoldWait;
        while (animator.GetCurrentAnimatorStateInfo (0).tagHash != hashLocomotionTag)
        {
            yield return null;
        }
        handleInput = true;
    }
}

Inventory(库存物品栏)

P156

https://www.bilibili.com/video/av34383045/?p=3

Brief

Create a simple inventory system with persistent content that is not lost during scene changes

Inventory Items should be extensible if the design changes可扩展的

two public functions: AddItem & RemoveItem两个公共方法

Simplify and improve the workflow of the project in the Inspector with regards to the Inventory and its Items简化、提升工作流

The Approach:

Use the UI system to display the inventory to the user用UI展示库存

Use ScriptableObjects to make a simple Item class which defines every possible inventory item and can easily be extended and referenced by the Inventory构建Item类,定义可能的库存项,使能被Inventory引用

Create a custom inspector for the Inventory to improve the workflow of the project

The Steps

1. Navigate to the Scenes folder

2. Open the Persistent scene

3. Set the Scene view to 2D mode(Scene视图上侧的2D按钮)

4. Navigate to the Game view

5. Set the Aspect Ratio(长宽比) to 16:9

6. Select and frame the PersistentCanvas

Understanding the UI in the Hierarchy Window

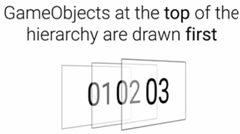
1. The order of UI Elements in the Hierarchy window informs the UI system what order to render the UI Elements(渲染UI元素)

2. The rendering order is from the top to the bottom which will render on screen from the back to the front(渲染次序从上到下,从后到前)

Unity 3.Adventure Game tutorial(事件系统、动画状态机、库存、条件、反应、交互、游戏状态)_第3张图片Unity 3.Adventure Game tutorial(事件系统、动画状态机、库存、条件、反应、交互、游戏状态)_第4张图片

1. Navigate back to the Scene view场景视图

2. With the PersistentCanvas selected:Create an empty child GameObject

3. Name this new GameObject Inventory(在PersistentCanvas创建空游戏对象Inventory)

4. Make sure that it is the first child of PersistentCanvas and that it is above FadeImage(确认排列为第一个子对象,在FadeImage之上,FadeImage是覆盖整个屏幕的淡入淡出黑框)


1. Create a child of Inventory called ItemSlot(Inventory下创建子对象ItemSlot项目槽)

2. As a child of ItemSlot, Create a new UI > Image GameObject(在ItemSlot下创建UI > Image对象)

3. Duplicate the Image GameObject(再复制一个Image对象。)

4. Name the first child Image BackgroundImage

5. Name the second ItemImage上面的image作为背景图像,下面的Image绘制item图像)


1. Select the BackgroundImage GameObject

2. Set the Image component’s Source Image to InventorySlotBG(在BackgroundImage的Image组件设置图像源为InventorySlotBG)

3. Select the ItemImage GameObject

4. Disable the Image component(禁用ItemImage的Image组件,因为无Source Image的image组件会默认为纯色(白),禁用后能看到背景)


1. Drag the ItemSlot GameObject into the Prefabs folder to make it a prefab(ItemSlot拖入预制件,易修改)

2. Return to the Hierarchy window

3. Duplicate the ItemSlot GameObject 3 times so there are 4 ItemSlots in total(复制出四个ItemSlot槽)

4. Name them: ItemSlot0, ItemSlot1, ItemSlot2 and ItemSlot3(分别重命名)


1. Select the Inventory GameObject

2. Add a Vertical Layout(竖直布局) Group component(在Inventory添加组件Vertical Layout)


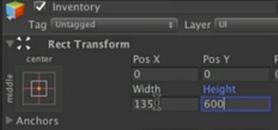
1. Find the Inventory’s Rect Transform component(在Inventory的Rect Transform组件调整)

2. Set the width to 135 and the height to 600(设置后item在inventory一列展开)

Unity 3.Adventure Game tutorial(事件系统、动画状态机、库存、条件、反应、交互、游戏状态)_第5张图片

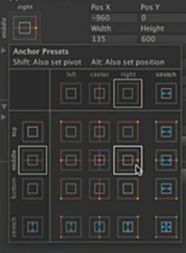
3. From the anchor selection dropdown, choose middle-right(左上角的框,点开选择,使锚点固定在画布右侧。)

Unity 3.Adventure Game tutorial(事件系统、动画状态机、库存、条件、反应、交互、游戏状态)_第6张图片

4. Set the position to -95, 0, 0(锚点在整体画布的位置受PosX,PosY控制)

11:32

接下来给Inventory写脚本

Item script

文件路径:Scripts/ScriptableObjects/Inventory

[CreateAssetMenu]
public class Item : ScriptableObject
{
    public Sprite sprite;
}

继承ScriptableObject可通过脚本访问对象,则可以将其创建为assetà则有item assets在项目文件夹中,得到创建asset的属性菜单。

则当点击在Unity菜单中点击assets时,可以创建一个item(基于这个脚本)

脚本中唯一定义的变量Sprite sprite,使用spike代替库存中的东西

如果要用它代表Object就加入public GameObject itemObject;来扩展这个item System

Unity 3.Adventure Game tutorial(事件系统、动画状态机、库存、条件、反应、交互、游戏状态)_第7张图片

Inventory script

控制Inventory

1. Select the Scripts > MonoBehaviours > Inventory folder

2. Create a C# script called Inventory

3. Open the Inventory script for editing

(在上述文件夹创建脚本Inventory)

编辑脚本:

Namespace:

using UnityEngine.UI; //处理UI,允许访问image组件

变量(variables):

需要使用它存储、显示items,需要得到图像组件来显示,需要items的数组存储物品。

相同size,数量(amount)的items,用 image组件显示他们

public const int numItemSlots = 4; // The number of items that can be carried.  This is a constant so that the number of Images and Items are always the same. 槽数为UI中物品数

使用UI初始化一些恒定长度数组,设为public:希望inventory editor能访问槽数

public Image[] itemImages = new Image[numItemSlots]; // The Image components that display the Items.将引用图像组件,初始化为相同大小数组
public Item[] items = new Item[numItemSlots]; // The Items that are carried by the player.

函数(function):

添加add items进入库存

删除remove


AddItem需要在其他地方被调用àpublic

需要传入添加的itemà参数

遍历所有Item slots,直到找到空位置插入

在循环中,每次迭代时检查当前items,若为空,用传入的item填充items数组位置,并改变Image数组,使之显示在屏幕(没有东西时关闭图像),跳出循环

    // This function is called by the PickedUpItemReaction in order to add an item to the inventory.
    public void AddItem(Item itemToAdd)
    {
        // Go through all the item slots...
        for (int i = 0; i < items.Length; i++)
        {
            // ... if the item slot is empty...
            if (items[i] == null)
            {
                // ... set it to the picked up item and set the image component to display the item's sprite.
                items[i] = itemToAdd;
                itemImages[i].sprite = itemToAdd.sprite;
                itemImages[i].enabled = true;
                return;
            }
        }
    }


Remove:

找到需要删除的项,改为空,并关闭显示

重命名快捷键:F2或ctrl R

// This function is called by the LostItemReaction in order to remove an item from the inventory.
    public void RemoveItem (Item itemToRemove)
    {
        // Go through all the item slots...
        for (int i = 0; i < items.Length; i++)
        {
            // ... if the item slot has the item to be removed...
            if (items[i] == itemToRemove)
            {
                // ... set the item slot to null and set the image component to display nothing.
                items[i] = null;
                itemImages[i].sprite = null;
                itemImages[i].enabled = false;
                return;
            }
        }
    }

整合库存到已有代码(integrate inventory)

使用这两个预存脚本

1. Navigate to Scripts > ScriptableObjects > Interaction >

Reactions > DelayedReactions folder

2. Open the LostItemReaction script for editing

1. Navigate to Scripts > ScriptableObjects > Interaction >

Reactions > DelayedReactions folder

2. Open the PickedUpItemReaction script for editing

3. Uncomment all the commented-out code(取消对所有代码的注释)

4. Save the script and return to the editor

LostItemReaction

如拿出硬币操作

public class LostItemReaction : DelayedReaction
{
    public Item item;               // Item to be removed from the Inventory.


    private Inventory inventory;    // Reference to the Inventory component.


    protected override void SpecificInit()
    {
        inventory = FindObjectOfType ();
    }


    protected override void ImmediateReaction()
    {
        inventory.RemoveItem (item);
    }
}

PickedUpItemReaction

public class PickedUpItemReaction : DelayedReaction
{
    public Item item;               // The item asset to be added to the Inventory.


    private Inventory inventory;    // Reference to the Inventory component.


    protected override void SpecificInit()
    {
        inventory = FindObjectOfType();
    }


    protected override void ImmediateReaction()
    {
        inventory.AddItem(item);
    }
}

1. Add an Inventory component to the PersistentCanvas GameObject(在PersistentCanvas添加Inventory脚本组件,这样能够在整个系统持久保存,而不是基于某个场景)

- Note that the Inventory component has two separate and unassociated arrays(这时组件的属性栏中有两个数组)

Unity 3.Adventure Game tutorial(事件系统、动画状态机、库存、条件、反应、交互、游戏状态)_第8张图片

建立自定义数组,分别关联四个项的images和items数组元素

Understanding the Custom Inspector

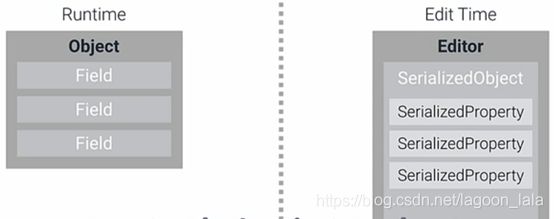
Runtime与Edit Time表现形式不同,创建Editor。针对每一个对象,需要一个对应表示àserializedObject(序列化对象,运行时对象的通用表示,serializedObject能够在Inventory中看到,得到序列化属性(serializedProperty))

serializedProperty属于serializedObject,并代表对象中的字段。

Unity 3.Adventure Game tutorial(事件系统、动画状态机、库存、条件、反应、交互、游戏状态)_第9张图片

InventoryEditor:

1. Find the Scripts > Editor > Inventory folder

2. Create a C# script called InventoryEditor

3. Open the InventoryEditor script for editing


using UnityEditor;

不继承MonoBehaviourMonoBehaviour 是要附加到游戏对象的脚本

public class InventoryEditor : Editor

给出Editor的目标type,CustomEditor,参数为Inventory

[CustomEditor(typeof(Inventory))]

序列化每一个字段的属性

private bool[] showItemSlots = new bool[Inventory.numItemSlots];    // Whether the GUI for each Item slot is expanded.每个项目槽是否展开显示image组件和item
    private SerializedProperty itemImagesProperty;             // Represents the array of Image components to display the Items.代表itemImages数组
    private SerializedProperty itemsProperty;                  // Represents the array of Items. Items数组

//给出序列化属性要查找的名字,名字字符串可与虚查找原名相同(变量名为:属性所在类Prop字段名)
    private const string inventoryPropItemImagesName = "itemImages";    // The name of the field that is an array of Image components.
    private const string inventoryPropItemsName = "items";              // The name of the field that is an array of Items.


在OnEnable函数找到相应名字的属性

private void OnEnable ()
    {
        // Cache the SerializedProperties.
        itemImagesProperty = serializedObject.FindProperty (inventoryPropItemImagesName);
        itemsProperty = serializedObject.FindProperty (inventoryPropItemsName);
    }

覆写(override)OnInspectorGUI

目标是Inventory,这里有序列化对象

这些序列化属性不属于inventory,而属于序列化对象

改变属性时,update改变序列化对象

改变序列化对象时,确保变化回到目标对象

public override void OnInspectorGUI ()
    {
        // Pull all the information from the target into the serializedObject. 确保序列化对象中信息与之相同
        serializedObject.Update ();

        // Display GUI for each Item slot.
        for (int i = 0; i < Inventory.numItemSlots; i++)
        {
            ItemSlotGUI (i);
        }

        // Push all the information from the serializedObject back into the target.
        serializedObject.ApplyModifiedProperties ();//改变目标对象
    }

ItemSlotGUI

传入参数,确定是哪个item

每个item显示在一个box

使用(Vertical layout group)垂直布局组

private void ItemSlotGUI (int index)
    {
        EditorGUILayout.BeginVertical (GUI.skin.box);//垂直安排接下来的项,样式参数GUI.skin.box为所有布局组中的都在box中显示,
        EditorGUI.indentLevel++;//缩进
        
        // Display a foldout to determine whether the GUI should be shown or not.显示折叠index索引(Item Slot0/1/2/3
        showItemSlots[index] = EditorGUILayout.Foldout (showItemSlots[index], "Item slot " + index);

        // If the foldout is open then display default GUI for the specific elements in each array.点击时改变当前展开情况
        if (showItemSlots[index])//如果状态为展开,则显示
        {
            EditorGUILayout.PropertyField (itemImagesProperty.GetArrayElementAtIndex (index));//显示默认值,不在每个item中显示完整的数组,GetArrayElementAtIndex找到子对象元素,显示特定的数组元素

//使用序列化属性的默认值PropertyField
            EditorGUILayout.PropertyField (itemsProperty.GetArrayElementAtIndex (index));
        }

        EditorGUI.indentLevel--;//退回缩进
        EditorGUILayout.EndVertical ();//结束竖直布局组,没有其他重叠GUI
    }


1. Observe the change in the Inspector(看属性栏的变化)

2. Drag the ItemImage GameObject from each ItemSlot to the appropriate Image object field on the Inventory inspector(PersistentCanvas中的Inventory脚本组件,分别引用四个槽的images对象)

3. Save the scene

Unity 3.Adventure Game tutorial(事件系统、动画状态机、库存、条件、反应、交互、游戏状态)_第10张图片

P184

-P204

Interaction System(交互系统)

Build a system allowing the Player to interact with the game

创建交互系统与玩家互动,改变游戏状态(game state)

• Conditions

      Create a system to check the current game state

• Scripting Patterns

• Scriptable Objects

• Generic Classes(泛型类)

• Inheritance(继承)

• Extension Methods(扩展方法)

• Reactions

      Create a system to perform actions based on condition state

• Polymorphism(多态)

• Further editor scripting

• Serialization(序列化)

• Interactables

      Create a system to define what the player can interact with

• Interactable Geometry

• EventSystem

• Interaction System Summary

Brief

Unity 3.Adventure Game tutorial(事件系统、动画状态机、库存、条件、反应、交互、游戏状态)_第11张图片

Approach

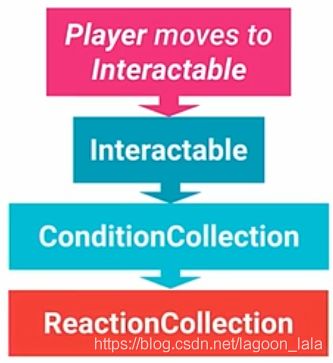
Create an Interactable GameObject > OnClickEvent > Condition > Reaction

The Interactable GameObject will be:(创建交互式游戏对象,接收用户点击输入作为click event,使用event System)

 • stand-alone and hold all logic & events(独立,处理所有逻辑、事件)

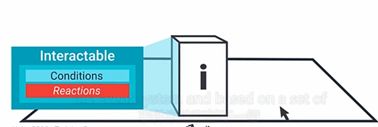
• decoupled from the actual props in the scene(与现实场景中的道具无关,但在道具周围设置带有碰撞器的对象,进行互动)实际有两个道具

Unity 3.Adventure Game tutorial(事件系统、动画状态机、库存、条件、反应、交互、游戏状态)_第12张图片

The Interactable GameObject will have:交互对象将有

• A Collider to detect clicks(检测点击的碰撞器)

• An EventTrigger to process clicks(处理点击的EventTrigger事件触发器)

• An Interactable component to control the logic of the interaction(控制逻辑与交互的交互脚本组件)

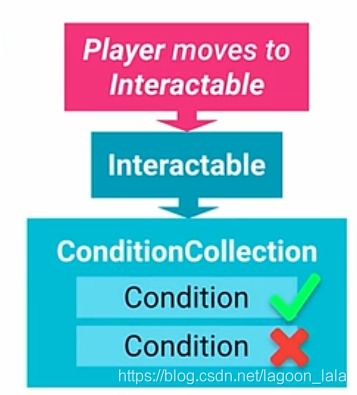
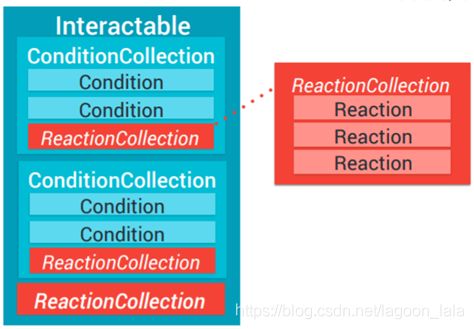
玩家走到交互对象处,点击发生交互,条件集合不吻合,则查看另一个条件集合,吻合则调用反应集合:

Unity 3.Adventure Game tutorial(事件系统、动画状态机、库存、条件、反应、交互、游戏状态)_第13张图片Unity 3.Adventure Game tutorial(事件系统、动画状态机、库存、条件、反应、交互、游戏状态)_第14张图片

Conditions are:条件

• Data objects that contain only an identifier and a boolean(保存标识符和bool状态的数据对象)

• Saved as ScriptableObject assets that can be used to compare the state of a Condition(脚本对象assets比较条件状态)


Reactions:反应

• Accommodate a wide variety of possible actions(保存可能的行动(播放动画设置,显示文本,加载场景-动画反应、文本反应、场景反应))

• Use Inheritance and Polymorphism to create specific Reactions for each possible type of action(用继承和多态性创建每种可能类型的特定反应行动)

Reactions will be Encapsulated(反应封装)

每个互动不需要知道将发生什么反应,只需知道是反应。一个单独的反应集合的组件,将分发需反应信息

• The Interactable will have a single object reference to a Reaction(接口将有single object引用Reaction)

• The Interactable will call a single React function regardless of how many actual Reactions there are(互动将调用一个React函数,不管实际有多少反映)

To improve workflow Custom Inspectors will be created to accommodate all of the different types of Reactions, Conditions and Interactables(自定义检查器,创造、容纳,适应所有不同类型的Reactions, Conditions and Interactables)

Conditions(条件)

5:12

Brief

Create a system to make Reactions conditional(创建反应条件系统

All Conditions will be ScriptableObjects(所有条件都是脚本对象)

• Some Conditions will be saved as assets to represent the global state of the game(一些条件保存为资源,代表全局游戏状态)

• Some Conditions will be instances in the scene which represent the required state(一些条件是场景中代表所需状态的实例)

Unity 3.Adventure Game tutorial(事件系统、动画状态机、库存、条件、反应、交互、游戏状态)_第15张图片

条件集合(condition)中有场景中的实例(instance in the scene),

比较他们与其他保存在asset的条件的实例

场景中实例需要发生反应,asset中实例的是游戏全局状态(global state of the game)

比较这两个实例的状态(hash),看是否满足(条件状态与全局状态(可通过玩家改变)相同)

Unity 3.Adventure Game tutorial(事件系统、动画状态机、库存、条件、反应、交互、游戏状态)_第16张图片

Reaction:

reaction改变状态(state)

Conditions中有全局状态的引用,用满足状态的反应改变asset中的全局状态

•Conditions will have an integer hash representing their description (条件中有一个整数hash)

•Comparing the hash will be more efficient than comparing the descriptions as strings(比较hash比比较字符串的效率高)

Steps

The Condition script

ScriptableObject>Interaction>Condition

这次不在菜单中创建asset,而创建场景中实例(instances exist in the scene),为全局状态创建的assets

三个变量

using UnityEngine;

// This class is used to determine whether or not Reactions
// should happen.(判断是否要发生反应)  Instances of Condition exist in two places:Condition的实例在两个地方存在)
// as assets which are part of the AllConditions asset and as
// part of ConditionCollections.AllConditions assetConditionCollections的一部分-assets  

//The Conditions that are part of the AllConditions asset are those that are set by
// Reactions and reflect the state of the game.AllConditions asset中的Conditions通过Reactions设置,反应了游戏状态)  

//Those that are on ConditionCollections are compared to the
// AllConditions asset to determine whether other Reactions
// should happen.ConditionCollectionsAllConditions asset比较,确定是否其他反应需要发生)
public class Condition : ScriptableObject
{
    public string description;      // A description of the Condition, for example 'BeamsOff'.
    public bool satisfied;          // Whether or not the Condition has been satisfied, for example are the beams off?
    public int hash;                // A number which represents the description.  This is used to compare ConditionCollection Conditions to AllConditions Conditions.
}

The AllConditions script

Unity 3.Adventure Game tutorial(事件系统、动画状态机、库存、条件、反应、交互、游戏状态)_第17张图片

同文件夹下

代表全局游戏状态(玩家是否有硬币等)

继承:

public class AllConditions : ResettableScriptableObject

AllConditions必须有reset函数,每次打开游戏时,清除旧的游戏状态

变量:

    public Condition[] conditions;// All the Conditions that exist in the game.条件数组

    private static AllConditions instance;// The singleton instance.单例的实例,引用自身,每次访问AllConditions类,可以用AllConditions. instance找到

    private const string loadPath = "AllConditions";// The path within the Resources folder that 存储路径

    public static AllConditions Instance// The public accessor for the singleton instance.私有单例的公共访问器(get&set
    {
        get
        {
// If the instance is currently null, try to find an AllConditions instance already in memory.如果没有实例,在memoryAllConditions实例
            if (!instance)
                instance = FindObjectOfType<AllConditions> ();
            // If the instance is still null, try to load it from the Resources folder.在资源文件夹加载
            if (!instance)
                instance = Resources.Load<AllConditions> (loadPath);
            // If the instance is still null, report that it has not been created yet.资源文件里也没有,报错-需要创建
            if (!instance)
                Debug.LogError ("AllConditions has not been created yet.  Go to Assets > Create > AllConditions.");
            return instance;
        }
        set { instance = value; }
    }

    // This function will be called at Start once per run of the game.每次加载游戏时调用
    public override void Reset ()
    {
        // If there are no conditions, do nothing.
        if (conditions == null)
            return;

        // Set all of the conditions to not satisfied.设置所有条件为初始(未达成)状态
        for (int i = 0; i < conditions.Length; i++)
        {
            conditions[i].satisfied = false;
        }
    }

    // This is called from ConditionCollections when they are being checked by an Interactable that has been clicked on.用来检测条件的静态函数,比较场景inspector设置的条件,ConditionCollections传入需要的条件
    public static bool CheckCondition (Condition requiredCondition)­­­­
    {
        // Cache the condition array.
        Condition[] allConditions = Instance.conditions;//取出实例中的条件
        Condition globalCondition = null;//想要去比较的全局条件
        
        // If there is at least one condition...列表有条件
        if (allConditions != null && allConditions[0] != null)
        {
            // ... go through all the conditions...
            for (int i = 0; i < allConditions.Length; i++)
            {
                // ... and if they match the given condition then this is the global version of the requiredConditiond. 找到列表中那个是需要比较的条件
                if (allConditions[i].hash == requiredCondition.hash)
                    globalCondition = allConditions[i];
            }
        }

        // If by this point a globalCondition hasn't been found then return false.如果没有全局条件,没有找到匹配的条件,返回检验条件为假
        if (!globalCondition)
            return false;

        // Return true if the satisfied states match, false otherwise.找到条件后将其与需要的条件对比
        return globalCondition.satisfied == requiredCondition.satisfied;
    }

15:46

ConditionCollection

1.Navigate to Scripts > ScriptableObjects > Interaction > Conditions folder

2.Open the ConditionCollection script for editing

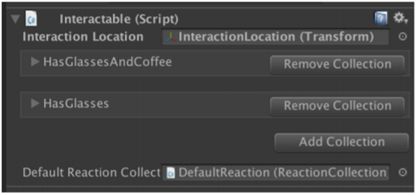
存在interactive的对象,interactable有一个条件数组“condition collections”,每个condition collections有一个条件数组

condition collections必须引用reaction collection,要让所有条件被满足(satisfied)

16:32

public class ConditionCollection : ScriptableObject

变量:

public string description;                                  // Description of the ConditionCollection.  This is used purely for identification in the inspector.在属性栏识别条件是关于什么的
    public Condition[] requiredConditions = new Condition[0];   // The Conditions that need to be met in order for the ReactionCollection to React.条件数组,初始化,就不会返回null
    public ReactionCollection reactionCollection;               // Reference to the ReactionCollection that will React should all the Conditions be met.引用ReactionCollection,需要所有条件被满足
 

函数:

检查条件,做出反应

// This is called by the Interactable one at a time for each of its ConditionCollections until one returns true.由可交互物调用,依次检查每个ConditionCollections,直到返回true
    public bool CheckAndReact()
    {
        // Go through all Conditions...循环所有需要条件
        for (int i = 0; i < requiredConditions.Length; i++)
        {
            // ... and check them against the AllConditions version of the Condition.  If they don't have the same satisfied flag, return false.AllConditions检查添加,如果没有满足,返回假
            if (!AllConditions.CheckCondition (requiredConditions[i]))
                return false;
        }

        // If there is an ReactionCollection assigned, call its React function. 如果有条件匹配成功,调用它的反应
        if(reactionCollection)
            reactionCollection.React();

        // A Reaction happened so return true.
        return true;
    }

完整脚本

using UnityEngine;

// This class represents a single outcome from clicking单击
// on an interactable.  It has an array of Conditions
// and if they are all met an ReactionCollection that
// will happen.
public class ConditionCollection : ScriptableObject
{
    public string description;                                  // Description of the ConditionCollection.  This is used purely for identification in the inspector.
    public Condition[] requiredConditions = new Condition[0];   // The Conditions that need to be met in order for the ReactionCollection to React.
    public ReactionCollection reactionCollection;               // Reference to the ReactionCollection that will React should all the Conditions be met.


    // This is called by the Interactable one at a time for each of its ConditionCollections until one returns true.
    public bool CheckAndReact()
    {
        // Go through all Conditions...
        for (int i = 0; i < requiredConditions.Length; i++)
        {
            // ... and check them against the AllConditions version of the Condition.  If they don't have the same satisfied flag, return false.
            if (!AllConditions.CheckCondition (requiredConditions[i]))
                return false;
        }

        // If there is an ReactionCollection assigned, call its React function.
        if(reactionCollection)
            reactionCollection.React();

        // A Reaction happened so return true.
        return true;
    }
} 

The EditorWithSubEditors script

带有子编辑器的编辑器

确保每个放进条件数组的脚本对象是正确的

Interactable中有conditionCollection数组

为interactable创建编辑器,不要那些对象字段,而是能看出conditionCollection中发生了什么,condition中发生了什么(下拉列表,可以选择编辑那个条件)

每个编辑器需要一些子编辑器

创建一个有大部分功能的基类

conditionCollection编辑器将有condition子编辑器

文件位置:scripts>editor>Abstracts

using UnityEngine;
using UnityEditor;//加载Editor命名空间

// This class acts as a base class for Editors that have Editors这个类作为嵌套编辑器的基类抽象类(abstract),继承,不实例化
// nested within them.  For example, the InteractableEditor has交互编辑器有一个ConditionCollectionEditors数组
// an array of ConditionCollectionEditors.
// It's generic types represent the type of Editor array that are它的泛型类表明嵌套编辑器的数组类型,和编辑器的目标类型
// nested within this Editor and the target type of those Editors. 泛型TEditor- target editor(如Condition Collection Editor), TTarget-type of Target. 获得ConditionCollectionEditor,ConditionEditor作为其子对象,目标是conditions。Where是对泛型类型的限制 ,TEditor要继承Editor
public abstract class EditorWithSubEditors : Editor
    where TEditor : Editor
    where TTarget : Object
{
    protected TEditor[] subEditors;         // Array of Editors nested within this Editor.嵌套子编辑器数组

    
    // This should be called in OnEnable and at the start of OnInspectorGUI. 在OnEnable,OnInspectorGUI开始处被调用,创建子编辑器,传入目标数组(可能是conditions或condition collection)
    protected void CheckAndCreateSubEditors (TTarget[] subEditorTargets)
    {
        // If there are the correct number of subEditors then do nothing.保证子编辑器存在,且数量正确-旧的编辑器已经清空
        if (subEditors != null && subEditors.Length == subEditorTargets.Length)
            return;

        // Otherwise get rid of the editors.
        CleanupEditors ();

        // Create an array of the subEditor type that is the right length for the targets.为目标创建自编辑器数组
        subEditors = new TEditor[subEditorTargets.Length];

        // Populate the array and setup each Editor.填充数组,创建编辑器
        for (int i = 0; i < subEditors.Length; i++)
        {
            subEditors[i] = CreateEditor (subEditorTargets[i]) as TEditor;
            SubEditorSetup (subEditors[i]);
        }
    }


    // This should be called in OnDisable.
    protected void CleanupEditors ()
    {
        // If there are no subEditors do nothing.
        if (subEditors == null)
            return;

        // Otherwise destroy all the subEditors.销毁所有子编辑器
        for (int i = 0; i < subEditors.Length; i++)
        {
            DestroyImmediate (subEditors[i]);
        }

        // Null the array so it's GCed.将数组引用清空
        subEditors = null;
    }


    // This must be overridden to provide any setup the subEditor needs when it is first created.第一次创建时重写setup子编辑器,就像构造函数一样
    protected abstract void SubEditorSetup (TEditor editor);
}

DestroyImmediate()Destroy()不同,用于销毁编辑器,Destroy销毁场景或对象

Unity 3.Adventure Game tutorial(事件系统、动画状态机、库存、条件、反应、交互、游戏状态)_第18张图片

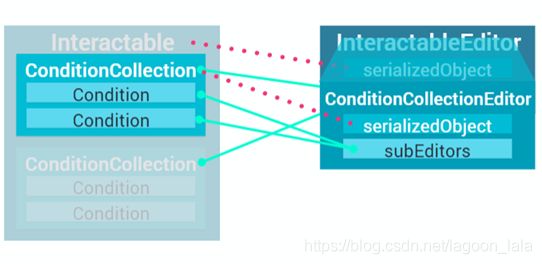
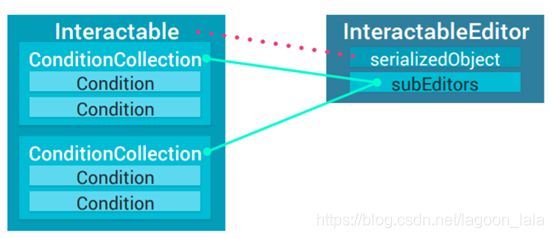
InteractableEditor的序列化对象指向interactable

InteractableEditor有一个子编辑器数组,指向conditionCollection

Unity 3.Adventure Game tutorial(事件系统、动画状态机、库存、条件、反应、交互、游戏状态)_第19张图片

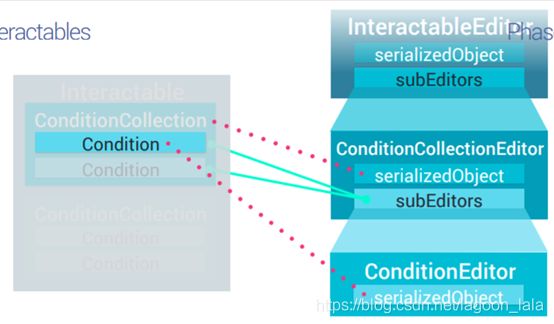
子编辑器中有ConditionCollection编辑器,每个编辑器有一个序列化对象,指向conditionCollection,它有一个子编辑器数组,指向conditions

Unity 3.Adventure Game tutorial(事件系统、动画状态机、库存、条件、反应、交互、游戏状态)_第20张图片

每个conditionEditor,序列化对象代表condition

ConditionCollectionEditor

1.Navigate to the Scripts > Editor > Interaction > Conditions folder

2.Select the ConditionCollectionEditor script and openit for editing(文件路径)

序列化对象、属性、编辑器使用

using UnityEngine;
using UnityEditor;

[CustomEditor(typeof(ConditionCollection))]//target
public class ConditionCollectionEditor : EditorWithSubEditors 
{
    public SerializedProperty collectionsProperty;              // Represents the array of ConditionCollections that the target belongs to. Condition序列化属性代表target依附的ConditionCollections数组


    private ConditionCollection conditionCollection;            // Reference to the target.引用目标,存储条件的引用
    private SerializedProperty descriptionProperty;             // Represents a string description for the target.代表目标字符串
    private SerializedProperty conditionsProperty;              // Represents an array of Conditions for the target.代表目标Conditions数组
    private SerializedProperty reactionCollectionProperty;      // Represents the ReactionCollection that is referenced by the target.代表引用目标的ReactionCollection 数组

//常量
    private const float conditionButtonWidth = 30f;             // Width of the button for adding a new Condition.添加新条件的按钮宽
    private const float collectionButtonWidth = 125f;           // Width of the button for removing the target from it's Interactable.从互动删除目标的按钮宽度
    private const string conditionCollectionPropDescriptionName = "description";
                                                                // Name of the field that represents a string description for the target. 代表目标描述字符串的字段名
    private const string conditionCollectionPropRequiredConditionsName = "requiredConditions";
                                                                // Name of the field that represents an array of Conditions for the target.代表Conditions目标数组
    private const string conditionCollectionPropReactionCollectionName = "reactionCollection";
                                                                // Name of the field that represents the ReactionCollection that is referenced by the target.代表被目标引用的Reaction Collection


    private void OnEnable ()
    {
        // Cache a reference to the target.将target转换为条件嘉禾,保存target引用
        conditionCollection = (ConditionCollection)target;

        // If this Editor exists but isn't targeting anything destroy it.销毁目标指向为空的编辑器
        if (target == null)
        {
            DestroyImmediate (this);
            return;
        }

        // Cache the SerializedProperties.保存序列化属性
        descriptionProperty = serializedObject.FindProperty(conditionCollectionPropDescriptionName);
        conditionsProperty = serializedObject.FindProperty(conditionCollectionPropRequiredConditionsName);
        reactionCollectionProperty = serializedObject.FindProperty(conditionCollectionPropReactionCollectionName);

        // Check if the Editors for the Conditions need creating and optionally create them.创建Conditions编辑器需要的属性
        CheckAndCreateSubEditors (conditionCollection.requiredConditions);
    }


    private void OnDisable ()
    {
        // When this Editor ends, destroy all it's subEditors.销毁条件集合时保证销毁所有子编辑器
        CleanupEditors ();
    }


    // This is called immediately when a subEditor is created.自编辑器创建时调用
    protected override void SubEditorSetup (ConditionEditor editor)
    {
        // Set the editor type so that the correct GUI for Condition is shown.设置编辑器种类,显示Condition界面
        editor.editorType = ConditionEditor.EditorType.ConditionCollection;

        // Assign the conditions property so that the ConditionEditor can remove its target if necessary.分配条件属性,知道它属于哪个条件数组,使其目标能被删除
        editor.conditionsProperty = conditionsProperty;
    }


    public override void OnInspectorGUI ()
    {
        // Pull the information from the target into the serializedObject.将信息从目标拉取到序列化对象
        serializedObject.Update ();

        // Check if the Editors for the Conditions need creating and optionally create them.检查并创建Conditions需要的编辑器
        CheckAndCreateSubEditors(conditionCollection.requiredConditions);
        
        EditorGUILayout.BeginVertical(GUI.skin.box);
        EditorGUI.indentLevel++;

        EditorGUILayout.BeginHorizontal();

        // Use the isExpanded bool for the descriptionProperty to store whether the foldout is open or closed.用描述属性的bool变量存储是否展开
        descriptionProperty.isExpanded = EditorGUILayout.Foldout(descriptionProperty.isExpanded, descriptionProperty.stringValue);

        // Display a button showing 'Remove Collection' which removes the target from the Interactable when clicked.显示按钮,点击删除Interactable的目标条件 序列化属性不知道他们是什么属性的,有所有种类属性,正在使用的不能被其他地方使用
        if (GUILayout.Button("Remove Collection", GUILayout.Width(collectionButtonWidth)))
        {
            collectionsProperty.RemoveFromObjectArray (conditionCollection);//需要从数组中删除的对象,Unity没有单独删除特定类型对象的具体数组,需要扩展方法(如下脚本)扩展方法已经知道传递那个序列化属性,所以只需要一个参数
        }

        EditorGUILayout.EndHorizontal();
        
        // If the foldout is open show the expanded GUI.展开则显示界面
        if (descriptionProperty.isExpanded)
        {
            ExpandedGUI ();
        }
        
        EditorGUI.indentLevel--;
        EditorGUILayout.EndVertical();

        // Push all changes made on the serializedObject back to the target.所有序列化对象中的变化返回目标
        serializedObject.ApplyModifiedProperties();
    }


    private void ExpandedGUI ()
    {
        EditorGUILayout.Space();

        // Display the description for editing.展示编辑的描述
        EditorGUILayout.PropertyField(descriptionProperty);

        EditorGUILayout.Space();

        // Display the Labels for the Conditions evenly split over the width of the inspector. 均匀宽度展开Conditions标签
        float space = EditorGUIUtility.currentViewWidth / 3f;

        EditorGUILayout.BeginHorizontal();
        EditorGUILayout.LabelField("Condition", GUILayout.Width(space));
        EditorGUILayout.LabelField("Satisfied?", GUILayout.Width(space));
        EditorGUILayout.LabelField("Add/Remove", GUILayout.Width(space));
        EditorGUILayout.EndHorizontal();

        // Display each of the Conditions.展示每个条件
        EditorGUILayout.BeginVertical(GUI.skin.box);
        for (int i = 0; i < subEditors.Length; i++)
        {
            subEditors[i].OnInspectorGUI();
        }
        EditorGUILayout.EndHorizontal();

        // Display a right aligned button which when clicked adds a Condition to the array.点击添加条件进入数组时,展示一行按钮
        EditorGUILayout.BeginHorizontal();
        GUILayout.FlexibleSpace ();
        if (GUILayout.Button("+", GUILayout.Width(conditionButtonWidth)))
        {
            Condition newCondition = ConditionEditor.CreateCondition();
            conditionsProperty.AddToObjectArray(newCondition);
        }
        EditorGUILayout.EndHorizontal();

        EditorGUILayout.Space();

        // Display the reference to the ReactionCollection for editing.展示编辑ReactionCollection引用
        EditorGUILayout.PropertyField(reactionCollectionProperty);
    }


    // This function is static such that it can be called without an editor being instanced.静态方法(可直接调用)
    public static ConditionCollection CreateConditionCollection()
    {
        // Create a new instance of ConditionCollection.创建ConditionCollection实例
        ConditionCollection newConditionCollection = CreateInstance();

        // Give it a default description.初始化描述
        newConditionCollection.description = "New condition collection";

        // Give it a single default Condition.假设人们创建时想至少创建一个条件,初始化默认条件但未填充,仍为null
        newConditionCollection.requiredConditions = new Condition[1];
        newConditionCollection.requiredConditions[0] = ConditionEditor.CreateCondition();//使用静态公共方法,创建条件
        return newConditionCollection;
    }
}

The RemoveFromObjectArray extension method of the SerializedPropertyExtensions script

在不同的脚本中保存扩展方法

序列化属性扩展脚本

SerializedPropertyExtensions

文件位置:Extensions

静态类可以被用在任何地方,所有扩展方法都是静态

using UnityEngine;
using UnityEditor;

// This class contains extension methods for the SerializedProperty这个类包含SerializedProperty类的扩展方法
// class.  Specifically, methods for dealing with object arrays.处理对象数组方法
public static class SerializedPropertyExtensions
{
    // Use this to add an object to an object array represented by a SerializedProperty.
    public static void AddToObjectArray (this SerializedProperty arrayProperty, T elementToAdd)
        where T : Object
    {
        // If the SerializedProperty this is being called from is not an array, throw an exception.
        if (!arrayProperty.isArray)
            throw new UnityException("SerializedProperty " + arrayProperty.name + " is not an array.");

        // Pull all the information from the target of the serializedObject.
        arrayProperty.serializedObject.Update();

        // Add a null array element to the end of the array then populate it with the object parameter.
        arrayProperty.InsertArrayElementAtIndex(arrayProperty.arraySize);
        arrayProperty.GetArrayElementAtIndex(arrayProperty.arraySize - 1).objectReferenceValue = elementToAdd;

        // Push all the information on the serializedObject back to the target.
        arrayProperty.serializedObject.ApplyModifiedProperties();
    }


    // Use this to remove the object at an index from an object array represented by a SerializedProperty.
    public static void RemoveFromObjectArrayAt (this SerializedProperty arrayProperty, int index)
    {
        // If the index is not appropriate or the serializedProperty this is being called from is not an array, throw an exception.
        if(index < 0)
            throw new UnityException("SerializedProperty " + arrayProperty.name + " cannot have negative elements removed.");

        if (!arrayProperty.isArray)
            throw new UnityException("SerializedProperty " + arrayProperty.name + " is not an array.");

        if(index > arrayProperty.arraySize - 1)
            throw new UnityException("SerializedProperty " + arrayProperty.name + " has only " + arrayProperty.arraySize + " elements so element " + index + " cannot be removed.");

        // Pull all the information from the target of the serializedObject.
        arrayProperty.serializedObject.Update();

        // If there is a non-null element at the index, null it.
        if (arrayProperty.GetArrayElementAtIndex(index).objectReferenceValue)
            arrayProperty.DeleteArrayElementAtIndex(index);

        // Delete the null element from the array at the index.
        arrayProperty.DeleteArrayElementAtIndex(index);

        // Push all the information on the serializedObject back to the target.
        arrayProperty.serializedObject.ApplyModifiedProperties();
    }


    // Use this to remove an object from an object array represented by a SerializedProperty.从对象数组中删除,public,能从序列化属性外部调用,通用方法,使用泛型(限制为对象)。扩展方法需要第一个参数,在这个SerializedProperty调用这个方法
    public static void RemoveFromObjectArray (this SerializedProperty arrayProperty, T elementToRemove)
        where T : Object
    {
        // If either the serializedProperty doesn't represent an array or the element is null, throw an exception.如果serializedProperty不是数组,或元素是空,抛出异常
        if (!arrayProperty.isArray)
            throw new UnityException("SerializedProperty " + arrayProperty.name + " is not an array.");

        if(!elementToRemove)
            throw new UnityException("Removing a null element is not supported using this method.");

        // Pull all the information from the target of the serializedObject.从serializedObject的target拉取所有信息
        arrayProperty.serializedObject.Update();

        // Go through all the elements in the serializedProperty's array...找到每个序列化属性元素
        for (int i = 0; i < arrayProperty.arraySize; i++)
        {
            SerializedProperty elementProperty = arrayProperty.GetArrayElementAtIndex(i);

            // ... until the element matches the parameter...
            if (elementProperty.objectReferenceValue == elementToRemove)
            {
                // ... then remove it.
                arrayProperty.RemoveFromObjectArrayAt (i);
                return;
            }
        }
//没有找到数组元素
        throw new UnityException("Element " + elementToRemove.name + "was not found in property " + arrayProperty.name);
    }
}

53:42

1.Navigate the Scenes folder in the Project window 返回场景文件夹

2.Open the SecurityRoom scene 打开SecurityRoom场景

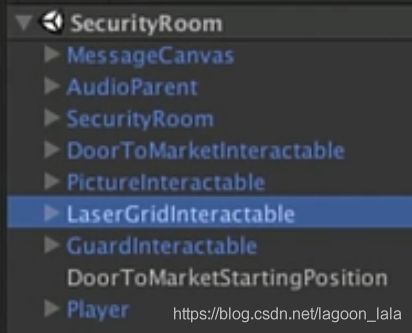
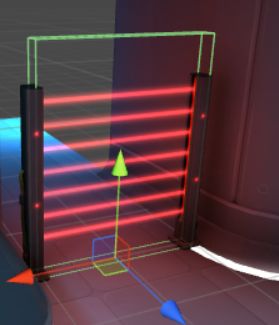
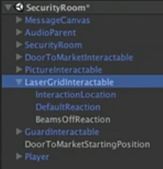
3.Select the LaserGridInteractable GameObject选择LaserGridInteractable游戏对象

Unity 3.Adventure Game tutorial(事件系统、动画状态机、库存、条件、反应、交互、游戏状态)_第21张图片Unity 3.Adventure Game tutorial(事件系统、动画状态机、库存、条件、反应、交互、游戏状态)_第22张图片

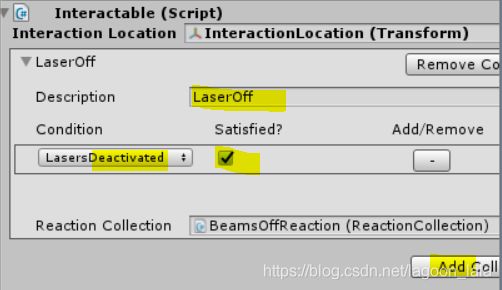
4.On the Interactable component, click the Add Collectionbutton 在Interactable脚本组件,点添加集合按钮

5.Set the Description of the new condition collection to LaserGridOff设置新条件集合的Description为LaserGridOff


1.From the dropdown, set the Condition to LasersDeactivated下拉列表给LaserGridOff设置条件

2.Check the Satisfied box选择满足框

Unity 3.Adventure Game tutorial(事件系统、动画状态机、库存、条件、反应、交互、游戏状态)_第23张图片Unity 3.Adventure Game tutorial(事件系统、动画状态机、库存、条件、反应、交互、游戏状态)_第24张图片

3.Expand the LaserGridInteractable展开LaserGridInteractable

Unity 3.Adventure Game tutorial(事件系统、动画状态机、库存、条件、反应、交互、游戏状态)_第25张图片

4.Drag the BeamsOffReaction from the hierarchy onto the InteractableReactionfield for the Condition Collection从层级窗口拖拽BeamsOffReaction到InteractableReactionfield条件集合

创建条件集合,添加条件,条件满足时使用反应集合-BeamsOffReaction

Unity 3.Adventure Game tutorial(事件系统、动画状态机、库存、条件、反应、交互、游戏状态)_第26张图片

P162

Reactions(反应)

Brief:

Create a system that performs a series of actions based on Conditions and the current Game State when the Player Clicks on an Interactable创建一个能在玩家点击时,基于条件和游戏状态播放一系列动画的系统

There can be many different types of Reactions such as:(不同的反应类型)

• Play an animation播放动画

• Play a sound声音

• Display text on screen在屏幕上显示文本

• Add the item to the inventory将物料添加到库存

• Disable a GameObject in the scene禁用场景中的游戏对象

• Change a global condition to acknowledge the pickup更改全局条件以确认拾取

Depending on type, some Reactions must have an optional delay while others must be instant(根据类型的不同, 某些反应必须具有可选的延迟, 而其他的必须是即时的)

Each type of Reaction will need its own Custom Editor每种类型的反应需要自定义编辑器

Unity 3.Adventure Game tutorial(事件系统、动画状态机、库存、条件、反应、交互、游戏状态)_第27张图片

Approach:

• Collections of Reactions will be encapsulated, initialized and called as part of a ReactionCollection script which contains a single public React function"反应集合" 将被封装、初始化,并作为包含单个公共反应函数的ReactionCollection脚本的一部分调用

Individual Reactions will all be different classes inheriting from a base Reaction class as this will maintain the key functionality across all the variations of Reactions and allow them to be treated as Reactions due to Polymorphism单个反应都是继承相同基反应类的不同类, 因为这将保持所有反应变体中的关键功能, 并允许它们被视为多态性引起的反应

Reactions will derive from ScriptableObject which allows Polymorphic Serialization so that custom inspectors can can be created based on the type of the Reaction反应将从脚本对象派生, 该对象允许多态体序列化, 因此可以根据反应的类型创建自定义检查器

ReactionCollection script

路径:MonoBehaviors/interaction

MonoBehavior将附加到游戏对象

using UnityEngine;

// This script acts as a collection for all the individual Reactions that happen as a result of an interaction.交互后发生的单反应的集合
public class ReactionCollection : MonoBehaviour
{
    public Reaction[] reactions = new Reaction[0];      // Array of all the Reactions to play when React is called.被调用时的反应数组


    private void Start ()
    {
        // Go through all the Reactions and call their Init function.初始化所有反应
        for (int i = 0; i < reactions.Length; i++)
        {
            // The DelayedReaction 'hides' the Reaction's Init function with it's own.延迟反应的初始化在它自己那里写
            // This means that we have to try to cast the Reaction to a DelayedReaction and then if it exists call it's Init function.将反应转换为延迟反应,如果存在就初始化
            // Note that this mainly done to demonstrate hiding and not especially for functionality.(这样做主要是为了演示隐藏)
            DelayedReaction delayedReaction = reactions[i] as DelayedReaction;

            if (delayedReaction)
                delayedReaction.Init ();
            else
                reactions[i].Init ();
        }
    }


    public void React ()
    {
        // Go through all the Reactions and call their React function.调用所有反应函数
        for (int i = 0; i < reactions.Length; i++)
        {
            // The DelayedReaction hides the Reaction.React function.延迟反应隐藏反应函数
            // Note again this is mainly done for demonstration purposes.
            DelayedReaction delayedReaction = reactions[i] as DelayedReaction;

            if(delayedReaction)
                delayedReaction.React (this);
            else
                reactions[i].React (this);
        }
    }
}


Inheritance and Polymorphism

多态

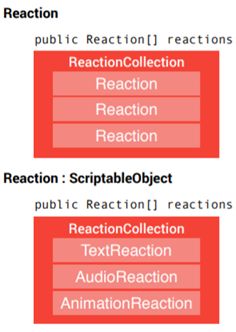
Scriptable Objects and Polymorphic Serialization

Reaction

public Reaction[] reactions; // TextReaction, AudioReaction, AnimationReaction在同一空间存储所有种类反应,在inspector都被视作reaction。看inspector时,反应集合只把他们当做reaction

Reaction : ScriptableObject

public Reaction[] reactions; // TextReaction, AudioReaction, AnimationReaction在脚本对象,展示正确名字。所有要把反应写成脚本对象

序列化serialization存储信息到磁盘(disk)

非多态序列化,只会看到默认反应,多态序列化能看到正确反应

Unity 3.Adventure Game tutorial(事件系统、动画状态机、库存、条件、反应、交互、游戏状态)_第28张图片

Return to ReactionCollection script

ReactionCollectionEditor

得到游戏对象,希望它的组件

1. Navigate to the Scripts > Editor > Interaction

2. Find the ReactionCollectionEditor自定义编辑器

3. Open the ReactionCollectionEditor script for editing

4. This is the finished custom editor we will be working on:

using System;
using UnityEngine;
using System.Collections.Generic;
using UnityEditor;

// This is the Editor for the ReactionCollection MonoBehaviour.这是反应集合ReactionCollection的编辑器
// However, since the ReactionCollection contains many Reactions, it requires many sub-editors to display them.但由于ReactionCollection包含多种反应,需要子编辑器展示
//more details see the EditorWithSubEditors class.子编辑器类
// There are two ways of adding Reactions to the ReactionCollection:两种方法可将反应添加到反应集合
// a type selection popup with confirmation button and a drag and drop area.  带确认按钮的弹出窗,和拖放区域Details on these are found below.
[CustomEditor(typeof(ReactionCollection))]
public class ReactionCollectionEditor : EditorWithSubEditors<ReactionEditorReaction>
{
    private ReactionCollection reactionCollection;          // Reference to the target.目标引用
    private SerializedProperty reactionsProperty;           // Represents the array of Reactions.反应数组

    private Type[] reactionTypes;                           // All the non-abstract types which inherit from Reaction.  This is used for adding new Reactions. 所有继承反应的非抽象类型。 这用于添加新的反应
    private string[] reactionTypeNames;                     // The names of all appropriate Reaction types.反应类型名称
    private int selectedIndex;                              // The index of the currently selected Reaction type.当前选定的反应类型索引


    private const float dropAreaHeight = 50f;               // Height in pixels of the area for dropping scripts.删除脚本的区域的高度
    private const float controlSpacing = 5f;                // Width in pixels between the popup type selection and drop area. 弹出类型选择和放置区域之间的宽度 (以像素为单位)
    private const string reactionsPropName = "reactions";   // Name of the field for the array of Reactions.反应数组的字段名


    private readonly float verticalSpacing = EditorGUIUtility.standardVerticalSpacing;
                                                            // Caching the vertical spacing between GUI elements. gui 元素之间的垂直间距


    private void OnEnable ()
    {
        // Cache the target.得到目标
        reactionCollection = (ReactionCollection)target;

        // Cache the SerializedProperty序列化对象
        reactionsProperty = serializedObject.FindProperty(reactionsPropName);

        // If new editors are required for Reactions, create them.如果反应需要新的编辑器,则创建
        CheckAndCreateSubEditors (reactionCollection.reactions);

        // Set the array of types and type names of subtypes of Reaction.设置反应子类型的数组类型和类型名
        SetReactionNamesArray ();
    }


    private void OnDisable ()
    {
        // Destroy all the subeditors.销毁所有子编辑器
        CleanupEditors ();
    }


    // This is called immediately after each ReactionEditor is created.每个反应编辑器创建时立即调用
    protected override void SubEditorSetup (ReactionEditor editor)
    {
        // Make sure the ReactionEditors have a reference to the array that contains their targets. 确保反应编辑器具有包含其目标的数组的引用。
        editor.reactionsProperty = reactionsProperty;
    }


    public override void OnInspectorGUI ()
    {
        // Pull all the information from the target into the serializedObject.从目标到序列化对象同步信息
        serializedObject.Update ();

        // If new editors for Reactions are required, create them.创建新反应编辑器
        CheckAndCreateSubEditors(reactionCollection.reactions);

        // Display all the Reactions.展示所有反应
        for (int i = 0; i < subEditors.Length; i++)
        {
            subEditors[i].OnInspectorGUI ();
        }

        // If there are Reactions, add a space.若存在反应,加空格
        if (reactionCollection.reactions.Length > 0)
        {
            EditorGUILayout.Space();
            EditorGUILayout.Space ();
        }

        // Create a Rect for the full width of the inspector with enough height for the drop area.创建足够宽高的放置区域(与inspector同宽)
        Rect fullWidthRect = GUILayoutUtility.GetRect(GUIContent.none, GUIStyle.none, GUILayout.Height(dropAreaHeight + verticalSpacing));

        // Create a Rect for the left GUI controls.为左侧控制创建方框
        Rect leftAreaRect = fullWidthRect;

        // It should be in half a space from the top.到顶部有一半空间
        leftAreaRect.y += verticalSpacing * 0.5f;

        // The width should be slightly less than half the width of the inspector.宽度略小于inspector一半
        leftAreaRect.width *= 0.5f;
        leftAreaRect.width -= controlSpacing * 0.5f;

        // The height should be the same as the drop area.高度与放置区域同
        leftAreaRect.height = dropAreaHeight;

        // Create a Rect for the right GUI controls that is the same as the left Rect except...右侧GUI控件与左侧类似
        Rect rightAreaRect = leftAreaRect;

        // ... it should be on the right.但位置不同
        rightAreaRect.x += rightAreaRect.width + controlSpacing;

        // Display the GUI for the type popup and button on the left.左侧显示类型弹窗和按钮
        TypeSelectionGUI (leftAreaRect);

        // Display the GUI for the drag and drop area on the right.展示右侧拖放区域的GUI
        DragAndDropAreaGUI (rightAreaRect);

        // Manage the events for dropping on the right area.管理放置在右侧区域的事件
        DraggingAndDropping(rightAreaRect, this);

        // Push the information back from the serializedObject to the target.将信息从序列化对象传回目标
        serializedObject.ApplyModifiedProperties ();
    }


    private void TypeSelectionGUI (Rect containingRect)
    {
        // Create Rects for the top and bottom half.
        Rect topHalf = containingRect;
        topHalf.height *= 0.5f;
        Rect bottomHalf = topHalf;
        bottomHalf.y += bottomHalf.height;

        // Display a popup in the top half showing all the reaction types.上半部分显示弹窗,展示所有反应类型
        selectedIndex = EditorGUI.Popup(topHalf, selectedIndex, reactionTypeNames);

        // Display a button in the bottom half that if clicked...下半部分显示按钮,点击按钮
        if (GUI.Button (bottomHalf, "Add Selected Reaction"))
        {
            // ... finds the type selected by the popup, creates an appropriate reaction and adds it to the array.查找窗口选择的类型,创建适当的反应并将其添加到数组中。
            Type reactionType = reactionTypes[selectedIndex];
            Reaction newReaction = ReactionEditor.CreateReaction (reactionType);
            reactionsProperty.AddToObjectArray (newReaction);
        }
    }


    private static void DragAndDropAreaGUI (Rect containingRect)
    {
        // Create a GUI style of a box but with middle aligned text and button text color.创建GUI框样式,文本居中,按钮文本颜色
        GUIStyle centredStyle = GUI.skin.box;
        centredStyle.alignment = TextAnchor.MiddleCenter;
        centredStyle.normal.textColor = GUI.skin.button.normal.textColor;

        // Draw a box over the area with the created style.绘制框,应用创建的样式
        GUI.Box (containingRect, "Drop new Reactions here", centredStyle);
    }


    private static void DraggingAndDropping (Rect dropArea, ReactionCollectionEditor editor)
    {
        // Cache the current event.当前事件
        Event currentEvent = Event.current;

        // If the drop area doesn't contain the mouse then return.防止区域没有mouse则返回
        if (!dropArea.Contains (currentEvent.mousePosition))
            return;

        switch (currentEvent.type)
        {
            // If the mouse is dragging something...鼠标拖拽
            case EventType.DragUpdated:

                // ... change whether or not the drag *can* be performed by changing the visual mode of the cursor based on the IsDragValid function.改变能否拖拽显示,用IsDragValid方法改变鼠标显示模式
                DragAndDrop.visualMode = IsDragValid () ? DragAndDropVisualMode.Link : DragAndDropVisualMode.Rejected;

                // Make sure the event isn't used by anything else.保证事件没被其他内容使用
                currentEvent.Use ();

                break;

            // If the mouse was dragging something and has released...鼠标拖拽并释放
            case EventType.DragPerform:
                
                // ... accept the drag event.接收拖拽事件
                DragAndDrop.AcceptDrag();
                
                // Go through all the objects that were being dragged...遍历所有被拖拽对象
                for (int i = 0; i < DragAndDrop.objectReferences.Length; i++)
                {
                    // ... and find the script asset that was being dragged...找到被拖的脚本asset
                    MonoScript script = DragAndDrop.objectReferences[i] as MonoScript;

                    // ... then find the type of that Reaction...找到反应类型
                    Type reactionType = script.GetClass();

                    // ... and create a Reaction of that type and add it to the array.创建该类型反应,加到数组
                    Reaction newReaction = ReactionEditor.CreateReaction (reactionType);
                    editor.reactionsProperty.AddToObjectArray (newReaction);
                }

                // Make sure the event isn't used by anything else.
                currentEvent.Use();

                break;
        }
    }


    private static bool IsDragValid ()
    {
        // Go through all the objects being dragged...遍历被拖对象
        for (int i = 0; i < DragAndDrop.objectReferences.Length; i++)
        {
            // ... and if any of them are not script assets, return that the drag is invalid.如果不是脚本assets,返回无效拖动
            if (DragAndDrop.objectReferences[i].GetType () != typeof (MonoScript))
                return false;
            
            // Otherwise find the class contained in the script asset.在脚本asset找到类型
            MonoScript script = DragAndDrop.objectReferences[i] as MonoScript;
            Type scriptType = script.GetClass ();

            // If the script does not inherit from Reaction, return that the drag is invalid.不继承反应Reaction,拖动无效
            if (!scriptType.IsSubclassOf (typeof(Reaction)))
                return false;

            // If the script is an abstract, return that the drag is invalid.如果脚本是抽象类,拖动无效
            if (scriptType.IsAbstract)
                return false;
        }

        // If none of the dragging objects returned that the drag was invalid, return that it is valid.如果没有返回无效拖动对象返回则有效
        return true;
    }


    private void SetReactionNamesArray ()
    {
        // Store the Reaction type.存储反应类型
        Type reactionType = typeof(Reaction);

        // Get all the types that are in the same Assembly (all the runtime scripts) as the Reaction type. 获取与 "反应" 类型位于同一程序集 (所有运行时脚本) 中的所有类型。
        Type[] allTypes = reactionType.Assembly.GetTypes();

        // Create an empty list to store all the types that are subtypes of Reaction.创建空列表存储所有子反应类型
        List<Type> reactionSubTypeList = new List<Type>();

        // Go through all the types in the Assembly...遍历所有类型
        for (int i = 0; i < allTypes.Length; i++)
        {
            // ... and if they are a non-abstract subclass of Reaction then add them to the list.是不抽象的反应子类则添加
            if (allTypes[i].IsSubclassOf(reactionType) && !allTypes[i].IsAbstract)
            {
                reactionSubTypeList.Add(allTypes[i]);
            }
        }

        // Convert the list to an array and store it.列表转换为数组并存储
        reactionTypes = reactionSubTypeList.ToArray();

        // Create an empty list of strings to store the names of the Reaction types.创建空列表存储反应类型名
        List<string> reactionTypeNameList = new List<string>();

        // Go through all the Reaction types and add their names to the list.添加反应类型名到数组
        for (int i = 0; i < reactionTypes.Length; i++)
        {
            reactionTypeNameList.Add(reactionTypes[i].Name);
        }

        // Convert the list to an array and store it.转换为数组
        reactionTypeNames = reactionTypeNameList.ToArray();
    }
}


1. Create a new Empty GameObject创建测试对象

2. Add an ReactionCollection component添加反应集合组件

3. Navigate to Scripts > ScriptableObjects > Interaction > Reactions folder

4. Drag either a DelayedReactions or ImmediateReactions onto the Drop area of the ReactionCollection component在反应文件夹添加脚本对象到拖拽框

Unity 3.Adventure Game tutorial(事件系统、动画状态机、库存、条件、反应、交互、游戏状态)_第29张图片

1. Delete the test GameObject you just made


Creating a specific Reaction type

创建特定反应类型

TextReaction

1. Navigate to the Scripts > ScriptableObjects > Interaction > Reactions > ImmediateReactions folder.

2. Create a new C# script

3. Name it TextReaction

4. Open the script for editing

using UnityEngine;

// This Reaction has a delay but is not a DelayedReaction. This is because the TextManager component handles the delay instead of the Reaction.这个反应有延迟,但不是延迟反应,因为TextManager组件处理延迟而不是反应类产生
public class TextReaction : Reaction//继承反应基类
{
    public string message;                      // The text to be displayed to the screen.显示文本到屏幕
    public Color textColor = Color.white;       // The color of the text when it's displayed (different colors for different characters talking).颜色
    public float delay;                         // How long after the React function is called before the text is displayed.显示文字前调用反应方法延迟的时间


    private TextManager textManager;            // Reference to the component to display the text.引用显示文字组件


    protected override void SpecificInit()//特殊类型初始化
    {
        textManager = FindObjectOfType<TextManager> ();
    }


    protected override void ImmediateReaction()
    {
        textManager.DisplayMessage (message, textColor, delay);
    }
}

TextReactionEditor

1. Navigate to the Scripts > Editor > Interaction > ReactionEditors folder.

2. Create a new C# script

3. Name it TextReactionEditor

4. Open the TextReactionEditor script for editing

message多行编辑器

using UnityEditor;
using UnityEngine;

[CustomEditor(typeof(TextReaction))]//target
public class TextReactionEditor : ReactionEditor
{
    private SerializedProperty messageProperty;         // Represents the string field which is the message to be displayed. 要显示的消息的字符串字段
    private SerializedProperty textColorProperty;       // Represents the color field which is the color of the message to be displayed.文本颜色属性
    private SerializedProperty delayProperty;           // Represents the float field which is the delay before the messaage is displayed延迟属性


    private const float messageGUILines = 3f;           // How many lines tall the GUI for the message field should be.消息字段的GUI行数
    private const float areaWidthOffset = 19f;          // Offset to account for the message GUI being made of two GUI calls.  It makes the GUI line up.偏移,使GUI排成一行
    private const string textReactionPropMessageName = "message";
                                                        // The name of the field which is the message to be written to the screen.写到屏幕的消息字段的名字
    private const string textReactionPropTextColorName = "textColor";
                                                        // The name of the field which is the color of the message to be written to the screen.颜色字段名字
    private const string textReactionPropDelayName = "delay";
                                                        // The name of the field which is the delay before the message is written to the screen.延迟


    protected override void Init ()
    {
        // Cache all the SerializedProperties.获取所有序列化属性
        messageProperty = serializedObject.FindProperty (textReactionPropMessageName);
        textColorProperty = serializedObject.FindProperty (textReactionPropTextColorName);
        delayProperty = serializedObject.FindProperty (textReactionPropDelayName);
    }


    protected override void DrawReaction ()
    {
        EditorGUILayout.BeginHorizontal ();
        
        // Display a label whose width is offset such that the TextArea lines up with the rest of the GUI.显示标签,宽度是offset,使TextArea与其余GUI对齐
        EditorGUILayout.LabelField ("Message"GUILayout.Width (EditorGUIUtility.labelWidth - areaWidthOffset));

        // Display an interactable GUI element for the text of the message to be displayed over several lines.在几行上显示消息文本的interactableGUI元素
        messageProperty.stringValue = EditorGUILayout.TextArea (messageProperty.stringValue, GUILayout.Height (EditorGUIUtility.singleLineHeight * messageGUILines));
        EditorGUILayout.EndHorizontal ();

        // Display default GUI for the text color and the delay.文本颜色和延迟的显示默认GUI
        EditorGUILayout.PropertyField (textColorProperty);
        EditorGUILayout.PropertyField (delayProperty);
    }


    protected override string GetFoldoutLabel ()
    {
        return "Text Reaction";
    }
}


1. Open the SecurityRoom scene

2. In the Hierarchy, find the DefaultReaction child of the PictureInteractable

3. Add a TextReaction using either the dropdown or the drop area下拉列表添加文字反应

4. Set the Message of the Text Reaction to “He looks pretty trustworthy.”设置文字

5. Save the scene


P301

Interactables

Create an Interactable system to process Player input and tie Conditions and Reactions together创建一个可交互系统来处理玩家输入, 并将条件和反应捆绑在一起

When an Interactable is clicked on the Player must move to a specific location in the scene marked by a Transform reference called InteractionLocation当单击 Interactable 时, 玩家必须移动到场景中 "InteractionLocation" 的位置(Transform)引用标记的特定位置

Upon reaching the InteractionLocation the player must call a public Interact function which will in turn call an appropriate Reaction collection based on a check of Conditions and Game State到达交互位置后, 玩家必须调用public Interact函数, 该函数将根据条件和游戏状态调用适当的反应集合

Create a custom inspector for the Interactable to make it easier to understand自定义Interactable的inspector

The Interactable will have:

• An EventTrigger component to registers clicks用于接收点击的事件触发器组件

• A Box Collider to define the volume to interact with一个Box碰撞器, 用于定义interact的体积

• When clicked, the Interactable sets the current destination for the Player单击时, Interactable设置玩家的目的地

• When the Player arrives, the Interact function will be called by the PlayerMovement script当玩家到达时, Interact函数将由PlayerMovement脚本调用

Create a Custom Inspector for the Interactable component自定义Interactable组件的inspector

Unity 3.Adventure Game tutorial(事件系统、动画状态机、库存、条件、反应、交互、游戏状态)_第30张图片

The Event System

1. Navigate to the Scenes folder

2. Open the SecurityRoom scene


The Event System

1. Send events发送事件

1. Physics Raycaster component投射器组件连接到camera

2. Receive events接收事件

1. Colliders & Event Triggers碰撞器、事件触发器

3. Manage events管理事件

1. The Event System事件系统


To recap the structure of Interactables(Interactables结构)

Unity 3.Adventure Game tutorial(事件系统、动画状态机、库存、条件、反应、交互、游戏状态)_第31张图片

Interactable中有条件集合,每个条件集合中有条件,并联系到满足条件后发生的反应集合,如果没有条件集合被满足,则发生interactable的默认条件集合

守卫的互动:

Unity 3.Adventure Game tutorial(事件系统、动画状态机、库存、条件、反应、交互、游戏状态)_第32张图片

using System.Collections;
using UnityEngine;
using UnityEngine.AI;
using UnityEngine.EventSystems;

public class PlayerMovement : MonoBehaviour
{
    public Animator animator;                   // Reference to the animator component.
    public NavMeshAgent agent;                  // Reference to the nav mesh agent component.
    public SaveData playerSaveData;             // Reference to the save data asset containing the player's starting position.
    public float turnSmoothing = 15f;           // The amount of smoothing applied to the player's turning using spherical interpolation.
    public float speedDampTime = 0.1f;          // The approximate amount of time it takes for the speed parameter to reach its value upon being set.
    public float slowingSpeed = 0.175f;         // The speed the player moves as it reaches close to it's destination.
    public float turnSpeedThreshold = 0.5f;     // The speed beyond which the player can move and turn normally.
    public float inputHoldDelay = 0.5f;         // How long after reaching an interactable before input is allowed again.
    

    private Interactable currentInteractable;   // The interactable that is currently being headed towards.
    private Vector3 destinationPosition;        // The position that is currently being headed towards, this is the interactionLocation of the currentInteractable if it is not null.
    private bool handleInput = true;            // Whether input is currently being handled.
    private WaitForSeconds inputHoldWait;       // The WaitForSeconds used to make the user wait before input is handled again.


    private readonly int hashSpeedPara = Animator.StringToHash("Speed");
                                                // An hash representing the Speed animator parameter, this is used at runtime in place of a string.
    private readonly int hashLocomotionTag = Animator.StringToHash("Locomotion");
                                                // An hash representing the Locomotion tag, this is used at runtime in place of a string.


    public const string startingPositionKey = "starting position";
                                                // The key used to retrieve the starting position from the playerSaveData.


    private const float stopDistanceProportion = 0.1f;
                                                // The proportion of the nav mesh agent's stopping distance within which the player stops completely.
    private const float navMeshSampleDistance = 4f;
                                                // The maximum distance from the nav mesh a click can be to be accepted.


    private void Start()
    {
        // The player will be rotated by this script so the nav mesh agent should not rotate it.
        agent.updateRotation = false;

        // Create the wait based on the delay.
        inputHoldWait = new WaitForSeconds (inputHoldDelay);

        // Load the starting position from the save data and find the transform from the starting position's name.
        string startingPositionName = "";
        playerSaveData.Load(startingPositionKey, ref startingPositionName);
        Transform startingPosition = StartingPosition.FindStartingPosition(startingPositionName);

        // Set the player's position and rotation based on the starting position.
        transform.position = startingPosition.position;
        transform.rotation = startingPosition.rotation;

        // Set the initial destination as the player's current position.
        destinationPosition = transform.position;
    }


    private void OnAnimatorMove()
    {
        // Set the velocity of the nav mesh agent (which is moving the player) based on the speed that the animator would move the player.
        agent.velocity = animator.deltaPosition / Time.deltaTime;
    }


    private void Update()
    {
        // If the nav mesh agent is currently waiting for a path, do nothing.
        if (agent.pathPending)
            return;

        // Cache the speed that nav mesh agent wants to move at.
        float speed = agent.desiredVelocity.magnitude;
        
        // If the nav mesh agent is very close to it's destination, call the Stopping function.
        if (agent.remainingDistance <= agent.stoppingDistance * stopDistanceProportion)
            Stopping (out speed);
        // Otherwise, if the nav mesh agent is close to it's destination, call the Slowing function.
        else if (agent.remainingDistance <= agent.stoppingDistance)
            Slowing(out speed, agent.remainingDistance);
        // Otherwise, if the nav mesh agent wants to move fast enough, call the Moving function.
        else if (speed > turnSpeedThreshold)
            Moving ();
        
        // Set the animator's Speed parameter based on the (possibly modified) speed that the nav mesh agent wants to move at.
        animator.SetFloat(hashSpeedPara, speed, speedDampTime, Time.deltaTime);
    }


    // This is called when the nav mesh agent is very close to it's destination.
    private void Stopping (out float speed)
    {
        // Stop the nav mesh agent from moving the player.
        agent.isStopped = true;

        // Set the player's position to the destination.
        transform.position = destinationPosition;

        // Set the speed (which is what the animator will use) to zero.
        speed = 0f;

        // If the player is stopping at an interactable...
        if (currentInteractable)
        {
            // ... set the player's rotation to match the interactionLocation's.
            transform.rotation = currentInteractable.interactionLocation.rotation;

            // Interact with the interactable and then null it out so this interaction only happens once.
            currentInteractable.Interact();
            currentInteractable = null;

            // Start the WaitForInteraction coroutine so that input is ignored briefly.
            StartCoroutine (WaitForInteraction ());
        }
    }


    // This is called when the nav mesh agent is close to its destination but not so close it's position should snap to it's destination.
    private void Slowing (out float speed, float distanceToDestination)
    {
        // Although the player will continue to move, it will be controlled manually so stop the nav mesh agent.
        agent.isStopped = true;

        // Find the distance to the destination as a percentage of the stopping distance.
        float proportionalDistance = 1f - distanceToDestination / agent.stoppingDistance;

        // The target rotation is the rotation of the interactionLocation if the player is headed to an interactable, or the player's own rotation if not.
        Quaternion targetRotation = currentInteractable ? currentInteractable.interactionLocation.rotation : transform.rotation;

        // Interpolate the player's rotation between itself and the target rotation based on how close to the destination the player is.
        transform.rotation = Quaternion.Lerp(transform.rotation, targetRotation, proportionalDistance);

        // Move the player towards the destination by an amount based on the slowing speed.
        transform.position = Vector3.MoveTowards(transform.position, destinationPosition, slowingSpeed * Time.deltaTime);

        // Set the speed (for use by the animator) to a value between slowing speed and zero based on the proportional distance.
        speed = Mathf.Lerp(slowingSpeed, 0f, proportionalDistance);
    }


    // This is called when the player is moving normally.  In such cases the player is moved by the nav mesh agent, but rotated by this function.
    private void Moving ()
    {
        // Create a rotation looking down the nav mesh agent's desired velocity.
        Quaternion targetRotation = Quaternion.LookRotation(agent.desiredVelocity);

        // Interpolate the player's rotation towards the target rotation.
        transform.rotation = Quaternion.Lerp(transform.rotation, targetRotation, turnSmoothing * Time.deltaTime);
    }


    // This function is called by the EventTrigger on the scene's ground when it is clicked on.
    public void OnGroundClick(BaseEventData data)
    {
        // If the handle input flag is set to false then do nothing.
        if(!handleInput)
            return;
        
        // The player is no longer headed for an interactable so set it to null.
        currentInteractable = null;

        // This function needs information about a click so cast the BaseEventData to a PointerEventData.
        PointerEventData pData = (PointerEventData)data;

        // Try and find a point on the nav mesh nearest to the world position of the click and set the destination to that.
        NavMeshHit hit;
        if (NavMesh.SamplePosition (pData.pointerCurrentRaycast.worldPosition, out hit, navMeshSampleDistance, NavMesh.AllAreas))
            destinationPosition = hit.position;
        else
            // In the event that the nearest position cannot be found, set the position as the world position of the click.
            destinationPosition = pData.pointerCurrentRaycast.worldPosition;

        // Set the destination of the nav mesh agent to the found destination position and start the nav mesh agent going.
        agent.SetDestination(destinationPosition);
        agent.isStopped = false;
    }


    // This function is called by the EventTrigger on an Interactable, the Interactable component is passed into it.
    public void OnInteractableClick(Interactable interactable)
    {
        // If the handle input flag is set to false then do nothing.
        if(!handleInput)
            return;

        // Store the interactble that was clicked on.
        currentInteractable = interactable;

        // Set the destination to the interaction location of the interactable.
        destinationPosition = currentInteractable.interactionLocation.position;

        // Set the destination of the nav mesh agent to the found destination position and start the nav mesh agent going.
        agent.SetDestination(destinationPosition);
        agent.isStopped = false;
    }


    private IEnumerator WaitForInteraction ()
    {
        // As soon as the wait starts, input should no longer be accepted.
        handleInput = false;

        // Wait for the normal pause on interaction.
        yield return inputHoldWait;

        // Until the animator is in a state with the Locomotion tag, wait.
        while (animator.GetCurrentAnimatorStateInfo (0).tagHash != hashLocomotionTag)
        {
            yield return null;
        }

        // Now input can be accepted again.
        handleInput = true;
    }
}


The EditorWithSubEditors Class

重温,替代普通编辑器,而不是继承有子编辑器的编辑器。已经获取target数组,需要子编辑器,有一个条件集合数组,每个条件集合有一个编辑器,想有一个interactive带有条件集合数组,需要一个interactive编辑器带有条件集合编辑器数组

Unity 3.Adventure Game tutorial(事件系统、动画状态机、库存、条件、反应、交互、游戏状态)_第33张图片

Interactable编辑器is targeting interactable,序列化对象代表interactable, 子编辑器代表条件集合

每个条件集合有条件集合编辑器,他们的序列化对象代表条件集合

子编辑器数组代表条件

Unity 3.Adventure Game tutorial(事件系统、动画状态机、库存、条件、反应、交互、游戏状态)_第34张图片

1. On the Pointer Click event of the EventTrigger, drag on the Player GameObject将玩家对象拖到EventTrigger组件的Pointer Click事件处

2. From the function dropdown select PlayerMovement > OnInteractableClick选择方法

3. Drag the Interactable component onto the object parameter field拖拽Interactable组件到参数栏


1. Select the InteractionLocation child GameObject设置

2. Set its position to -1.5, 0, 0

3. Set its rotation to 0, 90, 0


1. Select the DefaultReaction child GameObject

2. Add a TextReaction and an AudioReaction to the ReactionCollection component在ReactionCollection组件上通过下拉列表选择添加TextReaction和AudioReaction反应

3. Set the Message of the Text Reaction to “He looks pretty trustworthy.”设置文字反应的消息

4. Set the Audio Source of the Audio Reaction to VO设置声音反应的音源

5. Set the Audio Clip of the Audio Reaction to PlayerThisGuyLooksTrustworthy和音频片段

Unity 3.Adventure Game tutorial(事件系统、动画状态机、库存、条件、反应、交互、游戏状态)_第35张图片 Unity 3.Adventure Game tutorial(事件系统、动画状态机、库存、条件、反应、交互、游戏状态)_第36张图片 Unity 3.Adventure Game tutorial(事件系统、动画状态机、库存、条件、反应、交互、游戏状态)_第37张图片

1. Save the scene

2. Open the Persistent scene

3. Test

4. Exit Play Mode!

P312-349

Game State(游戏状态)

Create a system to transition between scenes创建一个系统能够在场景之间转换

 • Important information must be retained between scenes (eg: inventory state) 必须在场景之间保留重要信息 (例如: 库存状态)

• Fade to black during scene transitions在场景过渡过程中淡入黑色

• Multiple spawn points need to be supported due to possible entries from multiple other scenes由于从多个其他场景进入, 因此需要支持多个生成点

Create a system to save data between scene loads and unloads创建一个系统, 在场景加载和卸载之间保存数据

• Upon unloading a scene information such as the position of a GameObject must be stored so that on returning to the scene the information can be used again卸载场景信息 (如游戏对象的位置) 时, 必须存储, 以便在返回场景时可以再次使用该信息


The project architecture will be based on a main, or “persistent”, scene that will stay loaded all times项目架构将基于一个主场景, 或 "持久" 场景, 将始终保持加载状态

This “persistent” scene will handle the loading and unloading of other scenes这个 "持久" 的场景将处理其他场景的装卸

Certain information that needs to persist throughout all scenes (eg: the inventory) can be stored in the “persistent” scene某些需要在所有场景中保留的信息 (例如: 库存) 可以存储在 "持久" 场景中

The Persistent scene is not suitable to store all information, such as details about GameObjects that exist only in one particular scene (eg: the bird) 持久场景不适合存储所有信息, 例如仅存在于一个特定场景中的有关游戏对象的详细信息 (例如: 鸟)

ScriptableObject assets will be used to temporarily store this data so that it can be loaded again on return to a scene将使用脚本对象assets暂存此数据, 以便在返回到场景时可以再次加载这些数据

Unity 3.Adventure Game tutorial(事件系统、动画状态机、库存、条件、反应、交互、游戏状态)_第38张图片


Unity 3.Adventure Game tutorial(事件系统、动画状态机、库存、条件、反应、交互、游戏状态)_第39张图片

Unity 3.Adventure Game tutorial(事件系统、动画状态机、库存、条件、反应、交互、游戏状态)_第40张图片

The SaveData Architecture

场景1有九个抽象矩形,游戏时改变一些(如位置),保存相关数据,转化为asset

回到该场景时,加载默认数据,然后从asset重新加载reload变化的数据

Unity 3.Adventure Game tutorial(事件系统、动画状态机、库存、条件、反应、交互、游戏状态)_第41张图片

Unity 3.Adventure Game tutorial(事件系统、动画状态机、库存、条件、反应、交互、游戏状态)_第42张图片

The SceneController Architecture

场景控制架构

场景1变黑,unload,加载场景2

例子:

Unity 3.Adventure Game tutorial(事件系统、动画状态机、库存、条件、反应、交互、游戏状态)_第43张图片


用脚本对象(scriptObject)存储数据(temporary、only runtime不接受会话之间的存储)

只能为存储运行时文件(runtime files)

Delegate, Events and Lambda Expressions

委托/事件和lambda表达式

Delegates

  1. Delegates are variables that can store functions instead of data委托是存储函数而不是数据的变量
  2. The basic Action is a specific type of Delegate that represents a function that returns void and has no parameters

基类Action是特定类型的委托, 表示返回值为 void 且没有参数的函数


Functions are stored in delegates as follows:
函数存储在委托中

      void MyFunction ()
    {
    }


Action myAction = MyFunction;

The functions stored in delegates can be called as follows


myAction();


1. Actions also come in generic types
一般类型

          Action myIntegerAction;

2. The above Action can store a function that returns void and takes in a single integer parameter as below
上面的 action 可以存储一个返回 void的函数, 并接受一个整数参数, 如下所示

    public void MyFunction (int myInt)
    {
    }


    Action myIntegerAction = MyFunction;

  1. One of the most important things about delegates is that they are stored like variables, as such they can be passed to functions like a variable 委托最重要的一点是, 它们像变量一样被存储, 因此它们可以像变量一样传递给函数

public void MyFunction (Action myActionFunction)
 {    
 }

1. A delegate can be subscribed to by using the += operator and unsubscribed from using the -= operator
可以使用 + = 运算符添加委托挂接, 也可以使用-= 运算符取消委托挂接

myAction += MyFunction;


myAction -= MyFunction;

当有巨大巨慢的函数要传递,每次传递时这个函数都会被调用,用委托传递时,它的父函数可以决定是否调用委托函数。

Events

  1. Note that the events we are about to discuss are C# events which have nothing to do with the Event System in Unity and are solely a scripting feature请注意, 我们将要讨论的事件是 c# 事件, 与 unity 中的事件系统无关, 只是脚本特性

A delegate can be used as an event by putting the keyword 'event' in its definition
委托可以通过将关键字 "event" 放在其定义中用作事件

public event Action myEventAction;

1. It is very important that once an event has been subscribed to, that it is unsubscribed from before the object is destroyed 非常重要的是, 一旦一个事件被挂接, 它就会在对象被销毁之前取消挂接

2. Events that are still subscribed to will not be Garbage Collected and will therefore cause memory leaks if they are left subscribed仍挂接的事件将不会被收集垃圾, 因此, 如果它们保留挂接, 则会导致内存泄漏

--event一旦挂接(代表有可用的调用),一定要取消挂接

如:获取scene controller,将要卸载场景,它需要卸载所有场景有关物,存储场景想存储的数据。


实现方法:1.scene controller可以引用每一个想要存储的东西,告诉每一个东西场景要结束了该存储了。2.场景结束时调用event存储数据,它挂接了那些东西。可以每次添加新东西

1. Calling events works the same as calling delegates, this will call all of the functions which have subscribed to the event
调用事件的工作方式与调用委托相同, 这将调用挂接事件的所有函数

public event Action myEventAction;


myEventAction += MyFunction;


myEventAction();

1. The key point about events is that the triggering class does not need to tell all concerned classes to call a specific function事件的关键点是, 触发类不需要让所有相关类调用特定的函数

2. Instead, concerned classes can listen for an event and then act accordingly相反, 有关类可以监听一个事件, 然后采取相应的行动

每次添加新东西,可以拖到inspector引用它,写一条调用线(calling line)将要加载到场景。

这时挂接和取消挂接比较容易,卸载当前场景的东西时可以直接取消挂接这个事件。

就像在推特订阅某个人,当他发布了消息,就将被通知。


Lambda Expressions


  1. Lambda expressions are a short-hand way of writing functions that can be stored in delegates 该表达式是一种编写函数的快捷方法, 且可以添加到委托中

2. They have the following syntax: 'variable names' => 'expression(s) using those variables'它们具有以下语法: "变量名" = > "使用这些变量的表达式"

1. The variables declared for a lambda often very short 没有声明

2. Variables are usually implicitly typed, for example:
 通常用匿名类(implicitly typed)

x => x == someValue

3. In the above case, x implicitly has the same type as someValue


1.Lambda expressions are generally are quite short 2. Here are some examples of delegates using Lambda Expressions一些委托使用lambda表达式的例子

 Action myAction = () => Debug.Log("something");


Action myAction = x => x * x;


One key reason to use lambda expressions is to simplify our code使用lambda表达式的原因是简化代码


This: 

Action myAction = SomeFunction;

private void SomeFunction (string name)
 {
    print(name);
 } 

Becomes this: Action myAction = name => {print (name);};

注意闭合大括号后还有一个分号

15:25

P404

Steps

SceneController Script

1. Navigate to the Scripts > MonoBehaviours > SceneControl

2. Open the SceneController script for editing

using System;
using UnityEngine;
using System.Collections;
using UnityEngine.SceneManagement;//namespace使用场景管理

// This script exists in the Persistent scene and manages the content based scene's loading.  It works on a principle that the Persistent scene will be loaded first, then it loads the scenes that contain the player and other visual elements when they are needed.At the same time it will unload the scenes that are not needed when the player leaves them. 此脚本存在于持久场景中, 并管理基于场景加载的内容。 它的工作原理是, 首先加载持久场景, 然后在需要时加载包含玩家和其他视觉元素的场景。同时, 它将卸载玩家离开时不需要的场景。
public class SceneController : MonoBehaviour
{
    public event Action BeforeSceneUnload;          // Event delegate that is called just before a scene is unloaded.
    public event Action AfterSceneLoad;             // Event delegate that is called just after a scene is loaded.事件委托


    public CanvasGroup faderCanvasGroup;            // The CanvasGroup that controls the Image used for fading to black.画布组控制淡入淡出的黑色图像
    public float fadeDuration = 1f;                 // How long it should take to fade to and from black.淡入淡出延迟时间
    public string startingSceneName = "SecurityRoom";
                                                    // The name of the scene that should be loaded first.起始场景名
    public string initialStartingPositionName = "DoorToMarket";
                                                    // The name of the StartingPosition in the first scene to be loaded.第一个场景初始位置名
    public SaveData playerSaveData;                 // Reference to the ScriptableObject which stores the name of the StartingPosition in the next scene.引用存储下一个场景初始位置名的脚本对象
    
    
    private bool isFading;                          // Flag used to determine if the Image is currently fading to or from black.图像是否正在淡入淡出


    private IEnumerator Start ()
    {
        // Set the initial alpha to start off with a black screen. 将初始 alpha 设置为以黑屏开头。
        faderCanvasGroup.alpha = 1f;

        // Write the initial starting position to the playerSaveData so it can be loaded by the player when the first scene is loaded. 将初始位置写入玩家数据存储(playerSaveData, 以便在加载第一个场景时,玩家可以加载它。
        playerSaveData.Save (PlayerMovement.startingPositionKey, initialStartingPositionName);
        
        // Start the first scene loading and wait for it to finish.开始加载第一个场景, 并等待其完成
        yield return StartCoroutine (LoadSceneAndSetActive (startingSceneName));

        // Once the scene is finished loading, start fading in. 一旦场景完成加载, 开始淡入淡出
        StartCoroutine (Fade (0f));
    }


    // This is the main external point of contact and influence from the rest of the project. 这是项目其他部分的主要外部接触点和影响点。
    // This will be called by a SceneReaction when the player wants to switch scenes. 当玩家想要切换场景时, 这将被一个场景反应(SceneReaction)调用。
    public void FadeAndLoadScene (SceneReaction sceneReaction)
    {
        // If a fade isn't happening then start fading and switching scenes. 如果淡入淡出还没有开始, 那么就开始淡入淡出和切换场景。
        if (!isFading)
        {
            StartCoroutine (FadeAndSwitchScenes (sceneReaction.sceneName));
        }
    }


    // This is the coroutine where the 'building blocks' of the script are put together. 这是将脚本的 "构建块building blocks " 组合在一起的协程
    private IEnumerator FadeAndSwitchScenes (string sceneName)
    {
        // Start fading to black and wait for it to finish before continuing.在继续前等待淡入淡出完成
        yield return StartCoroutine (Fade (1f));

        // If this event has any subscribers, call it.如果事件有任何订阅者,调用他们
        if (BeforeSceneUnload != null)
            BeforeSceneUnload ();

        // Unload the current active scene.卸载当前活动场景
        yield return SceneManager.UnloadSceneAsync (SceneManager.GetActiveScene ().buildIndex);

        // Start loading the given scene and wait for it to finish. 开始加载给定的场景, 并等待其完成。
        yield return StartCoroutine (LoadSceneAndSetActive (sceneName));

        // If this event has any subscribers, call it.调用事件订阅者
        if (AfterSceneLoad != null)
            AfterSceneLoad ();
        
        // Start fading back in and wait for it to finish before exiting the function. 开始淡入淡出, 并等待它完成后再退出该函数。
        yield return StartCoroutine (Fade (0f));
    }


    private IEnumerator LoadSceneAndSetActive (string sceneName)
    {
        // Allow the given scene to load over several frames and add it to the already loaded scenes (just the Persistent scene at this point). 允许给定的场景加载到多个帧上, 并将其添加到已加载的场景 (此时只是 "持久" 场景)。异步加载场景
        yield return SceneManager.LoadSceneAsync (sceneName, LoadSceneMode.Additive);

        // Find the scene that was most recently loaded (the one at the last index of the loaded scenes). 查找最近加载的场景 (加载的场景的最后一个索引中的场景)
        Scene newlyLoadedScene = SceneManager.GetSceneAt (SceneManager.sceneCount - 1);

        // Set the newly loaded scene as the active scene (this marks it as the one to be unloaded next). 将新加载的场景设置为活动场景 (这将其标记为下一步要卸载的场景)
        SceneManager.SetActiveScene (newlyLoadedScene);
    }


    private IEnumerator Fade (float finalAlpha)
    {
        // Set the fading flag to true so the FadeAndSwitchScenes coroutine won't be called again. 将淡入淡出的标志设置为 true, 这样就不会再调用转换场景。
        isFading = true;

        // Make sure the CanvasGroup blocks raycasts into the scene so no more input can be accepted. 确保 canvasgroup 阻止向场景投掷射线raycasts, 以便不再接受任何输入。
        faderCanvasGroup.blocksRaycasts = true;

        // Calculate how fast the CanvasGroup should fade based on it's current alpha, it's final alpha and how long it has to change between the two. 根据目前的alpha、最终的alpha以及两者之间的变化时间, 计算出画布组应该以多快的速度消失。
        float fadeSpeed = Mathf.Abs (faderCanvasGroup.alpha - finalAlpha) / fadeDuration;

        // While the CanvasGroup hasn't reached the final alpha yet...还没有到final alpha,循环画布组
        while (!Mathf.Approximately (faderCanvasGroup.alpha, finalAlpha))
        {
            // ... move the alpha towards it's target alpha.像目标alpha移动
            faderCanvasGroup.alpha = Mathf.MoveTowards (faderCanvasGroup.alpha, finalAlpha,
                fadeSpeed * Time.deltaTime);

            // Wait for a frame then continue.在下一帧继续
            yield return null;
        }

        // Set the flag to false since the fade has finished.淡入淡出完成,设回false
        isFading = false;

        // Stop the CanvasGroup from blocking raycasts so input is no longer ignored. 停止 canvasgroup 阻塞, 以便不再忽略输入。
        faderCanvasGroup.blocksRaycasts = false;
    }
}


SaveData Script

1. Navigate to the Scripts > ScriptableObjects > DataPersistence folder

2. Open the SaveData script for editing

FindIndex的等价函数

private int GetIndex (string key) {

    for (int i = 0; i < keys.Count; i++)    {

        if (keys[i] == key)

            return i;

    }

    return -1; }


using System;
using UnityEngine;
using System.Collections.Generic;

// Instance of this class can be created as assets. 此类的实例可以创建为资产
// Each instance contains collections of data from the Saver monobehaviours they have been referenced by.  Since assets exist outside of the scene, the data will persist ready to be reloaded next time the scene is loaded.  Note that these assets DO NOT persist between loads of a build and can therefore NOT be used for saving the gamestate to disk. 每个实例都包含它们所引用的 Saver monobehaviours的数据集。 由于资产存在于场景之外, 因此数据将保持就绪(ready, 以便在下次加载场景时重新加载。 请注意, 这些资产不会在生成的加载之间持续存在, 因此不能用于将游戏空间保存到磁盘。
[CreateAssetMenu]
public class SaveData : ResettableScriptableObject
{
    // This nested class is a lighter replacement for Dictionaries.  This is required because Dictionaries are not serializable.  It has a single generic type that represents the type of data to be stored in it. 此嵌套类(一个类在另一个类中)是字典(Dictionaries)的较轻替代。这是必需的, 因为字典不是可序列化的。 它只有一个泛型类型, 表示要存储在其中的数据类型。
    [Serializable]//嵌套代表可以将数据保存到磁盘
    public class KeyValuePairLists<T>
    {
        public List<string> keys = new List<string>();      // The keys are unique identifiers for each element of data. 这些键是数据的每个元素的唯一标识符。
        public List<T> values = new List<T>();              // The values are the elements of data. 这些值是数据的元素。


        public void Clear ()
        {
            keys.Clear ();
            values.Clear ();
        }


        public void TrySetValue (string key, T value)
        {
            // Find the index of the keys and values based on the given key. 根据给定的键查找键和值的索引。
            int index = keys.FindIndex(x => x == key);

            // If the index is positive...如果索引为正
            if (index > -1)
            {
                // ... set the value at that index to the given value. 将该索引处的值设置为给定的值。
                values[index] = value;
            }
            else
            {
                // Otherwise add a new key and a new value to the collection. 否则, 向集合中添加新的键和新值。
                keys.Add (key);
                values.Add (value);
            }
        }


        public bool TryGetValue (string key, ref T value)
        {
            // Find the index of the keys and values based on the given key. 根据给定的键查找键和值的索引。
            int index = keys.FindIndex(x => x == key);

            // If the index is positive...
            if (index > -1)
            {
                // ... set the reference value to the value at that index and return that the value was found. 将参考值设置为该索引处的值, 并返回找到的值。
                value = values[index];
                return true;
            }

            // Otherwise, return that the value was not found.
            return false;
        }
    }


    // These are collections for various different data types. 这些是各种不同数据类型的集合。
    public KeyValuePairLists<bool> boolKeyValuePairLists = new KeyValuePairLists<bool> ();
    public KeyValuePairLists<int> intKeyValuePairLists = new KeyValuePairLists<int>();
    public KeyValuePairLists<string> stringKeyValuePairLists = new KeyValuePairLists<string>();
    public KeyValuePairLists<Vector3> vector3KeyValuePairLists = new KeyValuePairLists<Vector3>();
    public KeyValuePairLists<Quaternion> quaternionKeyValuePairLists = new KeyValuePairLists<Quaternion>();


    public override void Reset ()
    {
        boolKeyValuePairLists.Clear ();
        intKeyValuePairLists.Clear ();
        stringKeyValuePairLists.Clear ();
        vector3KeyValuePairLists.Clear ();
        quaternionKeyValuePairLists.Clear ();
    }


    // This is the generic version of the Save function which takes a collection and value of the same type and then tries to set a value. 这是 save 函数的通用版本, 它获取相同类型的集合和值, 然后设置值。
    private void Save<T>(KeyValuePairLists<T> lists, string key, T value)
    {
        lists.TrySetValue(key, value);
    }


    // This is similar to the generic Save function, it tries to get a value. 这类似于通用的 save 函数, 它尝试获取值。
    private bool Load<T>(KeyValuePairLists<T> lists, string key, ref T value)
    {
        return lists.TryGetValue(key, ref value);
    }


    // This is a public overload for the Save function that specifically chooses the generic type and calls the generic version. 这是save函数的public重载, 该函数专门选择泛型类型并调用泛型版本。
    public void Save (string key, bool value)
    {
        Save(boolKeyValuePairLists, key, value);
    }


    public void Save (string key, int value)
    {
        Save(intKeyValuePairLists, key, value);
    }


    public void Save (string key, string value)
    {
        Save(stringKeyValuePairLists, key, value);
    }


    public void Save (string key, Vector3 value)
    {
        Save(vector3KeyValuePairLists, key, value);
    }


    public void Save (string key, Quaternion value)
    {
        Save(quaternionKeyValuePairLists, key, value);
    }


    // This works the same as the public Save overloads except it calls the generic Load function. 这与public Save overloads的工作原理相同, 但它调用通用Load函数。
    public bool Load (string key, ref bool value)
    {
        return Load(boolKeyValuePairLists, key, ref value);
    }


    public bool Load (string key, ref int value)
    {
        return Load (intKeyValuePairLists, key, ref value);
    }


    public bool Load (string key, ref string value)
    {
        return Load (stringKeyValuePairLists, key, ref value);
    }


    public bool Load (string key, ref Vector3 value)
    {
        return Load(vector3KeyValuePairLists, key, ref value);
    }


    public bool Load (string key, ref Quaternion value)
    {
        return Load (quaternionKeyValuePairLists, key, ref value);
    }
}


The Saver Script and its children

路径:MonoBehaviours/DataPersistance/Saver

1. Open the Persistent scene 2. Test by entering Play Mode 3. Exit Play Mode

需要连接要存储信息的游戏对象与save data


using UnityEngine;

// This is an abstract MonoBehaviour that is the base class for all classes that want to save data to persist between scene loads and unloads. For an example of using this class, see the PositionSaver script. 这是一个抽象的MonoBehaviour, 它是所有要保存数据以在场景加载和卸载之间保持不变的类的基类。有关使用此类的例子, 请参阅PositionSaver脚本。
public abstract class Saver : MonoBehaviour
{
    public string uniqueIdentifier;             // A unique string set by a scene designer to identify what is being saved. 用字符串存储所有数据。需要唯一标识要存的数据uniqueIdentigier
    public SaveData saveData;                   // Reference to the SaveData scriptable object where the data is stored. SaveData是保存数据的对象引用


    protected string key;                       // A string to identify what is being saved.  This should be set using information about the data as well as the uniqueIdentifier. Key基于uniqueIdentigier和其他信息设置,标识要保存的内容


    private SceneController sceneController;    // Reference to the SceneController so that this can subscribe to events that happen before and after scene loads. 引用sceneController,以便订阅场景加载前后发生的事件


    private void Awake()
    {
        // Find the SceneController and store a reference to it. 找到 "SceneController" 并存储对它的引用。
        sceneController = FindObjectOfType<SceneController>();

        // If the SceneController couldn't be found throw an exception so it can be added.找不到则抛出异常
        if(!sceneController)
            throw new UnityException("Scene Controller could not be found, ensure that it exists in the Persistent scene.");
        
        // Set the key based on information in inheriting classes. 根据继承类中的信息设置key
        key = SetKey ();
    }


    private void OnEnable()
    {
        // Subscribe the Save function to the BeforeSceneUnload event.订阅save函数到卸载事件
        sceneController.BeforeSceneUnload += Save;

        // Subscribe the Load function to the AfterSceneLoad event.
        sceneController.AfterSceneLoad += Load;
    }


    private void OnDisable()
    {
        // Unsubscribe the Save function from the BeforeSceneUnloud event.销毁前取消订阅save函数
        sceneController.BeforeSceneUnload -= Save;

        // Unsubscribe the Load function from the AfterSceneLoad event.
        sceneController.AfterSceneLoad -= Load;
    }


    // This function will be called in awake and must return the intended key. 此函数将在唤醒时调用, 并且必须返回预期的密钥。
    // The key must be totally unique across all Saver scripts.key在所有saver脚本中唯一
    protected abstract string SetKey ();


    // This function will be called just before a scene is unloaded. 在卸载场景之前调用
    // It must call saveData.Save and pass in the key and the relevant data. 它必须调用 savedata. 保存并传入密钥和相关数据。
    protected abstract void Save ();


    // This function will be called just after a scene is finished loading. 场景加载完成后立即调用
    // It must call saveData.Load with a ref parameter to get the data out. 它必须调用 savedata.load 带有 ref 参数才能取出数据。
    protected abstract void Load ();
}


positionSaver(在同文件夹下)

using UnityEngine;

public class PositionSaver : Saver//继承了Saver,所以也是monoBehaviour
{
    public Transform transformToSave;   // Reference to the Transform that will have its position saved from and loaded to. 转换的引用, 该转换将其位置保存并加载


    protected override string SetKey()
    {
        // Here the key will be based on the name of the transform, the transform's type and a unique identifier.这个键将基于转换的名称、转换的类型和唯一标识符
        return transformToSave.name + transformToSave.GetType().FullName + uniqueIdentifier;
    }


    protected override void Save()
    {
        saveData.Save(key, transformToSave.position);
    }


    protected override void Load()
    {
        // Create a variable to be passed by reference to the Load function. 创建一个变量,要通过引用 load 函数传递
        Vector3 position = Vector3.zero;

        // If the load function returns true then the position can be set. 如果load函数返回 true, 则可以设置位置
        if (saveData.Load(key, ref position))
            transformToSave.position = position;
    }
}


51:10

快捷键

P229

在写for后按两下Tab,能自动出完整循环

重命名快捷键:F2(VS中为ctrl R)

联系3C店wifi(onlinebj2.4G)密码onlinebj123

你可能感兴趣的:(Unity与UE)