使用yolov5训练自己的数据集——科大讯飞X光安检图像识别baseline
文章目录
- 1、创建数据集的配置文件mydataset.yaml
- 2、创建标注文件
- 3、组织训练集的目录
- 4、选择模型backbone进行模型配置文件的修改
- 5、Train
- 6、Visualize
- 7、已有图像和xml制作标签的过程
- 7.1 check_img.py
- 7.2 check_box.py
- 7.3 rain_val_split.py
- 7.4 myData_label.py
- 8、推理
1、创建数据集的配置文件mydataset.yaml
# train and val datasets (image directory or *.txt file with image paths)
train: ./datasets/score/images/train/
val: ./datasets/score/images/val/

# number of classes
nc: 10

names: ["knife","scissors","lighter","zippooil",
"pressure","slingshot","handcuffs","nailpolish",
"powerbank","firecrackers"]
2、创建标注文件
可以使用LabelImg,Labme,Labelbox, CVAT来标注数据,对于目标检测而言需要标注bounding box即可。然后需要将标注转换为和darknet format相同的标注形式,每一个图像生成一个*.txt的标注文件(如果该图像没有标注目标则不用创建*.txt文件)。创建的*.txt文件遵循如下规则:
- 每一行存放一个标注类别
- 每一行的内容包括class x_center y_center width height
- Bounding box 的坐标信息是归一化之后的(0-1)
- class label转化为index时计数是从0开始的
每一个标注*.txt文件存放在和图像相似的文件目录下,只需要将/images/.jpg替换为/lables/.txt即可,例如:
datasets/score/images/train/000000109622.jpg  # image
datasets/score/labels/train/000000109622.txt  # label
3、组织训练集的目录
将训练集train和验证集val的images和labels文件夹按照如下的方式进行存放:

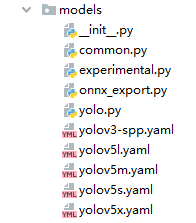
4、选择模型backbone进行模型配置文件的修改
在项目的./models文件夹下选择一个需要训练的模型,如果你选定了一个模型,那么需要修改模型对应的yaml文件,例如我在这里选择的是yolov5s.yaml,改nc=你需要训练的类别数即可:
# parameters
nc: 10  # number of classes<------------------  UPDATE to match your dataset
depth_multiple: 0.33  # model depth multiple # 借助efficient net
width_multiple: 0.50  # layer channel multiple

# anchors
anchors:# 锚框可以自己聚类,也可以直接用
  - [116,90, 156,198, 373,326]  # P5/32
  - [30,61, 62,45, 59,119]  # P4/16
  - [10,13, 16,30, 33,23]  # P3/8

# YOLOv5 backbone # 主干部分
#
backbone:
  # [from, number, module, args]

  [[-1, 1, Focus, [64, 3]],  # 0-P1/2
   [-1, 1, Conv, [128, 3, 2]],  # 1-P2/4
   [-1, 3, BottleneckCSP, [128]],
   [-1, 1, Conv, [256, 3, 2]],  # 3-P3/8
   [-1, 9, BottleneckCSP, [256]],
   [-1, 1, Conv, [512, 3, 2]],  # 5-P4/16
   [-1, 9, BottleneckCSP, [512]],
   [-1, 1, Conv, [1024, 3, 2]], # 7-P5/32
   [-1, 1, SPP, [1024, [5, 9, 13]]],
  ]

# YOLOv5 head  # 侦测部分
head:
  [[-1, 3, BottleneckCSP, [1024, False]],  # 9

   [-1, 1, Conv, [512, 1, 1]],
   [-1, 1, nn.Upsample, [None, 2, 'nearest']],
   [[-1, 6], 1, Concat, [1]],  # cat backbone P4
   [-1, 3, BottleneckCSP, [512, False]],  # 13

   [-1, 1, Conv, [256, 1, 1]],
   [-1, 1, nn.Upsample, [None, 2, 'nearest']],
   [[-1, 4], 1, Concat, [1]],  # cat backbone P3
   [-1, 3, BottleneckCSP, [256, False]],
   [-1, 1, nn.Conv2d, [na * (nc + 5), 1, 1]],  # 18 (P3/8-small)

   [-2, 1, Conv, [256, 3, 2]],
   [[-1, 14], 1, Concat, [1]],  # cat head P4
   [-1, 3, BottleneckCSP, [512, False]],
   [-1, 1, nn.Conv2d, [na * (nc + 5), 1, 1]],  # 22 (P4/16-medium)

   [-2, 1, Conv, [512, 3, 2]],
   [[-1, 10], 1, Concat, [1]],  # cat head P5
   [-1, 3, BottleneckCSP, [1024, False]],
   [-1, 1, nn.Conv2d, [na * (nc + 5), 1, 1]],  # 26 (P5/32-large)

   [[], 1, Detect, [nc, anchors]],  # Detect(P5, P4, P3)
  ]
5、Train
main函数下,修改一些默认参数为自己需要的:
# Train yolov5s on score for 300 epochs

$ python3 train.py
--img-size 640
--batch-size 16
--epochs 300
--data ./data/mydataset.yaml
--cfg ./models/score/yolov5s.yaml
--weights weights/yolov5s.pt
--device 0
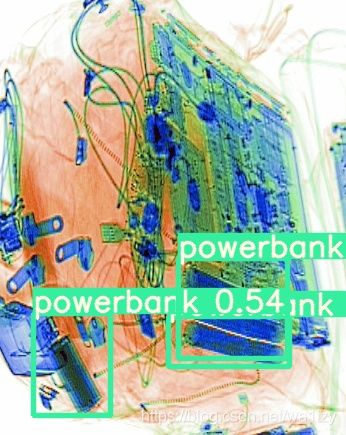
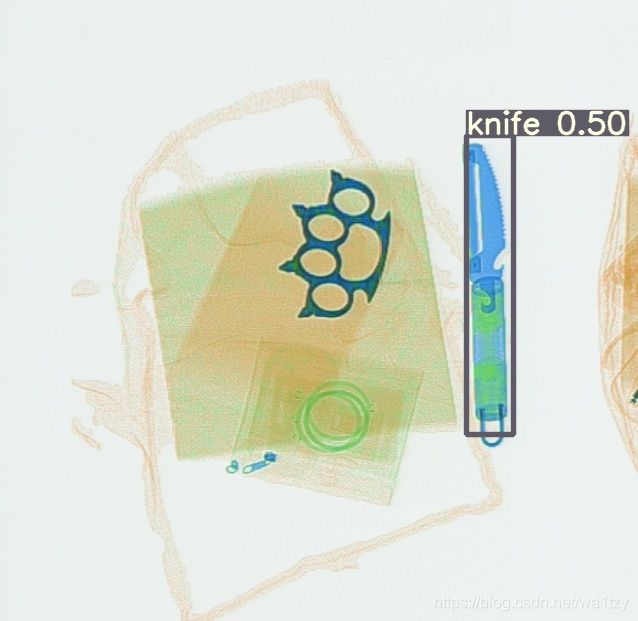
6、Visualize
开始训练后,查看train*.jpg图片查看训练数据,标签和数据增强,如果你的图像显示标签或数据增强不正确,你应该查看你的数据集的构建过程是否有问题。
7、已有图像和xml制作标签的过程
7.1 check_img.py
① 检测图像是否符合要求
import cv2
import os
import shutil

def check_img(img_path):
    imgs = os.listdir(img_path)
    for img in imgs:
        if img.split(".")[-1] !="jpg":
            print(img)
            shutil.move(img_path+"/"+img,"./error/"+img)

def check_anno(anno_path):
    anno_files = os.listdir(anno_path)
    for file in anno_files:
        if file.split(".")[-1] !="xml":
            print(file)
            shutil.move(anno_path+"/"+file,"./error/"+file)

def ckeck_img_label(img_path,anno_path):
    imgs = os.listdir(img_path)
    anno_files = os.listdir(anno_path)

    files = [i.split(".")[0] for i in anno_files]


    for img in imgs:
        if img.split(".")[0] not in files:
            print(img)
            shutil.move(img_path+"/"+img,"./error/"+img)

    imgs = os.listdir(img_path)
    images = [j.split(".")[0] for j in imgs]

    for file in anno_files:
        if file.split(".")[0] not in images:
            print(file)
            shutil.move(anno_path+"/"+file,"./error/"+file)


if __name__ == "__main__":
    img_path = r"E:/Annotations"# 图像路径
    anno_path = r"E:/XML"# XML文件路径

    print("============check image=========")
    check_img(img_path)

    print("============check anno==========")
    check_anno(anno_path)
    print("============check both==========")
    ckeck_img_label(img_path,anno_path)
7.2 check_box.py
检查标签有没有问题
import xml.etree.ElementTree as xml_tree
import pandas as pd
import numpy as np
import os
import shutil

def check_box(path):
    files = os.listdir(path)
    i = 0
    for anna_file in files:
        tree = xml_tree.parse(path + "/" + anna_file)
        root = tree.getroot()
        # Image shape.
        size = root.find('size')
        # Find annotations.
        bboxes = []
        labels = []
        labels_text = []
        difficult = []
        truncated = []

        for obj in root.findall('object'):
            if (float(bbox.find('ymin').text) >= float(bbox.find('ymax').text)) or (
                    float(bbox.find('xmin').text) >= float(bbox.find('xmax').text)):
                print(anna_file)
                i += 1
                try:
                    shutil.move(path + "/" + anna_file, "./error2/" + anna_file)
                    shutil.move(r"E:\Annotations" + anna_file.split(".")[0] + ".jpg",
                                "./error2/" + anna_file.split(".")[0] + ".jpg")
                except:
                    pass

    print(i)


if __name__ == "__main__":
    check_box(r"E:\XML")
7.3 rain_val_split.py
训练集与验证集的划分
import os
import random

trainval_percent = 0.1
train_percent = 0.9
xmlfilepath = r'E:\XML'
txtsavepath = 'ImageSets/Main'
total_xml = os.listdir(xmlfilepath)

num = len(total_xml)
lists = range(num)

tr = int(num * train_percent)
train = random.sample(lists, tr)

ftrain = open('./ImageSets/Main/train.txt', 'w')
fval = open('./ImageSets/Main/val.txt', 'w')

for i in lists:
    name = total_xml[i][:-4] + '\n'
    if i in train:
        ftrain.write(name)
    else:
        fval.write(name)

ftrain.close()
fval.close()
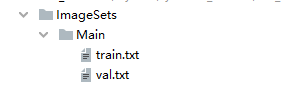
生成了一个文件夹ImageSets,txt内容如下:

7.4 myData_label.py
做训练集与验证集的标签
# _*_ coding:utf-8 _*_
import xml.etree.ElementTree as ET
import pickle
import os
from os import listdir, getcwd
from os.path import join
import cv2

# sets=[('myData', 'train'),('myData', 'val'), ('myData', 'test')]  # 根据自己数据去定义
sets=[('score', 'train'),('score', 'val')]  # 根据自己数据去定义

class2id = {'knife':0, 'scissors':1, 'lighter':2,'zippooil':3,'pressure':4,
        'slingshot':5,'handcuffs':6,'nailpolish':7,'powerbank':8,'firecrackers':9}
# classes = ["plane", "boat", "person"] # 根据自己的类别去定义


def convert(size, box):
    dw = 1./(size[0])
    dh = 1./(size[1])
    x = (box[0] + box[1])/2.0 - 1
    y = (box[2] + box[3])/2.0 - 1
    w = box[1] - box[0]
    h = box[3] - box[2]
    x = x*dw
    w = w*dw
    y = y*dh
    h = h*dh
    return (x,y,w,h)

def convert_annotation(year, image_id,image_set):
    in_file = open(r'E:\XML\%s.xml'%(image_id),encoding="utf-8")
    out_file = open('./labels/%s/%s.txt'%(image_set,image_id), 'w')
    # print(in_file)
    tree=ET.parse(in_file)
    root = tree.getroot()
    # size = root.find('size')
    # w = int(size.find('width').text)
    # h = int(size.find('height').text)
    print(image_id)
    img = cv2.imread(r"E:/Annotations/"+image_id+".jpg")

    sp = img.shape

    h = sp[0] #height(rows) of image
    w = sp[1] #width(colums) of image

    for obj in root.iter('object'):
        difficult = obj.find('difficult').text
        cls_ = obj.find('name').text
        if cls_ not in list(class2id.keys()):
            print("没有该label: {}".format(cls_))
            continue
        cls_id = class2id[cls_]
        xmlbox = obj.find('bndbox')
        b = (float(xmlbox.find('xmin').text), float(xmlbox.find('xmax').text), float(xmlbox.find('ymin').text), float(xmlbox.find('ymax').text))
        bb = convert((w,h), b)
        out_file.write(str(cls_id) + " " + " ".join([str(a) for a in bb]) + '\n')

wd = getcwd()

for year, image_set in sets:
    if not os.path.exists('./labels/'+image_set):
        os.makedirs('./labels/'+image_set)
    image_ids = open('./ImageSets/Main/%s.txt'%(image_set)).read().strip().split()
    list_file = open('./%s_%s.txt'%(year, image_set), 'w')
    for image_id in image_ids:
        list_file.write(r'%s/JPEGImages\%s.jpg\n'%(wd, image_id))  # 写了train或val的list
        convert_annotation(year, image_id,image_set)
    list_file.close()


# labels/标注数据有了
# train val的list数据也有了
生成一个文件夹,txt内容如下(darknet格式的标签):

![]()
接下来就按照上述第三大步把图像文件与标签文件拷贝到相应位置即可训练。
8、推理