Spring Boot 2.x实战85 - Spring Security 9 - OAuth 2.0之Client
OAuth 2.0是安全授权的工业标准协议,我们了解它需要理解下面的专用术语:

-
交互参与方:
- Client:需要访问
Resource Sever受保护资源的应用; - Resource Owner :终端用户,Client通过终端用户进行不同类型的授权(
Grant Type); - Authorization Server:提供访问授权的应用,
Client使用某种Grant Type向Authorization Server获取Access Token; - Resource Sever:包含受保护资源的应用,
Client使用Access Token访问Resource Server的受保护资源;
- Client:需要访问
-
授权类型 - Grant Type
- Authorization Code:让用户访问Client页面时,页面打向Authorization Server的登录页面,登录后显示授权访问页面,授权成功后Client即可获得Access Token访问Resource Server
- Password:通过提供提供用户名和密码获得Access Token,一般是给应用服务的客户端使用(IOS、Android、Web App)。
- Client Credentials:Client通过Client Id和Client Secret直接向Authorization Server请求Access Token;它主要用于非用户参与的应用,如后台服务。
-
Token
- Access Token:用来访问受保护资源的唯一令牌;
- Refresh Token:当Access Token失效时,我们可以使用Refresh Token来获取一个新的Access Token,它的时效性要远远大于Access Token
- JWT:JSON Web Token,它代表双方之间安全传输的信息;它使用数字签名,传输的信息可以被验证和信任。
3.3 OAuth 2.0 Client
前面我们使用Resource Server和Authorization Server演示Grant Type为password的场景;这节我们结合Client演示Grant Type为Authorization Code。
新建应用,信息如下:
Group:top.wisely
Artifact:client
Dependencies:Spring Security、OAuth2 Client、Spring Web Starter、Lombok
build.gradle文件中的依赖如下:
dependencies {
	implementation 'org.springframework.boot:spring-boot-starter-oauth2-client'
	implementation 'org.springframework.boot:spring-boot-starter-security'
	implementation 'org.springframework.boot:spring-boot-starter-web'
	compileOnly 'org.projectlombok:lombok'
	annotationProcessor 'org.projectlombok:lombok'
  //...
}
3.3.1 Spring Boot的自动配置
Spring Boot通过OAuth2ClientAutoConfiguration,通过OAuth2ClientProperties使用spring.security.oauth2.client.*来配置Client;它导入了两个配置:
-
OAuth2ClientRegistrationRepositoryConfiguration:读取外部配置ClientRegistration(Client 注册)集合,并添加到InMemoryClientRegistrationRepository(在内存中存储ClientClientRegistration的库),且将InMemoryClientRegistrationRepository注册成了Bean。注册Client,需要指定Client的Registration以及它对应Client的Provider(Authorization Server)信息-
Registration:通过配置
spring.security.oauth2.client.registration.[registrationId].*来实现; -
Provider:通过配置
spring.security.oauth2.client.provider.[providerId].*来实现;Provider和Client是对应关系,providerId和registrationId相同。
-
-
OAuth2WebSecurityConfiguration:为我们注册了两个Bean并做了相关的Spring Security配置。-
OAuth2AuthorizedClientService:使用其实现类InMemoryOAuth2AuthorizedClientService注册Bean,用来管理被授权的Client(OAuth2AuthorizedClient,可获得用户的Access Token); -
OAuth2AuthorizedClientRepository:使用其实现类AuthenticatedPrincipalOAuth2AuthorizedClientRepository注册Bean,用来在请求间持久化被授权的Client。 -
使用
HttpSecurity配置弃用OAuth 2.0的登录(oauth2Login())和Client(oauth2Client())设置:@Configuration(proxyBeanMethods = false) @ConditionalOnMissingBean(WebSecurityConfigurerAdapter.class) static class OAuth2WebSecurityConfigurerAdapter extends WebSecurityConfigurerAdapter { @Override protected void configure(HttpSecurity http) throws Exception { http.authorizeRequests().anyRequest().authenticated().and().oauth2Login() .and().oauth2Client(); } }
-
3.3.2 配置Client和Provider
spring:
  security:
    oauth2:
      client:
        registration:
          my-client: # 1
            client-id: app # 2
            client-secret: app # 3
            authorization-grant-type: authorization_code # 4
            redirect-uri: http://127.0.0.1:8083/login/oauth2/code/my-client # 5
        provider:
          my-client: # 6
            authorization-uri: http://localhost:8080/oauth/authorize # 7
            token-uri: http://localhost:8080/oauth/token # 8
            user-info-uri: http://localhost:8080/userInfo # 9
            userNameAttribute: username # 10
server:
  port: 8083
-
my-client为registrationId; -
设置在Authorization Server配置的Client Id;
-
设置在Authorization Server配置的Client Secret;
-
设置Grant Type为
authorization_code; -
设置转向的路径,默认规则为
{baseUrl}/login/oauth2/code/{registrationId};此处使用127.0.0.1而不是使用localhost(相同的域名会导致会话Cookie被覆盖,导致[authorization_request_not_found]错误);此处也需要我们在数据库表oauth_client_details中app数据中的web_server_redirect_uri值修改为http://127.0.0.1:8083/login/oauth2/code/my-client;

-
my-client为providerId; -
Authorization Server的授权路径;
-
Authorization Server获取Access Token的路径;
-
获取用户信息的路径;
-
从获取用户信息路径的返回值中的用户名的属性值。
3.3.3 Authorization Server的修改
在Client的Provider中设置了获取用户信息的路径,我们需要在Authorization Server上提供用户信息的控制器:
@RestController
public class UserController {
    @RequestMapping("/userInfo")
    public Map<String, String> userInfo(@AuthenticationPrincipal Jwt jwt){
        Map<String,String> map = new HashMap<>();
        map.put("username", jwt.getClaimAsString("user_name"));
        return map;
    }
}
上面Provider设置userNameAttribute的值此处的username的key值设置。我们若需要在外部访问这个路径也就意味着Authorization Server也需要是Resource Server来提供用户信息的服务,我们对Authorization Server做如下修改:
-
添加Resource Server依赖
implementation 'org.springframework.boot:spring-boot-starter-oauth2-resource-server' -
公钥配置
-
将
public.txt放置src/main/resources路径; -
配置公钥
spring:
  security:
    oauth2:
      resourceserver:
        jwt:
          public-key-location: classpath:public.txt
-
-
Spring Security配置Resource Server支持并开启表单登陆
@Configuration
public class WebSecurityConfig extends WebSecurityConfigurerAdapter {
		//...
    @Override
    protected void configure(HttpSecurity http) throws Exception {
        http.authorizeRequests()
                .mvcMatchers("/.well-known/jwks.json").permitAll()
                .anyRequest().authenticated()
                .and()
                .formLogin().permitAll() //表单登陆
                .and()
                .oauth2ResourceServer().jwt().jwtAuthenticationConverter(jwt -> {
            Collection<SimpleGrantedAuthority> authorities = ((Collection<String>) jwt.getClaims().get("authorities")).stream()
                    .map(SimpleGrantedAuthority::new)
                    .collect(Collectors.toSet());
            return new JwtAuthenticationToken(jwt, authorities);
        });

    }
		//...
}
3.3.4 受保护控制器
我们在Client中调用Resource Server的adminCan1服务。调用Resource Server服务使用RestTemplate,当调用的Resource Server时候我们时需要使用Bearer Token在头部传递Access Token;RestTemplateAutoConfiguration已经给我们自动配置了RestTemplateBuilder来配置RestTemplate,我们需要通过RestTemplateCustomizer来对RestTemplate来定制。
@Configuration
public class WebConfig {

    @Bean
    RestTemplateCustomizer restTemplateCustomizer(OAuth2AuthorizedClientService clientService){
        return restTemplate -> { //1
            List<ClientHttpRequestInterceptor> interceptors =
                    restTemplate.getInterceptors();
            if (CollectionUtils.isEmpty(interceptors)) {
                interceptors = new ArrayList<>();
            }
            interceptors.add((request, body, execution) -> { //2
                OAuth2AuthenticationToken auth = (OAuth2AuthenticationToken)
                        SecurityContextHolder.getContext().getAuthentication();
                String clientRegistrationId = auth.getAuthorizedClientRegistrationId();
                String principalName = auth.getName();
                OAuth2AuthorizedClient client =
                        clientService.loadAuthorizedClient(clientRegistrationId, principalName); //3
                String accessToken = client.getAccessToken().getTokenValue(); //4
                request.getHeaders().add("Authorization", "Bearer " + accessToken); //5
                return execution.execute(request, body);
            });
            restTemplate.setInterceptors(interceptors);
        };
    }

}
RestTemplateCustomizer时函数接口,入参时RestTemplate;- 通过增加
RestTemplate拦截器,让每次请求添加Bearer Token(Access Token);ClientHttpRequestInterceptor是函数接口,可用Lambda表达式来实现; OAuth2AuthorizedClientService可获得用户的OAuth2AuthorizedClient;OAuth2AuthorizedClient可获得用户Access Token;- 将Access Token通过头部的Bearer Token中访问Resource Server。
控制器内容如下:
@RestController
public class SecurityController {
    private RestTemplate restTemplate;

    public SecurityController(RestTemplateBuilder restTemplateBuilder) {
        this.restTemplate = restTemplateBuilder.build();
    }

    @GetMapping("/forAdminCan1")
    public Object forAdminCan1(){
        return restTemplate.getForObject("http://localhost:8082/adminCan1",Object.class);
    }
}
3.3.5 验证
此时Authorization Server、Resource Server、Client都启动了。使用Chrome访问http://127.0.0.1:8083/forAdminCan1,这是一个受保护的资源,地址会自动打向Authorization Server的登陆页面:http://localhost:8080/login。
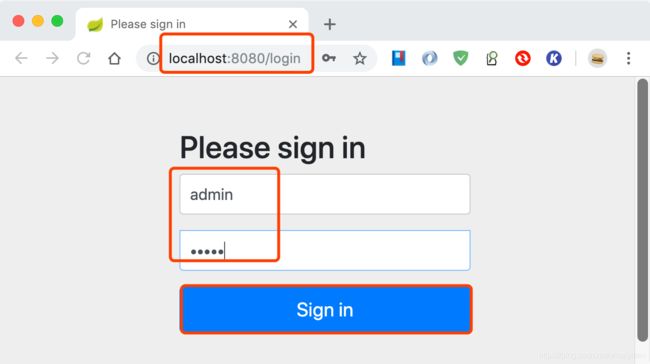
输入admin的账号密码,点击Sign in,这时页面打向http://localhost:8080/oauth/authorize?response_type=code&client_id=app&state=RVTd7i3-bbjgofPUOUMZ82DqqzjwT3D–Voe-oP16YI%3D&redirect_uri=http://127.0.0.1:8083/login/oauth2/code/my-client,可以在此页面进行授权。
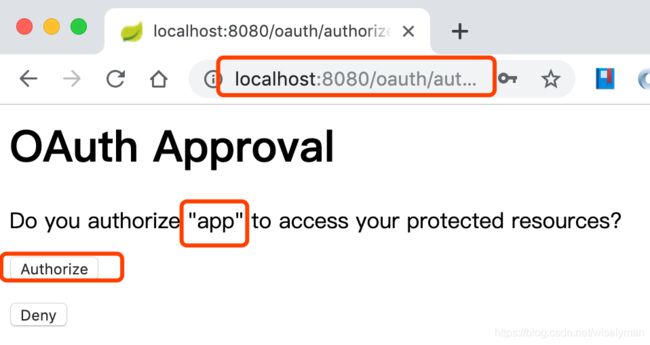
我们点击Authorize,地址会自动打向刚开始访问的http://127.0.0.1:8083/forAdminCan1地址,当我们在Authorization Server上登陆授权后,我们就可以获得访问Resource Server的服务了。
新书推荐:
我的新书《从企业级开发到云原生微服务:Spring Boot 实战》已出版,内容涵盖了丰富Spring Boot开发的相关知识
购买地址:https://item.jd.com/12760084.html
主要包含目录有:
第一章 初识Spring Boot(快速领略Spring Boot的美丽)
第二章 开发必备工具(对常用开发工具进行介绍:包含IntelliJ IDEA、Gradle、Lombok、Docker等)
第三章 函数式编程
第四章 Spring 5.x基础(以Spring 5.2.x为基础)
第五章 深入Spring Boot(以Spring Boot 2.2.x为基础)
第六章 Spring Web MVC
第七章 数据访问(包含Spring Data JPA、Spring Data Elasticsearch和数据缓存)
第八章 安全控制(包含Spring Security和OAuth2)
第九章 响应式编程(包含Project Reactor、Spring WebFlux、Reactive NoSQL、R2DBC、Reactive Spring Security)
第十章 事件驱动(包含JMS、RabbitMQ、Kafka、Websocket、RSocket)
第11章 系统集成和批处理(包含Spring Integration和Spring Batch)
第12章 Spring Cloud与微服务
第13章 Kubernetes与微服务(包含Kubernetes、Helm、Jenkins、Istio)
多谢大家支持。