利用百度API写出自己的桌面翻译器
下面三个是我参考到的博主的博文,大家有兴趣也可以去了解一下,我在他们的基础上加入了我自己的一些想法,程序也做得更合我心意。感谢这几位博主。
GUI使用教程
翻译程序的博文
GUI以及封装博文
前期准备:
注册一个百度API的账号,并获取里面的APP ID和密匙,在下面的代码中加入即可。
程序源码如下
#百度翻译程序版.py
#@author:海hong啊
#接入百度翻译API,进行个人需要的翻译功能的GUI界面,并最后生成桌面程序
from tkinter import *
from tkinter import ttk
from tkinter.messagebox import *
import tkinter as tk
import urllib.request
import urllib.parse
import json
import hashlib
import time, re, random

class user(Frame):
	'''
	wb = xlwt.Workbook()
	wb_xlsx = wb.add_sheet('翻译程序记录', cell_overwrite_ok = True)
	raw = ['源语言', '目标语言']
	for i in range(len(raw)):
		wb_xlsx.write(0, i, raw[i])
	'''
	"""docstring for user"""
	def __init__(self, root):
		frame = Frame(root)
		frame.place(x = 0, y = 0, width = 400, height = 400)

		cho_bef = tk.StringVar()
		cho_aft = tk.StringVar()


		self.lab1 = Label(frame, text = '输入')
		self.lab2 = Label(frame, text = '译文')
		self.lab3 = Label(frame, text = '源语言')
		self.lab4 = Label(frame, text = '目标语言')
		self.en1 = Entry(frame, width = 40) #输入框
		self.en2 = Text(frame, width = 40, height = 7) #翻译框
		self.choice1 = ttk.Combobox(frame, width = 10, textvariable = cho_bef)
		self.choice2 = ttk.Combobox(frame, width = 10, textvariable = cho_aft)
		self.but1 = Button(frame, text = '翻译', command = self.translate)
		self.but2 = Button(frame, text = '重置', command = self.clean)

		self.place()
		self.displaying = False

	def clean(self):
		self.en1.delete(0.0, END)
		self.en2.delete(0.0, END)

	def translate(self):
		#print('翻译')
		content = self.en1.get()
		print(content)
		from_lang = self.choice1.get()
		to_lang = self.choice2.get()

		language_match = {
							'自动检测': 'auto',
							'中文': 'zh',
							'英语': 'en',
							'粤语': 'yue',
							'文言文': 'wyw',
							'日语': 'jp',
							'韩语': 'kor',
							'繁体中文': 'cht'
		}
		from_lang = language_match.get(from_lang, 'en')
		to_lang = language_match.get(to_lang, 'zh')

		salt = '666'
		appid = ''
		secret_key = ''
		#REQUEST_FAILED = -1
		url = 'http://api.fanyi.baidu.com/api/trans/vip/translate'

		MD5_str = appid + content + salt + secret_key
		m2 = hashlib.md5()
		m2.update(MD5_str.encode('utf-8'))

		data = {}
		data['appid'] = appid
		data['salt'] = salt
		data['from'] = from_lang
		data['to'] = to_lang
		data['q'] = content
		data['sign'] = m2.hexdigest()
		print(data)

		self.en2.delete(0.0, END) #清空译文框

		data = urllib.parse.urlencode(data).encode('utf-8')
		response = urllib.request.urlopen(url, data)
		html = response.read().decode('utf-8')
		target = json.loads(html)
		print(target)

		self.en2.insert('insert', target['trans_result'][0]['dst'])
		print('翻译成功')
		f = open('翻译程序日志.txt', 'a+', encoding = 'utf-8')
		f.write(target['trans_result'][0]['src'])
		f.write('\n')
		f.write(target['trans_result'][0]['dst'])
		f.write('\n')
		f.write('__________' * 5)
		f.write('\n')
		f.close()

	#部件单独在这里摆放
	def place(self):
		self.choice1['values'] = ('自动检测', '英语', '中文', '日语', '文言文', '粤语', '韩语', '繁体中文')
		self.choice2['values'] = ('中文', '英语', '日语', '文言文', '粤语', '韩语', '繁体中文')
		self.choice1.current(1)
		self.choice2.current(1)
		self.choice1.place(x = 90, y = 300)
		self.choice2.place(x = 300, y = 300)

		self.lab1.place(x = 20, y = 20)
		self.lab2.place(x = 20, y = 150)
		self.lab3.place(x = 50, y = 300)
		self.lab4.place(x = 250, y = 300)

		self.en1.place(x = 100, y = 20)
		self.en2.place(x = 100, y = 120)

		self.but1.place(x = 120, y = 250)
		self.but2.place(x = 300, y = 250)


def use():
	root = Tk()
	root.title('翻译')
	#设置窗口尺寸
	ws = root.winfo_screenwidth()
	hs = root.winfo_screenheight()
	w = 450
	h = 400
	x = (ws/2) - (w/2)
	y = (hs/2) - (h/2)
	root.geometry('%dx%d+%d+%d' % (w, h, x, y))
	root.resizable(width = False, height = False)

	new_user = user(root)
	root.mainloop()


if __name__ == '__main__':
	use()
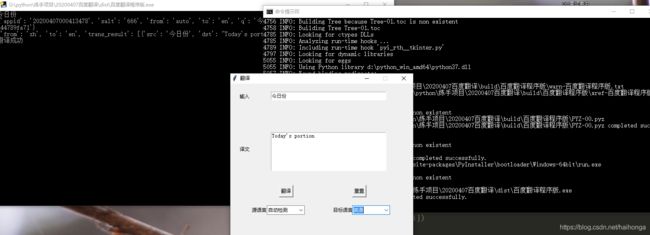
最后对其进行安装包打包,用到的是pyinstaller库。这个库需要pip安装。
我使用到的命令是pyinstaller -F 百度翻译程序版.py