ASP.NET MVC5入门之简单的登录验证方式
开发环境:
IDE:VS2013
架构:ASP.NET MVC5
语言:C#
1. 效果图
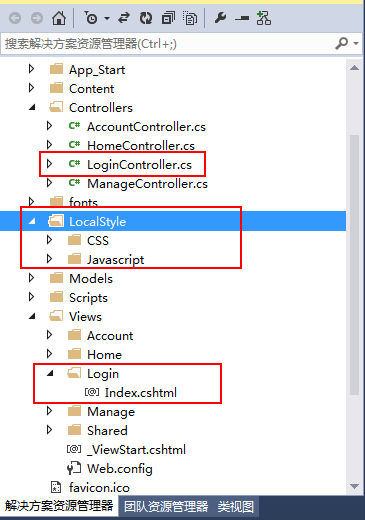
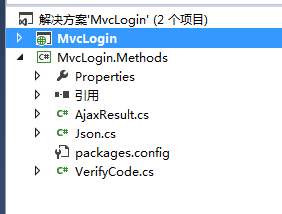
2.项目结构
解决方案包含两个工程文件:
- MvcLogin:默认创建的工程,是MVC架构的主体。该工程主要包含LoginController、Login/Index、LocalStyle文件夹,分别对应控制器、视图和应用于该工程的样式和js。
- MvcLogin.Methods:方法库,工程本身是一个类库,可以存放一些常用的方法,可以方便代码复用。此处涉及到登录时验证码的获取、登陆验证(通过Ajax),方法均存放在 该类库中。
3. CSS及jQuery
3.1 LocalStyle/CSS/LoginStyle.css文件
代码:
  @import url(http://fonts.googleapis.com/css?family=Tenor+Sans);
  html {
    background-color: #5D92BA;
    font-family: "Tenor Sans", sans-serif;
  }

  .container {
    width: 500px;
    height: 400px;
    margin: 0 auto;
  }

  .login {
    /*margin-top: 50px;*/
    margin-top:30%;
    width: 450px;
  }

  .login-heading {
    font: 1.8em/48px "Tenor Sans", sans-serif;
    color: white;
  }

  .input-txt {
    width: 100%;
    padding: 20px 10px;
    background: #5D92BA;
    border: none;
    font-size: 1em;
    color: white;
    border-bottom: 1px dotted rgba(250, 250, 250, 0.4);
    -moz-box-sizing: border-box;
    -webkit-box-sizing: border-box;
    box-sizing: border-box;
    -moz-transition: background-color 0.5s ease-in-out;
    -o-transition: background-color 0.5s ease-in-out;
    -webkit-transition: background-color 0.5s ease-in-out;
    transition: background-color 0.5s ease-in-out;
  }
  .input-txt:-moz-placeholder {
    color: #81aac9;
  }
  .input-txt:-ms-input-placeholder {
    color: #81aac9;
  }
  .input-txt::-webkit-input-placeholder {
    color: #81aac9;
  }
  .input-txt:focus {
    background-color: #4478a0;
  }

  .login-footer {
    margin: 10px 0;
    overflow: hidden;
    float: left;
    width: 100%;
  }

  .btn {
    padding: 15px 30px;
    border: none;
    background: white;
    color: #5D92BA;
  }

  .btn--right {
    float: right;
  }

  .icon {
    display: inline-block;
  }

  .icon--min {
    font-size: .9em;
  }

  .lnk {
    font-size: .8em;
    line-height: 3em;
    color: white;
    text-decoration: none;
  }
此部分代码不做介绍,均引自Simple Login Form项目
3.2 LocalStyle/Javascript/LoginScript文件
jQuery文件需要在html添加使用才可以使用,并且建议添加到body结束之前。
  (function ($) {
      $.login = {

          formMessage: function (msg) {
              $('.login_tips').find('.tips_msg').remove();
              $('.login_tips').append('' + msg + '');
          },

          loginClick: function () {
              var $username = $("#username");
              var $password = $("#password");
              var $code = $("#validateCode");
              if ($username.val() == "") {
                  $username.focus();
                  $.login.formMessage('请输入用户名');

                  return false;
              }
              else if ($password.val() == "") {
                  $password.focus();
                  $.login.formMessage('请输入登录密码');

                  return false;
              }
              else if ($code.val() == "") {
                  $code.focus();
                  $.login.formMessage('请输入验证码');

                  return false;
              }
              else {

                  $.login.formMessage('');
                  $("#loginButton").attr('disabled', 'disabled').find('span').html("验证中...");
                  $.ajax({
                      url: "/Login/CheckLogin",
  data: { username: $.trim($username.val()), password: $.trim($password.val()), code: $.trim($code.val()) },
                      type: "post",
                      dataType: "json",
                      success: function (data) {
                          if (data.state == "success") {
                              $("#loginButton").find('span').html("登录成功,正在跳转...");
                              window.setTimeout(function () {
                                  window.location.href = "/Home/Index";
                              }, 500);
                          }
                          else {
                              $("#loginButton").removeAttr('disabled').find('span').html("登录");
                              $("#switchCode").trigger("click");
                              $code.val('');
                              $.login.formMessage(data.message);
                          }
                      }
                  });
              }
          },

          init: function () {
              $("#switchCode").click(function () {
                  $("#imgCode").attr("src", "/Login/GetAuthCode?time=" + Math.random());
               });
              $("#loginButton").click(function () {
                  $.login.loginClick();
              });
          }

      };
      $(function () {
          $.login.init();
      });
  })(jQuery);
- 4~7行:定义函数formMessage:用于修改错误提示信息;
- 9~56行:定义函数loginClick:用于响应登录按键的点击事件;
- 35~54行:通过ajax同服务器通信,对用户名、密码及验证码的信息进行验证;
- 58~65行:初始化函数,为switchCode添加切换验证码的功能,为loginButton添加登录验证的功能。
注:
(1)在第60行的代码中,请求验证码时传入了time属性,这是根据数据路由规定的,因为MVC的默认使用传统路由。
          public static void RegisterRoutes(RouteCollection routes)
          {
              routes.IgnoreRoute("{resource}.axd/{*pathInfo}");

              routes.MapRoute(
                  name: "Default",
                  url: "{controller}/{action}/{id}",
                  defaults: new { controller = "Home", action = "Index", id = UrlParameter.Optional }
              );
          }
该路由协议中规定了id是作为必须的参数,因而尽管在验证码的获取函数中没有参数,此处仍需要多传一个参数过去,才能满足路由协议。
至于第60行使用time,这个可以使用其他字符串替换,如ti。
(2)在$.login中包含三个函数,每个函数的结束使用","进行分割,最后一个函数结束后可以不加。
$.login结束后后使用分号结尾。
(3)第5行、第6行使用jQuery的遍历和Html方法进行元素的查找和追加操作。
(4)loginClick函数中,用到了:
$username.focus();元素获取焦点;
$password.val():获取元素内容;
$password.val("字符串"):为元素赋值。

(5)Ajax(35~54行):
url:调用控制器的相应方法;
data:获取表单内容;
type:采用post的方法;
dataType:使用json。(json需要添加才能使用)
success:对服务器的返回数据进行处理,如果校验成功则跳转到主界面,否则对错误进行提示。
4 html文件
Views/Login/Index.cshtml文件定义了登陆界面的标签(当然需要依靠CSS文件才可以美化布局)
@{
Layout = null;
}
用户登录
ASP.NET MVC5 登陆验证
(1)第1~3行:未使用布局页;
(2)第12~13行:添加对样式的引用;
(3)第42~43行:添加对jQuery的引用。
(4)第29行:src属性使得元素可以直接引用控制器中的方法。
5 控制器LoginController
  public class LoginController : Controller
  {
      // GET: Login
      public ActionResult Index()
      {
          return View();
      }

      public ActionResult GetAuthCode()
     {
         return File(new VerifyCode().GetVerifyCode(), @"image/Gif");
     }

     public ActionResult CheckLogin(string username,string password,string code)
     {
         try
         {
             if(username=="admin")
                 return Content(new AjaxResult { state = ResultType.success.ToString(), message = "登录成功。" }.ToJson());
             else if(password=="123456")
                 return Content(new AjaxResult { state = ResultType.success.ToString(), message = "登录成功。" }.ToJson());
             else
                 return Content(new AjaxResult { state = ResultType.error.ToString(), message = "请验证帐号及密码!" }.ToJson());
         }

         catch (Exception ex)
         {
             return Content(new AjaxResult { state = ResultType.error.ToString(), message = ex.Message }.ToJson());
         }
     }
(1)第4~7行:Login界面打开的默认方法;
(2)第9~12行:获取验证码,参数意义可查看函数定义;
(3)第14~30行:对表单传过来的数据进行判断,并通过json返回判断结果。此处千万注意,参数username、password和code需要和jQuery中传的字符串一定匹配,因为结果通过键值对进行匹配,如果名称不一致则无法判断。
如果jQuery传值user而控制器中以username参数名称接收数据,则无法接到用户名参数,因而第一个if(username=="admin")根本不会进行判断。
6 辅助方法
AjaxResult类文件:
  public class AjaxResult
      {
          ///
          /// 操作结果类型
          ///
          public object state { get; set; }
          ///
          /// 获取 消息内容
          ///
         public string message { get; set; }
         ///
         /// 获取 返回数据
         ///
         public object data { get; set; }
     }
     ///
     /// 表示 ajax 操作结果类型的枚举
     ///
     public enum ResultType
     {
         ///
         /// 消息结果类型
         ///
         info,
         ///
         /// 成功结果类型
         ///
         success,
         ///
         /// 警告结果类型
         ///
         warning,
         ///
         /// 异常结果类型
         ///
         error
     }
Json类文件:
  public static class Json
      {
          public static object ToJson(this string Json)
          {
              return Json == null ? null : JsonConvert.DeserializeObject(Json);
          }
          public static string ToJson(this object obj)
          {
              var timeConverter = new IsoDateTimeConverter { DateTimeFormat = "yyyy-MM-dd HH:mm:ss" };
             return JsonConvert.SerializeObject(obj, timeConverter);
         }
         public static string ToJson(this object obj, string datetimeformats)
         {             var timeConverter = new IsoDateTimeConverter { DateTimeFormat = datetimeformats };
             return JsonConvert.SerializeObject(obj, timeConverter);
         }
         public static T ToObject(this string Json)
         {
             return Json == null ? default(T) : JsonConvert.DeserializeObject(Json);
         }
         public static List ToList(this string Json)
         {
             return Json == null ? null : JsonConvert.DeserializeObject>(Json);
         }
         public static DataTable ToTable(this string Json)
         {
             return Json == null ? null : JsonConvert.DeserializeObject(Json);
         }
         public static JObject ToJObject(this string Json)
         {
             return Json == null ? JObject.Parse("{}") : JObject.Parse(Json.Replace(" ", ""));
         }
     }
VerifyCode文件:
 public class VerifyCode
      {
          public byte[] GetVerifyCode()
          {
              int codeW = 80;
              int codeH = 30;
              int fontSize = 16;
              string chkCode = string.Empty;
              //颜色列表,用于验证码、噪线、噪点
             Color[] color = { Color.Black, Color.Red, Color.Blue, Color.Green, Color.Orange, Color.Brown, Color.Brown, Color.DarkBlue };
             //字体列表,用于验证码
             string[] font = { "Times New Roman" };
             //验证码的字符集,去掉了一些容易混淆的字符
             char[] character = { '1', '2', '3', '4', '5', '6', '7', '8', '9', 'a', 'b', 'd', 'e', 'f', 'h', 'k', 'm', 'n', 'r', 'x', 'y', 'A', 'B', 'C', 'D', 'E', 'F', 'G', 'H', 'J', 'K', 'L', 'M', 'N', 'P', 'R', 'S', 'T', 'W', 'X', 'Y' };
             Random rnd = new Random();
             //生成验证码字符串
             for (int i = 0; i < 4; i++)
             {
                 chkCode += character[rnd.Next(character.Length)];
             }
             //写入Session、验证码加密
             //WebHelper.WriteSession("nfine_session_verifycode", Md5.md5(chkCode.ToLower(), 16));
             //创建画布
             Bitmap bmp = new Bitmap(codeW, codeH);
             Graphics g = Graphics.FromImage(bmp);
             g.Clear(Color.White);
             //画噪线
             for (int i = 0; i < 3; i++)
             {
                 int x1 = rnd.Next(codeW);
                 int y1 = rnd.Next(codeH);
                 int x2 = rnd.Next(codeW);
                 int y2 = rnd.Next(codeH);
                 Color clr = color[rnd.Next(color.Length)];
                 g.DrawLine(new Pen(clr), x1, y1, x2, y2);
             }
             //画验证码字符串
             for (int i = 0; i < chkCode.Length; i++)
             {
                 string fnt = font[rnd.Next(font.Length)];
                 Font ft = new Font(fnt, fontSize);
                 Color clr = color[rnd.Next(color.Length)];
                 g.DrawString(chkCode[i].ToString(), ft, new SolidBrush(clr), (float)i * 18, (float)0);
             }
             //将验证码图片写入内存流,并将其以 "image/Png" 格式输出
             MemoryStream ms = new MemoryStream();
             try
             {
                 bmp.Save(ms, ImageFormat.Png);
                 return ms.ToArray();
             }
             catch (Exception)
             {
                 return null;
             }
             finally
             {
                 g.Dispose();
                 bmp.Dispose();
             }
         }
     }