RabbitMq学习笔记-实战篇-spring boot整合
1、JSON序列化与反序列化
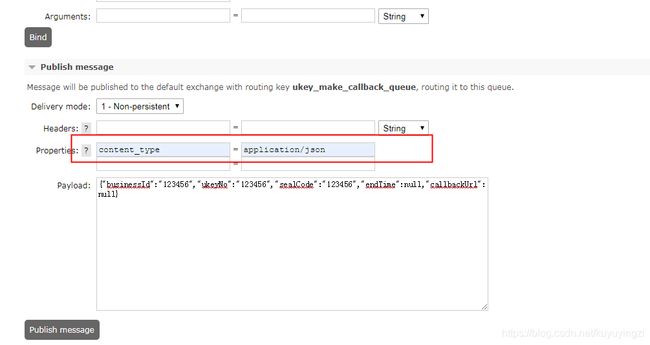
要实现消息跨平台,需要配置消息JSON序列化(配置见代码实现),就可以实现不同语言之间互相发送/接收消息,还可以直接用RabbitMQ控制台发送消息。
从RabbitMQ控制台发送消息,指定properties content_type=application/json
2、消息重试机制
见application.yml配置文件,手动模式下,当消费端消费抛异常时,消息会进行重试。消息等待重试时,会阻塞,直到重试都失败后,才会消费下一条消息。
pom.xml
    org.springframework.boot
    spring-boot-starter-amqp
application.yml
spring:
  rabbitmq:
    addresses: localhost:5672
    username: guest
    password: guest
    publisher-confirms: true #推送确认
    publisher-returns: true #推送退回
    listener:
      simple:
        acknowledge-mode: MANUAL # 手动确认模式
        prefetch: 10000 #最多允许多少个未应答
        retry:
          enabled: true #是否开启消费者重试(为false时关闭消费者重试,这时消费端代码异常会一直重复收到消息)
          max-attempts: 3 #最大重试次数
          initial-interval: 10S #重试间隔时间,如果重试间隔大于10S,必须设置最大重试间隔,否则只能小于等于10S
          max-interval: 10S #最大重试间隔时间,默认10S
RabbitTemplateConfig.java
@Slf4j
@Configuration
public class RabbitTemplateConfig implements RabbitTemplate.ConfirmCallback , RabbitTemplate.ReturnCallback{

    @Autowired
    private RabbitTemplate rabbitTemplate;
    @Autowired
    private SimpleRabbitListenerContainerFactory rabbitListenerContainerFactory;

    @PostConstruct
    public void init() {
        //指定 ConfirmCallback
        rabbitTemplate.setConfirmCallback(this);
        rabbitTemplate.setReturnCallback(this);
        // 使用 JSON 序列化与反序列化
        rabbitTemplate.setMessageConverter(new Jackson2JsonMessageConverter());
        rabbitListenerContainerFactory.setMessageConverter(new Jackson2JsonMessageConverter());
    }

    @Override
    public void confirm(CorrelationData correlationData, boolean ack, String cause) {
        if(!ack){
            log.info("发送MQ消息失败,ID:{}, 原因: {}", correlationData.toString(), cause);
        }
    }

    @Override
    public void returnedMessage(Message message, int replyCode, String replyText, String exchange, String routingKey) {
        log.info("发送MQ消息回退: {}, {}, exchange:{}, routing:{}" + JSON.toJSONString(message), replyCode, exchange, routingKey);
    }
}
Hello1Receiver.java
/**
 * 普通模式消费端
 */
@Slf4j
@Component
public class Hello1Receiver {

    @RabbitListener(queuesToDeclare = @Queue("hello")) // 需要注意,改注解要写在方法上,不然JSON序列化会失效
    public void process(Hello bean, Channel channel, @Header(AmqpHeaders.DELIVERY_TAG) long tag) throws Exception {
        // TODO 业务逻辑
        TimeUnit.SECONDS.sleep(2);
        // 手动确认
        channel.basicAck(tag, false);
        log.info("hello1消息消费成功params:{}", JSON.toJSONString(bean));
    }
}
TopicReceiver.java
/**
 * topic模式消费端
 */
@Slf4j
@Component
public class TopicReceiver {

    @RabbitListener(bindings = @QueueBinding(
            exchange = @Exchange(value = "topic.exchange",type = "topic"),
            value = @Queue(value = "consumer_queue"),
            key = "key.#"
    ))
    public void key(Hello bean, Channel channel, @Header(AmqpHeaders.DELIVERY_TAG) long tag) throws Exception {
        // TODO 业务逻辑

        // 手动确认
        channel.basicAck(tag, false);
        log.info("topic-key消息消费成功params:{}", JSON.toJSONString(bean));
    }


    @RabbitListener(bindings = @QueueBinding(
            exchange = @Exchange(value = "topic.exchange",type = "topic"),
            value = @Queue(value = "consumer_queue"),
            key = "value.#"
    ))
    public void value(Hello bean, Channel channel, @Header(AmqpHeaders.DELIVERY_TAG) long tag) throws Exception {
        // TODO 业务逻辑

        // 手动确认
        channel.basicAck(tag, false);
        log.info("topic-value消息消费成功params:{}", JSON.toJSONString(bean));
    }
}
HelloProducerTest.java
public class HelloProducerTest extends BasicTest{

    @Autowired
    private AmqpTemplate amqpTemplate;

    @Test
    public void sendTest() throws Exception {
        for (int i = 0; i < 10; i++) {
            Hello bean = Hello.builder()
                    .id(i)
                    .title("hello")
                    .content("你好")
                    .build();
            amqpTemplate.convertAndSend("hello", bean);
        }
        TimeUnit.SECONDS.sleep(5);
    }
}
TopicProducerTest.java
public class TopicProducerTest extends BasicTest{

    @Autowired
    private AmqpTemplate amqpTemplate;

    @Test
    public void sendTest() {
        Hello bean = Hello.builder()
                .id(1)
                .title("hello")
                .content("你好")
                .build();
        amqpTemplate.convertAndSend("topic.exchange", "key.hello", bean );
        amqpTemplate.convertAndSend("topic.exchange", "value.hello", bean );
    }
}
demo下载
https://download.csdn.net/download/kuyuyingzi/12235976
参考资料:
https://www.rabbitmq.com/getstarted.html
https://www.jianshu.com/p/911d987b5f11
