Python 3 & Keras YOLO v3解析与实现
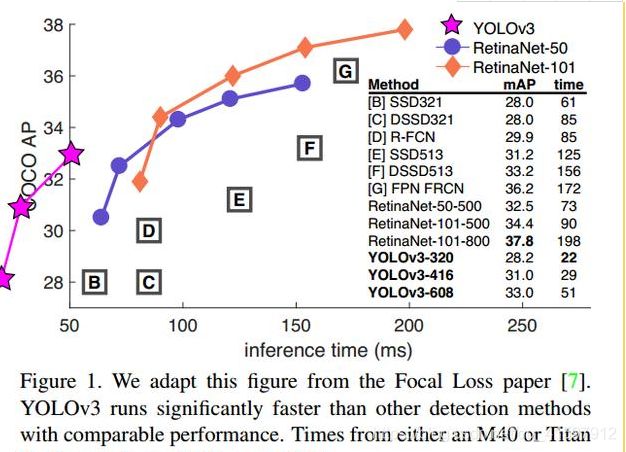
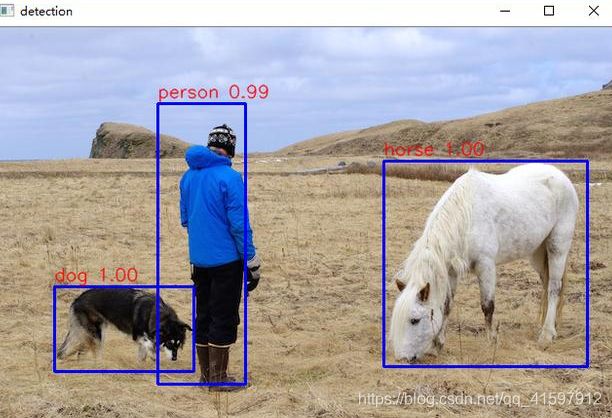
YOLOv3在YOLOv2的基础进行了一些改进,这些更改使其效果变得更好。其与SSD一样准确,但速度快了三倍,具体效果如下图。本文对YOLO v3的改进点进行了总结,并实现了一个基于Keras的YOLOv3检测模型。如果先验边界框不是最好的,但确实与真实对象的重叠超过某个阈值(这里是0.5),那么就忽略这次预测。YOLO v3只为每个真实对象分配一个边界框,如果先验边界框与真实对象不吻合,则不会产生坐标或类别预测损失,只会产生物体预测损失。demo.py 文件提供了使用yolo v3进行检测的例子。
YOLOv3在YOLOv2的基础进行了一些改进,这些更改使其效果变得更好。 在320×320的图像上,YOLOv3运行速度达到了22.2毫秒,mAP为28.2。其与SSD一样准确,但速度快了三倍,具体效果如下图。本文对YOLO v3的改进点进行了总结,并实现了一个基于Keras的YOLOv3检测模型。
在这里还是要推荐下我自己建的Python开发学习群:483546416,群里都是学Python开发的,如果你正在学习Python ,小编欢迎你加入,大家都是软件开发党,不定期分享干货(只有Python软件开发相关的),包括我自己整理的一份2018最新的Python进阶资料和高级开发教程,欢迎进阶中和进想深入Python的小伙伴
inference
Paper:YOLOv3: An Incremental Improvement
Official website:https://pjreddie.com/darknet/yolo
Github:https://github.com/xiaochus/YOLOv3
环境
-
Python 3.6
-
Tensorflow-gpu 1.5.0
-
Keras 2.1.3
-
OpenCV 3.4
改进点
1.Darknet-53特征提取网络
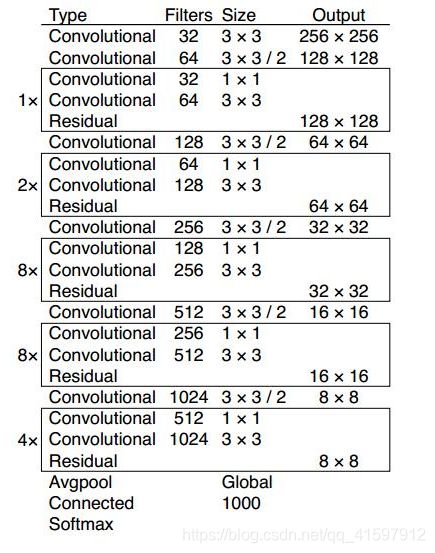
不同于Darknet-19,YOLO v3中使用了一个53层的卷积网络,这个网络由残差单元叠加而成。根据作者的实验,在分类准确度上跟效率的平衡上,这个模型比ResNet-101、 ResNet-152和Darknet-19表现得更好。
Darknet-53
2.边界框预测
基本的坐标偏移公式与YOLO v2相同。
box
YOLO v3使用逻辑回归预测每个边界框的分数。 如果先验边界框与真实框的重叠度比之前的任何其他边界框都要好,则该值应该为1。 如果先验边界框不是最好的,但确实与真实对象的重叠超过某个阈值(这里是0.5),那么就忽略这次预测。YOLO v3只为每个真实对象分配一个边界框,如果先验边界框与真实对象不吻合,则不会产生坐标或类别预测损失,只会产生物体预测损失。
3.类别预测
为了实现多标签分类,模型不再使用softmax函数作为最终的分类器,而是使用logistic作为分类器,使用 binary cross-entropy作为损失函数。
4.多尺度预测
不同于之前的YOLO,YOLO v3从三种不同尺度的特征图谱上进行预测任务。
-
在Darknet-53得到的特征图的基础上,经过7个卷积得到第一个特征图谱,在这个特征图谱上做第一次预测。
-
然后从后向前获得倒数第3个卷积层的输出,进行一次卷积一次x2上采样,将上采样特征与第43个卷积特征连接,经过7个卷积得到第二个特征图谱,在这个特征图谱上做第二次预测。
-
然后从后向前获得倒数第3个卷积层的输出,进行一次卷积一次x2上采样,将上采样特征与第26个卷积特征连接,经过7个卷积得到第三个特征图谱,在这个特征图谱上做第三次预测。
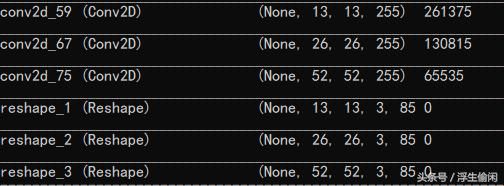
每个预测任务得到的特征大小都为N ×N ×[3∗(4+1+80)] ,N为格子大小,3为每个格子得到的边界框数量, 4是边界框坐标数量,1是目标预测值,80是类别数量。
out
实验
实现了一个输入大小为(416, 416)的yolo v3检测模型,模型使用了coco训练的权值文件。
权值文件转换
参考了yad2k项目的转换方法,我们为其添加了几个新的层,用来将Darknet的网络结构和权值文件转换为keras 2的网络结构和权值文件。
首先下载权值文件yolov3.weights
执行下列命令转换
python yad2k.py cfgyolo.cfg yolov3.weights datayolo.h5检测
demo.py文件提供了使用yolo v3进行检测的例子。
"""Demo for use yolo v3"""import osimport timeimport cv2import numpy as npfrom model.yolo_model import YOLOdef process_image(img): """Resize, reduce and expand image. # Argument: img: original image. # Returns image: ndarray(64, 64, 3), processed image. """ image = cv2.resize(img, (416, 416), interpolation=cv2.INTER_CUBIC) image = np.array(image, dtype='float32') image /= 255. image = np.expand_dims(image, axis=0) return imagedef get_classes(file): """Get classes name. # Argument: file: classes name for database. # Returns class_names: List, classes name. """ with open(file) as f: class_names = f.readlines() class_names = [c.strip() for c in class_names] return class_namesdef draw(image, boxes, scores, classes, all_classes): """Draw the boxes on the image. # Argument: image: original image. boxes: ndarray, boxes of objects. classes: ndarray, classes of objects. scores: ndarray, scores of objects. all_classes: all classes name. """ for box, score, cl in zip(boxes, scores, classes): x, y, w, h = box top = max(0, np.floor(x + 0.5).astype(int)) left = max(0, np.floor(y + 0.5).astype(int)) right = min(image.shape[1], np.floor(x + w + 0.5).astype(int)) bottom = min(image.shape[0], np.floor(y + h + 0.5).astype(int)) cv2.rectangle(image, (top, left), (right, bottom), (255, 0, 0), 2) cv2.putText(image, '{0} {1:.2f}'.format(all_classes[cl], score), (top, left - 6), cv2.FONT_HERSHEY_SIMPLEX, 0.6, (0, 0, 255), 1, cv2.LINE_AA)def detect(): """Use yolo v3 to detect images. """ yolo = YOLO(0.6, 0.5) file = 'data/coco_classes.txt' all_classes = get_classes(file) res = [] for (root, dirs, files) in os.walk('images/test'): if files: for f in files: print(f) path = os.path.join(root, f) image = cv2.imread(path) pimage = process_image(image) start = time.time() boxes, classes, scores = yolo.predict(pimage, image.shape) end = time.time() print(boxes) print(classes) print(scores) print(end - start) draw(image, boxes, scores, classes, all_classes) res.append(image) for r in res: cv2.namedWindow("detection") while True: cv2.imshow("detection", r) if cv2.waitKey(110) & 0xff == 27: breakif __name__ == '__main__': detect()结果
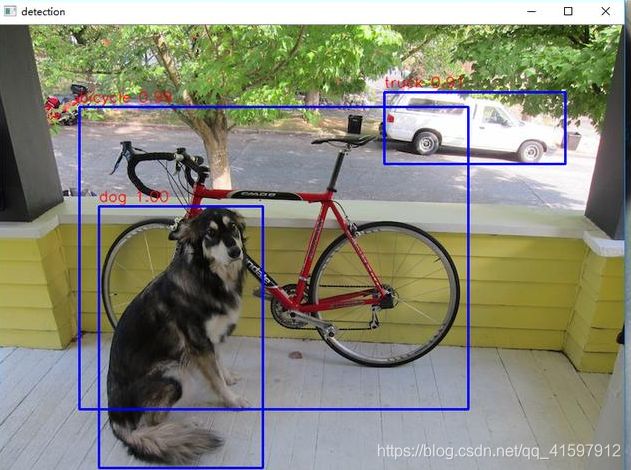
运行python demo.py
dog.png
eagle.png
giraffe.png
horses.png
