1. 下载:
https://github.com/mysql-inception/inception 选择下载:
注意安装包:
yum -y install cmake libncurses5-dev libssl-dev g++ bison openssl-devel.x86_64
2. 下载后解压编译:
# unzip inception-master.zip
# cd inception-master
# cmake .
# cmake -DWITH_DEBUG=OFF -DCMAKE_INSTALL_PREFIX=/usr/local/inception -DMYSQL_DATADIR=/data/inception -DWITH_SSL=yes -DCMAKE_BUILD_TYPE=RELEASE-DWITH_ZLIB=bundled-DMY_MAINTAINER_CXX_WARNINGS="-Wall -Wextra -Wunused -Wwrite-strings -Wno-strict-aliasing -Wno-unused-parameter -Woverloaded-virtual" -DMY_MAINTAINER_C_WARNINGS="-Wall -Wextra -Wunused -Wwrite-strings -Wno-strict-aliasing -Wdeclaration-after-statement"
# make && make install
# sh -x inception_build.sh debug
报错如下:
-- Build files have been written to: /root/inception-master
+ '[' x '!=' Xcode ']'
+ make install
make: *** 没有规则可以创建目标“install”。 停止。
# sh inception_build.sh debug [linux]
make: *** 没有规则可以创建目标“install”。 停止。
解决办法:# make -j6 && make install
安装完毕后添加配置文件:
#vim /etc/inc.cnf
[root@localhost ~]# cat /etc/inc.cnf
[inception]
general_log=1
general_log_file=/usr/local/inception/data/inception.log
port=6669
socket=/data/workspace/inception_data/inc.socket
character-set-client-handshake=0
character-set-server=utf8
inception_remote_system_password=123456
inception_remote_system_user=root
inception_remote_backup_port=3306
inception_remote_backup_host=127.0.0.1
inception_support_charset=utf8mb4
inception_enable_nullable=0
inception_check_primary_key=1
inception_check_column_comment=1
inception_check_table_comment=1
inception_osc_min_table_size=1
inception_osc_bin_dir=/data/temp
inception_osc_chunk_time=0.1
inception_ddl_support=1
inception_enable_blob_type=1
inception_check_column_default_value=1
//上面配置文件中用到的文件路径,没有的手动创建一下。
#mkdir -p /data/workspace/inception_data/
#mkdir -p /data/temp
6.启动Inception. 现在就到启动时间了,那么启动有两种方式,和MySQL是一样的
1. Inception –defaults-file=inc.cnf
2. Inception –port=6669
//启动inception服务
#/usr/local/inception/bin/Inception --defaults-file=/etc/inc.cnf //启动inception 有2种方式,在这采用配置文件启动方式。
//测试inception。
测试之前创建一个可以连接mysql的用户:用户名wwn 密码:123456 IP:127.0.0.1 保证能正常登陆mysql即可。
# mysql -uroot -h127.0.0.1 -P6669 //登陆inception
登录上去之后,再执行一个命令:
inception get variables;
输出了所有的变量,恭喜你,已经启动成功了,都说了非常简单。
[root@localhost app]# mysql -uroot -h127.0.0.1 -P6669
Welcome to the MySQL monitor. Commands end with ; or \g.
Your MySQL connection id is 36
Server version: Inception2.0.18-beta 1
Copyright (c) 2000, 2013, Oracle and/or its affiliates. All rights reserved.
Oracle is a registered trademark of Oracle Corporation and/or its
affiliates. Other names may be trademarks of their respective
owners.
Type 'help;' or '\h' for help. Type '\c' to clear the current input statement.
mysql>
下面用脚本测试相关的审核语句:
1. 审核表创建语句测试:
[root@localhost ~]# cat aa.py
#!/usr/bin/python
#-\*-coding: utf-8-\*-
import MySQLdb
sql='/*--user=wwn;--password=123456;--host=127.0.0.1;--execute=1;--port=3306;*/\
inception_magic_start;\
use test;\
CREATE TABLE `alifeba_user` (\
`ID` int(11) unsigned NOT NULL auto_increment comment"aaa",\
`username` varchar(50) NOT NULL Default "" comment"aaa",\
`realName` varchar(50) NOT NULL Default "" comment"aaa",\
`age` int(11) NOT NULL Default 0 comment"aaa",\
PRIMARY KEY (`ID`)\
) ENGINE=INNODB DEFAULT CHARSET=utf8mb4 COMMENT="AAAA";\
inception_magic_commit;'
try:
conn=MySQLdb.connect(host='127.0.0.1',user='wwn',passwd='123456',db='wwn',port=6669)
cur=conn.cursor()
ret=cur.execute(sql)
result=cur.fetchall()
num_fields = len(cur.description)
field_names = [i[0] for i in cur.description]
print field_names
for row in result:
print row[0], "¦",row[1],"¦",row[2],"¦",row[3],"¦",row[4],"¦",
row[5],"¦",row[6],"¦",row[7],"¦",row[8],"¦",row[9],"¦",row[10]
cur.close()
conn.close()
except MySQLdb.Error,e:
print "Mysql Error %d: %s" % (e.args[0], e.args[1])
2. 审核增删改语句
[root@localhost ~]# cat bb.py
#!/usr/bin/python
#-\*-coding: utf-8-\*-
import MySQLdb
sql='/*--user=wwn;--password=123456;--host=127.0.0.1;--execute=1;--enable-remote-backup;--port=3306;*/\
inception_magic_start;\
use wwn;\
INSERT INTO v9_wap(siteid,sitename,logo,domain,setting) VALUES ("12","aa","bb","cc","dd");\
delete from v9_wap where siteid=11;\
update v9_wap set sitename="haha" where siteid=10;\
inception_magic_commit;'
try:
conn=MySQLdb.connect(host='127.0.0.1',user='wwn',passwd='123456',db='wwn',port=6669)
cur=conn.cursor()
ret=cur.execute(sql)
result=cur.fetchall()
num_fields = len(cur.description)
field_names = [i[0] for i in cur.description]
print field_names
for row in result:
print row[0], "¦",row[1],"¦",row[2],"¦",row[3],"¦",row[4],"¦",
row[5],"¦",row[6],"¦",row[7],"¦",row[8],"¦",row[9],"¦",row[10]
cur.close()
conn.close()
except MySQLdb.Error,e:
print "Mysql Error %d: %s" % (e.args[0], e.args[1])
*************
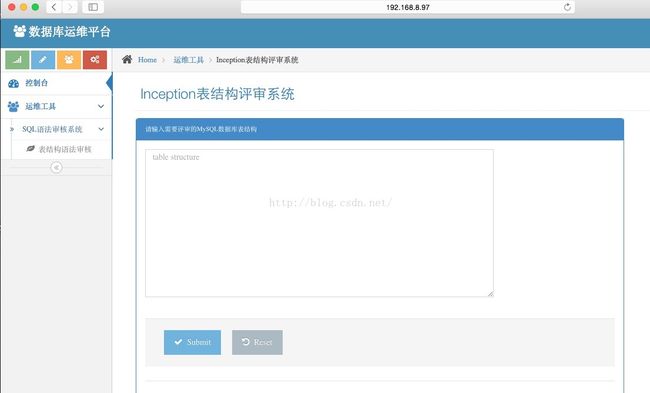
3. 在网上下载一个web封装的界面安装过程如下:
下载地址:https://github.com/dbalihui/inception_web
环境配置
python2.7 + flask
先安装依赖模块
pip install flask_wtf
pip install flask-script
pip install flask-debugtoolbar
pip install MySQL-python
使用方法
先将app目录中的inception.py文件里的账号密码改成自己的
记得use sql_check这里要改成自己的数据库名字
在inception_web目录下运行./run.py runserver --host 0.0.0.0
使用浏览器访问你的IP http://192.168.xx.xxx:5000/
运行报错的话是因为没有安装flask组件,请使用pip install xx安装相关组件
所以先升级Python2.7
# wget https://www.python.org/ftp/python/2.7.10/Python-2.7.10.tgz --no-check-certificate
# tar -xvf Python-2.7.10.tar
# cd Python-2.7.10
# ./configure && make && make install
# /usr/local/bin/python -V
# mv /usr/bin/python /usr/bin/python2.6.6
# ln -s /usr/local/bin/python /usr/bin/python
# python -V //验证版本
# vim /usr/bin/yum //修改#!/usr/bin/python 为#!/usr/bin/python2.6.6,因为yum安装依赖的是2.6版本的python
下面安装模块:
首先安装一个pip
# yum -y install python-pip //这种安装处理是2.6版本的
# wget https://bootstrap.pypa.io/ez_setup.py --no-check-certificate //下载一个ez_setup 安装pip2.7版本的
# python2.7 ez_setup.py
# easy_install-2.7 pip
# pip2.7 install MySQL-python
# yum install mysql-devel //如果报错看看是不是缺失mysql-devel包。
# pip2.7 install flask_wtf
# pip2.7 install flask-script
# pip2.7 install flask-debugtoolbar
安装步骤:
# unzip inception_web-master.zip
# cd inception_web-master
# vim inception.py //修改配置文件
# ./run.py runserver --host 0.0.0.0 //启动服务
配置文件信息如下:
[root@localhost inception_web-master]# cat /root/inception_web-master/app/inception.py
#coding=utf-8
import MySQLdb
def table_structure(mysql_structure):
sql1='/*--user=wwn;--password=123456;--host=192.168.8.97;--execute=1;--port=3306;*/\
inception_magic_start;\
use wwn;' //此处数据库是图形界面框中选择的数据,不然只写create table会报错提示要选择数据库。
sql2='inception_magic_commit;'
sql = sql1 + mysql_structure + sql2
try:
conn=MySQLdb.connect(host='127.0.0.1',user='wwn',passwd='123456',db='wwn',port=6669,use_unicode=True, charset="utf8")
cur=conn.cursor()
ret=cur.execute(sql)
result=cur.fetchall()
num_fields = len(cur.description)
field_names = [i[0] for i in cur.description]
print field_names
for row in result:
print row[0], "|",row[1],"|",row[2],"|",row[3],"|",row[4],"|",row[5],"|",row[6],"|",row[7],"|",row[8],"|",row[9],"|",row[10]
cur.close()
conn.close()
except MySQLdb.Error,e:
print "Mysql Error %d: %s" % (e.args[0], e.args[1])
return result[1][4].split("\n")
