LAMP环境搭建Wordpress
环境准备
apr-util-1.5.2.tar.bz2
apr-1.5.2.tar.bz2
httpd-2.4.27.tar.bz2
mariadb-10.2.8-linux-x86_64.tar.gz
php-7.1.7.tar.bz2
wordpress-4.8-zh_CN.tar.gz
apr、apr-util介绍
APR(Apache portable Run-time libraries,Apache可移植运行库) 主要为上层的应用程序提供一个可以跨越多操作系统平台使用的底层支持接口库。在早期的Apache版本中,应用程序本身必须能够处理各种具体操作系统平台的细节,并针对不同的平台调用不同的处理函数。
随着Apache的进一步开发,Apache组织决定将这些通用的函数独立出来并发展成为一个新的项目。这样,APR的开发就从Apache中独立出来,Apache仅仅是使用 APR而已。目前APR主要还是由Apache使用,由于APR的较好的移植性,因此一些需要进行移植的C程序也开始使用APR,开源项目比如用于服务器压力测试的Flood loader tester,该项目不仅仅适用于Apache,详情可查看这个连接 http://httpd.apache.org/test/flood
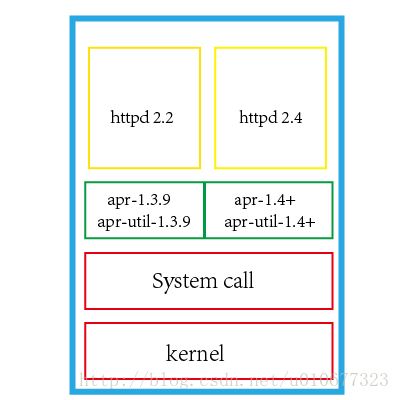
如果对APR起到了什么作用还是不清楚的话,可以根据上面的图来理解。其实APR就是解决了应用与系统调用之间的衔接问题,避免了Linux 开发一套应用程序,windows 开发一套程序。现在,有APR,并开放了统一的接口,只要应用满足这个接口标准就可以了,至于如何去进行系统调用,则是由APR来实现。
根据我们上面的示意图,我们看出,httpd 2.2 的运行,是运行在 apr 1.3.9 的基础之上的。而 httd 2.4 则是运行在 apr 1.4+ 之上的。而centos 6 默认的版本是 apr-1.3.9,apr-util-1.3.9,所以我们在使用yum 安装httpd的时候,一般都是httd 2.2 的版本。 但是,如果因为实际生产,我们需要在CentOS 6 平台上安装httpd 2.4版本的话,应该如何做呢?其实也很简单,我们将apr 也重新编译安装一下,就可以解决这个问题
上面图片和部分内容是借鉴的,源地址:在CentOS6上编译安装http2.4
httpd(apache)
Apache HTTP Server(简称Apache)是Apache软件基金会的一个开放源码的网页服务器,可以在大多数计算机操作系统中运行,由于其多平台和安全性被广泛使用,是最流行的Web服务器端软件之一。它快速、可靠并且可通过简单的API扩展,将Perl/Python等解释器编译到服务器中。Apache百科
编译安装httpd(这里顺便连apr和apr-util一起安装)
软件下载地址:
apr-1.5.2.tar.bz2
apr-util-1.5.2.tar.bz2
httpd-2.4.27.tar.bz2
解压包:
[ root@localhost /usr/local/src]#tar xf apr-1.5.2.tar.gz
[ root@localhost /usr/local/src]#tar xf apr-util-1.5.2.tar.gz
[ root@localhost /usr/local/src]#tar  xf httpd-2.4.27.tar.bz2

#注意:解压如果出错一般都是解压命令没安装,如下:
[ root@localhost /usr/local/src]#tar  xf httpd-2.4.27.tar.bz2
tar (child): lbzip2: Cannot exec: No such file or directory
tar (child): Error is not recoverable: exiting now
tar: Child returned status 2
tar: Error is not recoverable: exiting now

解决方法:安装bzip2即可
[ root@localhost /usr/local/src]#yum -y install bzip2
编译安装httpd,安装一些依赖包和软件
[ root@localhost /usr/local/src]#yum -y groupinstall "Development Tools"
[ root@localhost /usr/local/src]#yum -y install pcre-devel
[ root@localhost /usr/local/src]#yum -y install openssl-devel
[ root@localhost /usr/local/src]#yum -y install mod_ssl
#以上安装的编译时需要的环境
[ root@localhost /usr/local/src]#mv apr-1.5.2 httpd-2.4.27/srclib/apr
[ root@localhost /usr/local/src]#mv apr-util-1.5.2 httpd-2.4.27/srclib/apr-util
[ root@localhost /usr/local/src]cd  httpd-2.4.27
[ root@localhost /usr/local/src/httpd-2.4.27]#./configure  --prefix=/software/apache2 --enable-so --enable-ssl --enable-cgi --enable-rewrite --with-zlib --with-pcre --with-included-apr --enable-modules=most --enable-mpms-shared=all --with-mpm=prefork
[ root@localhost /usr/local/src/httpd-2.4.27]#make -j 4 && make install
设置环境变量
[ root@localhost /software/apache2]#vim /etc/profile.d/httpd.sh
PATH=/software/apache2/bin:$PATH
[ root@localhost /software/apache2]#. /etc/profile.d/httpd.sh
启动apache
[ root@localhost /software/apache2]#apachectl start
AH00558: httpd: Could not reliably determine the server's fully qualified domain name, using localhost.localdomain. Set the 'ServerName' directive globally to suppress this message'
#启动时报错,但还是正常启动
解决方法:
[ root@localhost /software/apache2]#vim conf/httpd.conf
#搜索ServerName
#ServerName www.example.com:80
#修改成
ServerName localhost:80
#保存,以后再次启动就不会再报错(以后启动直接输入apachectl start即可)
Mariadb
MariaDB数据库管理系统是MySQL的一个分支,主要由开源社区在维护,采用GPL授权许可 MariaDB的目的是完全兼容MySQL,包括API和命令行,使之能轻松成为MySQL的代替品。在存储引擎方面,使用XtraDB(英语:XtraDB)来代替MySQL的InnoDB。 MariaDB由MySQL的创始人Michael Widenius(英语:Michael Widenius)主导开发,他早前曾以10亿美元的价格,将自己创建的公司MySQL AB卖给了SUN,此后,随着SUN被甲骨文收购,MySQL的所有权也落入Oracle的手中。MariaDB名称来自Michael Widenius的女儿Maria的名字。Mariadb百科
二进制安装Mariadb
软件下载地址:Mariadb
[ root@localhost /software/apache2]#useradd  -r mysql -s /sbin/nologin -d /software/mysqldb -m
#创建Mysql账号

[ root@localhost ~]#tar xf mariadb-galera-5.5.43-linux-x86_64.tar.gz -C /usr/local
[ root@localhost ~]#ln -sv mariadb-galera-5.5.43-linux-x86_64 mysql
#因为是二进制安装,安装包里面设置的时候安装目录是/usr/local/mysql,所以得创建个软连接或者解压后直接改名为Mysql也行

[ root@localhost ~]#chown -R root:mysql ./*
#更改属组为mysql

[ root@localhost /usr/local/mysql]#scripts/mysql_install_db  --user=mysql --datadir=/software/mariadb
#创建数据库

[ root@localhost /software/mariadb]#mkdir /var/log/mariadb
[ root@localhost /software/mariadb]#touch /var/log/mariadb/mariadb.log
#创建日志目录和日志文件

[ root@localhost /usr/local/mysql/support-files]#cp my-medium.cnf  /etc/my.cnf

cp: overwrite ‘/etc/my.cnf’? y
[ root@localhost /usr/local/mysql/support-files]#vim /etc/my.cnf

#编辑配置文件,添加如下几行
datadir = /software/mariadb/
#指定数据库路径,不然无法启动mysql

innodb_file_per_table = on
#设置后当创建数据库的表的时候表文件都会分离开,方便复制表,不开启创建的表都在一个文件

skip_name_resolve = on
#跳过名称反解,Mysql每次使用客户端链接时都会把ip地址反解成主机名

[ root@localhost /usr/local/mysql/support-files ]# cp mysql.server  /etc/rc.d/init.d/mysqld
#拷贝启动脚本

[ root@localhost /usr/local/mysql/support-files]#service  mysqld start
Reloading systemd:                                         [  OK  ]
Starting mysqld (via systemctl):                           [  OK  ]
#启动Mysql

[ root@localhost /usr/local/mysql]#./bin/mysql_secure_installation
#初始化Mysql设置(前提得先开启mysql服务):

NOTE: RUNNING ALL PARTS OF THIS SCRIPT IS RECOMMENDED FOR ALL MariaDB
      SERVERS IN PRODUCTION USE!  PLEASE READ EACH STEP CAREFULLY!

In order to log into MariaDB to secure it, we'll need the current
password for the root user.  If you've just installed MariaDB, and
you haven't set the root password yet, the password will be blank,
so you should just press enter here.

Enter current password for root (enter for none):     #回车
OK, successfully used password, moving on...

Setting the root password ensures that nobody can log into the MariaDB
root user without the proper authorisation.

Set root password? [Y/n] y  #是否设置root密码
New password:
Re-enter new password:
Password updated successfully!
Reloading privilege tables..
 ... Success!


By default, a MariaDB installation has an anonymous user, allowing anyone
to log into MariaDB without having to have a user account created for
them.  This is intended only for testing, and to make the installation
go a bit smoother.  You should remove them before moving into a
production environment.

Remove anonymous users? [Y/n]    #删除匿名账号
 ... Success!

Normally, root should only be allowed to connect from 'localhost'.  This
ensures that someone cannot guess at the root password from the network.

Disallow root login remotely? [Y/n]   #是否禁止root账号远程登录,生产环境中一定要禁止
 ... Success!

By default, MariaDB comes with a database named 'test' that anyone can
access.  This is also intended only for testing, and should be removed
before moving into a production environment.

Remove test database and access to it? [Y/n] y    #是否清除测试数据库
 - Dropping test database...
 ... Success!
 - Removing privileges on test database...
 ... Success!

Reloading the privilege tables will ensure that all changes made so far
will take effect immediately.

Reload privilege tables now? [Y/n] y  #重载
 ... Success!

Cleaning up...

All done!  If you've completed all of the above steps, your MariaDB
installation should now be secure.

Thanks for using MariaDB!
测试登录Mysql数据库:
 [root@localhost ~]#vim /etc/profile.d/mysql.sh
PATH=/usr/local/mysql/bin:$PATH
#设置环境变量方便使用
[ root@localhost ~]#mysql -u root -p
Enter password:
Welcome to the MariaDB monitor.  Commands end with ; or \g.
Your MariaDB connection id is 15
Server version: 10.2.8-MariaDB-log MariaDB Server

Copyright (c) 2000, 2017, Oracle, MariaDB Corporation Ab and others.

Type 'help;' or '\h' for help. Type '\c' to clear the current input statement.

MariaDB [(none)]>
#登录成功
PHP
PHP(外文名:PHP: Hypertext Preprocessor,中文名:“超文本预处理器”)是一种通用开源脚本语言。语法吸收了C语言、Java和Perl的特点,利于学习,使用广泛,主要适用于Web开发领域。PHP 独特的语法混合了C、Java、Perl以及PHP自创的语法。它可以比CGI或者Perl更快速地执行动态网页。用PHP做出的动态页面与其他的编程语言相比,PHP是将程序嵌入到HTML(标准通用标记语言下的一个应用)文档中去执行,执行效率比完全生成HTML标记的CGI要高许多;PHP还可以执行编译后代码,编译可以达到加密和优化代码运行,使代码运行更快。PHP百科
软件下载地址:PHP
编译安装
[ root@localhost /usr/local/src]# yum -y install bzip2-devel
[ root@localhost /usr/local/src]# yum -y install libmcrypt-devel
[ root@localhost /usr/local/src]#yum -y install libxml2-devel
#以上安装的是依赖环境和包
[ root@localhost /usr/local/src]# tar xf php-7.1.7.tar.bz2
[ root@localhost /usr/local/src]# cd php-7.1.7
[ root@localhost /usr/local/src/php-7.1.7]# ./configure  --prefix=/software/php -enable-mysqlnd --with-mysqli=mysqlnd --with-openssl -enable-mbstring --with-png-dir --with-jpeg-dir --with-freetype-dir --with-zlib --with-libxml-dir=/usr --enable-xml --enable-sockets --with-apxs2=/software/apache2/bin/apxs --with-mcrypt --with-config-file-path=/etc --with-config-file-scan-dir=/etc/php.d --with-bz2
[ root@localhost /usr/local/src/php-7.1.7]# make -j 4 && make install
#编译安装,时间会有点久
设置php解析
[ root@localhost /usr/local/src/php-7.1.7]#vim /software/apache2/conf/httpd.conf
#搜索AddType,添加一行
AddType application/x-httpd-php .php
#在搜索index.html,在后面添加

    DirectoryIndex index.html index.php

#保存退出
测试解析
[ root@localhost /software/apache2/htdocs]#vim 1.php

#htdocs:apache默认网站文件目录
[ root@localhost /software/apache2/htdocs]#apachectl  restart
#重启apache服务
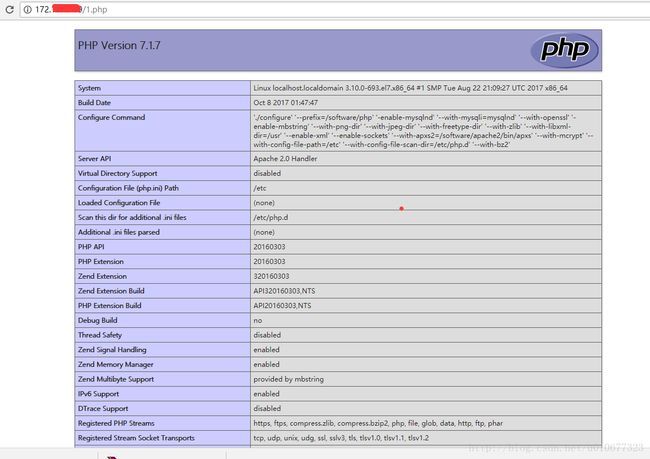
访问查看:
Wordpress
WordPress是使用PHP语言开发的博客平台,用户可以在支持PHP和MySQL数据库的服务器上架设属于自己的网站。也可以把 WordPress当作一个内容管理系统(CMS)来使用。
WordPress是一款个人博客系统,并逐步演化成一款内容管理系统软件,它是使用PHP语言和MySQL数据库开发的。用户可以在支持 PHP 和 MySQL数据库的服务器上使用自己的博客。Wordpress百科
软件下载地址:wordpress
搭建准备:创建网站数据库
[ root@localhost /software/apache2/htdocs]#mysql -uroot -p
Enter password:
Welcome to the MariaDB monitor.  Commands end with ; or \g.
Your MariaDB connection id is 16
Server version: 10.2.8-MariaDB-log MariaDB Server

Copyright (c) 2000, 2017, Oracle, MariaDB Corporation Ab and others.

Type 'help;' or '\h' for help. Type '\c' to clear the current input statement.

MariaDB [(none)]>
  riaDB [(none)]> create database wordpress;
uery OK, 1 row affected (0.01 sec)

MariaDB [(none)]> grant all on wordpress.* to 'yyc'@'localhost' identified by '123';
Query OK, 0 rows affected (0.00 sec)

MariaDB [(none)]> exit
Bye
#创建wordpress(网站数据库),并且创建账号为yyc
[ root@localhost /usr/local/src]#tar xf wordpress-4.8-zh_CN.tar.gz
#解压
[ root@localhost /usr/local/src]#mv wordpress/* /software/apache2/htdocs
#把wordpress内所有文件移动到站点目录下
[ root@localhost /software/apache2]#ps aux|grep httpd
daemon 29568 0.0 0.3 236820 4828 ? S 02:09 0:00 /software/apache2/bin/httpd -k start
daemon 29569 0.0 0.3 236820 4828 ? S 02:09 0:00 /software/apache2/bin/httpd -k start
daemon 29570 0.0 0.3 236820 4828 ? S 02:09 0:00 /software/apache2/bin/httpd -k start
daemon 29571 0.0 0.3 236820 4828 ? S 02:09 0:00 /software/apache2/bin/httpd -k start
daemon 29572 0.0 0.4 236820 5524 ? S 02:09 0:00 /software/apache2/bin/httpd -k start
daemon 29573 0.0 0.3 236820 4828 ? S 02:09 0:00 /software/apache2/bin/httpd -k start
root 29577 0.0 0.0 112660 968 pts/0 R+ 02:10 0:00 grep --color=auto httpd
root 54690 0.0 0.7 236688 9616 ? Ss 00:52 0:00 /software/apache2/bin/httpd -k start
#查看Httpd运行者身份
[ root@localhost /software/apache2]#chown -R daemon htdocs/*
#设置httpd站点目录下所有文件权限都为daemon(httpd服务运行者)
root@localhost /software/apache2/htdocs]#vim wp-config-sample.php
96%E8%BE%91_wp-config.php
*
* @package WordPress
*/
// ** MySQL 设置 - 具体信息来自您正在使用的主机 ** //
/** WordPress数据库的名称 */
define('DB_NAME', 'wordpress');
/** MySQL数据库用户名 */
define('DB_USER', 'yyc');
/** MySQL数据库密码 */
define('DB_PASSWORD', '123');
/** MySQL主机 */
define('DB_HOST', 'localhost');
/** 创建数据表时默认的文字编码 */
define('DB_CHARSET', 'utf8');
/** 数据库整理类型。如不确定请勿更改 */
define('DB_COLLATE', '');
/**#@+
* 身份认证密钥与盐。
*
* 修改为任意独一无二的字串!
* 或者直接访问{@link https://api.wordpress.org/secret-key/1.1/salt/
* WordPress.org密钥生成服务}
* 任何修改都会导致所有cookies失效,所有用户将必须重新登录。
*
"wp-config-sample.php" [dos] 96L, 2901C written
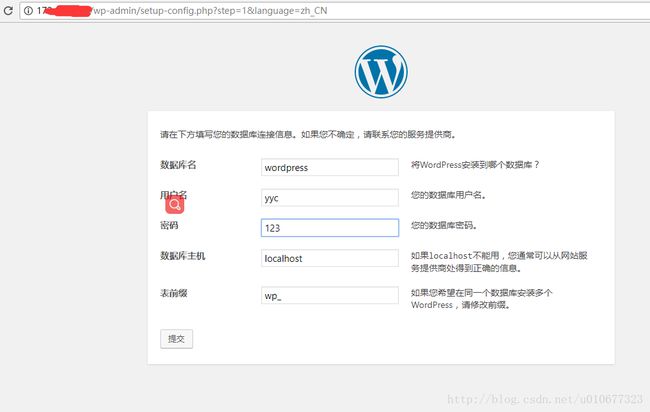
#编辑wordpress站点配置文件,对应写上数据库名称、账号、密码
[ root@localhost /software/apache2]#apachectl restart
#重启服务


