Unity中关于场景漫游的两个方法(二)
第二个方法不仅不需要借助漫游插件实现漫游效果,而且还可以实现对物体的抓取,比第一种方法更加方便快捷。废话不多说,下面进入正题:
导入steamVR Plugin插件
steamVR Plugin可以直接从Asset Store中导入。
将预制体SteamVR 和 CameraRig拖入场景中,删除主摄像机。
实现抓取物体
在结构视图中选中两个手柄,并为其添加Rigidbody和Box Colider
Rigidbody(勾选 is kimematic,不勾选 use Gravity),Box Colider中勾选is trigger 并修改触发器位置和大小
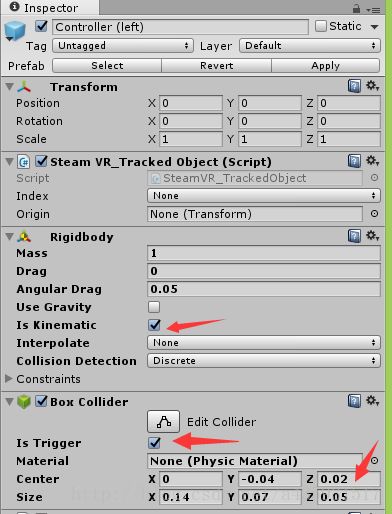
在左右手柄添加ControllerGrabObject.cs脚本
using System.Collections;
using System.Collections.Generic;
using UnityEngine;

public class ControllerGrabObject : MonoBehaviour {


    private SteamVR_TrackedObject trackedObj;
    private GameObject collidingObject;
    private GameObject objectInHand;

    private SteamVR_Controller.Device Controller
    {
        get{ return SteamVR_Controller.Input ((int)trackedObj.index);}
    }


    void Awake()
    {
        trackedObj = GetComponent ();
    }

    private void SetCollidingObject(Collider col){
        if (collidingObject || !col.GetComponent ()) {
            return;
        }
        collidingObject = col.gameObject;
    }

    public void OnTriggerEnter(Collider other){
        SetCollidingObject (other);
    }

    public void OnTriggerStay(Collider other){
        SetCollidingObject (other);
    }

    public void OnTriggerExit(Collider other){
        if (!collidingObject) {
            return;
        }
        collidingObject = null;
    }

    private void GrabObject(){
        objectInHand = collidingObject;
        collidingObject = null;
        var joint = AddFixedJoint ();
        joint.connectedBody = objectInHand.GetComponent ();
    }

    private FixedJoint AddFixedJoint(){
        FixedJoint fx = gameObject.AddComponent ();
        fx.breakForce = 20000;
        fx.breakTorque = 20000;
        return fx;
    }

    private void ReleaseObject(){
        if (GetComponent ()) {
            GetComponent ().connectedBody = null;
            Destroy (GetComponent());

            objectInHand.GetComponent ().velocity = Controller.velocity;
            objectInHand.GetComponent ().angularVelocity = Controller.angularVelocity;
        }

        objectInHand = null;
    }

    // Update is called once per frame
    void Update () {

        if (Controller.GetHairTriggerDown ()) {
            if (collidingObject) {
                GrabObject ();
            }
        }

        if (Controller.GetHairTriggerUp ()) {
            if (objectInHand) {
                ReleaseObject ();
            }
        }

    }
}
为被抓取的物体添加Rigidbody和Box Colider 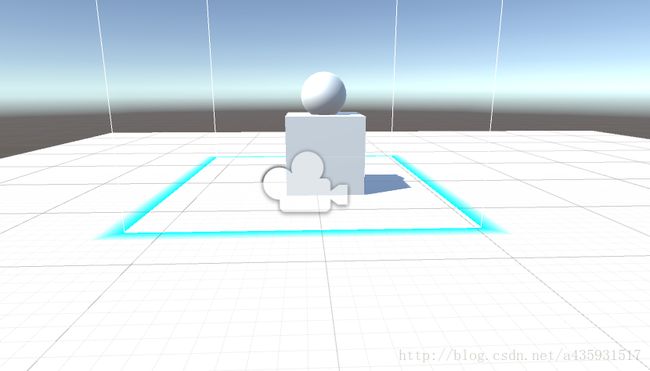
这里是让球具有物理属性,可以被抓取。若想让球具有弹性,则可新建一个Physic Material ,并设置其弹性 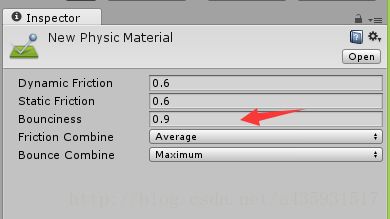
Dynamic Friction 动态摩擦力
Static Friction 静态摩擦力
Bounciness 弹力
Friction Combine 摩擦力组合方式
Bounce Combine 反弹组合
然后把Physic Material 添加到球的Material上 就可以把球抓起来扔地上产生反弹了
让手柄发射一道激光实现漫游,指哪去哪
1 首先 我们需要 构建一个cube(Laser) 位置和大小分别为 
去掉碰撞器colider 材质改为红色(shader:unlit/color)不反光 然后将这个cube 作为预制体。
2 然后创建一个Cylinder(TeleporterReticle) 将大小改为(1,0.0001,1)并为其添加一个圆环材质,然后将其作为预制体,这样我们把激光和圆环做好了。
3 选中两个手柄,为两个手柄添加脚本LaserPointer.cs
using System.Collections;
using System.Collections.Generic;
using UnityEngine;

public class LaserPointer : MonoBehaviour {

    private SteamVR_TrackedObject trackedObj;
    public GameObject laserPrefab;
    private GameObject laser;
    private Transform laserTransform;
    private Vector3 hitPoint;

    public Transform cameraRigTransform;
    public GameObject teleportReticlePrefab;
    private GameObject reticle;
    private Transform teleportReticleTransform;
    public Transform headTransform;
    public Vector3 teleportReticleOffset;
    public LayerMask teleportMask;
    private bool shouldTeleport;

    private SteamVR_Controller.Device Controller{
        get{ return SteamVR_Controller.Input ((int)trackedObj.index);}
    }

    void Awake(){
        trackedObj = GetComponent ();
    }

    private void ShowLaser(RaycastHit hit){
        laser.SetActive (true);
        laserTransform.position = Vector3.Lerp (trackedObj.transform.position,hitPoint,0.5f);
        laserTransform.LookAt (hitPoint);
        laserTransform.localScale = new Vector3 (laserTransform.localScale.x,laserTransform.localScale.y,hit.distance);
    }

    // Use this for initialization
    void Start () {
        laser = Instantiate (laserPrefab);
        laserTransform = laser.transform;

        reticle = Instantiate (teleportReticlePrefab);
        teleportReticleTransform = reticle.transform;
    }

    // Update is called once per frame
    void Update () {
        if (Controller.GetPress (SteamVR_Controller.ButtonMask.Touchpad)) {
            RaycastHit hit;
            if (Physics.Raycast (trackedObj.transform.position, transform.forward, out hit, 100,teleportMask)) {
                hitPoint = hit.point;
                ShowLaser (hit);

                reticle.SetActive (true);
                teleportReticleTransform.position = hitPoint + teleportReticleOffset;
                shouldTeleport = true;
            }
        } else {
            laser.SetActive (false);
            reticle.SetActive (false);
        }

        if (Controller.GetPressUp (SteamVR_Controller.ButtonMask.Touchpad) && shouldTeleport) {
            Teleport ();
        }

    }

    private void Teleport(){
        shouldTeleport = false;
        reticle.SetActive (false);
        Vector3 difference = cameraRigTransform.position - headTransform.position;
        difference.y = 0;
        cameraRigTransform.position = hitPoint + difference;
    }

}
然后将之前做好的两个预制体和CameraRig以及Camera (head)拖入相应的参数位置,并设置Teleport Mask 为你当前的layer
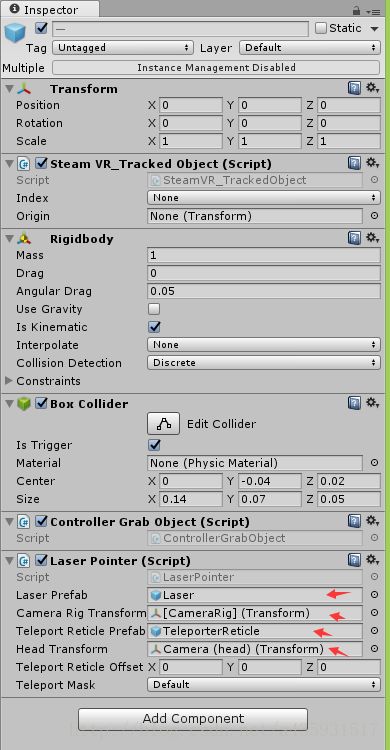
运行场景就可以实现手柄在当前层随处漫游。
结合之前的方法,实现将远处的物体拉到眼前
1 这里用到了 手柄后面的Grip键 ,重新创建一个cube(Laser2)修改一下颜色作为预制体Laser2
2 添加 拉物体的脚本SnapTest.cs
using System.Collections;
using System.Collections.Generic;
using UnityEngine;

public class SnapTest : MonoBehaviour {

    private SteamVR_TrackedObject trackedObj;
    public GameObject laserPrefab;
    private GameObject laser;
    private Transform laserTransform;
    private Vector3 hitPoint;

    private Vector3 tran=Vector3.zero;
    private Quaternion roa ;
    private bool f=false;
    private GameObject obj;

    public Transform headTransform;
    public LayerMask SelectMask;


    private SteamVR_Controller.Device Controller{
        get{ return SteamVR_Controller.Input ((int)trackedObj.index);}
    }

    void Awake(){
        trackedObj = GetComponent ();
    }

    private void ShowLaser(RaycastHit hit){
        laser.SetActive (true);
        laserTransform.position = Vector3.Lerp (trackedObj.transform.position,hitPoint,0.5f);
        laserTransform.LookAt (hitPoint);
        laserTransform.localScale = new Vector3 (laserTransform.localScale.x,laserTransform.localScale.y,hit.distance);
    }

    // Use this for initialization
    void Start () {
        laser = Instantiate (laserPrefab);
        laserTransform = laser.transform;
        laser.gameObject.transform.parent = this.transform;
    }

    // Update is called once per frame
    void Update () {
        if (Controller.GetPressDown (SteamVR_Controller.ButtonMask.Grip)) {
            RaycastHit hit;
            if (Physics.Raycast (trackedObj.transform.position, transform.forward, out hit, 100,SelectMask)) {
                hitPoint = hit.point;
                ShowLaser (hit);
                f = !f;
                if (f)
                {
                    obj = hit.transform.gameObject;
                    tran = obj.transform.position;
                    roa = obj.transform.rotation;
                }

            }
        }

         if (Controller.GetPressUp (SteamVR_Controller.ButtonMask.Grip) &&f&&obj) {
            Vector3 pos= headTransform.position;
            pos.z = pos.z + 2.0f;
            obj.transform.position = pos;
            laser.SetActive(false);
        }

         if (Controller.GetPressUp (SteamVR_Controller.ButtonMask.Grip) &&!f&&obj) {
            obj.transform.position = tran;
            obj.transform.rotation = roa;
            obj = null;
            laser.SetActive(false);
        }
         if (obj) {
             obj.transform.Rotate(0, 1.5f, 0);
         }


    }

}
将SnapTest.cs拖到左右手柄之上,然后将两个预制体拖入脚本之上。注意,这里的select mask 选的层(layer)是cube物体所在的层(layer),也要为物体添加colider属性。 
运行场景 按Grip键 选中物体按下就可将物体拉到眼前 再按就会回到远处 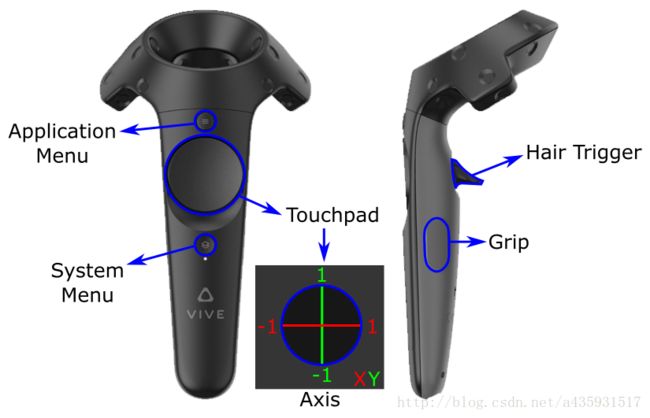
选中物体 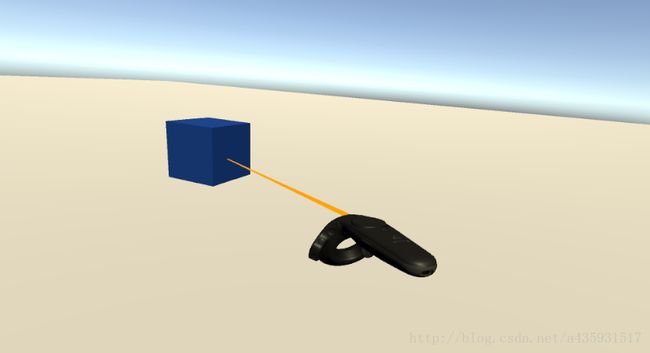
拉到近处 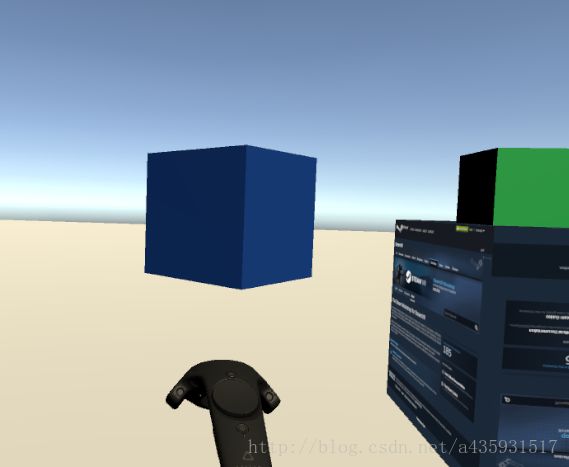
打完收工!
注: 抓取物体和漫游的具体代码含义可以参考这篇博客