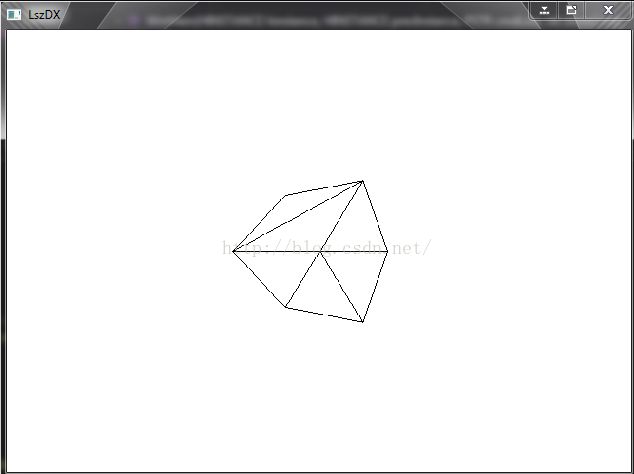
DirectX学习笔记(三):利用线框模式绘制可旋转的正方体
前言:
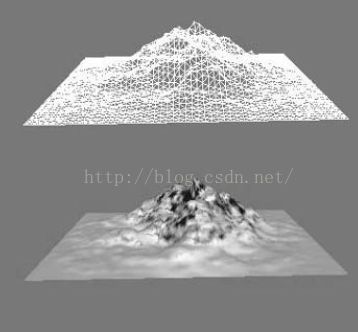
一个场景中,任何物体都可以用三角形网格来逼近表示。也就是说,三角形网格是构成物体模型的基本单元。
如图:
利用线框模式绘制可旋转的正方体的具体操作:
1.顶点缓存和索引缓存:
一个多边形中相邻的交汇点称为顶点,描述三角形单元时,我们需要指定该三角形3个顶点的位置。那么如果我们要通过三角形单元来描述一个物体,就需要指定构成该物体的三角形单元。但是要知道的是,在构成一个3D物体时,三角形单元之间会存在很多的公共顶点。如果模型的复杂度特别高,那么顶点的重复会更多。比如说:一个正方体,如果用简单的三角形构成,需要12个三角形,如果分开来算,需要36个顶点。但是实际上一个正方体只需要8个顶点。那么在Direct3D中使用了顶点缓存和索引缓存来处理这种情况。
如:对于一个立方体:
我们利用顶点缓存,来存储这8个顶点并对顶点进行编号,然后利用索引缓存来记录每个三角形都使用了哪些顶点:
Vertex vertexList[8] = { 0, 1, 2, 3 ,4,5,6,7};
WORD IndexList[6] = {0,1,2  //三角形0
                     0,2,3//三角形1
}
代码实现:
我们利用IDirect3DDevice9::CreateVertexBuffer(...)和IDirect3DDevice9::CreateIndexBuffer(...)来分别创建顶点缓存和索引缓存。那么如何来写入数据呢?
为了能够访问顶端缓存和索引缓存的数据,需要获得指向该缓存内部的指针,然后通过Lock(...)获取指向缓存内容的指针,进行锁定。然后进行读取或写入,但是要注意:当访问结束后需要利用Unlock()方法进行解锁。
  //创建顶点缓存和索引缓存
	Device->CreateVertexBuffer(8 * sizeof(Vertex),D3DUSAGE_WRITEONLY,Vertex::FVF,D3DPOOL_MANAGED,&VB,0);
	Device->CreateIndexBuffer(36 * sizeof(WORD),D3DUSAGE_WRITEONLY,D3DFMT_INDEX16,D3DPOOL_MANAGED,&IB,0);

	//访问顶点缓存,将Cube顶点数据写入
	Vertex* vertices;
	VB->Lock(0, 0, (void**)&vertices, 0);
	vertices[0] = Vertex(-1.0f, -1.0f, -1.0f);
	vertices[1] = Vertex(-1.0f, 1.0f, -1.0f);
	vertices[2] = Vertex(1.0f, 1.0f, -1.0f);
	vertices[3] = Vertex(1.0f, -1.0f, -1.0f);
	vertices[4] = Vertex(-1.0f, -1.0f, 1.0f);
	vertices[5] = Vertex(-1.0f, 1.0f, 1.0f);
	vertices[6] = Vertex(1.0f, 1.0f, 1.0f);
	vertices[7] = Vertex(1.0f, -1.0f, 1.0f);
	VB->Unlock();

	//访问索引缓存,将三角形单元的顶点构成数据写入
	WORD* indices = 0;
	IB->Lock(0, 0, (void**)&indices, 0);

	// front side
	indices[0] = 0; indices[1] = 1; indices[2] = 2;
	indices[3] = 0; indices[4] = 2; indices[5] = 3;

	// back side
	indices[6] = 4; indices[7] = 6; indices[8] = 5;
	indices[9] = 4; indices[10] = 7; indices[11] = 6;

	// left side
	indices[12] = 4; indices[13] = 5; indices[14] = 1;
	indices[15] = 4; indices[16] = 1; indices[17] = 0;

	// right side
	indices[18] = 3; indices[19] = 2; indices[20] = 6;
	indices[21] = 3; indices[22] = 6; indices[23] = 7;

	// top
	indices[24] = 1; indices[25] = 5; indices[26] = 6;
	indices[27] = 1; indices[28] = 6; indices[29] = 2;

	// bottom
	indices[30] = 4; indices[31] = 0; indices[32] = 3;
	indices[33] = 4; indices[34] = 3; indices[35] = 7;

	IB->Unlock();
2.取景变换:
在当摄像机的位置和朝向任意时,进行一些操作会造成效率低下很是麻烦。为了简化运算,我们将摄像机变换到世界坐标系的原点,并旋转摄像机使其光轴与世界坐标系的z轴朝向一致。要特别注意的是,世界中的所有物体都会随之摄像机变换,以保证摄像机的视场恒定。
我们先使用D3DXMatrixLookAtLH(...)函数来获取一个取景变换矩阵,然后利用::SetTransform(..)方法设定:
//取景变换
	D3DXVECTOR3 position(0.0f, 0.0f, -5.0f);
	D3DXVECTOR3 target(0.0f, 0.0f, 0.0f);
	D3DXVECTOR3 up(0.0f, 1.0f, 0.0f);
	D3DXMATRIX V;
	D3DXMatrixLookAtLH(&V, &position, &target, &up);

	Device->SetTransform(D3DTS_VIEW, &V);
3.投影:
Cube 作为一个3D物体,如何在3D平面中显示?这需要用到投影(投影:从n维变换到n-1 维的过程).
我们利用::D3DXMatrixPerspectiveFovLH(...)来创建一个投影矩阵,然后利用::SetTransform(...)方法来实现该投影变换矩阵的应用:
//投影变换
	D3DXMATRIX proj;
	D3DXMatrixPerspectiveFovLH(&proj,D3DX_PI * 0.5f, (float)Width / (float)Height,1.0f,1000.0f);
	Device->SetTransform(D3DTS_PROJECTION, &proj);
4.绘制状态:
Direct3D中封装了很多绘制状态,这些绘制状态将影响几何体的绘制方式。我们使用::SetRenderState(...)函数来设置绘制状态。
因为我们要利用线框模式进行绘制,于是我们这样设置:
//设置绘制状态
	Device->SetRenderState(D3DRS_FILLMODE, D3DFILL_WIREFRAME);
5.利用::DrawIndexedPrimitive(..)进行Cube的绘制:
函数声明:
HRESULT DrawIndexedPrimitive(
	D3DPRIMITIVETYPE Type,
	UINT MinIndex,
	UINT NumVertices,
	UINT StartIndex,
UINT PrimitiveCount);INT BaseVertexIndex-起始顶点索引
UINT MinVertexIndex-最小顶点索引
UINT NumVertices-顶点数量
UINT StartIndex-起始索引
UINT PrimitiveCount-图元数量
要详细了解此函数请点击:点击打开链接
代码实现:
Device->DrawIndexedPrimitive(D3DPT_TRIANGLELIST, 0, 0, 8, 0, 12);6.旋转:
我们利用:D3DXMatrixRotationX(...)和D3DXMatrixRotationY(...)函数来进行旋转功能实现。
D3DXMatrixRotationY 函数 (D3DXMatrixRotationX类似)
创建绕着Y轴旋转矩阵。
定义:
D3DXMATRIX *WINAPI D3DXMatrixRotationY( D3DXMATRIX *pOut,FLOAT Angle);
参数:
pOut 指向D3DXMATRIX 结构的操作结果矩阵。
Angle 绕着Y轴旋转的角度(单位是弧度)。角度计算方法是当朝着旋转轴的原点看去时,顺时针方向为正值。
返回值:
指向D3DXMATRIX 结构的绕着Y轴旋转矩阵。
代码实现:
D3DXMATRIX Rx, Ry;
	D3DXMatrixRotationX(&Rx, 3.14f / 4.0f);//先绕X轴旋转45度
	static float y = 0.0f;
	D3DXMatrixRotationY(&Ry, y);//然后在每帧绘制的时候Y轴都会均匀变化,达到旋转目的
	y += 0.0001f;
	if (y >= 6.28f)
	y = 0.0f;
	D3DXMATRIX p = Rx * Ry; //利用矩阵相乘计算最后的cube矩阵信息
	Device->SetTransform(D3DTS_WORLD, &p);  //将矩阵变换到世界坐标系
完整代码:(可直接运行):
#include
#include
#include

IDirect3DDevice9* Device = 0; // 一个C++对象,代表了我们用来显示3D图形的物理硬件设备
IDirect3DVertexBuffer9* VB = 0;//顶点缓存
IDirect3DIndexBuffer9*  IB = 0; //索引缓存

const int Width = 640; //窗口的宽度
const int Height = 480; //高度


//-----------------------------顶点结构体----------------------------------
struct Vertex //顶点结构
{
	Vertex(){}
	Vertex(float x, float y, float z)
	{
		_x = x;  _y = y;  _z = z;
	}
	float _x, _y, _z;
	static const DWORD FVF;
};
const DWORD Vertex::FVF = D3DFVF_XYZ;


//------------------------------以下为窗口过程---------------------------------
LRESULT CALLBACK WndProc(HWND hwnd, UINT msg, WPARAM wParam, LPARAM lParam)//窗口过程
{
	switch (msg)
	{
	case WM_DESTROY://销毁
		PostQuitMessage(0); //终止请求
		break;
	}
	//调用缺省的窗口过程来为应用程序没有处理的任何窗口消息提供缺省的处理。
	//该函数确保每一个消息得到处理
	return ::DefWindowProc(hwnd, msg, wParam, lParam);
}


//----------------------------以下为初始化窗口信息---------------------------------
bool InitWindow(HINSTANCE hInstance,HWND &hwnd, int width, int height)
{
	//定义窗口样式
	WNDCLASS wc;
	wc.style = CS_HREDRAW | CS_VREDRAW;
	wc.lpfnWndProc = WndProc;
	wc.cbClsExtra = 0;
	wc.cbWndExtra = 0;
	wc.hInstance = hInstance;
	wc.hIcon = LoadIcon(0, IDI_APPLICATION);
	wc.hCursor = LoadCursor(0, IDC_ARROW);
	wc.hbrBackground = (HBRUSH)GetStockObject(WHITE_BRUSH);
	wc.lpszMenuName = 0;
	wc.lpszClassName = "LszDX";

	//窗口注册
	RegisterClass(&wc);

	//创建窗口
	hwnd = ::CreateWindow("LszDX", "LszDX", WS_OVERLAPPEDWINDOW, 0, 0, width, height, 0, 0, hInstance, 0);

	//绘制更新窗口
	ShowWindow(hwnd, SW_SHOW);
	UpdateWindow(hwnd);
	return true;
}


//----------------------------以下为初始化Direct3D----------------------------------------
//注意函数的hwnd为传引用
bool InitD3D(HINSTANCE hInstance,HWND &hwnd,int width, int height,bool windowed,D3DDEVTYPE deviceType,IDirect3DDevice9** device)
{
	//获取IDirect3D9的指针
	IDirect3D9* d3d9 = 0;
	d3d9 = Direct3DCreate9(D3D_SDK_VERSION);

	//检验硬件顶点运算
	D3DCAPS9 caps;
	d3d9->GetDeviceCaps(D3DADAPTER_DEFAULT, deviceType, &caps);

	int vp = 0;
	if (caps.DevCaps & D3DDEVCAPS_HWTRANSFORMANDLIGHT)
		vp = D3DCREATE_HARDWARE_VERTEXPROCESSING;
	else
		vp = D3DCREATE_SOFTWARE_VERTEXPROCESSING;

	//填充D3DPRESENT_PARAMETERS 结构
	D3DPRESENT_PARAMETERS d3dpp;
	d3dpp.BackBufferWidth = width;
	d3dpp.BackBufferHeight = height;
	d3dpp.BackBufferFormat = D3DFMT_A8R8G8B8;
	d3dpp.BackBufferCount = 1;
	d3dpp.MultiSampleType = D3DMULTISAMPLE_NONE;
	d3dpp.MultiSampleQuality = 0;
	d3dpp.SwapEffect = D3DSWAPEFFECT_DISCARD;
	d3dpp.hDeviceWindow = hwnd;
	d3dpp.Windowed = windowed;
	d3dpp.EnableAutoDepthStencil = true;
	d3dpp.AutoDepthStencilFormat = D3DFMT_D24S8;
	d3dpp.Flags = 0;
	d3dpp.FullScreen_RefreshRateInHz = D3DPRESENT_RATE_DEFAULT;
	d3dpp.PresentationInterval = D3DPRESENT_INTERVAL_IMMEDIATE;

	//创建IDirect3DDevice9接口
	d3d9->CreateDevice(	D3DADAPTER_DEFAULT,deviceType,hwnd,vp,&d3dpp,device);
	d3d9->Release();
	return true;
}


//---------------------------以下为Cube输入写入------------------------------------------------
//此函用来处理为了显示Cube所要进行的工作,
//包括:
//创建顶点缓存和索引缓存
//访问缓存内容(修改)
//取景变换
//投影变换
//设置绘制状态
bool InitCube()
{
	//创建顶点缓存和索引缓存
	Device->CreateVertexBuffer(8 * sizeof(Vertex),D3DUSAGE_WRITEONLY,Vertex::FVF,D3DPOOL_MANAGED,&VB,0);
	Device->CreateIndexBuffer(36 * sizeof(WORD),D3DUSAGE_WRITEONLY,D3DFMT_INDEX16,D3DPOOL_MANAGED,&IB,0);

	//访问顶点缓存,将Cube顶点数据写入
	Vertex* vertices;
	VB->Lock(0, 0, (void**)&vertices, 0);
	vertices[0] = Vertex(-1.0f, -1.0f, -1.0f);
	vertices[1] = Vertex(-1.0f, 1.0f, -1.0f);
	vertices[2] = Vertex(1.0f, 1.0f, -1.0f);
	vertices[3] = Vertex(1.0f, -1.0f, -1.0f);
	vertices[4] = Vertex(-1.0f, -1.0f, 1.0f);
	vertices[5] = Vertex(-1.0f, 1.0f, 1.0f);
	vertices[6] = Vertex(1.0f, 1.0f, 1.0f);
	vertices[7] = Vertex(1.0f, -1.0f, 1.0f);
	VB->Unlock();

	//访问索引缓存,将三角形单元的顶点构成数据写入
	WORD* indices = 0;
	IB->Lock(0, 0, (void**)&indices, 0);

	// front side
	indices[0] = 0; indices[1] = 1; indices[2] = 2;
	indices[3] = 0; indices[4] = 2; indices[5] = 3;

	// back side
	indices[6] = 4; indices[7] = 6; indices[8] = 5;
	indices[9] = 4; indices[10] = 7; indices[11] = 6;

	// left side
	indices[12] = 4; indices[13] = 5; indices[14] = 1;
	indices[15] = 4; indices[16] = 1; indices[17] = 0;

	// right side
	indices[18] = 3; indices[19] = 2; indices[20] = 6;
	indices[21] = 3; indices[22] = 6; indices[23] = 7;

	// top
	indices[24] = 1; indices[25] = 5; indices[26] = 6;
	indices[27] = 1; indices[28] = 6; indices[29] = 2;

	// bottom
	indices[30] = 4; indices[31] = 0; indices[32] = 3;
	indices[33] = 4; indices[34] = 3; indices[35] = 7;

	IB->Unlock();

	//取景变换
	D3DXVECTOR3 position(0.0f, 0.0f, -5.0f);
	D3DXVECTOR3 target(0.0f, 0.0f, 0.0f);
	D3DXVECTOR3 up(0.0f, 1.0f, 0.0f);
	D3DXMATRIX V;
	D3DXMatrixLookAtLH(&V, &position, &target, &up);

	Device->SetTransform(D3DTS_VIEW, &V);

	//投影变换
	D3DXMATRIX proj;
	D3DXMatrixPerspectiveFovLH(&proj,D3DX_PI * 0.5f, (float)Width / (float)Height,1.0f,1000.0f);
	Device->SetTransform(D3DTS_PROJECTION, &proj);

	//设置绘制状态
	Device->SetRenderState(D3DRS_FILLMODE, D3DFILL_WIREFRAME);
	return true;
}

//-----------------------以下为对Cube进行绘制-------------------------------------
bool Display()
{
	MSG msg;
	ZeroMemory(&msg, sizeof(MSG));//用0来填充消息可类比为:memset()函数
	while (msg.message != WM_QUIT) //退出
	{
		//PeekMessage函数是以查看的方式从系统中获取消息
		//并将该消息(如果存在)放于指定的结构
		if (PeekMessage(&msg, 0, 0, 0, PM_REMOVE))
		{
			//PM_REMOVE:PeekMessage处理后,消息从队列里除掉。

			    //TranslateMessage函数将虚拟键消息转换为字符消息。
				//字符消息被寄送到调用线程的消息队列里,
				//当下一次线程调用函数GetMessage或PeekMessage时被读出。
				//TranslateMessage只能用于转换调用GetMessage或PeekMessage接收的消息。

			TranslateMessage(&msg);

			//DispatchMessage函数
			//该函数分发一个消息给窗口程序。
			//通常消息从GetMessage函数获得。
			//消息被分发到回调函数(过程函数),作用是消息传递给操作系统,
			//然后操作系统去调用我们的回调函数,也就是说我们在窗体的过程函数中处理消息
			DispatchMessage(&msg);
		}
		else
		{
			if (Device)
			{
				//旋转
				D3DXMATRIX Rx, Ry;
				D3DXMatrixRotationX(&Rx, 3.14f / 4.0f);
				static float y = 0.0f;
				D3DXMatrixRotationY(&Ry, y);
				y += 0.0001f;
				if (y >= 6.28f)
					y = 0.0f;
				D3DXMATRIX p = Rx * Ry;
				Device->SetTransform(D3DTS_WORLD, &p);

				//绘制
				Device->Clear(0, 0, D3DCLEAR_TARGET | D3DCLEAR_ZBUFFER, 0xffffffff, 1.0f, 0);
				Device->BeginScene();

				Device->SetStreamSource(0, VB, 0, sizeof(Vertex));
				Device->SetIndices(IB);
				Device->SetFVF(Vertex::FVF);

				Device->DrawIndexedPrimitive(D3DPT_TRIANGLELIST, 0, 0, 8, 0, 12);

				Device->EndScene();
				Device->Present(0, 0, 0, 0);
			}
		}
	}
	return true;
}


//-------------------------Main函数-----------------------------------------------
int WINAPI WinMain(HINSTANCE hinstance,HINSTANCE prevInstance,PSTR cmdLine,int showCmd)
{
	HWND hwnd =0;

	//1.窗口创建
	InitWindow(hinstance,hwnd, Width, Height);

	//2.初始化Direct3D
	InitD3D(hinstance, hwnd, Width, Height, true, D3DDEVTYPE_HAL, &Device);

	//3.初始化cube信息
	InitCube();

	//4.进行显示绘制
	Display();

	//5.释放指针
	Device->Release();
	VB->Release();
	IB->Release();
	return 0;
} 
