vue项目,使用前端微服务
1、先看最终的实现效果,主项目上的导航栏中的子项目菜单下的所有导航界面,均属于副项目的界面

2、首先我们先新建两个vue项目,例如一个是parent,另一个是child
3、主项目输入命令
vue add vue-cli-plugin-qiankun --type master4、副项目输入命令(记住6070端口是可以自己定义的,后面需要用到这个端口号)
vue add vue-cli-plugin-qiankun --type slave --port 60705、父项目中,我们新建一个child界面,并且将此界面的路由设置为动态路由,如下:
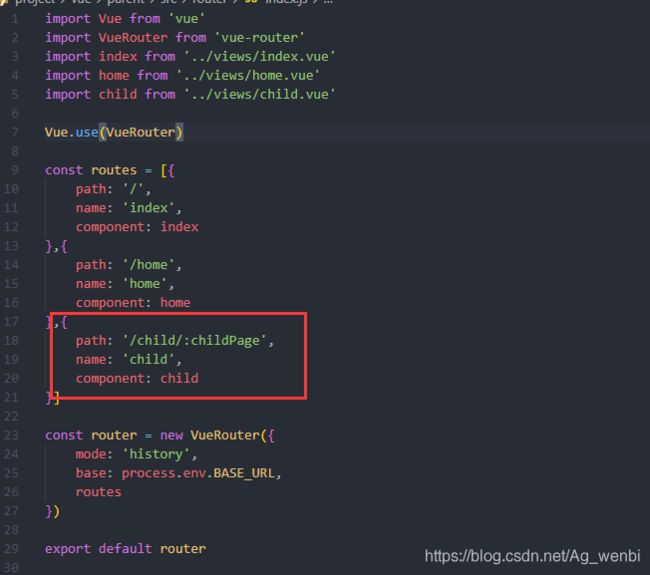
6、设置父项目的child界面
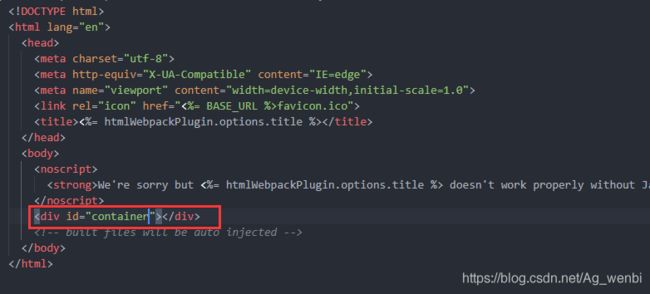
7、更改主项目的vue容器节点id,可根据自身情况修改,位置为别是index.html与app.vue
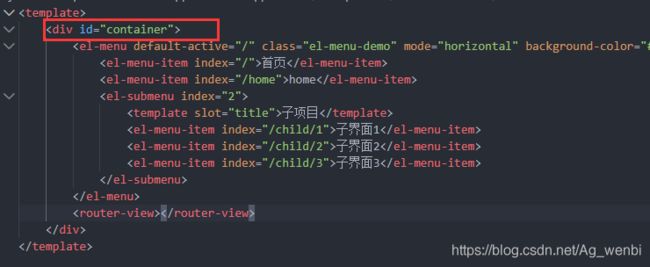
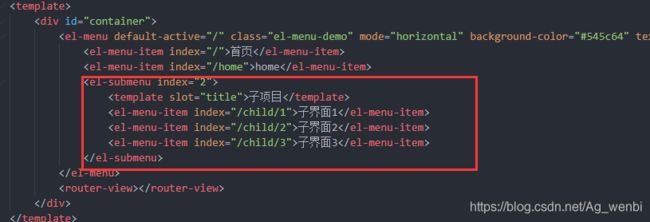
8、设置app.vue的菜单路由,如下,动态路由后的1,2,3对应副项目的路由,后面会讲,暂且主项目设置完成
9、副项目的main.js设置
import Vue from 'vue'
import App from './App.vue'
import router from './router'
import store from './store'
import ElementUI from 'element-ui';
import 'element-ui/lib/theme-chalk/index.css';

Vue.use(ElementUI);
Vue.config.productionTip = false

let instance = null

function render () {
  instance = new Vue({
    router,
    store,
    render: function (h) { return h(App) }
}).$mount('#app')

  }

  if (!window.__POWERED_BY_QIANKUN__) {
    render()
  }

  export async function bootstrap () {
    // eslint-disable-next-line no-console
    //console.log('vue app bootstraped')
  }

  export async function mount (props) {
    // eslint-disable-next-line no-console
    //console.log('props from main framework', props)
    render()
  }

  export async function unmount () {
    instance.$destroy()
    instance = null
  }
10、副项目app.vue
11、新建副项目三个界面及设置对应的路由,注意这里的1,2,3既是对应第八步的设置
import Vue from 'vue'
import VueRouter from 'vue-router'
import index from '../views/index.vue'
import index2 from '../views/index2.vue'
import index3 from '../views/index3.vue'

Vue.use(VueRouter)

const routes = [{
  path: '/1',
  name: 'index',
  component: index
},{
  path: '/2',
  name: 'index2',
  component: index2
},{
  path: '/3',
  name: 'index3',
  component: index3
}]

const router = new VueRouter({
  mode: 'history',
  base: window.__POWERED_BY_QIANKUN__ ? '/child' : '/',
  routes
})

export default router
12、分别启动两个项目,至此我们即可实现前端微应用
13、如需扩展更多用法,可自行查阅文档学习
1、https://github.com/F-loat/vue-cli-plugin-qiankun
2、https://qiankun.umijs.org/zh