Django、haystack、whoosh实现全局搜索
Django、haystack、whoosh实现全局搜索
关注公众号“轻松学编程”了解更多。
【参考:https://blog.csdn.net/zhaogeno1/article/details/78965298
https://www.cnblogs.com/fuhuixiang/p/4488029.html
】
创建Django项目,创建子应用。
一、设置全局搜索
1.首先安装haystack、whoosh、jieba
pip install drf-haystack
pip install whoosh
pip install jieba
haystack: django的一个包,可以方便地对model(模型)里面的内容进行索引、搜索。设计为支持whoosh,soir,Xapian,Elasticsearch四种全文检索引擎后端,属于一种全文检索的框架。
whoosh: 纯Python编写的全文搜索引擎,虽然性能比不上sphinx、Xapian、Elasticsearch等,但是whoosh无二进制包,程序不会莫名其妙的崩溃,对于小型的站点,whoosh已经足够使用。
jieba:一款免费的中文分词包。
2.在settings中进行配置
在INSTALLED_APPS添加 haystack
INSTALLED_APPS = [
    # 其它app
    # 全局搜索
    'haystack',
    # 我的app应用
    'songcommon',
    'songapp',
]
haystack最好放在我的app应用前面。
3.添加搜索引擎
HAYSTACK_CONNECTIONS = {
    'default': {
        'ENGINE': 'haystack.backends.whoosh_cn_backend.WhooshEngine',
        'PATH': os.path.join(BASE_DIR, 'whoosh_index'),
    }
}
# 每页显示搜索结果数目为10
HAYSTACK_SEARCH_RESULTS_PER_PAGE = 10
# 自动生成索引
HAYSTACK_SIGNAL_PROCESSOR = 'haystack.signals.RealtimeSignalProcessor'
-
其它搜索引擎设置见官网
http://django-haystack.readthedocs.io/en/v2.4.1/tutorial.html#configuration
4.新建search_indexes.py文件
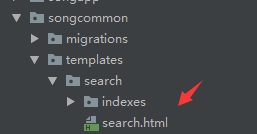
在应用目录(即要设为检索关键字的应用目录下)下新建一个search_indexes.py文件(名字是固定的不能改)。比如:
内容为:
from haystack import indexes
#引入你项目下的model(也就是你要将其作为检索关键词的models)
from songcommon.models import Song

# model名 + Index作为类名
class SongIndex(indexes.SearchIndex, indexes.Indexable):

    text = indexes.CharField(document=True, use_template=True)
    # 对歌名、歌手、歌词进行搜索
    name = indexes.CharField(model_attr='name')
    singer = indexes.CharField(model_attr='singer')
    lyric = indexes.CharField(model_attr='lyric')

    def get_model(self):
        return Song

    def index_queryset(self, using=None):
        """Used when the entire index for model is updated."""
        return self.get_model().objects.all()
5、创建“模型类名称_text.txt”文件
在子应用目录下创建一个新目录templates。
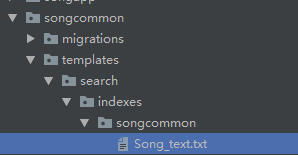
- 在目录"templates/search/indexes/应用名称/"下创建"模型类名称_text.txt"文件(我建立的是Song_text.txt),这个模板的作用是让text字段包含的内容,在后面的模板中可能会有用。

Song_text.txt中的内容如下:
{{ object.name }}
{{ object.singer }}
{{ object.lyric }}
txt中的内容根据模型类中需要进行搜索的字段进行设置。如我的models.py下的
我需要搜索的字段有name,singer,lyric。
6.配置路由
from django.urls import path, include

urlpatterns = [
    # 其它path设置

    path(r'search/', include('haystack.urls')),
    # django小于 2.0版本的用以下的url
    # url(r'^search/', include('haystack.urls')),
]
7.创建search.html
在目录"templates/search/"下建立search.html作为检索结果返回的页面(可自己进行定制)
内容为:
<html>
<head>
    <title>title>
head>
<body>
<form method='get' action="/search" target="_self">
    <input type="text" name="q" >
    <input type="submit" value="查询">
form>

{% if query %}
    <h3>搜索结果如下:h3>
    {% for result in page.object_list %}
        <a href="{% url 'song:search_song' result.object.sid %}  " target="_blank">{{ result.object.name }} {{ result.object.singer }}a><br/>
    {% empty %}
        <p>啥也没找到p>
    {% endfor %}

    {% if page.has_previous or page.has_next %}
        <div>
            {% if page.has_previous %}<a href="?q={{ query }}&page={{ page.previous_page_number }}">{% endif %}« 上一页{% if page.has_previous %}a>{% endif %}
        |
            {% if page.has_next %}<a href="?q={{ query }}&page={{ page.next_page_number }}">{% endif %}下一页 »{% if page.has_next %}a>{% endif %}
        div>
    {% endif %}
{% endif %}
body>
html>
{{ result.object.name }} {{ result.object.singer }}中的name和singer是models.py中要进行全局搜索的类中的属性。要改为你的才可以。
{% url ‘song:search_song’ result.object.sid %} 也要修改为你设置的路由。
8.建立ChineseAnalyzer.py文件
保存在haystack的安装文件夹下,路径如下
D:\Learn\pythonPro\songvenv\Lib\site-packages\haystack\backends
找到自己的虚拟环境下的Lib\site-packages\haystack\backends
# ChineseAnalyzer.py文件内容
import jieba
from whoosh.analysis import Tokenizer, Token


class ChineseTokenizer(Tokenizer):
    def __call__(self, value, positions=False, chars=False,
                 keeporiginal=False, removestops=True,
                 start_pos=0, start_char=0, mode='', **kwargs):
        t = Token(positions, chars, removestops=removestops, mode=mode,
                  **kwargs)
        seglist = jieba.cut(value, cut_all=True)
        for w in seglist:
            t.original = t.text = w
            t.boost = 1.0
            if positions:
                t.pos = start_pos + value.find(w)
            if chars:
                t.startchar = start_char + value.find(w)
                t.endchar = start_char + value.find(w) + len(w)
            yield t


def ChineseAnalyzer():
    return ChineseTokenizer()
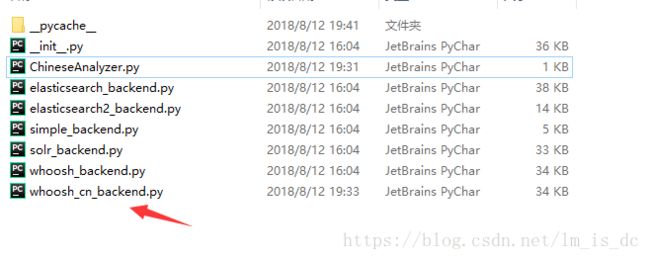
9.复制whoosh_backend.py文件,改名为whoosh_cn_backend.py
- 还是在刚才的路径下
在whoosh_cn_backend.py文件中添加:
#添加
from haystack.backends.ChineseAnalyzer  import ChineseAnalyzer
并修改:
在大概166行代码处,
# 将文件中的
analyzer=StemmingAnalyzer()
改为
analyzer=ChineseAnalyzer()
最好将原来的注释掉,再复制一行改成自己的。
10、生成索引
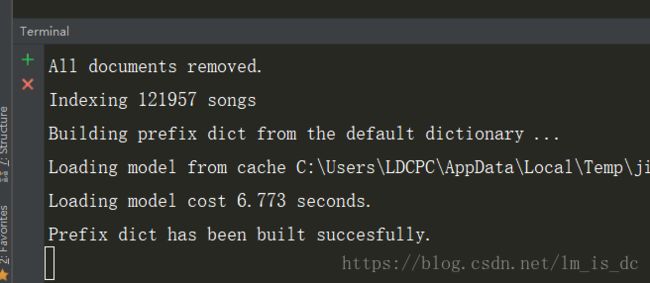
- 在Terminal窗口中输入
python manage.py rebuild_index
出现这样的字样说明索引已经建立的。
以后可以通过以下命令来更新索引。
python manage.py update_index
(ps:如果在settings.py中添加了
HAYSTACK_SIGNAL_PROCESSOR = 'haystack.signals.RealtimeSignalProcessor'
就不用手动更新索引,系统会自动更新。
)
生成成功后在根目录下会生成一个whoosh_index的文件夹。
###11、启动Django服务,打开浏览器便可以进行搜索
二、使用自定义的搜索视图
1、在urls.py设置自定义的路由
urlpatterns = [

    # 搜索
    # path(r'search', include('haystack.urls',namespace='haystack')),
    # 使用自定义的路由
    path(r'search/', include('songcommon.urls',namespace='haystack')),

]
2、在songcommon应用目录下创建urls.py文件
urls.py中的内容如下:
from django.urls import   path

from songcommon import views
from songcommon.searchView import MySearchView

app_name ='songcommon'
urlpatterns = (
    #使用自定义的搜索视图
    path(r'search/?', MySearchView.as_view(), name='haystack_search'),
)
3、在songcommon应用目录下创建searchView.py文件
searchView.py中的内容如下:
from haystack.generic_views import SearchView
from songcommon.models import Song
from django.core.cache import cache

class MySearchView(SearchView):
    """My custom search view."""

    def get_queryset(self):
        queryset = super(MySearchView, self).get_queryset()
        return queryset.all()

    def get_context_data(self, *args, **kwargs):

        mySearchView = super(MySearchView, self)
		# form表单提交的参数可以通过以下方式获取
        #form_data = mySearchView.get_form_kwargs()['data']
        context = mySearchView.get_context_data(*args, **kwargs)
        return context
项目开源地址
后记
【后记】为了让大家能够轻松学编程,我创建了一个公众号【轻松学编程】,里面有让你快速学会编程的文章,当然也有一些干货提高你的编程水平,也有一些编程项目适合做一些课程设计等课题。
也可加我微信【1257309054】,拉你进群,大家一起交流学习。
如果文章对您有帮助,请我喝杯咖啡吧!
公众号
![]()
![]()
关注我,我们一起成长~~


