关于cocos2dx如何绑定c++的静态方法和类给lua调用
静态绑定(这名词哪来的?呵呵 我也不知道 不要在意那么多细节),直接是绑定静态方法,不是绑定类的实例方法,绑定类的实例方法有点屌,知道为什么lua可以实现c++为底层的游戏框架不,其实就是利用绑定类的这种方法(应该是 哈哈),写好c++的类,直接绑定到lua中用。怎么做的,后面慢慢道来。
新建一个lua项目,注意是lua语言。打开项目的class源码文件夹,
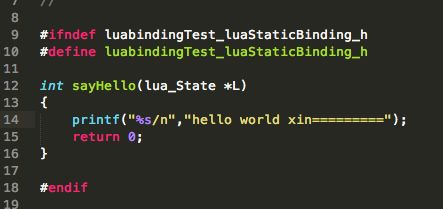
1、添加c++接口代码新添加一个luaStaticBinding.h头文件,如图: 
这里一定要注意方法的格式,要按照这种格式
    int methodName(luaState *L)
    {
        //todo
        return num;     (num指返回参数的个数)
    }
2、然后是注册c++方法注册静态方法在与class下面的AppDelegate的applicationDidFinishLaunching方法中,找找有如图代码的位置: 
直接敲入
lua_register(L, “sayHello”, sayHello); (记得在AppDelegate上面引用luaStaticBinding.h)
ok,搞定。
3、测试
在lua代码文件中的main中添加一行代码:
sayHello()
运行,如果log出现如图则表示成功了。![]()
下面来个屌的,c++类的绑定。
1、有时候我们遇到性能比较耗的代码,那没办法用c++吧,可以,写好直接注册给lua用一样的效果还有c++的速度。有时候还遇到纯c++写的模块代码要移植过来下面里面,那也要绑定。
2、先到class下面目录下添加一个test.h文件和test.cpp文件,实现如图:
test.h 
这里是按照cocos2d的类的实现方式,就是为了方便内存管理。如果自己编写类不按照这种方式的话,有可能在用脚本生产的时候不能通过,未验证。
3、编写ini配置文件
进入/Users/stephenxu/Desktop
/mr_xin/mygame/luabindingTest/frameworks/cocos2d-x/tools/tolua
添加一个cocos2dx_test.ini文件,并添加如下内容。
这里有个模板,复制就可以了。也可以复制文件夹下的一个ini文件,复制,修改也可以(推荐),必要的地方修改,其他地方删除。这里出错生成将不会通过,最蛋疼就是这里了。少年O(∩_∩)O哈哈~。
[cocos2dx_test]
# the prefix to be added to the generated functions. You might or might not use this in your own
# templates
prefix = cocos2dx_test
# create a target namespace (in javascript, this would create some code like the equiv. to ns = ns || {})
# all classes will be embedded in that namespace
target_namespace =
android_headers = -I%(androidndkdir)s/platforms/android-14/arch-arm/usr/include -I%(androidndkdir)s/sources/cxx-stl/gnu-libstdc++/4.7/libs/armeabi-v7a/include -I%(androidndkdir)s/sources/cxx-stl/gnu-libstdc++/4.7/include -I%(androidndkdir)s/sources/cxx-stl/gnu-libstdc++/4.8/libs/armeabi-v7a/include -I%(androidndkdir)s/sources/cxx-stl/gnu-libstdc++/4.8/include
android_flags = -D_SIZE_T_DEFINED_
clang_headers = -I%(clangllvmdir)s/lib/clang/3.3/include
clang_flags = -nostdinc -x c++ -std=c++11
cocos_headers = -I%(cocosdir)s/cocos -I%(cocosdir)s/my -I%(cocosdir)s/cocos/base -I%(cocosdir)s/cocos/platform/android
cocos_flags = -DANDROID
cxxgenerator_headers =
# extra arguments for clang
extra_arguments = %(android_headers)s %(clang_headers)s %(cxxgenerator_headers)s %(cocos_headers)s %(android_flags)s %(clang_flags)s %(cocos_flags)s %(extra_flags)s
# what headers to parse
headers = /Users/stephenxu/Desktop/mr_xin/mygame/luabindingTest/frameworks/runtime-src/Classes/test.h
# what classes to produce code for. You can use regular expressions here. When testing the regular
# expression, it will be enclosed in “^",likethis:"Menu∗”.
classes = test.*
# what should we skip? in the format ClassName::[function function]
# ClassName is a regular expression, but will be used like this: “^ClassName” functions are also
# regular expressions, they will not be surrounded by “^”. If you want to skip a whole class, just
# add a single “” as functions. See bellow for several examples. A special class name is ““, which
# will apply to all class names. This is a convenience wildcard to be able to skip similar named
# functions from all classes.
skip =
rename_functions =
rename_classes =
# for all class names, should we remove something when registering in the target VM?
remove_prefix =
# classes for which there will be no “parent” lookup
classes_have_no_parents =
# base classes which will be skipped when their sub-classes found them.
base_classes_to_skip =
# classes that create no constructor
# Set is special and we will use a hand-written constructor
abstract_classes =
# Determining whether to use script object(js object) to control the lifecycle of native(cpp) object or the other way around. Supported values are ‘yes’ or ‘no’.
script_control_cpp = no
这里注意一下要改的地方就是
[cocos2dx_test]
prefix = cocos2dx_test
cocos_headers = 头文件的路径,可以用相对路径绝对路径
classes = test.*
如果是复制的从classes=下面开始就都留空吧script_control_cpp = no不用留空就行了。如果报错就自己改改吧。
要改成对应的名字,之后要对应到脚本里去。任何一处出错都可能执行不了脚本生成。
4、添加脚本文件,并执行
在3的目录下有个genbindings.py,这里是lua本身生成绑定的脚本,可以直接编辑他生成,但是生成其他的已有的绑定代码,很慢不必要,
另外复制genbindings.py,改名my_genbindings.py ,修改如下代码: 
此处黄色的代码全部删除,按照我们刚才的ini模仿写一个,如: 
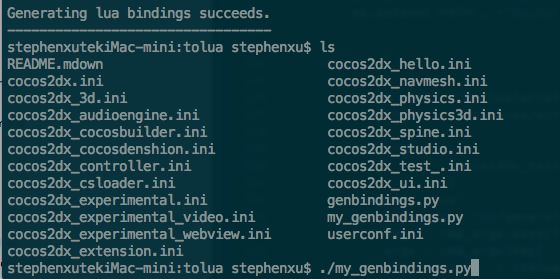
ok,搞定,执行次脚本。命令行进入该目录(确保是进到目录下执行脚本的),执行。
执行成功后会显示 ![]()
去到/Users/stephenxu/Desktop/mr_xin/mygame
/luabindingTest/frameworks/cocos2d-x/cocos/scripting/lua-bindings/auto
会发现多了两个文件分别是: ![]()
4、注册
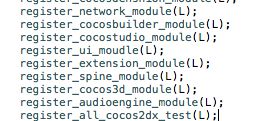
注册非常简单,去到我们的class目录下,打开lua_module_register.h,直接复制lua_cocos2dx_test_auto.hpp里面的
register_all_cocos2dx_test(lua_State* tolua_S);到如图位置 
记得把形参改成实参,改行代码放到最后即可。
OK,工作做完了。这样就万事大吉了只差测试了。
5、测试
在main.lua的main方法中添加调用语句:
local test_ = test:create()
local str = test_:helloMsg()
执行后即会输出: ![]()
6、cocos2dx的类也是用这种方法把类注册进来给lua使用,不过调用的时候是使用cc.Sprite之类的,其实这个也可以定的,可以在配置文件cocos2dx_test.ini的target_namespace = 位置加上你要的命名空间,比如cc,然后你就可以lua中调用cc.test去调用类了。当然实际运用远远没有这么简单,这个只是个简单没有传参,没有返回值的方法。不过也不会难到我们嘛。好懒,遇到这需求再深入深入,恩,收工。
* 菜鸟所致, 非属精品,纯属学习过程的随手笔记,若致汝困惑,呵呵表打我。*
