目标检测基础——mosaic数据增强
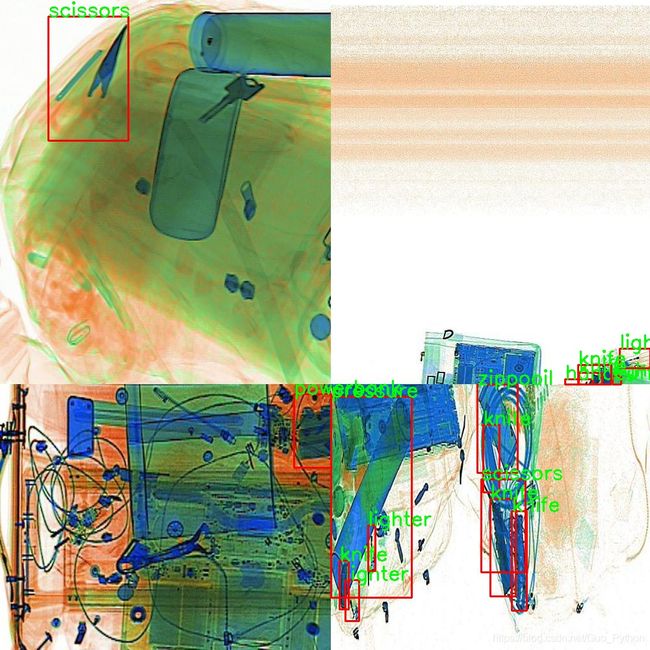
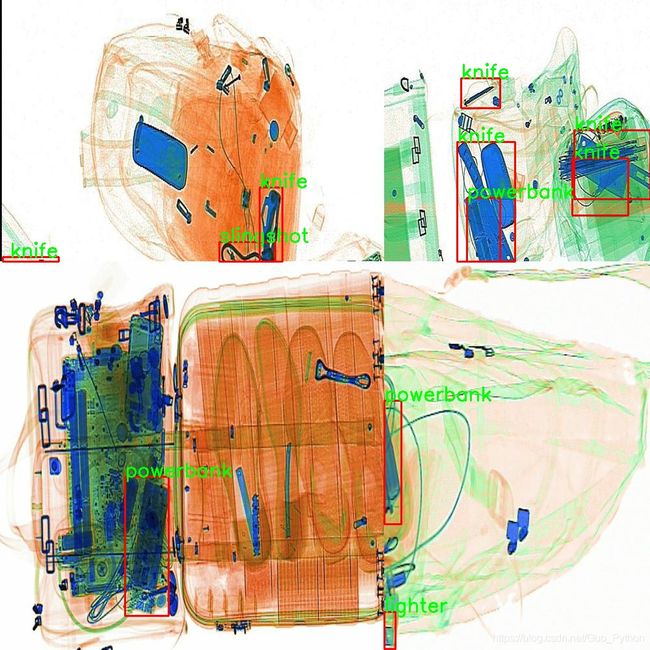
自从Yolo v4论文发表以后,新的数据增强方式mosaic备受关注。本文实现该数据增强方式:
先看看train.txt中的文件格式 img_path x1,y1,x2,y2,cls
/home/gp/dukto/Xray_match/data/train/JPEGImages/300059.jpg 91,263,219,324,2
/home/gp/dukto/Xray_match/data/train/JPEGImages/200408.jpg 274,99,358,139,1
/home/gp/dukto/Xray_match/data/train/JPEGImages/400329.jpg 370,356,467,439,2 588,107,720,160,0
/home/gp/dukto/Xray_match/data/train/JPEGImages/400566.jpg 115,52,201,199,0
/home/gp/dukto/Xray_match/data/train/JPEGImages/400327.jpg 151,184,236,292,2 159,210,418,298,0 313,110,382,216,4
离线数据增强代码:
from PIL import Image, ImageDraw
import numpy as np
from matplotlib.colors import rgb_to_hsv, hsv_to_rgb
import math
from gen_xml import get_result, CreatXml
import xml.dom.minidom


def rand(a=0, b=1):
    return np.random.rand()*(b-a) + a

def merge_bboxes(bboxes, cutx, cuty):

    merge_bbox = []
    for i in range(len(bboxes)):
        for box in bboxes[i]:
            tmp_box = []
            x1,y1,x2,y2 = box[0], box[1], box[2], box[3]

            if i == 0:
                if y1 > cuty or x1 > cutx:
                    continue
                if y2 >= cuty and y1 <= cuty:
                    y2 = cuty
                    if y2-y1 < 5:
                        continue
                if x2 >= cutx and x1 <= cutx:
                    x2 = cutx
                    if x2-x1 < 5:
                        continue

            if i == 1:
                if y2 < cuty or x1 > cutx:
                    continue

                if y2 >= cuty and y1 <= cuty:
                    y1 = cuty
                    if y2-y1 < 5:
                        continue

                if x2 >= cutx and x1 <= cutx:
                    x2 = cutx
                    if x2-x1 < 5:
                        continue

            if i == 2:
                if y2 < cuty or x2 < cutx:
                    continue

                if y2 >= cuty and y1 <= cuty:
                    y1 = cuty
                    if y2-y1 < 5:
                        continue

                if x2 >= cutx and x1 <= cutx:
                    x1 = cutx
                    if x2-x1 < 5:
                        continue

            if i == 3:
                if y1 > cuty or x2 < cutx:
                    continue

                if y2 >= cuty and y1 <= cuty:
                    y2 = cuty
                    if y2-y1 < 5:
                        continue

                if (x2 >= cutx) and (x1 <= cutx):
                    x1 = cutx
                    if x2-x1 < 5:
                        continue

            tmp_box.append(x1)
            tmp_box.append(y1)
            tmp_box.append(x2)
            tmp_box.append(y2)
            tmp_box.append(box[-1])
            merge_bbox.append(tmp_box)
    return merge_bbox

def get_random_data(annotation_line, input_shape, random=True, hue=.1, sat=1.5, val=1.5, proc_img=True):
    '''random preprocessing for real-time data augmentation'''
    h, w = input_shape
    min_offset_x = 0.4
    min_offset_y = 0.4
    scale_low = 1-min(min_offset_x,min_offset_y)
    scale_high = scale_low+0.2

    image_datas = []

    box_datas = []
    index = 0

    place_x = [0,0,int(w*min_offset_x),int(w*min_offset_x)]
    place_y = [0,int(h*min_offset_y),int(w*min_offset_y),0]
    for line in annotation_line:
        # 每一行进行分割
        line_content = line.split()
        # 打开图片
        image = Image.open(line_content[0])
        image = image.convert("RGB")
        # 图片的大小
        iw, ih = image.size
        # 保存框的位置
        box = np.array([np.array(list(map(int,box.split(',')))) for box in line_content[1:]])

        # image.save(str(index)+".jpg")
        # 是否翻转图片
        flip = rand()<.5
        if flip and len(box)>0:
            image = image.transpose(Image.FLIP_LEFT_RIGHT)
            box[:, [0,2]] = iw - box[:, [2,0]]

        # 对输入进来的图片进行缩放
        new_ar = w/h
        scale = rand(scale_low, scale_high)
        if new_ar < 1:
            nh = int(scale*h)
            nw = int(nh*new_ar)
        else:
            nw = int(scale*w)
            nh = int(nw/new_ar)
        image = image.resize((nw,nh), Image.BICUBIC)

        # 进行色域变换
        hue = rand(-hue, hue)
        sat = rand(1, sat) if rand()<.5 else 1/rand(1, sat)
        val = rand(1, val) if rand()<.5 else 1/rand(1, val)
        x = rgb_to_hsv(np.array(image)/255.)
        x[..., 0] += hue
        x[..., 0][x[..., 0]>1] -= 1
        x[..., 0][x[..., 0]<0] += 1
        x[..., 1] *= sat
        x[..., 2] *= val
        x[x>1] = 1
        x[x<0] = 0
        image = hsv_to_rgb(x)
        image = Image.fromarray((image*255).astype(np.uint8))

        # 将图片进行放置,分别对应四张分割图片的位置
        dx = place_x[index]
        dy = place_y[index]
        new_image = Image.new('RGB', (w,h), (128,128,128))
        new_image.paste(image, (dx, dy))
        image_data = np.array(new_image)/255

        index = index + 1
        box_data = []
        # 对box进行重新处理
        if len(box)>0:
            np.random.shuffle(box)
            box[:, [0,2]] = box[:, [0,2]]*nw/iw + dx
            box[:, [1,3]] = box[:, [1,3]]*nh/ih + dy
            box[:, 0:2][box[:, 0:2]<0] = 0
            box[:, 2][box[:, 2]>w] = w
            box[:, 3][box[:, 3]>h] = h
            box_w = box[:, 2] - box[:, 0]
            box_h = box[:, 3] - box[:, 1]
            box = box[np.logical_and(box_w>1, box_h>1)]
            box_data = np.zeros((len(box),5))
            box_data[:len(box)] = box

        image_datas.append(image_data)
        box_datas.append(box_data)

        img = Image.fromarray((image_data*255).astype(np.uint8))
        #for j in range(len(box_data)):
        #    thickness = 3
        #    left, top, right, bottom = box_data[j][0:4]
        #    draw = ImageDraw.Draw(img)
        #    for i in range(thickness):
        #        draw.rectangle([left + i, top + i, right - i, bottom - i],outline=(255,255,255))
        #img.show()

    # 将图片分割,放在一起
    cutx = np.random.randint(int(w*min_offset_x), int(w*(1 - min_offset_x)))
    cuty = np.random.randint(int(h*min_offset_y), int(h*(1 - min_offset_y)))

    new_image = np.zeros([h,w,3])
    new_image[:cuty, :cutx, :] = image_datas[0][:cuty, :cutx, :]
    new_image[cuty:, :cutx, :] = image_datas[1][cuty:, :cutx, :]
    new_image[cuty:, cutx:, :] = image_datas[2][cuty:, cutx:, :]
    new_image[:cuty, cutx:, :] = image_datas[3][:cuty, cutx:, :]

    # 对框进行进一步的处理
    new_boxes = merge_bboxes(box_datas, cutx, cuty)
    return new_image, new_boxes

def normal_(annotation_line, input_shape):
    '''random preprocessing for real-time data augmentation'''
    line = annotation_line.split()
    image = Image.open(line[0])
    box = np.array([np.array(list(map(int,box.split(',')))) for box in line[1:]])

    iw, ih = image.size
    image = image.transpose(Image.FLIP_LEFT_RIGHT)
    box[:, [0,2]] = iw - box[:, [2,0]]

    return image, box


if __name__ == "__main__":
    with open("train.txt") as f:
        lines = f.readlines()

    for i in range(5000):
        a = np.random.randint(0,len(lines))

        line = lines[a:a+4]
        try:
            image_data, box_data = get_random_data(line,[416,416])
            img = Image.fromarray((image_data*255).astype(np.uint8))
            img_path = "imgs/%s.jpg" % i
            img.save(img_path)

            results = get_result(box_data)
            xml_path = "xmls/%s.xml" % i
            CreatXml(img_path, results, xml_path)

        except:
            continue
两个辅助函数的代码(本文以科大讯飞竞赛的数据为例说明):
#-*-coding:utf8-*-
import numpy as np
import sys
import cv2
import glob
import os
import xml.dom.minidom
import argparse
import random


def CreatXml(imgPath, results, xmlPath):
    img = cv2.imread(imgPath)
    imgSize = img.shape
    imgName = imgPath.split('/')[-1]

    impl = xml.dom.minidom.getDOMImplementation()
    dom = impl.createDocument(None, 'annotation', None)
    root = dom.documentElement

    folder = dom.createElement('folder')
    root.appendChild(folder)
    name_folfer = dom.createTextNode('Unknown')
    folder.appendChild(name_folfer)

    filename = dom.createElement('filename')
    root.appendChild(filename)
    name_img = dom.createTextNode(os.path.splitext(imgName)[0])
    filename.appendChild(name_img)

    filepath = dom.createElement('path')
    root.appendChild(filepath)
    path_img = dom.createTextNode(imgPath)
    filepath.appendChild(path_img)

    source = dom.createElement('source')
    root.appendChild(source)
    database = dom.createElement('database')
    database_name = dom.createTextNode('Unknown')
    database.appendChild(database_name)
    source.appendChild(database)

    img_size = dom.createElement('size')
    root.appendChild(img_size)
    width = dom.createElement('width')
    width_num = dom.createTextNode(str(int(imgSize[1])))
    width.appendChild(width_num)
    height = dom.createElement('height')
    height_num = dom.createTextNode(str(int(imgSize[0])))
    height.appendChild(height_num)
    depth = dom.createElement('depth')
    depth_num = dom.createTextNode(str(int(imgSize[2])))
    depth.appendChild(depth_num)
    img_size.appendChild(width)
    img_size.appendChild(height)
    img_size.appendChild(depth)

    segmented = dom.createElement('segmented')
    root.appendChild(segmented)
    segmented_num = dom.createTextNode('0')
    segmented.appendChild(segmented_num)

    for i in range(len(results)):
        img_object = dom.createElement('object')
        root.appendChild(img_object)
        label_name = dom.createElement('name')
        namecls = dom.createTextNode(results[i]['name'])
        label_name.appendChild(namecls)
        pose = dom.createElement('pose')
        pose_name = dom.createTextNode('Unspecified')
        pose.appendChild(pose_name)
        truncated = dom.createElement('truncated')
        truncated_num = dom.createTextNode('0')
        truncated.appendChild(truncated_num)
        difficult = dom.createElement('difficult')
        difficult_num = dom.createTextNode('0')
        difficult.appendChild(difficult_num)
        bndbox = dom.createElement('bndbox')
        xmin = dom.createElement('xmin')
        xmin_num = dom.createTextNode(str(int(results[i]['bbox'][0])))
        xmin.appendChild(xmin_num)
        ymin = dom.createElement('ymin')
        ymin_num = dom.createTextNode(str(int(results[i]['bbox'][1])))
        ymin.appendChild(ymin_num)
        xmax = dom.createElement('xmax')
        xmax_num = dom.createTextNode(str(int(results[i]['bbox'][2])))
        xmax.appendChild(xmax_num)
        ymax = dom.createElement('ymax')
        ymax_num = dom.createTextNode(str(int(results[i]['bbox'][3])))
        ymax.appendChild(ymax_num)
        bndbox.appendChild(xmin)
        bndbox.appendChild(ymin)
        bndbox.appendChild(xmax)
        bndbox.appendChild(ymax)
        img_object.appendChild(label_name)
        img_object.appendChild(pose)
        img_object.appendChild(truncated)
        img_object.appendChild(difficult)
        img_object.appendChild(bndbox)

    f = open(xmlPath, 'w')
    dom.writexml(f, addindent='  ', newl='\n')
    f.close()


def get_result(box_data):
    classes = ['knife', 'scissors', 'lighter', 'zippooil', 'pressure',
                'slingshot', 'handcuffs', 'nailpolish', 'powerbank',
                'firecrackers']
    results = []
    for obj in box_data:
        result = {}
        obj = [int(i) for i in obj]
        box = obj[:4]
        name = classes[obj[-1]]
        result["name"] = name
        result["bbox"] = box
        results.append(result)
    return results
最终的效果如图所示:
博主在比赛中用到该数据增强,有涨点!!!

