pytorch图像分类篇:4.VGG详解,感受野计算及网络搭建
前言
最近在b站发现了一个非常好的 计算机视觉 + pytorch 的教程,相见恨晚,能让初学者少走很多弯路。
因此决定按着up给的教程路线:图像分类→目标检测→…一步步学习用pytorch实现深度学习在cv上的应用,并做笔记整理和总结。
up主教程给出了pytorch和tensorflow两个版本的实现,我暂时只记录pytorch版本的笔记。
参考内容来自:
- up主的b站链接:https://space.bilibili.com/18161609/channel/index
- up主将代码和ppt都放在了github:https://github.com/WZMIAOMIAO/deep-learning-for-image-processing
- up主的CSDN博客:https://blog.csdn.net/qq_37541097/article/details/103482003
学习资料
- VGG网络详解及感受野的计算
- 使用pytorch搭建VGG网络
VGG详解
VGG 在2014年由牛津大学著名研究组 VGG(Visual Geometry Group)提出,斩获该年 ImageNet 竞赛中 Localization Task(定位任务)第一名和 Classification Task(分类任务)第二名。
原论文地址:Very Deep Convolutional Networks for Large-Scale Image Recognition
VGG网络的创新点:通过堆叠多个小卷积核来替代大尺度卷积核,可以减少训练参数,同时能保证相同的感受野。
论文中提到,可以通过堆叠两个3×3的卷积核替代5x5的卷积核,堆叠三个3×3的卷积核替代7x7的卷积核。
1. CNN感受野
在卷积神经网络中,决定某一层输出结果中一个元素所对应的输入层的区域大小,被称作感受野(receptive field)。
通俗的解释是,输出feature map上的一个单元 对应 输入层上的区域大小。
以下图为例,输出层 layer3 中一个单元 对应 输入层 layer2 上区域大小为2×2(池化操作),对应输入层 layer1 上大小为5×5
(可以这么理解,layer2中 2×2区域中的每一块对应一个3×3的卷积核,又因为 stride=2,所以layer1的感受野为5×5)
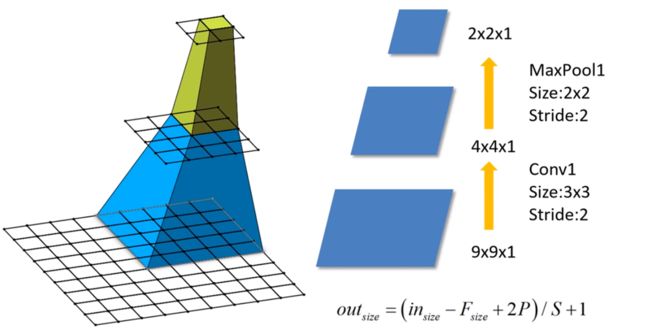
感受野的计算公式为:
F ( i ) = ( F ( i + 1 ) − 1 ) × Stride + Ksize F(i)=(F(i+1)-1) \times \text {Stride }+\text {Ksize} F(i)=(F(i+1)−1)×Stride +Ksize
- F ( i ) F(i) F(i) 为第 i i i 层感受野
- S t r i d e Stride Stride 为第 i i i 层的步距
- K s i z e Ksize Ksize 为 卷积核 或 池化核 尺寸
以上图为例:
- Feature map: F ( 3 ) = 1 F(3)=1 F(3)=1
- Pool1: F ( 2 ) = ( 1 − 1 ) × 2 + 2 = 2 \quad F(2)=(1-1) \times 2+2=2 F(2)=(1−1)×2+2=2
- Conv1: F ( 1 ) = ( 2 − 1 ) × 2 + 3 = 5 \quad F(1)=(2-1) \times 2+3=5 F(1)=(2−1)×2+3=5
2. 小卷积核
现在,我们来验证下VGG论文中的两点结论:
1.堆叠两个3×3的卷积核替代5x5的卷积核,堆叠三个3×3的卷积核替代7x7的卷积核。替代前后感受野是否相同?
(注:VGG网络中卷积的Stride默认为1)
- Feature map: F = 1 F=1 F=1
- Conv3x3(3): F = ( 1 − 1 ) × 1 + 3 = 3 \quad F=(1-1) \times 1+3=3 F=(1−1)×1+3=3
- Conv3x3(2): F = ( 3 − 1 ) × 1 + 3 = 5 \quad F=(3-1) \times 1+3=5 F=(3−1)×1+3=5 (5×5卷积核感受野)
- Conv3x3(1): F = ( 5 − 1 ) × 1 + 3 = 7 \quad F=(5-1) \times 1+3=7 F=(5−1)×1+3=7 (7×7卷积核感受野)
2.堆叠3×3卷积核后训练参数是否真的减少了?
注:CNN参数个数 = 卷积核尺寸×卷积核深度 × 卷积核组数 = 卷积核尺寸 × 输入特征矩阵深度 × 输出特征矩阵深度
现假设 输入特征矩阵深度 = 输出特征矩阵深度 = C
- 使用7×7卷积核所需参数个数: 7 × 7 × C × C = 49 C 2 7 \times 7 \times C \times C=49 C^{2} 7×7×C×C=49C2
- 堆叠三个3×3的卷积核所需参数个数: 3 × 3 × C × C + 3 × 3 × C × C + 3 × 3 × C × C = 27 C 2 3 \times 3 \times C \times C+3 \times 3 \times C \times C+3 \times 3 \times C \times C=27 C^{2} 3×3×C×C+3×3×C×C+3×3×C×C=27C2
3. VGG-16
VGG网络有多个版本,一般常用的是VGG-16模型,其网络结构如下如所示:
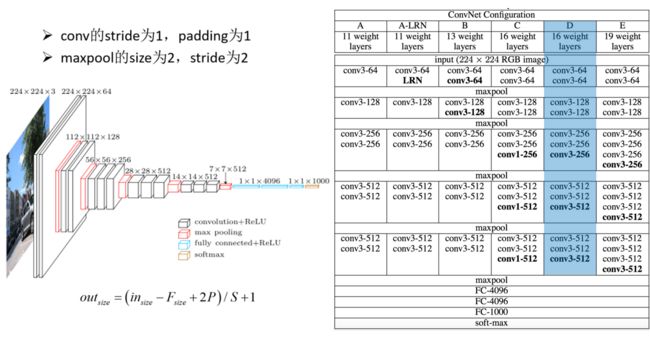
稍作计算可以发现,经3×3卷积的特征矩阵的尺寸是不改变的:
out size = ( in size − F size + 2 P ) / S + 1 = ( in size − 3 + 2 ) / 1 + 1 = in size \text { out }_{\text {size}}=\left(\text {in}_{\text { size}}-F_{\text {size}}+2 P\right) / S+1 =(\text {in}_{\text { size}}-3+2)/1+1=\text { in}_{\text { size}} out size=(in size−Fsize+2P)/S+1=(in size−3+2)/1+1= in size
pytorch搭建VGG网络
1. model.py
跟上一篇AlexNet中网络模型的定义一样,VGG网络也是分为 卷积层提取特征 和 全连接层进行分类 这两个模块
import torch.nn as nn
import torch

class VGG(nn.Module):
    def __init__(self, features, num_classes=1000, init_weights=False):
        super(VGG, self).__init__()
        self.features = features			# 卷积层提取特征
        self.classifier = nn.Sequential(	# 全连接层进行分类
            nn.Dropout(p=0.5),
            nn.Linear(512*7*7, 2048),
            nn.ReLU(True),
            nn.Dropout(p=0.5),
            nn.Linear(2048, 2048),
            nn.ReLU(True),
            nn.Linear(2048, num_classes)
        )
        if init_weights:
            self._initialize_weights()

    def forward(self, x):
        # N x 3 x 224 x 224
        x = self.features(x)
        # N x 512 x 7 x 7
        x = torch.flatten(x, start_dim=1)
        # N x 512*7*7
        x = self.classifier(x)
        return x

    def _initialize_weights(self):
        for m in self.modules():
            if isinstance(m, nn.Conv2d):
                # nn.init.kaiming_normal_(m.weight, mode='fan_out', nonlinearity='relu')
                nn.init.xavier_uniform_(m.weight)
                if m.bias is not None:
                    nn.init.constant_(m.bias, 0)
            elif isinstance(m, nn.Linear):
                nn.init.xavier_uniform_(m.weight)
                # nn.init.normal_(m.weight, 0, 0.01)
                nn.init.constant_(m.bias, 0)

不同的是,VGG网络有 VGG-13、VGG-16等多种网络结构,能不能将这几种结构统一成一个模型呢?
以上图的A、B、D、E模型为例,其全连接层完全一样,卷积层只有卷积核个数稍有不同
# vgg网络模型配置列表,数字表示卷积核个数,'M'表示最大池化层
cfgs = {
    'vgg11': [64, 'M', 128, 'M', 256, 256, 'M', 512, 512, 'M', 512, 512, 'M'],											# 模型A
    'vgg13': [64, 64, 'M', 128, 128, 'M', 256, 256, 'M', 512, 512, 'M', 512, 512, 'M'],									# 模型B
    'vgg16': [64, 64, 'M', 128, 128, 'M', 256, 256, 256, 'M', 512, 512, 512, 'M', 512, 512, 512, 'M'],					# 模型D
    'vgg19': [64, 64, 'M', 128, 128, 'M', 256, 256, 256, 256, 'M', 512, 512, 512, 512, 'M', 512, 512, 512, 512, 'M'], 	# 模型E
}

# 卷积层提取特征
def make_features(cfg: list): # 传入的是具体某个模型的参数列表
    layers = []
    in_channels = 3		# 输入的原始图像(rgb三通道)
    for v in cfg:
        # 最大池化层
        if v == "M":
            layers += [nn.MaxPool2d(kernel_size=2, stride=2)]
        # 卷积层
        else:
            conv2d = nn.Conv2d(in_channels, v, kernel_size=3, padding=1)
            layers += [conv2d, nn.ReLU(True)]
            in_channels = v
    return nn.Sequential(*layers)  # 单星号(*)将参数以元组(tuple)的形式导入


def vgg(model_name="vgg16", **kwargs):  # 双星号(**)将参数以字典的形式导入
    try:
        cfg = cfgs[model_name]
    except:
        print("Warning: model number {} not in cfgs dict!".format(model_name))
        exit(-1)
    model = VGG(make_features(cfg), **kwargs)
    return model
参考:Python 函数参数前面一个星号(*)和两个星号(**)的区别
2. train.py
训练脚本跟上一篇AlexNet基本一致,需要注意的是实例化网络的过程:
model_name = "vgg16"
net = vgg(model_name=model_name, num_classes=5, init_weights=True)
函数调用关系:
net = vgg(model_name="vgg16", num_classes=5, init_weights=True)cfg = cfgs[model_name]
= cfgs[vgg16] = [64, 64, 'M', 128, 128, 'M', 256, 256, 256, 'M', 512, 512, 512, 'M', 512, 512, 512, 'M']model = VGG(make_features(cfg), num_classes=5, init_weights=True)make_features(cfg: list)
注:VGG网络模型较深,需要使用GPU进行训练(而且要内存大一点的GPU,我笔记本那2GB的GPU跑不动,pytorch会报错GPU内存不足)
3. predict.py
预测脚本也跟上一篇AlexNet一致