温度预测示例&参数优化工具RandomizedSearchCV
一般情况下,我们做数据挖掘任务都是按照“数据预处理 - 特征工程 - 构建模型(使用默认参数或经验参数) - 模型评估 - 参数优化 - 模型固定”这样一个流程来处理问题。这一小节,我们要讨论的主题就是参数优化,前面我们讨论过GridSearchCV(网格搜索)这个工具,它是对我们的参数进行组合,选取效果最好的那组参数。

这一节,我们探索下参数优化当中的另一个工具RandomizedSearchCV(随机搜索),这名字咋一听感觉有点不太靠谱,对,它是有点不太靠谱,但为什么我们还要用它呢?因为它的效率高,它可以快速地帮助我们确定一个参数的大概范围,然后我们再使用网格搜索确定参数的精确值。就像警察抓犯人一样,先得快速地确认罪犯的活动区域,然后在该区域内展开地毯式搜索,这样效率更高。
这一小节,我们以随机森林模型作为例子,通过演示一个完整的建模过程,来说明RandomizedSearchCV的用法。当然这个工具不是随机森林特有的,它可以应用于任何模型的参数优化当中。
随机森林模型:
官方文档:https://scikitlearn.org/stable/modules/generated/sklearn.ensemble.RandomForestRegressor.html?highlight=randomforestr#sklearn.ensemble.RandomForestRegressor

从上图可以看出随机森林模型有很多参数,如:n_estimators, max_depth, min_samples_split, min_samples_leaf,max_features,bootstrap等。每一个参数都会对最终结果产生影响,同时每一个参数又有着众多的取值,我们的目标是找到最优的参数组合,使得我们的模型效果最好。
RandomizedSearchCV工具:
官方文档:
https://scikit-learn.org/stable/modules/generated/sklearn.model_selection.RandomizedSearchCV.html?highlight=randomized#sklearn.model_selection.RandomizedSearchCV

RandomizedSearchCV参数说明:
- estimator:我们要传入的模型,如KNN,LogisticRegression,RandomForestRegression等。
- params_distributions:参数分布,字典格式。将我们所传入模型当中的参数组合为一个字典。
- n_iter:随机寻找参数组合的数量,默认值为10。
- scoring:模型的评估方法。在分类模型中有accuracy,precision,recall_score,roc_auc_score等,在回归模型中有MSE,RMSE等。
- n_jobs:并行计算时使用的计算机核心数量,默认值为1。当n_jobs的值设为-1时,则使用所有的处理器。
- iid:bool变量,默认为deprecated,返回值为每折交叉验证的值。当iid = True时,返回的是交叉验证的均值。
- cv:交叉验证的折数,最新的sklearn库默认为5。
接下来,我们采用温度数据集作为例子,来演示RandomizedSearchCV的用法。我们将进行一个完整的数据建模过程:数据预处理 - 模型搭建 - RandomizedSearchCV参数优化 - GridSearchCV参数优化 - 确定最优参数,确定模型。
温度数据集: 链接:https://pan.baidu.com/s/1q10_Vz7ujuu8oCOqysNU7A
提取码:bxcr
任务目标: 基于昨天和前天的一些历史天气数据,建立模型,预测当天的最高的真实温度。
数据集中主要特征说明:
- ws_1:昨天的风速。
- prcp_1:昨天的降水量。
- snwd_1:昨天的降雪厚度。
- temp_1:昨天的最高温度。
- temp_2:前天的最高温度。
- average:历史中这一天的平均最高温度。
- actual:当天的真实最高温度。
###建模完整过程演示:
#导入数据分析的两大工具包
import numpy as np
import pandas as pd

#读取数据
df = pd.read_csv('D:\\Py_dataset\\temps_extended.csv')
df.head()
#查看数据的规模
df.shape
(2191, 12)#该数据集有2191个样本,每个样本有12个特征。
1.数据预处理
该数据集整体上是比较干净的,没有缺失值和异常值。这一步我们熟悉下数据预处理的基本过程。
# 1.查看数据集的基本信息
df.info()
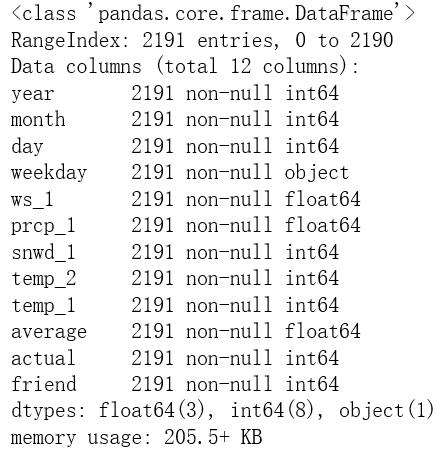
从上述结果可以看出这份数据集的整体情况。一共2191个样本,索引从0开始,截止于2190。一共12个特征,每个特征的数量为2191,缺失值情况(non-null),类型(int64 or object or float64),内存使用205.5KB。
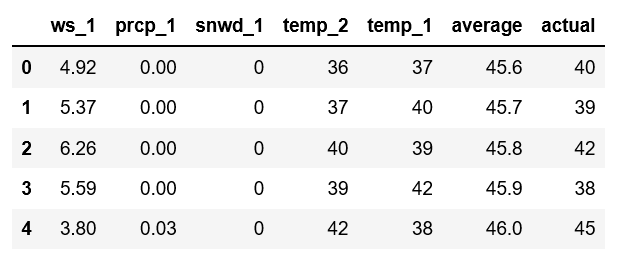
由于数据没有缺失值,所以我们不需要做缺失值处理。接下来我们看数据类型,由于计算机只能识别数值型数据,所以我们必须将数据集中的非数值型数据转化为数值型数据。该数据集中只有"weekday"是object类型,由于我们要预测的是今天的温度值,所以日期数据(如昨天是几号,星期几)对我们的结果没有什么影响,将这些日期数据删掉。数据集中有一个"friend"特征,该值的意思可能是朋友的猜测结果,在建模过程中,我们暂不关注这个特征,所以将"friend"特征也删掉。
df = df.drop(['year','month','day','weekday','friend'],axis = 1)
df.head()
2.数据切分
当我们完成了数据集清洗之后,接下来就是将原始数据集切分为特征(features)和标签(labels)。接着将特征和标签再次切分为训练特征,测试特征,训练标签和测试标签。
#导入数据切分模块
from sklearn.model_selection import train_test_split
#提取数据标签
labels = df['actual']
#提取数据特征
features = df.drop('actual',axis = 1)

#将数据切分为训练集和测试集
train_features,test_features,train_labels,test_labels = train_test_split(features,labels,
test_size = 0.3,random_state = 0)

print('训练特征的规模:',train_features.shape)
print('训练标签的规模:',train_labels.shape)
print('测试特征的规模:',test_features.shape)
print('测试标签的规模:',test_labels.shape)

#切分之后的结果
训练特征的规模: (1533, 6)
训练标签的规模: (1533,)
测试特征的规模: (658, 6)
测试标签的规模: (658,)
3.建立初始随机森林模型
建立初始模型,基本上都使用模型的默认参数,建立RF(RandomForestRegressor)模型,我们唯一指定了一个n_estimators参数。
from sklearn.ensemble import RandomForestRegressor

#建立初始模型
RF = RandomForestRegressor(n_estimators = 100,random_state = 0)
#训练数据
RF.fit(train_features,train_labels)
#预测数据
predictions = RF.predict(test_features)
4.模型评估
该例子我们使用的是回归模型,预测结果是一个准确的数值。我们的目标是希望我们的预测结果与真实数据的误差越小越好。所以我们在此选用的模型评估方法为均方误差(mean_squared_error)和均方根误差(root_mean_squared_error)。下式分别是MSE和RMSE的计算公式,其中Yi为真实值,Yi^为预测值。
M S E = 1 m ∑ i = 1 m ( y i − y ^ i ) 2 MSE = \frac{1}{m}\sum_{i=1}^m(y_i - \hat y_i)^2 MSE=m1i=1∑m(yi−y^i)2
R M S E = 1 m ∑ i = 1 m ( y i − y ^ i ) 2 RMSE =\sqrt{ \frac{1}{m}\sum_{i=1}^m(y_i - \hat y_i)^2} RMSE=m1i=1∑m(yi−y^i)2
from sklearn.metrics import mean_squared_error
#传入真实值,预测值
MSE = mean_squared_error(test_labels,predictions)

RMSE = np.sqrt(MSE)
print('模型预测误差:',RMSE)
模型预测误差: 5.068073484568353
5.RandomizdSearchCV参数优化
from sklearn.model_selection import RandomizedSearchCV

RF = RandomForestRegressor()
#设置初始的参数空间
n_estimators = [int(x) for x in np.linspace(start = 200,stop = 2000,num = 10)]
min_samples_split = [2,5,10]
min_samples_leaf = [1,2,4]
max_depth = [5,8,10]
max_features = ['auto','sqrt']
bootstrap = [True,False]
#将参数整理为字典格式
random_params_group = {'n_estimators':n_estimators,
                      'min_samples_split':min_samples_split,
                      'min_samples_leaf':min_samples_leaf,
                      'max_depth':max_depth,
                      'max_features':max_features,
                      'bootstrap':bootstrap}
#建立RandomizedSearchCV模型
random_model =RandomizedSearchCV(RF,param_distributions = random_params_group,n_iter = 100,
scoring = 'neg_mean_squared_error',verbose = 2,n_jobs = -1,cv = 3,random_state = 0)
#使用该模型训练数据
random_model.fit(train_features,train_labels)

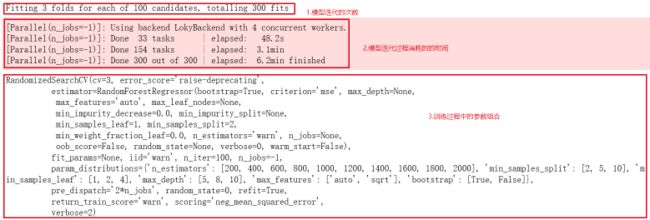
我们观察下模型的训练过程,我们设置了n_iter=100,由于交叉验证的折数=3,所以该模型要迭代300次。第二层显示的是训练过程的用时,训练完成总共用了6.2min。第三层显示的是参与训练的参数。
使用集成算法的属性,获得Random_model最好的参数
random_model.best_params_
{'n_estimators': 1200,
 'min_samples_split': 5,
 'min_samples_leaf': 4,
 'max_features': 'auto',
 'max_depth': 5,
 'bootstrap': True}
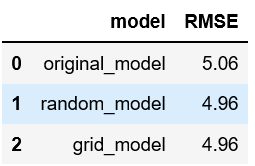
将得出的最优参数,传给RF模型,再次训练参数,并进行结果预测。可以看到经过参数优化后,模型的效果提升了2%。
RF = RandomForestRegressor(n_estimators = 1200,min_samples_split = 5,
                           min_samples_leaf = 4,max_features = 'auto',max_depth = 5,bootstrap = True)
RF.fit(train_features,train_labels)
predictions = RF.predict(test_features)

RMSE = np.sqrt(mean_squared_error(test_labels,predictions))

print('模型预测误差:',RMSE)
print('模型的提升效果:{}'.format(round(100*(5.06-4.96)/5.06),2),'%')

模型预测误差: 4.966401154246091
模型的提升效果:2 %
6.使用GridSearhCV对参数进行进一步优化
上一步基本上确定了参数的大概范围,这一步我们在该范围,进行更加细致的搜索。网格搜索的效率比较低,这里我只选择了少数的几个参数,但是用时也达到了9分钟。如果参数增加,模型训练的时间将会大幅增加。
from sklearn.model_selection import GridSearchCV
import time

param_grid = {'n_estimators':[1100,1200,1300],
             'min_samples_split':[4,5,6,7],
             'min_samples_leaf':[3,4,5],
             'max_depth':[4,5,6,7]}
RF = RandomForestRegressor()
grid = GridSearchCV(RF,param_grid = param_grid,scoring = 'neg_mean_squared_error',cv = 3,n_jobs = -1)
start_time = time.time()
grid.fit(train_features,train_labels)
end_time = time.time()
print('模型训练用时:{}'.format(end_time - start_time))
模型训练用时:534.4072196483612
获得grid模型最好的参数
grid.best_params_
{'max_depth': 5,
 'min_samples_leaf': 5,
 'min_samples_split': 6,
 'n_estimators': 1100}
将最好的模型参数传给RF模型,再次对数据进行训练并作出预测。
RF = RandomForestRegressor(n_estimators = 1100,min_samples_split = 6,
                           min_samples_leaf = 5,max_features = 'auto',max_depth = 5,bootstrap = True)
RF.fit(train_features,train_labels)
predictions = RF.predict(test_features)

RMSE = np.sqrt(mean_squared_error(test_labels,predictions))

print('模型预测误差:',RMSE)
模型预测误差: 4.969890784882202
从结果来看,模型效果并没有什么提升,说明在随机搜索的过程中,已经找到了最优参数。最终结果模型预测的温度与实际温度相差4.96华氏度(2.75℃)。我们以该数据集作为一个示例,总结数据挖掘的全过程以及RandomizedSearchCV工具,在具体的调参工作中也是通过一步一步去优化参数,不断缩小预测值与真实值之间的误差。

7.总结
- 1.随机参数选择模型(RandomizedSearchCV)可以帮助我们快速的确定参数的范围。
- 2.对于随机参数选择模型而言,初始的特征空间选择特别重要。如果初始的特征空间选择不对,则后面的调参工作都可能是徒劳。我们可参考一些经验值或者做一些对比试验,来确定模型的参数空间。
- 3.RandomizedSearchCV和GridSearchCV搭配使用,先找大致范围,再精确搜索。
- 4.通过优化模型参数,虽然每次的提升幅度不是很大,但是通过多次的优化,这些小的提升累加在一起就是很大的提升。
- 5.遇到不懂的问题,多查看sklearn官方文档,这是一个逐渐积累和提升的过程。

