Amazon multi VPC interconnected (base openswan)
Overview
Amazon Virtual Private Cloud (Amazon VPC) provides customers with tremendous network routing flexibility. This document describes how a customer can create a secure IPSec tunnel to connect multiple VPCs into a larger virtual private network that allows instances in each VPC to seamlessly connect to each other using private IP addresses.
Amazon Virtual Private Network Components
Please reference the Amazon Virtual Private Cloud Network Administrator Guide for complete VPC networking documentation; however, the following definitions, example configuration, and diagram may be helpful for understanding the content of this paper.
Internet Gateway (IGW)
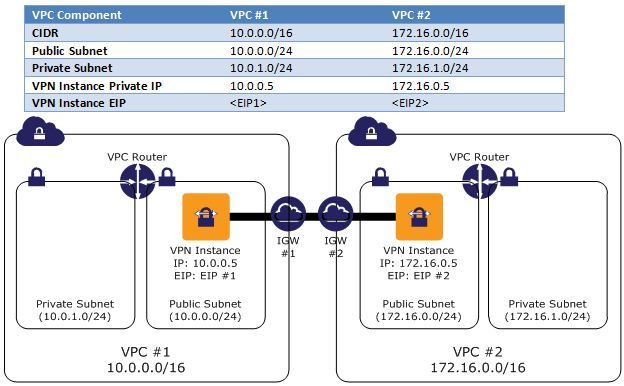
The IGW is an egress point from a customer's VPC that allows public Elastic IP (EIP) addresses to be mapped to VPC instances. IGW provides public address mapping that allows VPN instances in each VPC to communicate with each other. When communicating between VPCs in different AWS Regions, the Internet gateway routes the VPN connections over the Internet. However, when communicating between VPCs in the same AWS Region, the IGW routes traffic directly between the VPCs using the AWS network.
IPSec Connection
An IPSec VPN connection between two EC2 VPN instances that is used to virtually connect the two VPC networks.
Example VPC Setup
This guide will use the following VPC configuration for illustrative purposes:
Additional Considerations
-
The IPSec connections require each VPN instance to live in a public subnet and have an EIP address.
-
VPN instances are a potential single point of failure. Please see the appendix for a high-level High Availability design for this component
-
This lab provides examples using Amazon Linux and standard Amazon Linux packages.
-
This guide assumes you already have two or more VPCs created. For instructions on creating VPCs, please see the Amazon Virtual Private Cloud Getting Starting Guide.
-
In this scenario, AWS manages the IGW and the customer is responsible for managing their EC2 instances and the IPSec connections.
Configuration Walkthrough
In this walkthrough, we will perform the following steps:
1. Launch EC2 VPN instances
2. Configure VPN server software on the EC2 instances
3. Connect additional VPCs (if needed)
To launch Amazon EC2 VPN instances
1. Launch two Amazon Linux instances, one in each VPC public subnet, with the following characteristics:
1). Assign the VPN instance a static private IP address (not required, but makes setting up the configure files much easier). In this example we will use 10.0.0.5 and 172.16.0.5.
2). Allocate two VPC EIPs (or one VPC EIP in each region) and associate an EIP to each VPN instance. In this example we will use EIP1 and EIP2 to represent the EIPs for VPC 1 and VPC 2 respectively.
3). Ensure the Security Groups associated with each instance allow UDP 500, UDP 4500, IP 50, and IP 51 between each other's EIP.
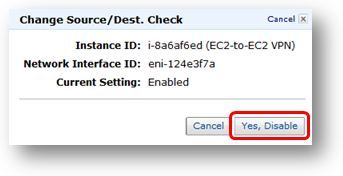
2. Disable Source/Dest checking on both instances by right-clicking on the instances and selecting Change Source/Dest. Check.(Personal note: this step is very important)
3. Configure Routing Tables in both VPCs to send traffic to the "other" VPC through the VPC EC2 instances.VPC #1 Main Route Table
VPC #1 Main Route Table
VPC #2 Main Route Table
To configure VPN server software on Amazon EC2 instances
1. Connect to each EC2 VPN Instance and install the openswan package with the following command:
Prompt> sudo yum install openswan
2. Edit the /etc/ipsec.conf file (as root) to include files in /etc/ipsec.d/*.conf (uncomment the last line by removing the '#' on the first character of the last line so it looks like the following):
Prompt> sudo vi /etc/ipsec.conf
# /etc/ipsec.conf - Openswan IPsec configuration file
#
# Manual: ipsec.conf.5
#
# Please place your own config files in /etc/ipsec.d/ ending in .conf
version 2.0 # conforms to second version of ipsec.conf specification
# basic configuration
config setup
# Debug-logging controls: "none" for (almost) none, "all" for lots.
# klipsdebug=none
# plutodebug="control parsing"
# For Red Hat Enterprise Linux and Fedora, leave protostack=netkey
protostack=netkey
nat_traversal=yes
virtual_private=
oe=off
# Enable this if you see "failed to find any available worker"
# nhelpers=0
#You may put your configuration (.conf) file in the "/etc/ipsec.d/" and uncomment this.
include /etc/ipsec.d/*.conf
3. Create the following files in /etc/ipsec.d (as root)
(1) VPC1/EIP1 Instance
Prompt> sudo vi /etc/ipsec.d/vpc1-to-vpc2.conf
conn vpc1-to-vpc2
type=tunnel
authby=secret
left=%defaultroute
leftid=
leftnexthop=%defaultroute
leftsubnet=
right=
rightsubnet=
pfs=yes
auto=start
Prompt> sudo vi /etc/ipsec.d/vpc1-to-vpc2.secrets
(2) VPC2/EIP2 Instance
Prompt> sudo vi /etc/ipsec.d/vpc2-to-vpc1.conf
conn vpc2-to-vpc1
type=tunnel
authby=secret
left=%defaultroute
leftid=
leftnexthop=%defaultroute
leftsubnet=
right=
rightsubnet=
pfs=yes
auto=start
Prompt> sudo vi /etc/ipsec.d/vpc2-to-vpc1.secrets
4. On both instances, perform the following steps:
1). Start IPSec/Openswan
Prompt> sudo service ipsec start
2). Configure IPSec/Openswan to always start on boot
Prompt> sudo chkconfig ipsec on
3). Configure the Linux instances to route traffic by editing /etc/sysctl.conf and change the net.ipv4.ip_forward, net.ipv4.conf.all.accept_redirects, and net.ipv4.conf.all.send_redirects variables.
Prompt> sudo vi /etc/sysctl.conf
net.ipv4.ip_forward = 1
net.ipv4.conf.all.accept_redirects = 0
net.ipv4.conf.all.send_redirects = 0
4). Restart your network settings for the network forwarding settings to take effect
Prompt> sudo service network restart
Checking VPN Status
The following commands can be helpful in checking or troubleshooting your VPN status:
Prompt> sudo ipsec verify
(checks the status of the services required for OpenSWAN to run properly)
Prompt> sudo service ipsec status
(checks the status of the OpenSWAN service and the VPN tunnels)
Connecting Additional VPCs
You can connect additional VPCs by simply repeating the steps above while creating additional IPSec configuration and secrets files in /etc/ipsec.d. For example, on VPC1/EIP1 instance, /etc/ipsec.d could have the following files to connect a 3rd and 4th VPC via VPN:
vpc1-to-vpc2.conf
vpc1-to-vpc2.secrets
vpc1-to-vpc3.conf
vpc1-to-vpc3.secrets
vpc1-to-vpc4.conf
vpc1-to-vpc4.secrets
The EC2 VPN instances in these additional VPCs would have corresponding files like those created for VPC #2 above.
Appendix: High-Level HA Architecture for VPN Instances
Creating a fully redundant VPC connection between VPCs in two regions requires the setup and configuration of four VPN instances and monitoring instances to monitor the health of the VPN connections.
We recommend configuring your VPC route tables to leverage all VPN instances simultaneously by directing traffic from all of the subnets in one Availability Zone through its respective VPN instances in the same Availability Zone. Each VPN instance will then provide cross-VPC connectivity for instances that share the same Availability Zone.
VPN Monitoring Instance(s)
The VPN Monitor is a custom instance that you will need to create and develop monitoring scripts to run on. This instance is intended to run and monitor the state of VPN connection and VPN instances. If a VPN instance or connection goes down, the monitor will need to stop, terminate, or restart the VPN instance while also rerouting traffic from one subnet to the working VPN instance until both connections are functional. High Availability for Amazon VPC NAT Instances: An Example provides an example of a script that could be modified to run on the VPN instances or a separate monitoring instance to preform this function.
source address: https://aws.amazon.com/articles/5472675506466066


