pointpillars代码阅读----prep_pointcloud篇
Brief
这一篇内容主要是对函数prep_pointcloud进行debug和记录,这里也是dataloader的大部分内容,同时也涉及到gt的loss函数部分。作者的function breif如下:
	convert point cloud to voxels, create targets if ground truths exists.
    input_dict format: dataset.get_sensor_data format
说明只有在gt存在时,才会有target,那么那些空的anchor的七个维度是用什么代替的呢。
在写正文前先要了解一些python的parttial函数:partial 函数的功能就是:把一个函数的某些参数给固定住,返回一个新的函数。
作者在dataset_builder.py函数中如下调用了函数prep_pointcloud,实际上也就是把prep_pointcloud重载了一遍,因为prep_pointcloud直接调用需要传入很多参数,作者把很多参数都固定下来:
 prep_func = partial(
        prep_pointcloud,
        root_path=dataset_cfg.kitti_root_path,
        voxel_generator=voxel_generator,
        target_assigner=target_assigner,
        training=training,
        max_voxels=prep_cfg.max_number_of_voxels,
        remove_outside_points=False,
        。。。
因此如果查看函数prep_pointcloud的使用,只需要查看函数prep_func的调用就行了。其中函数prep_func在调用时需要传入没有被固定下来的参数。
后面作者进行了又一次的重载,本次只是固定了一个参数anchor_cache
prep_func = partial(prep_func, anchor_cache=anchor_cache)
重要输入参数
由于上面的重载,很多参数都不需要再次传入,但是为了理解,我们先来看那些固定不变的参数中比较重要的。
第一次partial时固定的重要参数:
| partial_one时的参数 | shape | 含义 |
|---|---|---|
| root_path=dataset_cfg.kitti_root_path | - | kitti数据路径 |
| voxel_generator=voxel_generator | - | 数据类型是VoxelGeneratorV2,内容含有voxel_size,grid_size,max_voxels等 ,用于生成voxels,但是并不能把点放进去,没有点信息,但是有一个_coor_to_voxelidx[40,1280,1056],目前内容全是-1,猜测是voxel中是否有点的表征 |
| target_assigner | - | 数据类型是TargetAssigner, 主要内容包含一个_anchor_generate(list,4个anchorGeanerateRange,每一个的内容就是config中claassSetting的内容,并不能生成voxel,但是包含了其主要的range信息), _box_coder(GroundBbox3dCoderTorch数据类型,内容只有_code_size=7),_classes(list,大小是4,[“car”,“cylist”,“pedestrain”,“van”]),_feature_map_sizes(list,大小是4,对应每一个classes的最终的feature_map,因为四个类别的fea都是一样的,因此就是4个[bs,160,132]) |
| anchor_cache | dict,len=5 | 含有4个ndarry,分别是anchor,anchor_bv,matched_thresholds,unmatch_thresholds 和1个dictanchor_dict。最后一个dict包含前4种的gt形式.下一个表展开讲 |
| 不是很重要 |
- anchor_cache
上文表格的第4个路径,也是第二次paritial所固定的参数。因为比较重要,所以展开做表如下,同时这一个也是第二次partiacl:
prep_func = partial(prep_func, anchor_cache=anchor_cache)
| 第二次partial内容 | shape | 含义 |
|---|---|---|
| anchor | [160×132×2×4,7] | 7维度内容分别是[x,y,z,w,l,h,yaw],其中每一共四个class,每一个class有 [ 160 ∗ 132 ∗ 2 , 7 ] [160*132*2,7] [160∗132∗2,7]个维度大小,所以在这个ndarray的前42240个元素是对应着car的rotat为[0,1.57];第42240到84480对应着Cyclist的两个旋转向[0,1.57],第84480到126720对应着Van的两个朝向[0,1.57],最后一部分则是对应着Pedestrian的两个朝向[0,1.57](在nuscene中Pedestrian只有一个方向,这个有两个);综合一下,anchors也就是划分的anchor |
| anchors_bv | [160×132×2×4,4] | 因为这相当于是在俯视图上划分的anchor,只需要最左上和最右下两个坐标就可以了,主要内容同上,分别对应着car,cyclist,van,pedestarain的 [ x 1 , y 1 ; x 2 , y 2 ] [x_1,y_1;x_2,y_2] [x1,y1;x2,y2](左上,右下),具体是如何通过上一个内容anchor 计算得到的anchor_bev,对应用三维anchor投影计算就行 |
| matched_threshods | [160×132×2×4,1] | 对应着每一类被认为是pos的IOU最小值 |
| unmatched_threshods | [160×132×2×4,1] | 对应着每一类被认为是neg的IOU最大值 |
| anchors_dict | dict,len=4 | 包含的4个dict分别是car,cylist,pedestrain,van,每一个对应的dict又都分别包含achnors,matched_thresholds,unmatch_thresholds 三个nadarry;以car为例,写在下一个单元格 |
| anchors_dict {car,pedestrain,cyclist,van} |
[42240,7],[42240,1],[42240,1 ] | 这里三个shape分别表示 car的anchors,matched_thresholds,unmatched_thresholds,每一个元素大小都是 [42240,*],内容都还是空的,只是定义好shape |
使用
上面在preprocess.py文件中定义的函数实际上仅仅是把prep_pointcloud重载,固定参数后变成了函数prep_func,最后返回为dataset的一个函数成员。
在kitti_dataset.py文件中的 __getitem__函数中
    def __getitem__(self, idx):
        input_dict = self.get_sensor_data(idx)
        example = self._prep_func(input_dict=input_dict)
果然,其他参数都固定了就只需要传入第一个参数就可以了。
函数第一句:
input_dict = self.get_sensor_data(idx)
得到的input_dict是一个dict含有len=4(lidar,metadata,calib,cam)四个dict,分别如下:
| input_dict的内容 | shape | 含义 |
|---|---|---|
| lidar | points(nadarry)[numponts,4]; annotations(dict)[boxes(nadarry,【n,7】);.names(nadarry,【n,】)] |
points 表示输入的一块点云点的个数,后面的 annotations中有两个元素,第一个元素是gt的三维包围框,第二个元素names是对应的包围框的名字 |
| metada | dict,{image_idx(1);image_shape(nadarry[2])} | 第一个元素对应着上文输入的点云在image_2的二维图像,第二个元素的image_shape是对应的图像大小. |
| calib | dict{rect,Trv2c,P2} | 三维和二维的变换矩阵 |
| cam | dict{annotation{boxes(nadarry[n,4]),names(ndarray[n,1])}} | 二维gt_box以及对应的class_name |
第二句函数,进入函数_prep_func,input_dict内容如上表示了gt的7个维度。
example = self._prep_func(input_dict=input_dict)
这里进入的函数直接是prep_pointcloud,简单叙述一下主要过程:
(1)输入预处理,得到三维数据中gt_box----
anno_dict,再分离出对应的gt_box和names,
        gt_dict = {
            "gt_boxes": anno_dict["boxes"],
            "gt_names": anno_dict["names"],
            "gt_importance": np.ones([anno_dict["boxes"].shape[0]], dtype=anno_dict["boxes"].dtype),
        }
(2)计算gt_mask:
gt_boxes_mask = np.array( [n in class_names for n in gt_dict["gt_names"]], dtype=np.bool_)
上式中,目的就是得到在label中的gt是不是我们所需要的gt,比如gt对
car,tram等都会进行标注,但是实际上,我们使用仅仅是对car进行回归,所以我们这里的gt_boxes_mask 的shape为[n,1]=[true,false](3)在db中进行采样。代码最下:
首先,仅仅是对需要检测的classes进行曾广[car×9,pedestrian×6,cyclist×5,van×2],也就是随机采样了22个gt。
然后,配备了每一个gt的gt_box以及对应的points(这是在当前点云里吗)
其次,有一个元素含义为group_ids就是包括原来点云中的gt的按照顺序的编码。
最终得到一个sample_dict,如下表.
            sampled_dict = db_sampler.sample_all(
                root_path,
                gt_dict["gt_boxes"],
                gt_dict["gt_names"],
                num_point_features,
                random_crop,
                gt_group_ids=group_ids,
                calib=calib)
| sample_dict元素 | shape | 含义 |
|---|---|---|
| gt_names | [sample_num,1] | 采样的每一个元素的class name{car,pedestarian,cyclist,van} |
| difficulty | [sample_num,1] | 困难程度 |
| gt_boxes | [sample_num,7] | 在该点云中的gt位置[x,y,z,w,h,l] |
| points | [sample_points,4] | sample数据在该点云中的位置,点云个数不确定 |
| gt_masks | [sample_num,1] | 采样的都是需要分类的class{car,pedestarian,cyclist,van} ,因此都是true |
| group_ids | [sample_num,1] | 在该点云中的gt进行编号,原始点云有2个gt,因此采样的22个编号依次是[3,4,5,…] |
(4)把本来的gt和sample的组合在一起,如下代码,concat在一起就完事了,最后一行是把采样得到的点也和原来的点云concate 在一起(intial_numponits+sample_num)
  gt_dict["gt_names"] = np.concatenate(
                    [gt_dict["gt_names"], sampled_gt_names], axis=0)
                gt_dict["gt_boxes"] = np.concatenate(
                    [gt_dict["gt_boxes"], sampled_gt_boxes])
                gt_boxes_mask = np.concatenate(
                    [gt_boxes_mask, sampled_gt_masks], axis=0)
                sampled_gt_importance = np.full([sampled_gt_boxes.shape[0]], sample_importance, dtype=sampled_gt_boxes.dtype)
                gt_dict["gt_importance"] = np.concatenate(
                    [gt_dict["gt_importance"], sampled_gt_importance])
                points = np.concatenate([sampled_points, points], axis=0)
(5)随机shuffe,在函数
noise_per_object_v3_,按照作者自己的原文是:random rotate or remove each groundtrutn independently.use kitti viewer to test this function points_transform_
        prep.noise_per_object_v3_(
            gt_dict["gt_boxes"],
            points,
            gt_boxes_mask,
            rotation_perturb=gt_rotation_noise,
            center_noise_std=gt_loc_noise_std,
            global_random_rot_range=global_random_rot_range,
            group_ids=group_ids,
            num_try=100)
(6)再经过gt_mask的 筛选,前面说过在原始的gt中会有不是想要使用的gt{tram等},其对应的gt_mask的值是false,因此可以根据这个把它排除在gt_dict外,如下函数,经过了这个操作后,原本是[24,1]的gt_box也就成了[23,1]的gt_box。
_dict_select(gt_dict, gt_boxes_mask)
(7)根据gt_names得到对应的gt_classes,也就是一个映射关系{car–1,van—4,pedestrain,3,cyclist–2}
        gt_classes = np.array(
            [class_names.index(n) + 1 for n in gt_dict["gt_names"]],
            dtype=np.int32)
        gt_dict["gt_classes"] = gt_classes
(8)曾广操作,比如旋转,缩放等。
(9)将gt_box中的在点云外的gt排除掉(对应的mask设置为false),再一次清理不符合规范的gt_boxes,最后得到更少的gt。也就是在本函数中要进行两次的排除,第一次是根据names在不在需要det的范围内,第二次是得到的sample的gt是否在点云中.
        mask = prep.filter_gt_box_outside_range_by_center(gt_dict["gt_boxes"], bv_range)
        _dict_select(gt_dict, mask)
(10)
gt_dict["gt_boxes"][:, 6]表示的是旋转角度,在于原始数据中范围不是[-pi,pi],需要把它弄到这个区间中。
        gt_dict["gt_boxes"][:, 6] = box_np_ops.limit_period(
            gt_dict["gt_boxes"][:, 6], offset=0.5, period=2 * np.pi)
(11)对points进行shuffle,上面的一些数据曾广策略都是针对gt的,这一个是对全局的points。实际上有没有用我也不知道。
np.random.shuffle(points)
(12)生成voxel,终于来了!!!(研究这个函数的目的就是知道对应的gt是如何被放到voxel中的),输入的points大小是加入了sample后的size(intial_num+sample_num,4),但是最后生成的voxel的shape大小和intial_num一样大。如下表:
        res = voxel_generator.generate(
            points, max_voxels)
| res 元素 | shape | 含义 |
|---|---|---|
| voxels | [intial_num,5,4] | shpe的第一个维度是针对存在的点来的,和原始点云数目一样多个voxels,也就是都是非空的;采样过程应该是:如果有point落在voxel中,那么该voxel则是被记录的,并且里面每一个点都会重复表示一次,有几个点这个voxel就被表示多少次 |
| coordinates | [intial_num,3] | 不是表示坐标信息,而是每一个点在哪一个voxel中的索引,3个维度分别是(x,y,z) |
| num_points_per_voxel | [intial_num,1] | 每一个voxel中具有几个点 |
| voxel_point_mask | [intial_num,5,1] | 因为一个voxel钟最大的Points数目是5,如果一个voxel中存在2个点,那么这两个点的索引就是1,剩下3个点的缩影是0 |
(13)根据out_size_factor(在config文件中设置的下采样因子)计算feature_map的size,最后也就是[1280,1056]//8=[160,132]–>[bs,160,132]
    feature_map_size = grid_size[:2] // out_size_factor
    feature_map_size = [*feature_map_size, 1][::-1]
(14)填充到example中去,经过上面的voxel生成就得到了example的前几个内容{voxels ,num_points,coordinates,num_voxels,metrics},metrics中目前只有生成voxel的时间。
    example = {
        'voxels': voxels,
        'num_points': num_points,
        'coordinates': coordinates,
        "num_voxels": num_voxels,
        "metrics": metrics,
    }
后续继续添加剩下的 信息:
example["calib"] = calib
example["anchors"] = anchors#也就是上文的anchors[40,1056,1280]
继续添加gt对应的names,
example["gt_names"] = gt_dict["gt_names"]
(15)create_targets,也就是把gt和anchor联系起来的操作,函数如下:
        targets_dict = target_assigner.assign(
            anchors,
            anchors_dict,
            gt_dict["gt_boxes"],
            anchors_mask,
            gt_classes=gt_dict["gt_classes"],
            gt_names=gt_dict["gt_names"],
            matched_thresholds=matched_thresholds,
            unmatched_thresholds=unmatched_thresholds,
            importance=gt_dict["gt_importance"])
输入的内容上文中都能找到,其中anchors_mask=None;输入的前两个是有关anchor的(3维度的anchor[40,1280,1056]),后面几个参数则是有关于gt的。
接下来在traget_assigner.py文件中进入函数self.assign_per_class:
    def assign_per_class(self,
                         anchors_dict,
                         gt_boxes,
                         anchors_mask=None,
                         gt_classes=None,
                         gt_names=None,
                         importance=None):
该函数是对每一类别的gt分别处理,含有一个for循环:
for class_name, anchor_dict in anchors_dict.items():
也就是对{car,cyclist,pedestrain,van}分别处理到anchor中去,因此这里就仅仅以car为例讲解是如何把gt和anchor对应起来的 。下面的函数步骤就是在这个for循环中的。
1’ 在gt_maks中只对car设置为true,因为这里只对car做处理,gt_mask是[21,1]的其中车子为true的为前九个,因此mask为[true,true,…,false,false](前九个是true)
mask = np.array([c == class_name for c in gt_names],dtype=np.bool_)
2’ 取出car的anchor的参数。在上面的for循环中已经得到了car的{anchor,matched_threshold和unmatched_threshold},这里的这三个元素已经有了内容,也就是前文中的的car在xy面上的anchor大小。anchor的大小是[42240,]
num_loc = anchor_dict["anchors"].shape[-2]
3’ 使用函数
create_target_np,传入的参数第一个car的anchor,第二个是car的gt_box,所以这一个函数就是把car的gt和car的anchor联系起来。
 targets = create_target_np(
                anchor_dict["anchors"].reshape(-1, self.box_ndim),
                gt_boxes[mask],
                similarity_fn,
                box_encoding_fn,
                prune_anchor_fn=prune_anchor_fn,
                gt_classes=gt_classes[mask],
                matched_threshold=anchor_dict["matched_thresholds"],
                unmatched_threshold=anchor_dict["unmatched_thresholds"],
                positive_fraction=self._positive_fraction,
                rpn_batch_size=self._sample_size,
                norm_by_num_examples=False,
                box_code_size=self.box_coder.code_size,
                gt_importance=importance)
这个函数的处理过程主要如下:
1" 获取anchor[42240,7],建立内容全是-1的labels和gt_ids[42240,1](初始化全为-1)以及建立内容全是1的importance[42240,1]。
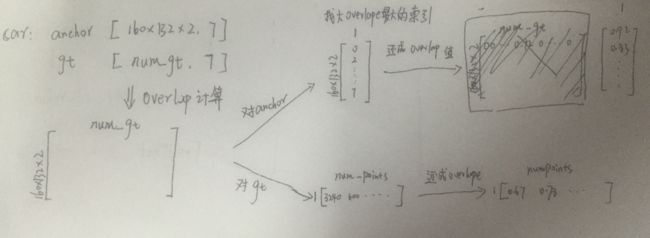
2" 计算anchors和car的gt_boxes的overlap。得到的anchor_by_gt_overlap 的大小为[42240,9],(为什么会是9,是因为car是具有9个gt的,在这一块点云中.)
anchor_by_gt_overlap = similarity_fn(anchors, gt_boxes)3" 找到anchor_by_gt_overlap 在dimm=1上的最大值得索引,使用函数
numpy.argmax(dim=1),所以最后得到的anchor_to_gt_argmax大小是[42240,1](表示9个gt中,anchor和其对应的overlap重叠最大的anchor的索引)
anchor_to_gt_argmax = anchor_by_gt_overlap.argmax(axis=1)4" 根据每一个anhcor对应的最大overlap的gt的索引,索引回去得到最大的overlap).如下:
anchor_to_gt_max = anchor_by_gt_overlap[np.arange(num_inside),anchor_to_gt_argmax]5" 同样,对每一个gt,找对对应overlap最大的anchor:
gt_to_anchor_argmax = anchor_by_gt_overlap.argmax(axis=0)6" 一样的,把每一个gt对应的anchor最大的overlap还回去得到overlap值
gt_to_anchor_max = anchor_by_gt_overlap[gt_to_anchor_argmax, np.arange(anchor_by_gt_overlap.shape[1])]
7" 最后再把那些没有和任何anchor有overlap的gt去掉。
上述的过程用图像可以表示为下图的过程
8" 上面几个步骤得到了
gt_to_anchor_max是为了找到那些最大overlap是同一个gt的anchors,anchors_with_max_overlap [gt_num+repeat_num](这里的大小是10,对于第一个gt有两个anchor都是和它的具有相同的最大overlap(amazing)很相近的两个anchor具有同样的overlap),其中anchors_with_max_overlap中的值表示gt对应最大anchor的位置索引.gt_inds_force 则是对应的最大overlap的anchors[10,1]对应的car的gt的label索引[10,1] (对9个gt分别用0~8表示)
anchors_with_max_overlap = np.where(anchor_by_gt_overlap == gt_to_anchor_max)[0]
gt_inds_force = anchor_to_gt_argmax[anchors_with_max_overlap]9" 对laels中的对应anchors为最大overlap打上label为:car----1;同时给
gt_ids赋值成gt_inds_force(对应的位置上为car的9个gt的编号(0~9),那么到时候,pedestrain的gt又会重新初始化一个gt_ids,因此不会有问题,这个数组的含义是每一个anchor对应的最大overlap的索引.)
labels[anchors_with_max_overlap] = gt_classes[gt_inds_force]
gt_ids[anchors_with_max_overlap] = gt_inds_force10" 根据
matched_threshold确定pos_id;anchor_to_gt_max(每一个anchor对应的最大overlap值),对于car而言,IOU大于0.6才算是pos的,对应的pos_inds [42440,1]的值才会是true,不然就是false。
同时,找到这些anchors对应的gt的编号(0~9),本次实验中,居然有47个anchor和gt的overlap超过了0.6.
pos_inds = anchor_to_gt_max >= matched_threshold
gt_inds = anchor_to_gt_argmax[pos_inds]11" 把那些IOU和gt超过0.6的labels也打上car的label—1;同时把anchors对应gt编号做好记录(0~9);稍微总结一下,上面经过一些操作把两类anchor当做的pos的,其一是和每一个gt的IOU最大的anchors,其二是那些和gt的IOU超过了0.6的anchors;找到之后需要做的是,第一:把该anchor的labels设置为car(对应数字1),第二:把该anchor对应的car的gt的编号记录下来(gt_ids(0~9)),这样在train时,一个anchor有了对应的label,同时也有了对应的gt_box
labels[pos_inds] = gt_classes[gt_inds]
gt_ids[pos_inds] = gt_inds12" 找到那些IOU小于0.45的,当做背景,也就是neg的。也就不用标记什么的.背景的label都是0,对应的gt_id是-1。那些介于0.45~0.6的anchor则是label是-1.
13" 初始化建立
bbox_targets,[482440,7],然后根据上面的前景的anchors的索引,将其对应的gt的gt_box换上去,背景对应的每一个维度都是0。
bbox_targets[fg_inds, :] = box_encoding_fn( gt_boxes[anchor_to_gt_argmax[fg_inds], :], anchors[fg_inds, :])14" 设置pos的anchors的权重为1,背景点的权重为0;
bbox_outside_weights = np.zeros((num_inside, ), dtype=all_anchors.dtype)
bbox_outside_weights[labels > 0] = 1.0
最后该函数算是把anchor和对应的gt联系起来了,然后对每一个的class进行一次这个操作就可以得到多分类的工作了。最后该函数返回如下,其中第一个labels表示该anchor表示哪一类class(car),第二个参数
bbox_targets则是每一个anchor对应的gt的回归维度(dim=7);第三个参数是前景点的权重(=1);最后一个参数则是被判定为pos的anchors的索引.
    ret = {
        "labels": labels,
        "bbox_targets": bbox_targets,
        "bbox_outside_weights": bbox_outside_weights,
        "assigned_anchors_overlap": fg_max_overlap,
        "positive_gt_id": gt_pos_ids,
        "importance": importance,
        "assigned_anchors_inds":fg_inds,
    }
上面讲的函数是create_target_np函数对car的gt和anchor联合的操作,现在回到create_target_np被调用的函数assign_per_class函数上来,在对每一个的class分别进行了gt和anchor的联合操作后,都会加上对应的anchor数量,以及把得到的targets给append进一个List中去:
	for。。。。。。。。。
			targets=create_target_np(。。。。。。)
            anchor_loc_idx += num_loc
            targets_list.append(targets)
            anchor_gene_idx += 1
然后在for循环后面,作者把所有target整合到一个targets_dict中:
首先是把所有targets_list中的内容分门别类对应分好,对cls分类有用的labels,对回归有用的bbox_targets,每一个元素应该都具有num_classs=4{car,cyclist,car,pedestrain}个nadarry.
        targets_dict = {
            "labels": [t["labels"] for t in targets_list],
            "bbox_targets": [t["bbox_targets"] for t in targets_list],
            "importance": [t["importance"] for t in targets_list],
        }
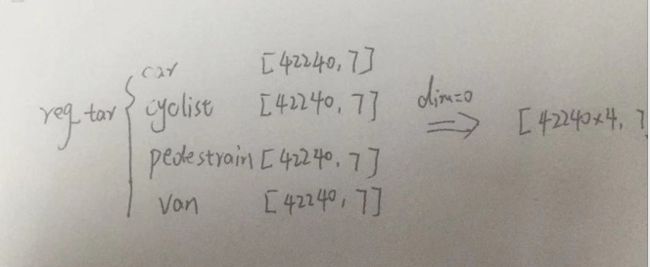
然后是对reg有用的bbox_targets进行concate(dim=0)
        targets_dict["bbox_targets"] = np.concatenate([
            v.reshape(-1, self.box_coder.code_size)
            for v in targets_dict["bbox_targets"]
        ],axis=0)
如下图所示:

同样我们也要把和cls有关的labelsconcate一下:
        targets_dict["labels"] = np.concatenate(
            [v.reshape(-1) for v in targets_dict["labels"]],
            axis=0)
因此最后得到的labels[42240×4,1](其中car–1,cyclist–2,pedestrain–3,van–4,背景anchor对应0,无关anchor对应是-1);最后得到的bbox_targets[42240×4,7] (前面42240个anchor如果对应7个维度不是-1,那么其对应的gt表示car;后续的42240依次是cyclist,pedestrain,van)
(fianlly)回到最主要的函数
prep_pointcloud中,前面做了那么多工作也就是为了得到这样一个anchor和gt之间的对应关系,最后加载进example中
        example.update({
            'labels': targets_dict['labels'],
            'reg_targets': targets_dict['bbox_targets'],
            # 'reg_weights': targets_dict['bbox_outside_weights'],
            'importance': targets_dict['importance'],
        })
            return example
因此example的内容就都齐全了,回归架构篇会更明显。
