动手学深度学习PyTorch-打卡3
一、数据增强
大规模数据集是成功应用深度神经网络的前提。图像增广(image augmentation)技术通过对训练图像做一系列随机改变,来产生相似但又不同的训练样本,从而扩大训练数据集的规模。图像增广的另一种解释是,随机改变训练样本可以降低模型对某些属性的依赖,从而提高模型的泛化能力。例如,我们可以对图像进行不同方式的裁剪,使感兴趣的物体出现在不同位置,从而减轻模型对物体出现位置的依赖性。我们也可以调整亮度、色彩等因素来降低模型对色彩的敏感度。可以说,在当年AlexNet的成功中,图像增广技术功不可没。
常用的图像增广方法
翻转和裁剪
左右翻转图像通常不改变物体的类别。它是最早也是最广泛使用的一种图像增广方法。下面我们通过torchvision.transforms模块创建RandomHorizontalFlip实例来实现一半概率的图像水平(左右)翻转。
apply(img, torchvision.transforms.RandomHorizontalFlip())
上下翻转不如左右翻转通用。但是至少对于样例图像,上下翻转不会造成识别障碍。下面我们创建RandomVerticalFlip实例来实现一半概率的图像垂直(上下)翻转。
apply(img, torchvision.transforms.RandomVerticalFlip())
在之前我们解释了池化层能降低卷积层对目标位置的敏感度。除此之外,我们还可以通过对图像随机裁剪来让物体以不同的比例出现在图像的不同位置,这同样能够降低模型对目标位置的敏感性。
在下面的代码里,我们每次随机裁剪出一块面积为原面积10%~100%的区域,且该区域的宽和高之比随机取自0.5~2,然后再将该区域的宽和高分别缩放到200像素。若无特殊说明,a和b之间的随机数指的是从区间【a,b】中随机均匀采样所得到的连续值。
shape_aug = torchvision.transforms.RandomResizedCrop(200, scale=(0.1, 1), ratio=(0.5, 2))
apply(img, shape_aug)
变化颜色
另一类增广方法是变化颜色。我们可以从4个方面改变图像的颜色:亮度(brightness)、对比度(contrast)、饱和度(saturation)和色调(hue)。在下面的例子里,我们将图像的亮度随机变化为原图亮度的50%(1-0.5)~150%(1+0.5)。
apply(img, torchvision.transforms.ColorJitter(brightness=0.5, contrast=0, saturation=0, hue=0))
我们也可以随机变化图像的色调
apply(img, torchvision.transforms.ColorJitter(brightness=0, contrast=0, saturation=0, hue=0.5))
类似的我们也可以随机变化图像的对比度
apply(img, torchvision.transforms.ColorJitter(brightness=0, contrast=0.5, saturation=0, hue=0))
我们也可以同时设置如何随机变化图像的亮度(brightness)、对比度(contrast)、饱和度(saturation)和色调(hue)。
color_aug = torchvision.transforms.ColorJitter(brightness=0.5, contrast=0.5, saturation=0.5, hue=0.5)
apply(img, color_aug)
叠加多个图像增广方法
实际应用中我们会将多个图像增广方法叠加使用。我们可以通过Compose实例将上面定义的多个图像增广方法叠加起来,再应用到每张图像之上。
augs = torchvision.transforms.Compose([
    torchvision.transforms.RandomHorizontalFlip(), color_aug, shape_aug])
apply(img, augs)
使用图像增广训练模型
下面我们来看一个将图像增广应用在实际训练中的例子。这里我们使用CIFAR-10数据集,而不是之前我们一直使用的Fashion-MNIST数据集。这是因为Fashion-MNIST数据集中物体的位置和尺寸都已经经过归一化处理,而CIFAR-10数据集中物体的颜色和大小区别更加显著。下面展示了CIFAR-10数据集中前32张训练图像。
CIFAR_ROOT_PATH = '/home/kesci/input/cifar102021'
all_imges = torchvision.datasets.CIFAR10(train=True, root=CIFAR_ROOT_PATH, download = True)
# all_imges的每一个元素都是(image, label)
show_images([all_imges[i][0] for i in range(32)], 4, 8, scale=0.8);
为了在预测时得到确定的结果,我们通常只将图像增广应用在训练样本上,而不在预测时使用含随机操作的图像增广。在这里我们只使用最简单的随机左右翻转。此外,我们使用ToTensor将小批量图像转成PyTorch需要的格式,即形状为(批量大小, 通道数, 高, 宽)、值域在0到1之间且类型为32位浮点数。
flip_aug = torchvision.transforms.Compose([
     torchvision.transforms.RandomHorizontalFlip(),
     torchvision.transforms.ToTensor()])

no_aug = torchvision.transforms.Compose([
     torchvision.transforms.ToTensor()])
接下来我们定义一个辅助函数来方便读取图像并应用图像增广。
num_workers = 0 if sys.platform.startswith('win32') else 4
def load_cifar10(is_train, augs, batch_size, root=CIFAR_ROOT_PATH):
    dataset = torchvision.datasets.CIFAR10(root=root, train=is_train, transform=augs, download=False)
    return DataLoader(dataset, batch_size=batch_size, shuffle=is_train, num_workers=num_workers)
我们先定义train函数使用GPU训练并评价模型。
def train(train_iter, test_iter, net, loss, optimizer, device, num_epochs):
    net = net.to(device)
    print("training on ", device)
    batch_count = 0
    for epoch in range(num_epochs):
        train_l_sum, train_acc_sum, n, start = 0.0, 0.0, 0, time.time()
        for X, y in train_iter:
            X = X.to(device)
            y = y.to(device)
            y_hat = net(X)
            l = loss(y_hat, y)
            optimizer.zero_grad()
            l.backward()
            optimizer.step()
            train_l_sum += l.cpu().item()
            train_acc_sum += (y_hat.argmax(dim=1) == y).sum().cpu().item()
            n += y.shape[0]
            batch_count += 1
        test_acc = d2l.evaluate_accuracy(test_iter, net)
        print('epoch %d, loss %.4f, train acc %.3f, test acc %.3f, time %.1f sec'
              % (epoch + 1, train_l_sum / batch_count, train_acc_sum / n, test_acc, time.time() - start))
然后就可以定义train_with_data_aug函数使用图像增广来训练模型了。该函数使用Adam算法作为训练使用的优化算法,然后将图像增广应用于训练数据集之上,最后调用刚才定义的train函数训练并评价模型。
def train_with_data_aug(train_augs, test_augs, lr=0.001):
    batch_size, net = 256, d2l.resnet18(10)
    optimizer = torch.optim.Adam(net.parameters(), lr=lr)
    loss = torch.nn.CrossEntropyLoss()
    train_iter = load_cifar10(True, train_augs, batch_size)
    test_iter = load_cifar10(False, test_augs, batch_size)
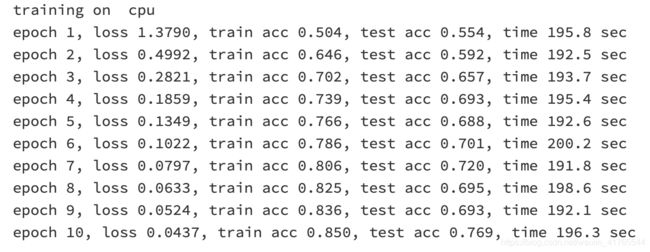
    train(train_iter, test_iter, net, loss, optimizer, device, num_epochs=10)
下面使用随机左右翻转的图像增广来训练模型。
train_with_data_aug(flip_aug, no_aug)
二、图像风格迁移
样式迁移
如果你是一位摄影爱好者,也许接触过滤镜。它能改变照片的颜色样式,从而使风景照更加锐利或者令人像更加美白。但一个滤镜通常只能改变照片的某个方面。如果要照片达到理想中的样式,经常需要尝试大量不同的组合,其复杂程度不亚于模型调参。
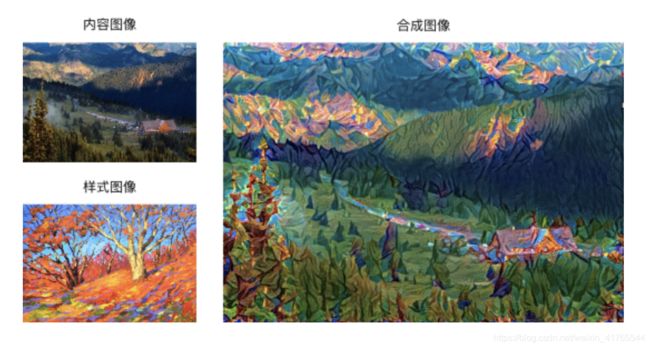
我们将介绍如何使用卷积神经网络自动将某图像中的样式应用在另一图像之上,即样式迁移(style transfer)。这里我们需要两张输入图像,一张是内容图像,另一张是样式图像,我们将使用神经网络修改内容图像使其在样式上接近样式图像。图9.12中的内容图像为本书作者在西雅图郊区的雷尼尔山国家公园(Mount Rainier National Park)拍摄的风景照,而样式图像则是一副主题为秋天橡树的油画。最终输出的合成图像在保留了内容图像中物体主体形状的情况下应用了样式图像的油画笔触,同时也让整体颜色更加鲜艳。
原理
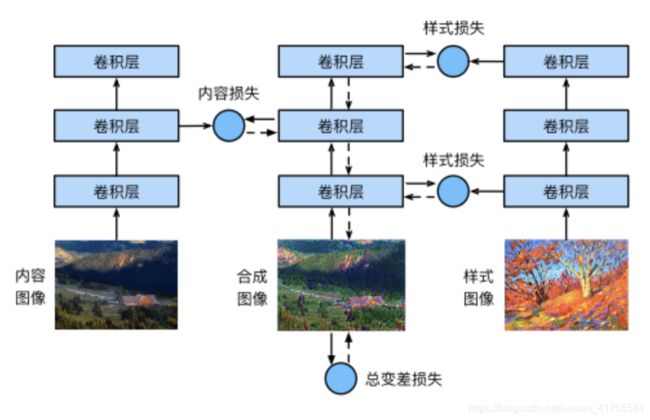
用一个例子来阐述基于卷积神经网络的样式迁移方法。首先,我们初始化合成图像,例如将其初始化成内容图像。该合成图像是样式迁移过程中唯一需要更新的变量,即样式迁移所需迭代的模型参数。然后,我们选择一个预训练的卷积神经网络来抽取图像的特征,其中的模型参数在训练中无须更新。深度卷积神经网络凭借多个层逐级抽取图像的特征。我们可以选择其中某些层的输出作为内容特征或样式特征。以图9.13为例,这里选取的预训练的神经网络含有3个卷积层,其中第二层输出图像的内容特征,而第一层和第三层的输出被作为图像的样式特征。接下来,我们通过正向传播(实线箭头方向)计算样式迁移的损失函数,并通过反向传播(虚线箭头方向)迭代模型参数,即不断更新合成图像。样式迁移常用的损失函数由3部分组成:内容损失(content loss)使合成图像与内容图像在内容特征上接近,样式损失(style loss)令合成图像与样式图像在样式特征上接近,而总变差损失(total variation loss)则有助于减少合成图像中的噪点。最后,当模型训练结束时,我们输出样式迁移的模型参数,即得到最终的合成图像。
预处理和后处理图像
下面定义图像的预处理函数和后处理函数。预处理函数preprocess对输入图像在RGB三个通道分别做标准化,并将结果变换成卷积神经网络接受的输入格式。后处理函数postprocess则将输出图像中的像素值还原回标准化之前的值。由于图像打印函数要求每个像素的浮点数值在0到1之间,我们使用clamp函数对小于0和大于1的值分别取0和1。
rgb_mean = np.array([0.485, 0.456, 0.406])
rgb_std = np.array([0.229, 0.224, 0.225])

def preprocess(PIL_img, image_shape):
    process = torchvision.transforms.Compose([
        torchvision.transforms.Resize(image_shape),
        torchvision.transforms.ToTensor(),
        torchvision.transforms.Normalize(mean=rgb_mean, std=rgb_std)])

    return process(PIL_img).unsqueeze(dim = 0) # (batch_size, 3, H, W)

def postprocess(img_tensor):
    inv_normalize = torchvision.transforms.Normalize(
        mean= -rgb_mean / rgb_std,
        std= 1/rgb_std)
    to_PIL_image = torchvision.transforms.ToPILImage()
    return to_PIL_image(inv_normalize(img_tensor[0].cpu()).clamp(0, 1))
抽取特征
下面定义两个函数,其中get_contents函数对内容图像抽取内容特征,而get_styles函数则对样式图像抽取样式特征。因为在训练时无须改变预训练的VGG的模型参数,所以我们可以在训练开始之前就提取出内容图像的内容特征,以及样式图像的样式特征。由于合成图像是样式迁移所需迭代的模型参数,我们只能在训练过程中通过调用extract_features函数来抽取合成图像的内容特征和样式特征。
def get_contents(image_shape, device):
    content_X = preprocess(content_img, image_shape).to(device)
    contents_Y, _ = extract_features(content_X, content_layers, style_layers)
    return content_X, contents_Y

def get_styles(image_shape, device):
    style_X = preprocess(style_img, image_shape).to(device)
    _, styles_Y = extract_features(style_X, content_layers, style_layers)
    return style_X, styles_Y
小结
- 样式迁移常用的损失函数由3部分组成:内容损失使合成图像与内容图像在内容特征上接近,样式损失令合成图像与样式图像在样式特征上接近,而总变差损失则有助于减少合成图像中的噪点。
- 可以通过预训练的卷积神经网络来抽取图像的特征,并通过最小化损失函数来不断更新合成图像。
- 用格拉姆矩阵表达样式层输出的样式。
三、模型微调
微调
我们介绍了如何在只有6万张图像的Fashion-MNIST训练数据集上训练模型。我们还描述了学术界当下使用最广泛的大规模图像数据集ImageNet,它有超过1,000万的图像和1,000类的物体。然而,我们平常接触到数据集的规模通常在这两者之间。
假设我们想从图像中识别出不同种类的椅子,然后将购买链接推荐给用户。一种可能的方法是先找出100种常见的椅子,为每种椅子拍摄1,000张不同角度的图像,然后在收集到的图像数据集上训练一个分类模型。这个椅子数据集虽然可能比Fashion-MNIST数据集要庞大,但样本数仍然不及ImageNet数据集中样本数的十分之一。这可能会导致适用于ImageNet数据集的复杂模型在这个椅子数据集上过拟合。同时,因为数据量有限,最终训练得到的模型的精度也可能达不到实用的要求。
为了应对上述问题,一个显而易见的解决办法是收集更多的数据。然而,收集和标注数据会花费大量的时间和资金。例如,为了收集ImageNet数据集,研究人员花费了数百万美元的研究经费。虽然目前的数据采集成本已降低了不少,但其成本仍然不可忽略。
另外一种解决办法是应用迁移学习(transfer learning),将从源数据集学到的知识迁移到目标数据集上。例如,虽然ImageNet数据集的图像大多跟椅子无关,但在该数据集上训练的模型可以抽取较通用的图像特征,从而能够帮助识别边缘、纹理、形状和物体组成等。这些类似的特征对于识别椅子也可能同样有效。
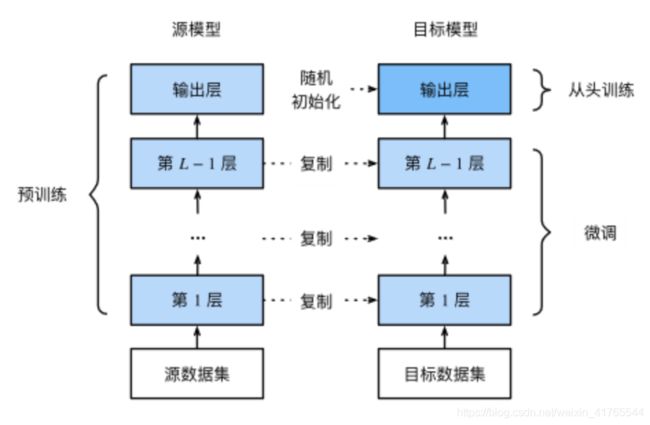
微调由以下4步构成:
- 在源数据集(如ImageNet数据集)上预训练一个神经网络模型,即源模型。
- 创建一个新的神经网络模型,即目标模型。它复制了源模型上除了输出层外的所有模型设计及其参数。我们假设这些模型参数包含了源数据集上学习到的知识,且这些知识同样适用于目标数据集。我们还假设源模型的输出层跟源数据集的标签紧密相关,因此在目标模型中不予采用。
- 为目标模型添加一个输出大小为目标数据集类别个数的输出层,并随机初始化该层的模型参数。
- 在目标数据集(如椅子数据集)上训练目标模型。我们将从头训练输出层,而其余层的参数都是基于源模型的参数微调得到的。
当目标数据集远小于源数据集时,微调有助于提升模型的泛化能力。
四、目标检测基础
锚框
目标检测算法通常会在输入图像中采样大量的区域,然后判断这些区域中是否包含我们感兴趣的目标,并调整区域边缘从而更准确地预测目标的真实边界框(ground-truth bounding box)。不同的模型使用的区域采样方法可能不同。这里我们介绍其中的一种方法:它以每个像素为中心生成多个大小和宽高比(aspect ratio)不同的边界框。这些边界框被称为锚框(anchor box)。我们将在后面基于锚框实践目标检测。
生成多个锚框
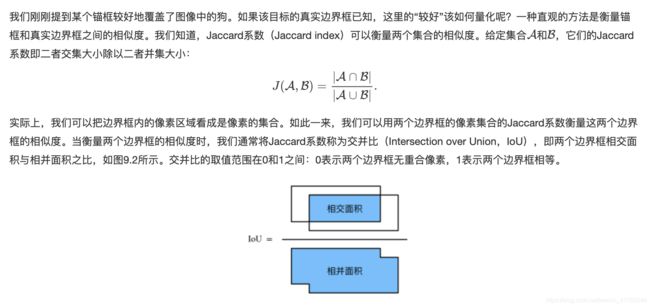
交并比
def compute_intersection(set_1, set_2):
    """
    计算anchor之间的交集
    Args:
        set_1: a tensor of dimensions (n1, 4), anchor表示成(xmin, ymin, xmax, ymax)
        set_2: a tensor of dimensions (n2, 4), anchor表示成(xmin, ymin, xmax, ymax)
    Returns:
        intersection of each of the boxes in set 1 with respect to each of the boxes in set 2, shape: (n1, n2)
    """
    # PyTorch auto-broadcasts singleton dimensions
    lower_bounds = torch.max(set_1[:, :2].unsqueeze(1), set_2[:, :2].unsqueeze(0))  # (n1, n2, 2)
    upper_bounds = torch.min(set_1[:, 2:].unsqueeze(1), set_2[:, 2:].unsqueeze(0))  # (n1, n2, 2)
    intersection_dims = torch.clamp(upper_bounds - lower_bounds, min=0)  # (n1, n2, 2)
    return intersection_dims[:, :, 0] * intersection_dims[:, :, 1]  # (n1, n2)


def compute_jaccard(set_1, set_2):
    """
    计算anchor之间的Jaccard系数(IoU)
    Args:
        set_1: a tensor of dimensions (n1, 4), anchor表示成(xmin, ymin, xmax, ymax)
        set_2: a tensor of dimensions (n2, 4), anchor表示成(xmin, ymin, xmax, ymax)
    Returns:
        Jaccard Overlap of each of the boxes in set 1 with respect to each of the boxes in set 2, shape: (n1, n2)
    """
    # Find intersections
    intersection = compute_intersection(set_1, set_2)  # (n1, n2)

    # Find areas of each box in both sets
    areas_set_1 = (set_1[:, 2] - set_1[:, 0]) * (set_1[:, 3] - set_1[:, 1])  # (n1)
    areas_set_2 = (set_2[:, 2] - set_2[:, 0]) * (set_2[:, 3] - set_2[:, 1])  # (n2)

    # Find the union
    # PyTorch auto-broadcasts singleton dimensions
    union = areas_set_1.unsqueeze(1) + areas_set_2.unsqueeze(0) - intersection  # (n1, n2)

    return intersection / union  # (n1, n2)
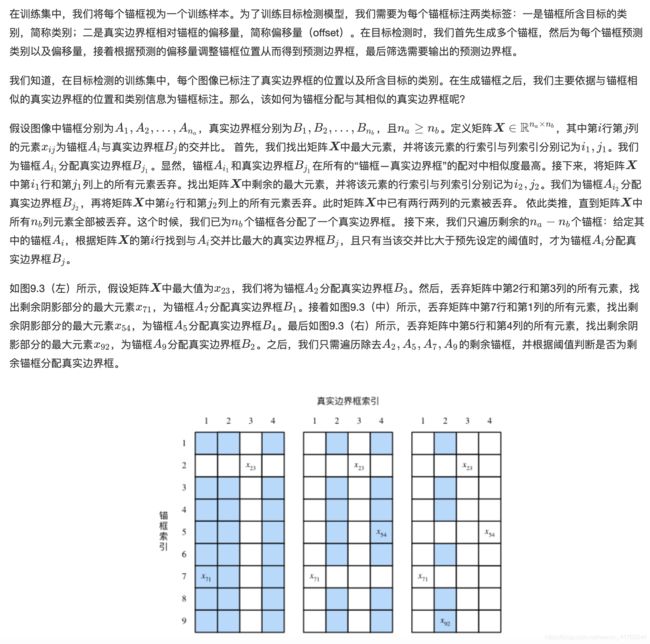
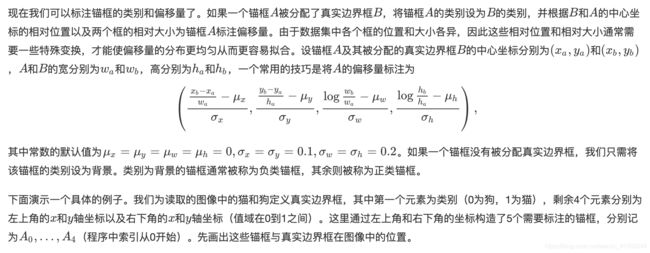
标注训练集的锚框
输出预测边界框
小结
- 以每个像素为中心,生成多个大小和宽高比不同的锚框。
- 交并比是两个边界框相交面积与相并面积之比。
- 在训练集中,为每个锚框标注两类标签:一是锚框所含目标的类别;二是真实边界框相对锚框的偏移量。
- 预测时,可以使用非极大值抑制来移除相似的预测边界框,从而令结果简洁。
多尺度目标检测
我们在实验中以输入图像的每个像素为中心生成多个锚框。这些锚框是对输入图像不同区域的采样。然而,如果以图像每个像素为中心都生成锚框,很容易生成过多锚框而造成计算量过大。举个例子,假设输入图像的高和宽分别为561像素和728像素,如果以每个像素为中心生成5个不同形状的锚框,那么一张图像上则需要标注并预测200多万个锚框(561x728x5)。
减少锚框个数并不难。一种简单的方法是在输入图像中均匀采样一小部分像素,并以采样的像素为中心生成锚框。此外,在不同尺度下,我们可以生成不同数量和不同大小的锚框。值得注意的是,较小目标比较大目标在图像上出现位置的可能性更多。举个简单的例子:形状为1x1、1x2和2x2的目标在形状为2x2的图像上可能出现的位置分别有4、2和1种。因此,当使用较小锚框来检测较小目标时,我们可以采样较多的区域;而当使用较大锚框来检测较大目标时,我们可以采样较少的区域。
五、图像分类案例
1、Kaggle上的图像分类(CIFAR-10)
# 本节的网络需要较长的训练时间
# 可以在Kaggle访问:
# https://www.kaggle.com/boyuai/boyu-d2l-image-classification-cifar-10
import numpy as np
import torch
import torch.nn as nn
import torch.optim as optim
import torchvision
import torchvision.transforms as transforms
import torch.nn.functional as F
import torch.optim as optim
from torchvision import datasets, transforms
import os
import time
获取和组织数据集
比赛数据分为训练集和测试集。训练集包含 50,000 图片。测试集包含 300,000 图片。两个数据集中的图像格式均为PNG,高度和宽度均为32像素,并具有三个颜色通道(RGB)。图像涵盖10个类别:飞机,汽车,鸟类,猫,鹿,狗,青蛙,马,船和卡车。 为了更容易上手,我们提供了上述数据集的小样本。“ train_tiny.zip”包含 80 训练样本,而“ test_tiny.zip”包含100个测试样本。它们的未压缩文件夹名称分别是“ train_tiny”和“ test_tiny”。
图像增广
data_transform = transforms.Compose([
    transforms.Resize(40),
    transforms.RandomHorizontalFlip(),
    transforms.RandomCrop(32),
    transforms.ToTensor()
])
trainset = torchvision.datasets.ImageFolder(root='/home/kesci/input/CIFAR102891/cifar-10/train', transform=data_transform)

# 图像增强
transform_train = transforms.Compose([
    transforms.RandomCrop(32, padding=4),  #先四周填充0,再把图像随机裁剪成32*32
    transforms.RandomHorizontalFlip(),  #图像一半的概率翻转,一半的概率不翻转
    transforms.ToTensor(),
    transforms.Normalize((0.4731, 0.4822, 0.4465), (0.2212, 0.1994, 0.2010)), #R,G,B每层的归一化用到的均值和方差
])

transform_test = transforms.Compose([
    transforms.ToTensor(),
    transforms.Normalize((0.4731, 0.4822, 0.4465), (0.2212, 0.1994, 0.2010)),
])
导入数据集
train_dir = '/home/kesci/input/CIFAR102891/cifar-10/train'
test_dir = '/home/kesci/input/CIFAR102891/cifar-10/test'

trainset = torchvision.datasets.ImageFolder(root=train_dir, transform=transform_train)
trainloader = torch.utils.data.DataLoader(trainset, batch_size=256, shuffle=True)

testset = torchvision.datasets.ImageFolder(root=test_dir, transform=transform_test)
testloader = torch.utils.data.DataLoader(testset, batch_size=256, shuffle=False)

classes = ['airplane', 'automobile', 'bird', 'cat', 'deer', 'dog', 'forg', 'horse', 'ship', 'truck']
定义模型
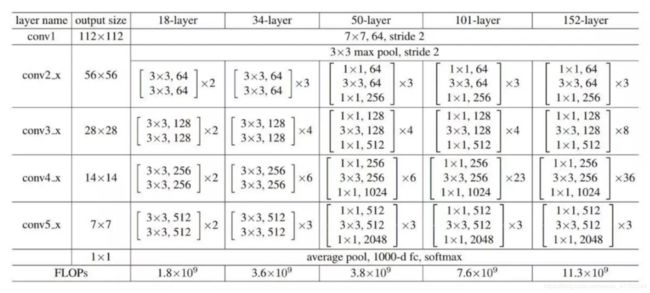
ResNet-18网络结构:ResNet全名Residual Network残差网络。Kaiming He 的《Deep Residual Learning for Image Recognition》获得了CVPR最佳论文。他提出的深度残差网络在2015年可以说是洗刷了图像方面的各大比赛,以绝对优势取得了多个比赛的冠军。而且它在保证网络精度的前提下,将网络的深度达到了152层,后来又进一步加到1000的深度。
class ResidualBlock(nn.Module):   # 我们定义网络时一般是继承的torch.nn.Module创建新的子类

    def __init__(self, inchannel, outchannel, stride=1):
        super(ResidualBlock, self).__init__()
        #torch.nn.Sequential是一个Sequential容器,模块将按照构造函数中传递的顺序添加到模块中。
        self.left = nn.Sequential(
            nn.Conv2d(inchannel, outchannel, kernel_size=3, stride=stride, padding=1, bias=False),
            # 添加第一个卷积层,调用了nn里面的Conv2d()
            nn.BatchNorm2d(outchannel), # 进行数据的归一化处理
            nn.ReLU(inplace=True), # 修正线性单元,是一种人工神经网络中常用的激活函数
            nn.Conv2d(outchannel, outchannel, kernel_size=3, stride=1, padding=1, bias=False),
            nn.BatchNorm2d(outchannel)
        )
        self.shortcut = nn.Sequential()
        if stride != 1 or inchannel != outchannel:
            self.shortcut = nn.Sequential(
                nn.Conv2d(inchannel, outchannel, kernel_size=1, stride=stride, bias=False),
                nn.BatchNorm2d(outchannel)
            )
        #  便于之后的联合,要判断Y = self.left(X)的形状是否与X相同

    def forward(self, x): # 将两个模块的特征进行结合,并使用ReLU激活函数得到最终的特征。
        out = self.left(x)
        out += self.shortcut(x)
        out = F.relu(out)
        return out

class ResNet(nn.Module):
    def __init__(self, ResidualBlock, num_classes=10):
        super(ResNet, self).__init__()
        self.inchannel = 64
        self.conv1 = nn.Sequential( # 用3个3x3的卷积核代替7x7的卷积核,减少模型参数
            nn.Conv2d(3, 64, kernel_size=3, stride=1, padding=1, bias=False),
            nn.BatchNorm2d(64),
            nn.ReLU(),
        )
        self.layer1 = self.make_layer(ResidualBlock, 64,  2, stride=1)
        self.layer2 = self.make_layer(ResidualBlock, 128, 2, stride=2)
        self.layer3 = self.make_layer(ResidualBlock, 256, 2, stride=2)
        self.layer4 = self.make_layer(ResidualBlock, 512, 2, stride=2)
        self.fc = nn.Linear(512, num_classes)

    def make_layer(self, block, channels, num_blocks, stride):
        strides = [stride] + [1] * (num_blocks - 1)   #第一个ResidualBlock的步幅由make_layer的函数参数stride指定
        # ,后续的num_blocks-1个ResidualBlock步幅是1
        layers = []
        for stride in strides:
            layers.append(block(self.inchannel, channels, stride))
            self.inchannel = channels
        return nn.Sequential(*layers)

    def forward(self, x):
        out = self.conv1(x)
        out = self.layer1(out)
        out = self.layer2(out)
        out = self.layer3(out)
        out = self.layer4(out)
        out = F.avg_pool2d(out, 4)
        out = out.view(out.size(0), -1)
        out = self.fc(out)
        return out


def ResNet18():
    return ResNet(ResidualBlock)
训练和测试
# 定义是否使用GPU
device = torch.device("cuda" if torch.cuda.is_available() else "cpu")

# 超参数设置
EPOCH = 20   #遍历数据集次数
pre_epoch = 0  # 定义已经遍历数据集的次数
LR = 0.1        #学习率

# 模型定义-ResNet
net = ResNet18().to(device)

# 定义损失函数和优化方式
criterion = nn.CrossEntropyLoss()  #损失函数为交叉熵,多用于多分类问题
optimizer = optim.SGD(net.parameters(), lr=LR, momentum=0.9, weight_decay=5e-4)
#优化方式为mini-batch momentum-SGD,并采用L2正则化(权重衰减)

# 训练
if __name__ == "__main__":
    print("Start Training, Resnet-18!")
    num_iters = 0
    for epoch in range(pre_epoch, EPOCH):
        print('\nEpoch: %d' % (epoch + 1))
        net.train()
        sum_loss = 0.0
        correct = 0.0
        total = 0
        for i, data in enumerate(trainloader, 0):
            #用于将一个可遍历的数据对象(如列表、元组或字符串)组合为一个索引序列,同时列出数据和数据下标,
            #下标起始位置为0,返回 enumerate(枚举) 对象。

            num_iters += 1
            inputs, labels = data
            inputs, labels = inputs.to(device), labels.to(device)
            optimizer.zero_grad()  # 清空梯度

            # forward + backward
            outputs = net(inputs)
            loss = criterion(outputs, labels)
            loss.backward()
            optimizer.step()

            sum_loss += loss.item() * labels.size(0)
            _, predicted = torch.max(outputs, 1) #选出每一列中最大的值作为预测结果
            total += labels.size(0)
            correct += (predicted == labels).sum().item()
            # 每20个batch打印一次loss和准确率
            if (i + 1) % 20 == 0:
                print('[epoch:%d, iter:%d] Loss: %.03f | Acc: %.3f%% '
                        % (epoch + 1, num_iters, sum_loss / (i + 1), 100. * correct / total))

    print("Training Finished, TotalEPOCH=%d" % EPOCH)
2、Kaggle上的狗品种识别(ImageNet Dogs
我们将解决Kaggle竞赛中的犬种识别挑战,比赛的网址是https://www.kaggle.com/c/dog-breed-identification 在这项比赛中,我们尝试确定120种不同的狗。该比赛中使用的数据集实际上是著名的ImageNet数据集的子集。
# 在本节notebook中,使用后续设置的参数在完整训练集上训练模型,大致需要40-50分钟
# 请大家合理安排GPU时长,尽量只在训练时切换到GPU资源
# 也可以在Kaggle上访问本节notebook:
# https://www.kaggle.com/boyuai/boyu-d2l-dog-breed-identification-imagenet-dogs
import torch
import torch.nn as nn
import torch.optim as optim
import torchvision
import torchvision.transforms as transforms
import torchvision.models as models
import os
import shutil
import time
import pandas as pd
import random

# 设置随机数种子
random.seed(0)
torch.manual_seed(0)
torch.cuda.manual_seed(0)
整理数据集
train和test目录下分别是训练集和测试集的图像,训练集包含10,222张图像,测试集包含10,357张图像,图像格式都是JPEG,每张图像的文件名是一个唯一的id。labels.csv包含训练集图像的标签,文件包含10,222行,每行包含两列,第一列是图像id,第二列是狗的类别。狗的类别一共有120种。
我们希望对数据进行整理,方便后续的读取,我们的主要目标是:
- 从训练集中划分出验证数据集,用于调整超参数。划分之后,数据集应该包含4个部分:划分后的训练集、划分后的验证集、完整训练集、完整测试集
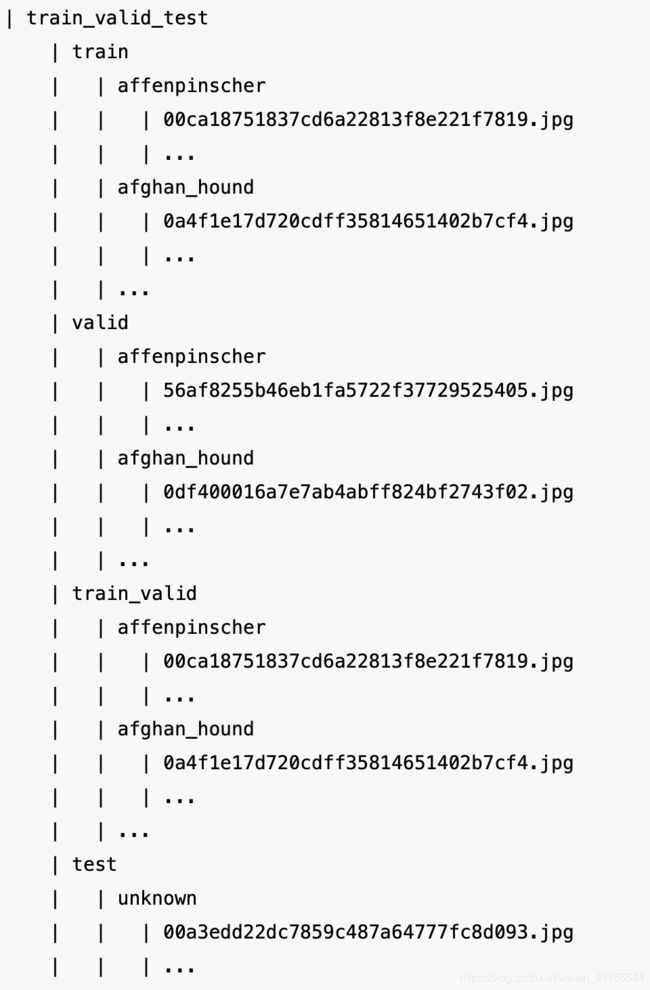
- 对于4个部分,建立4个文件夹:train, valid, train_valid, test。在上述文件夹中,对每个类别都建立一个文件夹,在其中存放属于该类别的图像。前三个部分的标签已知,所以各有120个子文件夹,而测试集的标签未知,所以仅建立一个名为unknown的子文件夹,存放所有测试数据。
data_dir = '/home/kesci/input/Kaggle_Dog6357/dog-breed-identification'  # 数据集目录
label_file, train_dir, test_dir = 'labels.csv', 'train', 'test'  # data_dir中的文件夹、文件
new_data_dir = './train_valid_test'  # 整理之后的数据存放的目录
valid_ratio = 0.1  # 验证集所占比例

def mkdir_if_not_exist(path):
    # 若目录path不存在,则创建目录
    if not os.path.exists(os.path.join(*path)):
        os.makedirs(os.path.join(*path))

def reorg_dog_data(data_dir, label_file, train_dir, test_dir, new_data_dir, valid_ratio):
    # 读取训练数据标签
    labels = pd.read_csv(os.path.join(data_dir, label_file))
    id2label = {Id: label for Id, label in labels.values}  # (key: value): (id: label)

    # 随机打乱训练数据
    train_files = os.listdir(os.path.join(data_dir, train_dir))
    random.shuffle(train_files)

    # 原训练集
    valid_ds_size = int(len(train_files) * valid_ratio)  # 验证集大小
    for i, file in enumerate(train_files):
        img_id = file.split('.')[0]  # file是形式为id.jpg的字符串
        img_label = id2label[img_id]
        if i < valid_ds_size:
            mkdir_if_not_exist([new_data_dir, 'valid', img_label])
            shutil.copy(os.path.join(data_dir, train_dir, file),
                        os.path.join(new_data_dir, 'valid', img_label))
        else:
            mkdir_if_not_exist([new_data_dir, 'train', img_label])
            shutil.copy(os.path.join(data_dir, train_dir, file),
                        os.path.join(new_data_dir, 'train', img_label))
        mkdir_if_not_exist([new_data_dir, 'train_valid', img_label])
        shutil.copy(os.path.join(data_dir, train_dir, file),
                    os.path.join(new_data_dir, 'train_valid', img_label))

    # 测试集
    mkdir_if_not_exist([new_data_dir, 'test', 'unknown'])
    for test_file in os.listdir(os.path.join(data_dir, test_dir)):
        shutil.copy(os.path.join(data_dir, test_dir, test_file),
                    os.path.join(new_data_dir, 'test', 'unknown'))

reorg_dog_data(data_dir, label_file, train_dir, test_dir, new_data_dir, valid_ratio)
图像增强
transform_train = transforms.Compose([
    # 随机对图像裁剪出面积为原图像面积0.08~1倍、且高和宽之比在3/4~4/3的图像,再放缩为高和宽均为224像素的新图像
    transforms.RandomResizedCrop(224, scale=(0.08, 1.0),
                                 ratio=(3.0/4.0, 4.0/3.0)),
    # 以0.5的概率随机水平翻转
    transforms.RandomHorizontalFlip(),
    # 随机更改亮度、对比度和饱和度
    transforms.ColorJitter(brightness=0.4, contrast=0.4, saturation=0.4),
    transforms.ToTensor(),
    # 对各个通道做标准化,(0.485, 0.456, 0.406)和(0.229, 0.224, 0.225)是在ImageNet上计算得的各通道均值与方差
    transforms.Normalize([0.485, 0.456, 0.406], [0.229, 0.224, 0.225])  # ImageNet上的均值和方差
])

# 在测试集上的图像增强只做确定性的操作
transform_test = transforms.Compose([
    transforms.Resize(256),
    # 将图像中央的高和宽均为224的正方形区域裁剪出来
    transforms.CenterCrop(224),
    transforms.ToTensor(),
    transforms.Normalize([0.485, 0.456, 0.406], [0.229, 0.224, 0.225])
])
读取数据
# new_data_dir目录下有train, valid, train_valid, test四个目录
# 这四个目录中,每个子目录表示一种类别,目录中是属于该类别的所有图像
train_ds = torchvision.datasets.ImageFolder(root=os.path.join(new_data_dir, 'train'),
                                            transform=transform_train)
valid_ds = torchvision.datasets.ImageFolder(root=os.path.join(new_data_dir, 'valid'),
                                            transform=transform_test)
train_valid_ds = torchvision.datasets.ImageFolder(root=os.path.join(new_data_dir, 'train_valid'),
                                            transform=transform_train)
test_ds = torchvision.datasets.ImageFolder(root=os.path.join(new_data_dir, 'test'),
                                            transform=transform_test)

batch_size = 128
train_iter = torch.utils.data.DataLoader(train_ds, batch_size=batch_size, shuffle=True)
valid_iter = torch.utils.data.DataLoader(valid_ds, batch_size=batch_size, shuffle=True)
train_valid_iter = torch.utils.data.DataLoader(train_valid_ds, batch_size=batch_size, shuffle=True)
test_iter = torch.utils.data.DataLoader(test_ds, batch_size=batch_size, shuffle=False)  # shuffle=False
定义模型
这个比赛的数据属于ImageNet数据集的子集,我们使用微调的方法,选用在ImageNet完整数据集上预训练的模型来抽取图像特征,以作为自定义小规模输出网络的输入。
此处我们使用与训练的ResNet-34模型,直接复用预训练模型在输出层的输入,即抽取的特征,然后我们重新定义输出层,本次我们仅对重定义的输出层的参数进行训练,而对于用于抽取特征的部分,我们保留预训练模型的参数。
def get_net(device):
    finetune_net = models.resnet34(pretrained=False)  # 预训练的resnet34网络
    finetune_net.load_state_dict(torch.load('/home/kesci/input/resnet347742/resnet34-333f7ec4.pth'))
    for param in finetune_net.parameters():  # 冻结参数
        param.requires_grad = False
    # 原finetune_net.fc是一个输入单元数为512,输出单元数为1000的全连接层
    # 替换掉原finetune_net.fc,新finetuen_net.fc中的模型参数会记录梯度
    finetune_net.fc = nn.Sequential(
        nn.Linear(in_features=512, out_features=256),
        nn.ReLU(),
        nn.Linear(in_features=256, out_features=120)  # 120是输出类别数
    )
    return finetune_net
定义训练函数
def evaluate_loss_acc(data_iter, net, device):
    # 计算data_iter上的平均损失与准确率
    loss = nn.CrossEntropyLoss()
    is_training = net.training  # Bool net是否处于train模式
    net.eval()
    l_sum, acc_sum, n = 0, 0, 0
    with torch.no_grad():
        for X, y in data_iter:
            X, y = X.to(device), y.to(device)
            y_hat = net(X)
            l = loss(y_hat, y)
            l_sum += l.item() * y.shape[0]
            acc_sum += (y_hat.argmax(dim=1) == y).sum().item()
            n += y.shape[0]
    net.train(is_training)  # 恢复net的train/eval状态
    return l_sum / n, acc_sum / n

def train(net, train_iter, valid_iter, num_epochs, lr, wd, device, lr_period,
          lr_decay):
    loss = nn.CrossEntropyLoss()
    optimizer = optim.SGD(net.fc.parameters(), lr=lr, momentum=0.9, weight_decay=wd)
    net = net.to(device)
    for epoch in range(num_epochs):
        train_l_sum, n, start = 0.0, 0, time.time()
        if epoch > 0 and epoch % lr_period == 0:  # 每lr_period个epoch,学习率衰减一次
            lr = lr * lr_decay
            for param_group in optimizer.param_groups:
                param_group['lr'] = lr
        for X, y in train_iter:
            X, y = X.to(device), y.to(device)
            optimizer.zero_grad()
            y_hat = net(X)
            l = loss(y_hat, y)
            l.backward()
            optimizer.step()
            train_l_sum += l.item() * y.shape[0]
            n += y.shape[0]
        time_s = "time %.2f sec" % (time.time() - start)
        if valid_iter is not None:
            valid_loss, valid_acc = evaluate_loss_acc(valid_iter, net, device)
            epoch_s = ("epoch %d, train loss %f, valid loss %f, valid acc %f, "
                       % (epoch + 1, train_l_sum / n, valid_loss, valid_acc))
        else:
            epoch_s = ("epoch %d, train loss %f, "
                       % (epoch + 1, train_l_sum / n))
        print(epoch_s + time_s + ', lr ' + str(lr))
调参
num_epochs, lr_period, lr_decay = 20, 10, 0.1
lr, wd = 0.03, 1e-4
device = torch.device('cuda' if torch.cuda.is_available() else 'cpu')

net = get_net(device)
train(net, train_iter, valid_iter, num_epochs, lr, wd, device, lr_period, lr_decay)
在完整数据集上进行训练
# 使用上面的参数设置,在完整数据集上训练模型大致需要40-50分钟的时间
net = get_net(device)
train(net, train_valid_iter, None, num_epochs, lr, wd, device, lr_period, lr_decay)
对测试集分类并提交结果
用训练好的模型对测试数据进行预测。比赛要求对测试集中的每张图片,都要预测其属于各个类别的概率。
preds = []
for X, _ in test_iter:
    X = X.to(device)
    output = net(X)
    output = torch.softmax(output, dim=1)
    preds += output.tolist()
ids = sorted(os.listdir(os.path.join(new_data_dir, 'test/unknown')))
with open('submission.csv', 'w') as f:
    f.write('id,' + ','.join(train_valid_ds.classes) + '\n')
    for i, output in zip(ids, preds):
        f.write(i.split('.')[0] + ',' + ','.join(
            [str(num) for num in output]) + '\n')
