centos 7.6 ——自动安装:Nginx网页动静分离(Apache——动态页面)
centos 7.6 ——自动安装:Nginx网页动静分离(Apache——动态页面)
文章目录
- centos 7.6 ——自动安装:Nginx网页动静分离(Apache——动态页面)
- Nginx概念
- Apache概念
- 实验环境
- 一、动态页面Apache服务端配置 192.168.75.131
- 1. 自动安装apache
- 2. 自动安装Linux中自带的数据库工具mariadb
- 3. 自动安装php
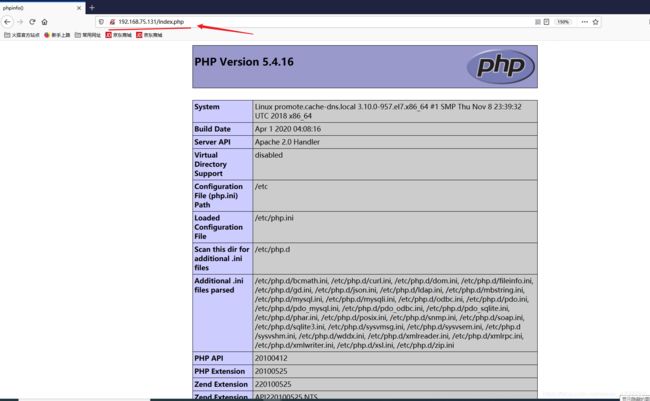
- 4. 虚拟机win10 验证 192.168.75.131/index.php
- 二、静态页面Nginx服务端配置 192.168.75.129
- 1. 手工配置Nginx
- 2. 修改Apache服务端的主页192.168.75.131
- 2. 虚拟机win10 验证动静分离网页
Nginx概念
Nginx 支持静态页面
Nginx (engine x) 是一个高性能的HTTP和反向代理web服务器,同时也提供了IMAP/POP3/SMTP服务。Nginx是由伊戈尔·赛索耶夫为俄罗斯访问量第二的Rambler.ru站点(俄文:Рамблер)开发的,第一个公开版本0.1.0发布于2004年10月4日。
其将源代码以类BSD许可证的形式发布,因它的稳定性、丰富的功能集、示例配置文件和低系统资源的消耗而闻名。2011年6月1日,nginx 1.0.4发布。
Nginx是一款轻量级的Web 服务器/反向代理服务器及电子邮件(IMAP/POP3)代理服务器,在BSD-like 协议下发行。其特点是占有内存少,并发能力强,事实上nginx的并发能力在同类型的网页服务器中表现较好,中国大陆使用nginx网站用户有:百度、京东、新浪、网易、腾讯、淘宝等。
Apache概念
Apache支持静态和动态页面
Apacheweb服务器软件拥有以下特性:
1.支持最新的HTTP/1.1通信协议
2.拥有简单而强有力的基于文件的配置过程
3.支持通用网关接口
4.支持基于IP和基于域名的虚拟主机
5.支持多种方式的HTTP认证
6.集成Perl处理模块
7.集成代理服务器模块
8.支持实时监视服务器状态和定制服务器日志
9.支持服务器端包含指令(SSI)
10.支持安全Socket层(SSL)
11.提供用户会话过程的跟踪
12.支持FastCGI
13.通过第三方模块可以支持JavaServlets
实验环境
- Nginx负责静态解析,Apache负责动态网页解析。
- Apache服务端:192.168.75.131
- Nginx服务端:192.168.75.129
- win 10 : 用于验证
一、动态页面Apache服务端配置 192.168.75.131
1. 自动安装apache
########################自动安装apache ##########################

[root@promote nginx]#  yum -y install httpd httpd-devel -y
[root@promote nginx]# sudo fuser -k 80/tcp
80/tcp:              16426 16427
[root@promote nginx]# systemctl start httpd.service
[root@promote nginx]#
[root@promote nginx]# firewall-cmd --permanent --zone=public --add-service=http
success
[root@promote nginx]# firewall-cmd --permanent --zone=public --add-service=https
success
[root@promote nginx]# firewall-cmd --reload
success
[root@promote nginx]#
2. 自动安装Linux中自带的数据库工具mariadb
########################自动安装Linux中自带的数据库工具mariadb ##########################


[root@promote nginx]# yum -y install mariadb mariadb-server mariadb-libs mariadb-devel

[root@promote nginx]# systemctl start mariadb.service
[root@promote nginx]#

[root@promote nginx]# mysql_secure_installation

NOTE: RUNNING ALL PARTS OF THIS SCRIPT IS RECOMMENDED FOR ALL MariaDB
      SERVERS IN PRODUCTION USE!  PLEASE READ EACH STEP CAREFULLY!

In order to log into MariaDB to secure it, we'll need the current
password for the root user.  If you've just installed MariaDB, and
you haven't set the root password yet, the password will be blank,
so you should just press enter here.

Enter current password for root (enter for none):      //因为之前设置了密码所以这边直接输入密码  (未设置密码之前,这边enter回车,会有提示输入用户密码设置)
ERROR 1045 (28000): Access denied for user 'root'@'localhost' (using password: NO)
Enter current password for root (enter for none):
OK, successfully used password, moving on...

Setting the root password ensures that nobody can log into the MariaDB
root user without the proper authorisation.

You already have a root password set, so you can safely answer 'n'.

Change the root password? [Y/n] n
 ... skipping.

By default, a MariaDB installation has an anonymous user, allowing anyone
to log into MariaDB without having to have a user account created for
them.  This is intended only for testing, and to make the installation
go a bit smoother.  You should remove them before moving into a
production environment.

Remove anonymous users? [Y/n] n
 ... skipping.

Normally, root should only be allowed to connect from 'localhost'.  This
ensures that someone cannot guess at the root password from the network.

Disallow root login remotely? [Y/n] n
 ... skipping.

By default, MariaDB comes with a database named 'test' that anyone can
access.  This is also intended only for testing, and should be removed
before moving into a production environment.

Remove test database and access to it? [Y/n] n
 ... skipping.

Reloading the privilege tables will ensure that all changes made so far
will take effect immediately.

Reload privilege tables now? [Y/n] y
 ... Success!

Cleaning up...

All done!  If you've completed all of the above steps, your MariaDB
installation should now be secure.

Thanks for using MariaDB!
3. 自动安装php
[root@promote nginx]#  yum -y install php

[root@promote nginx]#yum -y install mysql
[root@promote nginx]#yum install -y php-gd php-ldap php-odbc php-pear php-xml php-xmlrpc php-mbstring php-snmp php-soap curl curl-devel php-bcmath

[root@promote nginx]# cd /var/www/html/
[root@promote html]# vim index.html
[root@promote html]# ls
index.html
[root@promote html]# mv index.html index.html.bak
[root@promote html]# vim index.php
<?php
  phpinfo();
?>

[root@promote html]# systemctl restart httpd
[root@promote html]#
4. 虚拟机win10 验证 192.168.75.131/index.php
二、静态页面Nginx服务端配置 192.168.75.129
1. 手工配置Nginx
tar zxvf nginx-q.12.2

[root@localhost opt]# cd nginx-1.12.2/
[root@localhost nginx-1.12.2]# useradd -M -s /sbin/nologin nginx   //新建用户Nginx ,——M是指不产生家目录
[root@localhost nginx-1.12.2]# ./configure \
> --prefix=/usr/local/nginx \  // 安装路径
> --user=nginx \   //指定用户来管理Nginx
> --group=nginx \   // 用户组
> --with-http_stub_status_module   //添加统计并发量模块

[root@localhost nginx-1.12.2]# make && make install

[root@localhost nginx-1.12.2]# ln -s /usr/local/nginx/sbin/* /usr/local/sbin   //配置文件软链接
[root@localhost nginx-1.12.2]# ls -l /usr/local/sbin/
总用量 0
lrwxrwxrwx. 1 root root 27 8月   6 22:01 nginx -> /usr/local/nginx/sbin/nginx

[root@localhost nginx-1.12.2]# nginx -t
nginx: the configuration file /usr/local/nginx/conf/nginx.conf syntax is ok
nginx: configuration file /usr/local/nginx/conf/nginx.conf test is successful


************在/etc/init.d 目录下新建Nginx文件为启动脚本*****************

[root@localhost init.d]# vim nginx


#!/bin/bash
#chkconfig:- 99 20
#description:Nginx Service Control Script
PROG="/usr/local/nginx/sbin/nginx"
PIDF="/usr/local/nginx/logs/nginx.pid"
case "$1" in
 start)
  $PROG
 ;;
stop)
   kill -s QUIT $(cat $PIDF)
 ;;
restart)
 $0 stop
 $0 start
 ;;
reload)
 kill -s HUP $(cat $PIDF)
 ;;
 *)
   echo "Usage:$0{start|stop|restart|reload}"
   exit 1
esac
exit 0


[root@localhost init.d]# chmod +x nginx   //添加权限

[root@localhost init.d]# chkconfig --add nginx   //添加到systemctl启动文件设置中

[root@localhost init.d]# service nginx stop
cat: /usr/local/nginx/logs/nginx.pid: No such file or directory
kill: usage: kill [-s sigspec | -n signum | -sigspec] pid | jobspec ... or kill -l [sigspec]

[root@localhost init.d]# sudo fuser -k 80/tcp   //重启出现错误,提示端口被占用,使用该命令
80/tcp:              12826 12827

[root@localhost init.d]# service nginx stop
[root@localhost init.d]# service nginx start  //修改主配置文件之后需要重启Nginx服务
[root@localhost init.d]# vim /usr/local/nginx/conf/nginx.conf
 location ~ \.php$ {
            proxy_pass   http://192.168.75.131;  //192.168.75.131指Apache服务端的地址,用于解析动态网页
        }
[root@localhost init.d]#systemctl stop firewalld
[root@localhost init.d]#setenforce 0
[root@localhost init.d]# service nginx start  //修改主配置文件之后需要重启Nginx服务
2. 修改Apache服务端的主页192.168.75.131
[root@promote html]# vim index.php
Apache web !

[root@promote html]#systemctl restart httpd
2. 虚拟机win10 验证动静分离网页
浏览器输入 192.168.75.129/index.php

