spring boot 实现rest风格api 简单demo教程 附源码
背景
这两天在网上了解了一下restapi,这里用springboot实现一个简单的demo,这个demo借鉴了https://my.oschina.net/huangyong/blog/521891,原文使用了springmvc实现,本文使用spring boot + mybatis。
框架搭建
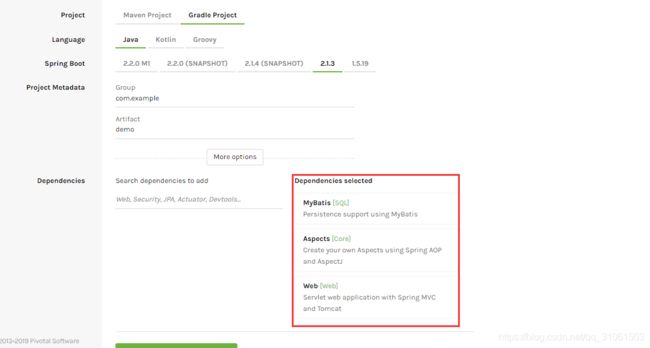
1.在springboot官网生成gradle项目

2.将下载的zip包解压后用idea导入

导入之后将资源仓库url 改为http://maven.aliyun.com/nexus/content/groups/public 同时添加implementation ‘com.oracle:ojdbc6:11.2.0.3’ ojdbc驱动。添加完成后等待gradle下载完毕。
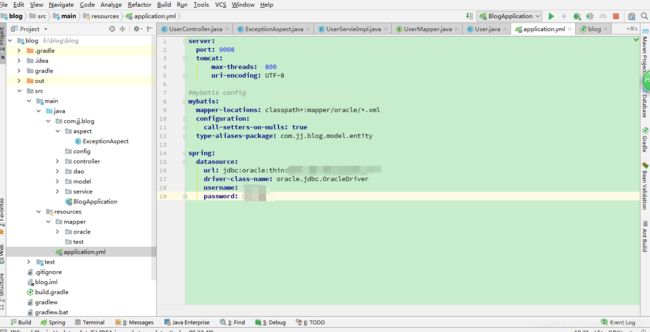
3 配置yml文件

设置一下datasource ,换成你的用户名密码
配置mybatis
#mybatis config
mybatis:
mapper-locations: classpath*:mapper/oracle/*.xml ----xml文件路径
configuration:
call-setters-on-nulls: true —无值的字段过滤
type-aliases-package: com.jj.blog.model.entity -----实体类路径,在xml中使用实体类时可以省略包名
代码实现
- 定义统一返回实体,包含响应结果,响应数据,作为api的统一返回结果。
public class JsonResponse {


    private ResObj resObj;
    private Object data;

    public JsonResponse success() {
        this.resObj = new ResObj("optSuccess","1");
        return this;
    }

    public JsonResponse success(Object obj) {
        this.resObj = new ResObj("optSuccess","1");
        this.data = obj;
        return this;
    }

    public JsonResponse failure(String message) {
        this.resObj = new ResObj(message,"0");
        return this;
    }


    public ResObj getResObj() {
        return resObj;
    }

    public void setResObj(ResObj resObj) {
        this.resObj = resObj;
    }

    public Object getData() {
        return data;
    }

    public void setData(Object data) {
        this.data = data;
    }
}
public class ResObj  {


    private String message;
    private String resCode;

    public ResObj(String message, String resCode) {
        this.message = message;
        this.resCode = resCode;
    }

    public ResObj(String resCode) {
        this.resCode = resCode;
    }


    public String getMessage() {
        return message;
    }

    public void setMessage(String message) {
        this.message = message;
    }

    public String getResCode() {
        return resCode;
    }

    public void setResCode(String resCode) {
        this.resCode = resCode;
    }
}
- 编写dao层
public interface UserMapper {

    List<User> findAllUsers();

    User findUserById(@Param("userId")String userId);

    int updateUserById(User u);

    int deleteUserByUserId(@Param("userId")String userId);

    int insertUser(User u);

}
user.xml:
<mapper namespace="com.jj.blog.dao.UserMapper">

    <resultMap id="usersResult" type="User">
        <result property="userId" column="USERID"/>
        <result property="userName" column="USERNAME"/>
        <result property="userPassword" column="PASSWORD"/>
    resultMap>


    <select id="findAllUsers" resultMap="usersResult">
        SELECT USERID, USERNAME,PASSWORD FROM T_USER_2019
    select>
    <select id="findUserById" resultMap="usersResult" parameterType="java.lang.String">
        SELECT USERID, USERNAME,PASSWORD FROM T_USER_2019
        WHERE USERID = #{userId}
    select>

    <update id="updateUserById" >
        UPDATE  T_USER_2019
        <set>
            <if test="userPassword != null and userPassword.length()>0">PASSWORD = #{userPassword},if>
        set>
        WHERE
        USERID = #{userId}
    update>

    <delete id="deleteUserByUserId" parameterType="java.lang.String">
        DELETE FROM T_USER_2019 WHERE USERID = #{userId}
    delete>

    <insert id="insertUser" parameterType="com.jj.blog.model.entity.User">
        INSERT INTO T_USER_2019 (USERID,USERNAME,PASSWORD)
        VALUES   (#{userId},  #{userName},  #{userPassword})
    insert>

mapper>
- service层(略)
- controller层 根据不同请求方式进行增删改查
//restcontroller = controller + responseBody 将返回结果转换问json格式
@RestController
public class UserController {

    @Autowired
    UserServie userServie;

	//根据不同请求方式进行增删改查
    @PostMapping(value = "/user")
    public JsonResponse createUser(@RequestBody User u) {
        userServie.insertUser(u);
        return new JsonResponse().success(u);
    }

    @GetMapping(value = "/users")
    public JsonResponse getUserList( ) {
        return new JsonResponse().success(userServie.findAllUsers());
    }

    @GetMapping(value = "/user/{userId}")
    public JsonResponse getUser(@PathVariable("userId") String userId) {
        User u = userServie.findUserById(userId);
        return new JsonResponse().success(u);
    }

    @DeleteMapping(value = "/user/{userId}")
    public JsonResponse deleteUser(@PathVariable("userId") String userId) {
        userServie.deleteUserByUserId(userId);
        return new JsonResponse().success();
    }

    @PutMapping(value = "/user")
    public JsonResponse updateUser(@RequestBody User u) {
        userServie.updateUserById(u);
        return new JsonResponse().success(u);
    }


}
- 使用aop对异常做统一处理
创建切面类ExceptionAspect.class。添加ControllerAdvice注解增强控制器和ResponseBody注解
@ControllerAdvice   // 控制器增强
@ResponseBody
public class ExceptionAspect {

    private static final Logger log = Logger.getLogger(ExceptionAspect.class);


    /**
     * 400 - Bad Request
     */
    @ResponseStatus(HttpStatus.BAD_REQUEST)
    @ExceptionHandler(HttpMessageNotReadableException.class)
    public JsonResponse handleHttpMessageNotReadableException(
            HttpMessageNotReadableException e) {
        log.error("could_not_read_json...", e);
        return new JsonResponse().failure("could_not_read_json");
    }

    /**
     * 400 - Bad Request
     */
    @ResponseStatus(HttpStatus.BAD_REQUEST)
    @ExceptionHandler({MethodArgumentNotValidException.class})
    public JsonResponse handleValidationException(MethodArgumentNotValidException e) {
        log.error("parameter_validation_exception...", e);
        return new JsonResponse().failure("parameter_validation_exception");
    }

    /**
     * 405 - Method Not Allowed。HttpRequestMethodNotSupportedException
     * 是ServletException的子类,需要Servlet API支持
     */
    @ResponseStatus(HttpStatus.METHOD_NOT_ALLOWED)
    @ExceptionHandler(HttpRequestMethodNotSupportedException.class)
    public JsonResponse handleHttpRequestMethodNotSupportedException(
            HttpRequestMethodNotSupportedException e) {
        log.error("request_method_not_supported...", e);
        return new JsonResponse().failure("request_method_not_supported");
    }

    /**
     * 415 - Unsupported Media Type。HttpMediaTypeNotSupportedException
     * 是ServletException的子类,需要Servlet API支持
     */
    @ResponseStatus(HttpStatus.UNSUPPORTED_MEDIA_TYPE)
    @ExceptionHandler({ HttpMediaTypeNotSupportedException.class })
    public JsonResponse handleHttpMediaTypeNotSupportedException(Exception e) {
        log.error("content_type_not_supported...", e);
        return new JsonResponse().failure("content_type_not_supported");
    }

    /**
     * 500 - Internal Server Error
     */
    @ResponseStatus(HttpStatus.INTERNAL_SERVER_ERROR)
    @ExceptionHandler(Exception.class)
    public JsonResponse handleException(Exception e) {
        log.error("Internal Server Error...", e);
        return new JsonResponse().failure("Internal Server Error");
    }
}
启动成功!到此一个简单的rest风格的接口服务demo就完成了。
测试
- 使用postman进行测试
使用put提交新增用户
后续会在此基础上集成更多的内容。


