idea创建maven项目整合SSH
前言
前面,我们已经通过IDEA直接整合过SSH(spring, Struts, hibernate),在这个文章中, 我將主要实现如下事件:
a)使用maven搭建一个SSH项目(基本的项目框架)
b)实现一个简易的登录程序,涉及到MySQL,Hibernate, Spring, Struts
c)如何使用IDEA2017搭建maven项目
所有的代码都可以在 github 下载
一. 前期准备
1)环境
a)安装IDEA
b)安装mysql
2)数据库
a)直接使用github上面的SEL.sql文件进行建立数据表和插入信息(主要命令为source SEL.sql);相关的操作截图如下(执行目录为.sql文件所在目录):
![]()
二. 建立项目
1)IDEA新建maven项目,相关截图如下:
![]()
![]()
![]()
![]()
2)完善目录结构,主要完善如下:
2.1)在src/main/Java目录下新建四个包文件,分别为com.kevin.action, com.kevin.dao, com.kevin.entity, com.kevin.service, com.kevin.util; 建议方式为右击src/main/java目录--->New---->Package---->(输入)com.kevin.action;这四个包文件主要是用来存放我们的java文件,其中com.kevin.entity用来存放数据库映射对象文件,com.kevin.dao用来存放dao文件(data access object),com.kevin.service用来存放service文件(服务类文件),com.kevin.action用来存放action文件(供struts2调用);这了更好地理解这个目录结构,这里补充一下entity, dao ,service, action之间的关系
2.1.1)entity是hibernate对于数据库表抽象出来的类,它和数据库中的表是完全对应的;
2.1.2)dao类是针对数据库进行直接操作(调用entity);
2.1.3)service是业务逻辑层(通过调用dao层类来进行修改数据库数据);
2.1.4)action是表示层,控制页面的跳转(负责调用业务逻辑的服务组件);
具体可以参考 链接
2.2)在src/main目录下建立一个webapp目录, 在webapp目录下建立一个WEB-INF目录,在WEB-INF目录再建立web.xml文件,然后在webapp目录下建立 css, image, js目录,再建立index.jsp文件;这个目录就是我们的tomcat目录了;
如下是我们的整体的目录结构
![]()
三. 修改maven的pom.xml
直接修改pom.xml文件,内容如下
- xml version="1.0" encoding="UTF-8"?>
- <project xmlns="http://maven.apache.org/POM/4.0.0"
- xmlns:xsi="http://www.w3.org/2001/XMLSchema-instance"
- xsi:schemaLocation="http://maven.apache.org/POM/4.0.0 http://maven.apache.org/xsd/maven-4.0.0.xsd">
- <modelVersion>4.0.0modelVersion>
- <groupId>ssh_learning_logingroupId>
- <artifactId>kevinartifactId>
- <version>1.0-SNAPSHOTversion>
- <properties>
- <project.build.sourceEncoding>UTF-8project.build.sourceEncoding>
- <spring.version>3.1.1.RELEASEspring.version>
- <hibernate.version>3.6.5.Finalhibernate.version>
- <struts2.version>2.3.1struts2.version>
- properties>
- <dependencies>
- <dependency>
- <groupId>junitgroupId>
- <artifactId>junitartifactId>
- <version>3.8.1version>
- <scope>testscope>
- dependency>
- <dependency>
- <groupId>org.springframeworkgroupId>
- <artifactId>spring-coreartifactId>
- <version>${spring.version}version>
- dependency>
- <dependency>
- <groupId>org.springframeworkgroupId>
- <artifactId>spring-contextartifactId>
- <version>${spring.version}version>
- dependency>
- <dependency>
- <groupId>org.springframeworkgroupId>
- <artifactId>spring-jdbcartifactId>
- <version>${spring.version}version>
- dependency>
- <dependency>
- <groupId>org.springframeworkgroupId>
- <artifactId>spring-beansartifactId>
- <version>${spring.version}version>
- dependency>
- <dependency>
- <groupId>org.springframeworkgroupId>
- <artifactId>spring-webartifactId>
- <version>${spring.version}version>
- dependency>
- <dependency>
- <groupId>org.springframeworkgroupId>
- <artifactId>spring-expressionartifactId>
- <version>${spring.version}version>
- dependency>
- <dependency>
- <groupId>org.springframeworkgroupId>
- <artifactId>spring-ormartifactId>
- <version>${spring.version}version>
- dependency>
- <dependency>
- <groupId>cglibgroupId>
- <artifactId>cglib-nodepartifactId>
- <version>2.1_3version>
- dependency>
- <dependency>
- <groupId>org.hibernategroupId>
- <artifactId>hibernate-coreartifactId>
- <version>${hibernate.version}version>
- dependency>
- <dependency>
- <groupId>org.apache.strutsgroupId>
- <artifactId>struts2-coreartifactId>
- <version>${struts2.version}version>
- dependency>
- <dependency>
- <groupId>org.apache.strutsgroupId>
- <artifactId>struts2-junit-pluginartifactId>
- <version>${struts2.version}version>
- <scope>testscope>
- dependency>
- <dependency>
- <groupId>org.apache.strutsgroupId>
- <artifactId>struts2-spring-pluginartifactId>
- <version>${struts2.version}version>
- dependency>
- <dependency>
- <groupId>mysqlgroupId>
- <artifactId>mysql-connector-javaartifactId>
- <version>5.0.5version>
- dependency>
- <dependency>
- <groupId>c3p0groupId>
- <artifactId>c3p0artifactId>
- <version>0.9.1.2version>
- dependency>
- dependencies>
- <build>
- <plugins>
- <plugin>
- <groupId>org.apache.maven.pluginsgroupId>
- <artifactId>maven-war-pluginartifactId>
- <version>2.2version>
- <configuration>
- <webResources>
- <resource>
- <directory>src\main\webappdirectory>
- resource>
- webResources>
- configuration>
- plugin>
- <plugin>
- <groupId>org.apache.maven.pluginsgroupId>
- <artifactId>maven-compiler-pluginartifactId>
- <configuration>
- <source>1.6source>
- <target>1.6target>
- configuration>
- plugin>
- plugins>
- <finalName>comfinalName>
- build>
- project>
四. Java代码层面
1)Entity层
1.1)先建立一个Database,位置在IDEA界面的右面点击Database---->点击界面的加号------->Data Source-----> Mysql---->根据自己的情况进行配置,相关截图如下:
这里补充一点,就是在建立自己的Mysql的时候,一定要点击里面的Test Connection,确认自己的配置是正确的;
![]()
![]()
1.2)操作Persistence,自动生成Entity;我们可以看到在Idea界面里面看不到Persistence选项(将鼠标悬浮在左下角的正方形那里,截图如下),因为一开始使用maven来搭建项目,我们并没有显示引入hibernate,所以没有Persistence界面,所以我们作如下操作来显示加入Hibernate; 点击 File-----> Project Structure------>Modules----->点击+-------->选择Hibernate------>Apply------>OK; 看界面,我们可以看到 Persistence出现了,截图如下:
![]()
![]()
1.3)配置aplicationContext.xml,applicationContext.xml是spring的配置文件,因为在这个项目中我们需要让spring接管Hibernate的配置工作,所以我们直接建立applicationContext.xml文件并配置数据库信息, 为了方便数据库信息的管理,我们同时建立db.properties。所以我们的操作是在src/main/resources下面建立两个文件,一个是applicationContext.xml,一个是db.properties;
1.3.1) db.properties文件内容如下(是Mysq数据库的配置信息)
- database.database=mysql
- database.driverClassName=com.mysql.jdbc.Driver
- database.username=root
- database.password=XXXX
- database.show_sql=true
- database.url=jdbc:mysql://localhost:3306/TESTDB?useUnicode=true&characterEncoding=UTF-8
1.3.2)applicationContext.xml内容如下
- xml version="1.0" encoding="UTF-8"?>
- <beans xmlns="http://www.springframework.org/schema/beans"
- xmlns:xsi="http://www.w3.org/2001/XMLSchema-instance"
- xmlns:context="http://www.springframework.org/schema/context" xmlns:tx="http://www.springframework.org/schema/tx"
- xsi:schemaLocation="http://www.springframework.org/schema/beans http://www.springframework.org/schema/beans/spring-beans.xsd http://www.springframework.org/schema/context http://www.springframework.org/schema/context/spring-context.xsd http://www.springframework.org/schema/tx http://www.springframework.org/schema/tx/spring-tx.xsd">
- <context:property-placeholder location="classpath:db.properties" />
- <context:annotation-config/>
- <context:component-scan base-package="com.kevin.action"/>
- <context:component-scan base-package="com.kevin.service"/>
- <context:component-scan base-package="com.kevin.dao" />
- <bean id="dataSource" class="com.mchange.v2.c3p0.ComboPooledDataSource">
- <property name="driverClass" value="${database.driverClassName}">property>
- <property name="jdbcUrl" value="${database.url}">property>
- <property name="user" value="${database.username}">property>
- <property name="password" value="${database.password}">property>
- <property name="maxPoolSize">
- <value>50value>
- property>
- <property name="minPoolSize">
- <value>5value>
- property>
- <property name="initialPoolSize">
- <value>5value>
- property>
- <property name="maxIdleTime">
- <value>20value>
- property>
- <property name="maxStatements">
- <value>50value>
- property>
- <property name="acquireIncrement">
- <value>20value>
- property>
- bean>
- <bean id="sessionFactory" class="org.springframework.orm.hibernate3.annotation.AnnotationSessionFactoryBean">
- <property name="dataSource">
- <ref bean="dataSource" />
- property>
- <property name="hibernateProperties">
- <props>
- <prop key="hibernate.dialect">org.hibernate.dialect.MySQLDialectprop>
- <prop key="hibernate.autoReconnect">trueprop>
- <prop key="hibernate.hbm2ddl.auto">updateprop>
- <prop key="hibernate.show_sql">trueprop>
- <prop key="hibernate.format_sql">trueprop>
- <prop key="hibernate.enable_lazy_load_no_trans">trueprop>
- <prop key="current_session_context_class">threadprop>
- <prop key="hibernate.cache.provider_class">org.hibernate.cache.HashtableCacheProviderprop>
- <prop key="hibernate.max_fetch_depth">3prop>
- <prop key="hibernate.connection.url">jdbc:mysql://localhost:3306/TESTDBprop>
- <prop key="hibernate.connection.driver_class">com.mysql.jdbc.Driverprop>
- props>
- property>
- <property name="packagesToScan">
- <list>
- <value>com.kevin.entityvalue>
- list>
- property>
- bean>
- <bean id="transactionManager" class="org.springframework.orm.hibernate3.HibernateTransactionManager">
- <property name="sessionFactory" ref="sessionFactory" />
- bean>
- <tx:annotation-driven transaction-manager="transactionManager" proxy-target-class="true"/>
- beans>
上面是这个项目完成的pom.xml文件,在这一步主要要配置的是dataSource这个bean 和sessionFactory这个bean
这里有一个要注意的,我们刚建立applicationContext.xml的时候,会在编辑界面出现一个黄条,如下
![]()
这个时候我们要点击“Configure application context”然后编辑,apply
1.4) 生成Entity类;这个时候,如果上面正确的话,点击Persistence,会出现如下的界面:
![]()
我们右击sessionFactory--->Generate Persistence Mapping----> By Database Schema; 在Import Database Schema界面进行如下的选择:
![]()
成功的话,可看我们src/main/java/com/kevin/entity下面应该有一个User类
2) DAO层代码
为了代码的可拓展性,我们把实现与定义分离;在src/main/java/com/kevin/dao下面再建立一个impl包,存放接口的实现类;在dao目录下新建一个UserDao.java接口类(记住是接口,在选择类型的时候要选择接口), 在impl放这个接口的实现类,UserDaoImpl.java
UserDao.java文件内容
- package com.kevin.dao;
- import com.kevin.entity.User;
- import java.util.List;
- /**
- * Created by kinthon on 17-6-23.
- */
- public interface UserDao {
- /**
- * 添加并保存用户
- * @param user
- */
- public void add(User user);
- /**
- * 进行登录
- */
- public boolean login(User user);
- /**
- * 获取用户列表
- */
- public List getUser();
- /**
- * 根据用户Id获取用户信息
- * @param id
- * @return
- */
- public User getUser(int id);
- /**
- * 更新用户信息
- * @param user
- */
- public void update(User user);
- /**
- * 根据用户id删除用户信息
- * @param id
- */
- public void delete(int id);
- }
UserDaoImpl.java 内容
- package com.kevin.dao.impl;
- import com.kevin.dao.UserDao;
- import com.kevin.entity.User;
- import org.hibernate.Query;
- import org.hibernate.SessionFactory;
- import org.springframework.stereotype.Repository;
- import org.springframework.transaction.annotation.Transactional;
- import javax.annotation.Resource;
- import java.util.Iterator;
- import java.util.List;
- /**
- * Created by kinthon on 17-6-23.
- */
- @Transactional(rollbackFor = Exception.class)
- //出现Exception异常回滚
- @Repository("userDao") //进行注入
- public class UserDaoImpl implements UserDao {
- @Resource(name="sessionFactory")
- private SessionFactory sessionFactory;
- @Override
- public void add(User user) {
- sessionFactory.getCurrentSession().save(user);
- }
- @Override
- public boolean login(User user) {
- Iterator
it; - String hsql="FROM User u where u.username=? and u.password=?";
- System.out.println(hsql);
- Query query = sessionFactory.getCurrentSession().createQuery(hsql);
- query.setString(0, user.getUsername());
- query.setString(1, user.getPassword());
- System.out.println(user.getUsername());
- it=query.iterate();
- if(it.hasNext()) {
- System.out.println("true");
- return true;
- } else {
- System.out.println("false");
- return false;
- }
- }
- @Override
- public List getUser() {
- return sessionFactory.getCurrentSession().createQuery("FROM User").list();
- }
- @Override
- public User getUser(int id) {
- return (User)sessionFactory.getCurrentSession().get(User.class, id);
- }
- @Override
- public void update(User user) {
- sessionFactory.getCurrentSession().update(user);
- }
- @Override
- public void delete(int id) {
- sessionFactory.getCurrentSession().delete(
- sessionFactory.getCurrentSession().get(User.class, id)
- );
- }
- }
与DAO层一样,在src/main/java/com/kevin/service下面再建立一个impl包,存放接口的实现类;在service目录下新建一个UserService.java接口类(记住是接口,在选择类型的时候要选择接口), 在impl放这个接口的实现类,UserServiceImpl.java
UserService.java 内容
- package com.kevin.service;
- import com.kevin.entity.User;
- import java.util.List;
- /**
- * Created by kinthon on 17-6-23.
- */
- public interface UserService {
- public boolean addUser(User user);
- public boolean login(User user);
- public List getAllUser();
- public User getUserById(int id);
- public boolean updateUser(User user);
- public boolean deleteUser(int id);
- }
UserServiceImpl.java 内容
- package com.kevin.service.impl;
- import com.kevin.dao.UserDao;
- import com.kevin.entity.User;
- import com.kevin.service.UserService;
- import org.springframework.stereotype.Service;
- import javax.annotation.Resource;
- import java.util.List;
- /**
- * Created by kinthon on 17-6-23.
- */
- //注入服务
- @Service("userService")
- public class UserServiceImpl implements UserService{
- //自动注入userDao,也可以使用@Autowired
- @Resource
- private UserDao userDao;
- @Override
- public boolean addUser(User user) {
- this.userDao.add(user);
- return true;
- }
- @Override
- public boolean login(User user) {
- return this.userDao.login(user);
- }
- @Override
- public List getAllUser() {
- return this.userDao.getUser();
- }
- @Override
- public User getUserById(int id) {
- return this.userDao.getUser(id);
- }
- @Override
- public boolean updateUser(User user) {
- this.userDao.update(user);
- return true;
- }
- @Override
- public boolean deleteUser(int id) {
- this.userDao.delete(id);
- return true;
- }
- }
Action主要是调用业务逻辑,结合struts.xml来进行处理页面跳转,我们是希望实现用户登录,在action包下建立一个UserAction.java,代码如下
- package com.kevin.action;
- import com.kevin.entity.User;
- import com.kevin.service.UserService;
- import com.opensymphony.xwork2.ActionContext;
- import com.opensymphony.xwork2.ActionSupport;
- import org.springframework.context.annotation.Scope;
- import org.springframework.stereotype.Controller;
- import javax.annotation.Resource;
- import java.util.Map;
- /**
- * Created by kinthon on 17-6-25.
- */
- @Controller("userAction")
- @Scope("prototype")
- public class UserAction extends ActionSupport {
- @Resource
- private UserService userService;
- private User user;
- public User getUser() {
- return user;
- }
- public void setUser(User user) {
- this.user = user;
- }
- public String login() {
- if(userService.login(user)) {
- Map session = ActionContext.getContext().getSession();
- session.put("user", user);
- return SUCCESS;
- } else {
- return ERROR;
- }
- }
- }
1)接下来我们要引入struts2, 首先还是在src/main/java/resources/下面建立一个struts.xml文件,内容如下:
- xml version="1.0" encoding="UTF-8"?>
- "-//Apache Software Foundation//DTD Struts Configuration 2.3//EN"
- "http://struts.apache.org/dtds/struts-2.3.dtd">
- <struts>
- <constant name="struts.devMode" value="false"/>
- <constant name="struts.objectFactory" value="spring" />
- <package name="user" namespace="/" extends="struts-default">
- <action name="user_*" class="userAction" method="{1}">
- <result name="success">/success.jspresult>
- <result name="error">/error.jspresult>
- action>
- package>
- struts>
2) 配置web.xml,内容如下
- xml version="1.0" encoding="UTF-8"?>
- <web-app xmlns="http://xmlns.jcp.org/xml/ns/javaee"
- xmlns:xsi="http://www.w3.org/2001/XMLSchema-instance"
- xsi:schemaLocation="http://xmlns.jcp.org/xml/ns/javaee http://xmlns.jcp.org/xml/ns/javaee/web-app_3_1.xsd"
- version="3.1">
- <filter>
- <filter-name>struts2filter-name>
- <filter-class>org.apache.struts2.dispatcher.ng.filter.StrutsPrepareAndExecuteFilterfilter-class>
- filter>
- <filter-mapping>
- <filter-name>struts2filter-name>
- <url-pattern>/*url-pattern>
- filter-mapping>
- <context-param>
- <param-name>contextConfigLocationparam-name>
- <param-value>/WEB-INF/classes/applicationContext.xmlparam-value>
- context-param>
- <listener>
- <listener-class>org.springframework.web.context.ContextLoaderListenerlistener-class>
- listener>
- <listener>
- <listener-class>org.springframework.web.util.IntrospectorCleanupListenerlistener-class>
- listener>
- <welcome-file-list>
- <welcome-file>index.jspwelcome-file>
- welcome-file-list>
- web-app>
index.jsp
- <%--
- Created by IntelliJ IDEA.
- User: kinthon
- Date: 17-6-23
- Time: 下午8:15
- To change this template use File | Settings | File Templates.
- --%>
- <%@ page contentType="text/html;charset=UTF-8" language="java" %>
- <html>
- <head>
- <title>Titletitle>
- head>
- <body>
- <form action="user_login.action" method="post">
- <input type="text" name="user.username" placeholder="输入用户名" />
- <br/>
- <input type="password" name="user.password" placeholder="输入密码" />
- <br />
- <input type="submit" value="登录">
- <input type="reset" value="重置">
- form>
- body>
- html>
success.jsp
- <%--
- Created by IntelliJ IDEA.
- User: kinthon
- Date: 17-6-25
- Time: 下午1:32
- To change this template use File | Settings | File Templates.
- --%>
- <%@ page contentType="text/html;charset=UTF-8" language="java" %>
- <html>
- <head>
- <title>successtitle>
- head>
- <body>
- <h1>hello ${user.username}h1>
- body>
- html>
error.jsp
- <%--
- Created by IntelliJ IDEA.
- User: kinthon
- Date: 17-6-25
- Time: 下午1:32
- To change this template use File | Settings | File Templates.
- --%>
- <%@ page contentType="text/html;charset=UTF-8" language="java" %>
- <html>
- <head>
- <title>Titletitle>
- head>
- <body>
- <h1>somethin errorh1>
- body>
- html>
五,建立Tomcat服务器
到目前为止,我们已经把所有的代码和配置都完成了,接下来就是加入Tomcat服务器,让我们的程序运行起来;我们直接加入tomcat服务器,操作如图(这个的具体位置在整个界面的右上方),将鼠标悬浮在倒三角形上,会出现为“Edit Configurations...” 点击它然后在打开界面左上角中点击加号选择Tomcat Server---->Local; 点击Apply; 相关操作如下
![]()
![]()
我们试着运行下,运行点击如图:
![]()
发现服务器启动正常,但是页面不可获取;
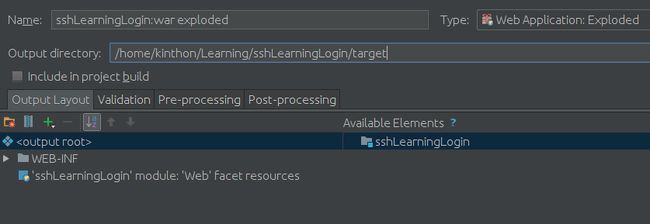
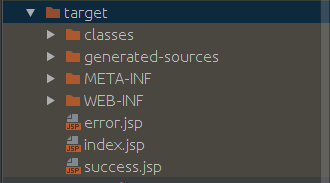
我们查看下根目录下的target目录,我们可以看到这个目录没有导出我们webapp里面的文件,这是因为我们还没有进行导出配置;我们进行如下操作,点击File----->Project Strutcture--->Artifacts----->点击+----->web application:Explored ----> From module---->OK; 同时为了让所有的代码都在同一个目录下,我们修改打开的页面的Output directory的目录为对应目录下sshLearningLogin/target; 相关操作截图和结果图如下:
![]()
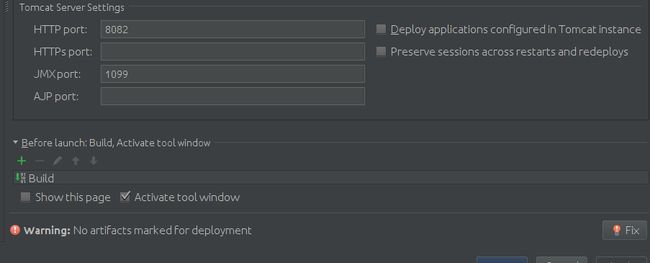
接着回到我们的tomcat配置界面,点击界面的右下角fix-->Apply
接着删除之前生成的target目录,重新运行服务器,可以看到如下的:
![]()
![]()
![]()
![]()
六. 总结
本教程至此结束,如有问题可以直接留言,也可以通过[email protected]进行联系交流


