【服务器】Nginx + 反向代理 + 负载均衡 + Session Cookie
注意:nginx一旦改动了配置,都需要重启才能看到更新!!
————————
下载地址:/usr/local/Cellar/nginx
核心配置文件 nginx.conf:/usr/local/etc/nginx/nginx.conf
————————
- 启动:
cd /usr/local/Cellar/nginx/1.15.12/bin
输入:nginx或者sudo ./nginx
若:启动失败,会返回:
nginx: [emerg] bind() to 0.0.0.0:8080 failed (48: Address already in use)
...
nginx: [emerg] still could not bind()
说明8080端口已被占用;
查看此端口被谁占用:$ lsof -i:8080 :
COMMAND   PID USER   FD   TYPE            DEVICE SIZE/OFF NODE NAME
java    25882 xxxx   50u  IPv6 0x4b841ab353081bd      0t0  TCP *:http-alt (LISTEN)
杀掉此PID:$ kill 25882
再启动nginx:nginx;
若:启动成功,会无返回;
浏览器查看:localhost:8080
————————
- 停止:
查看进程:ps -ef|grep nginx,返回:
  501 68108     1   0 20May19 ??         0:00.01 nginx: master process /usr/local/opt/nginx/bin/nginx -g daemon off;
  501 68111 68108   0 20May19 ??         0:00.01 nginx: worker process
  501 25813 25806   0  2:36PM ttys000    0:00.01 grep nginx
注意查看,第一行nginx: master的进程号是:68108
在终端中输入以下几种命令都可以停止:
Kill -QUIT 进程号 (从容的停止,即不会立刻停止)
Kill -TERM 进程号 (立刻停止)
Kill -INT 进程号 (立刻停止)
NginX
Nginx 是一个高性能的 HTTP 和反向代理服务器,同时也是一个 IMAP/POP3/SMTP 代理服务器。
由俄罗斯程序师Igor Sysoev所开发,官方支持5W并发链接,且CPU、内存消耗非常低,运行非常稳定;(流量超大公司才合适使用NginX,如alibaba)
作用:
- HTTP服务器(类似的有:Tomcat);
网页静态服务器(如果我们将网页一静态化的形式呈现,就可以使用Nginx这样高性能的web服务器来部署,它可以承载5W的并发;而Tomcat只有几百并发;) - 虚拟主机(网站空间):可以实现在一台服务器虚拟出多个网站(例如个人网站使用的虚拟主机)
他就像仓库一样,网站信息在网络中需要有存放的地方,通常企业做网站都不会自己架服务器,而是选择以虚拟主机空间做为放置网站内容的网站空间。
小型网站空间 - 虚拟主机
中型网站空间 - VPS主机
大型网站空间 - 服务器 - 反向代理、负载均衡:当网站的访问量达到一定程度后,单台服务器不能满足用户的请求,需要多台服务器集群可以使用Nginx做反向代理,而且多台服务器可以平均分担负载,不会因为某台服务器负载高宕机
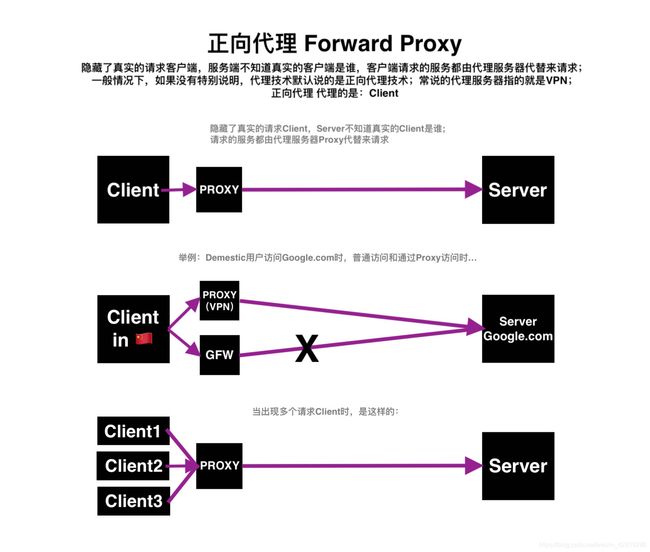
正向代理 & 反向代理
NginX + Tomcat 实现反向代理
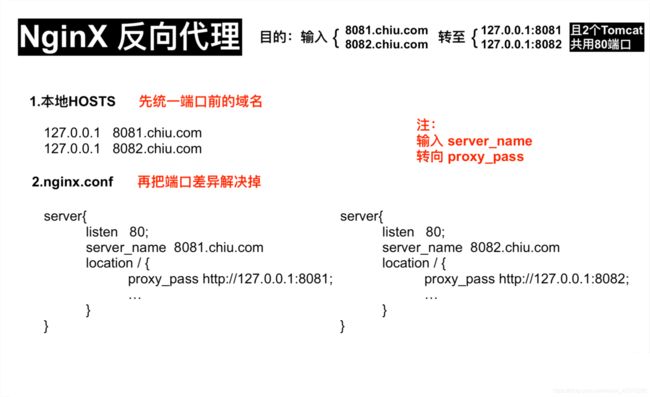
使用nginx同一端口根据不同域名转发到不同端口:
需求:在一台服务器上部署两个Tomcat项目,都想共用同一个端口号80;但是一台服务器Tomcat端口号不能重复,那么这个问题如何解决?
答:使用NginX,同一端口根据不同域名转发到不同端口;
可以在本地启动两个Tomcat,两个Tomcat端口号分别为8081和8082,一个nginx端口号为80;
分别访问两个Tomcat和nginx:
Tomcat 1 端口号:8081,访问地址:127.0.0.1:8081
Tomcat 2 端口号:8082,访问地址:127.0.0.1:8082
再用nginx实现反向代理;
输出8081.chiu.com,跳转到127.0.0.1:8081
输出8082.chiu.com,跳转到127.0.0.1:8082
有点奇怪,这两个URL都没写端口,应该是默认8080,但却跳到了两个端口;
实现 反向代理:
可能需要配合文章:TOMCAT
https://blog.csdn.net/weixin_42915286/article/details/84108532
- 1.先复制两个TOMCAT服务器,他们分别为:
Tomcat 8081和Tomcat 8082;
————————
(1).分别修改他们conf - Server.xml中的三个端口号;
新TOMCAT 1 ————————————————————

 8085 改成 8086
 8085 改成 8087
若不修改端口,则两个服务器会保留了同样的端口,第一个服务器启动后,第二个服务器会无法启动;
(2).分别修改他们浏览器中的静态页面:
(这个步骤的意思是:本来某Tomcat服务器登录成功后,浏览器访问localhost:端口号,会返回一个jsp页面,里面有Tomcat的Logo和配置信息;这些信息就是ROOT文件夹的内容;我们把它删掉,用一行html文字作为浏览器对于Tomcat登录成功的返回页面)
把webapps - ROOT中的内容删光,分别新建一个.txt文件,内容比如为:This is the Server of 8081
.html;
用来区分8081和8082服务器;
注意!此.html一定要命名为index.html,其他名字会让其不能被识别!!
配置完成后,启动8081和8082的bin - startup.sh;
然后,浏览器分别访问:
localhost:8081
localhost:8082
分别可以见到
This is the Server of 8081.
This is the Server of 8082.
————————
- 2.配置本地域名,实现URL跳转
比如我想实现如下效果:
输出8081.chiu.com,跳转到127.0.0.1:8081
输出8082.chiu.com,跳转到127.0.0.1:8082
————————
进入本地HOST文件(作用:做DNS解析)配置本地域名,添加:
127.0.0.1  8081.chiu.com
127.0.0.1  8082.chiu.com
然后在浏览器分别访问:
http://8081.chiu.com:8081/
http://8082.chiu.com:8082/
访问成功;
————————————————
但,这时我们想 免输入端口号 来访问:
- (3). 配置 NginX 反向代理
在nginx.conf中把server port改成80;(若光改此文件无效的话,试试也改下nginx.conf.default)
浏览器输入127.0.0.1(不输入端口号)访问看看
(nginx配置修改后,都要重启一次才生效)
————————
把nginx.conf中这一行server{...}删除(虚拟主机),新写一个虚拟主机:
这段话意思是:浏览器输入server_name后,地址会重定向到proxy_pass
server {
        listen       80;
        server_name  8081.chiu.com;
        #charset koi8-r;

        #access_log  logs/host.access.log  main;

        location / {
            proxy_pass http://127.0.0.1:8081;
            proxy_redirect default;
            proxy_set_header Host $host;
            proxy_set_header X-Real-IP $remote_addr;
        }
    }
(nginx每一次更新配置后都要重启)
这样,在浏览器输入8081.chiu.com得到的页面 = localhost:8081的页面;
那么8082呢?新增一份:
    server {
        listen       80;
        server_name  8082.chiu.com;
        #charset koi8-r;

        #access_log  logs/host.access.log  main;

        location / {
            proxy_pass http://127.0.0.1:8082;
            proxy_redirect default;
            proxy_set_header Host $host;
            proxy_set_header X-Real-IP $remote_addr;
        }
    }
完成。
负载均衡
负载均衡:
当一台服务器的性能达到极限时,我们可以使用服务器集群来提高网站的整体性能。那么,在服务器集群中,需要有一台服务器充当调度者的角色,用户的所有请求都会首先由它接收,调度者再根据每台服务器的负载情况将请求分配给某一台后端服务器去处理。
那么在这个过程中,调度者如何合理分配任务,保证所有后端服务器都将性能充分发挥,从而保持服务器集群的整体性能最优,这就是负载均衡问题。
负载均衡的5种实现方式:
- 1.HTTP重定向
优点:比较简单;
缺点:浏览器需要每次请求两次服务器才能拿完成一次访问,性能较差。 - 2.DNS负载均衡
优点:将负载均衡工作交给DNS,省略掉了网络管理的麻烦;
缺点:DNS可能缓存A记录,不受网站控制。 - 3.反向代理负载均衡
优点:部署简单;
缺点:反向代理服务器是所有请求和响应的中转站,其性能可能会成为瓶颈。 - 4.IP负载均衡
优点:IP负载均衡在内核进程完成数据分发,较反向代理均衡有更好的处理性能。
缺点:负载均衡的网卡带宽成为系统的瓶颈。 - 5.数据链路层负载均衡
避免负载均衡服务器网卡带宽成为瓶颈,是目前大型网站所使用的最广的一种负载均衡手段。
负载均衡组件:
- apache (市场占有率最高,老牌)
是Apache软件基金会的一个开放源代码的跨平台的网页服务器,属于老牌的web服务器了,支持基于Ip或者域名的虚拟主机,支持代理服务器,支持安全Socket层(SSL)等等,目前互联网主要使用它做静态资源服务器,也可以做代理服务器转发请求(如:图片链等),结合tomcat等servlet容器处理jsp。 - ngnix (最常用,增长速度最快)
俄罗斯人开发的一个高性能的 HTTP和反向代理服务器。由于Nginx 超越 Apache 的高性能和稳定性,使得国内使用 Nginx 作为 Web 服务器的网站也越来越多,其中包括新浪博客、新浪播客、网易新闻、腾讯网、搜狐博客等门户网站频道等,在3w以上的高并发环境下,ngnix处理能力相当于apache的10倍。
nginx比apache高并发好;
nginx速度比apache快:
他们都用了副路多用模式,但因为nginx采用了epoll,apache采用了select
select:客人去饭店吃饭,服务员全程接待:迎接、点菜、等菜、上菜,不能去做其他事,只能为这位客人服务,这样很多情况下是阻塞的;客人一多只能叫来更多服务员,但饭店资源(CPU)有限,增加了很多管理成本,陷入瓶颈;
epoll:饭店门口有个门帘,一旦有客人进门,即有一位服务员接待,然后继续忙其他事情;若客人点好了菜,服务员再来一下;服务器阻塞很小,餐厅效率提高;
当然在小并发时,nginx和apache没有太大区别;
-
LVS
Linux Virtual Server的简写,意即Linux虚拟服务器,是一个虚拟的服务器集群系统。由毕业于国防科技大学的章文嵩博士于1998年5月创立,可以实现LINUX平台下的简单负载均衡。
了解更多,访问官网:http://zh.linuxvirtualserver.org/。 -
HAProxy
HAProxy提供高可用性、负载均衡以及基于TCP和HTTP应用的代理,支持虚拟主机,它是免费、快速并且可靠的一种解决方案。HAProxy特别适用于那些负载特大的web站点, 这些站点通常又需要会话保持或七层处理。HAProxy运行在当前的硬件上,完全可以支持数以万计的并发连接。并且它的运行模式使得它可以很简单安全的整合进您当前的架构中, 同时可以保护你的web服务器不被暴露到网络上。(他有Session保持功能,不用担心Session共享失败;支持通过URL检测应用是否挂了) -
keepalived
这里说的keepalived不是apache或者tomcat等某个组件上的属性字段,它也是一个组件,可以实现web服务器的高可用(HA high availably)。它可以检测web服务器的工作状态,如果该服务器出现故障被检测到,将其剔除服务器群中,直至正常工作后,keepalive会自动检测到并加入到服务器群里面。实现主备服务器发生故障时ip瞬时无缝交接。它是LVS集群节点健康检测的一个用户空间守护进程,也是LVS的引导故障转移模块(director failover)。Keepalived守护进程可以检查LVS池的状态。如果LVS服务器池当中的某一个服务器宕机了。keepalived会通过一 个setsockopt呼叫通知内核将这个节点从LVS拓扑图中移除。 -
memcached
它是一个高性能分布式内存对象缓存系统。当初是Danga Interactive为了LiveJournal快速发展开发的系统,用于对业务查询数据缓存,减轻数据库的负载。其守护进程(daemon)是用C写的,但是客户端支持几乎所有语言(客户端基本上有3种版本[memcache client for java;spymemcached;xMecache]),服务端和客户端通过简单的协议通信;在memcached里面缓存的数据必须序列化。 -
terracotta
是一款由美国Terracotta公司开发的著名开源Java集群平台。它在JVM与Java应用之间实现了一个专门处理集群功能的抽象层,允许用户在不改变系统代码的情况下实现java应用的集群。支持数据的持久化、session的复制以及高可用(HA)。
负载均衡算法:
- 轮询 / 加权轮询(
weight = 数字) - 随机算法(约等于:轮询) / 加权随机
- 最小连接数(每次尝试与最少连接的那台服务器连接)
- IPHash(过时)
- URL散列
————————————————————————————
NginX + Tomcat 实现负载均衡
需求:nginx作为负载均衡服务器,用户请求先到达nginx,再由nginx根据负载均衡将请求转发至Tomcat服务器;
nginx负载均衡服务器:127.0.0.1
Tomcat 1 服务器:127.0.0.1:8081
Tomcat 1 服务器:127.0.0.1:8082
但是在真实生产环境中,nginx和Tomcat服务器未在同一台服务器上;
-
在HOSTS中添加本地域名
127.0.0.1 www.chiu.com -
配置nginx的负载均衡
新增了upstream,修改了server_name和proxy_pass -
配置负载均衡的权重:weight默认为1,权重越高,请求处理越多;
upstream tomcatserver1 {
    server 127.0.0.1:8081 weight=1;
    server 127.0.0.1:8082 weight=1;
    }

    server {
        listen       80;
        server_name  www.chiu.com;
        #charset koi8-r;

        #access_log  logs/host.access.log  main;

        location / {
            proxy_pass http://tomcatserver1;
            proxy_redirect default;
            proxy_set_header Host $host;
            proxy_set_header X-Real-IP $remote_addr;
        }
    }
重启nginx后,浏览器访问www.chiu.com,返回
This is the Server of 8081. 或 This is the Server of 8082.的几率是一样的(因为权重是一样的),刷新可变化;
Session共享问题
单机部署走向集群部署,必然会遇到这个问题;
在使用Nginx+Tomcat实现负载均衡的时候,由于Nginx对不同的请求分发到某一个Tomcat,Tomcat在运行的时候分别是不同的容器里,因为会出现session不同步或者丢失的问题。
可以利用redis实现session存储;
(2019年6月更新:现在最流行采用k8s+docker容器化部署)
(Redis session已经成熟,不需要再用到iphash)
比如:购物网站已经登录,见到了登录成功的页面,这时点击“购买”链接(此链接反向代理到两个服务器),若服务器1挂了,定向到服务器1时,系统会返回“未登录”状态,此时发生的就是Session丢失/不同步的现象(或者单点故障);
轮询:
upstream tomcatserver1 {
    server 127.0.0.1:8081 // 如果未写 weight值,即实现轮询
    server 127.0.0.1:8082 // 如果未写 weight值,即实现轮询
}
轮询即第一次8081,第二次8082,第三次8081,第四次8082;
HTTP是无状态协议;
什么是无状态协议?
服务器在某次会话中产生的数据不会被保留下来,所以第二次请求时,服务器无法识别曾经来过;
(每一次对话都好像第一次对话)
无场景场景例子:
A:你吃了什么?
B:川菜
A:那么味道如何?
B:什么东西味道如何?
Session让Http从无状态变成有状态了:
页面之间传值、用户相关信息、一些不变的数据、甚至于查出来的DataTable也可以放进去,取值的时候只需要Session[Key]即可,真是方便极了。
Cookie和Session
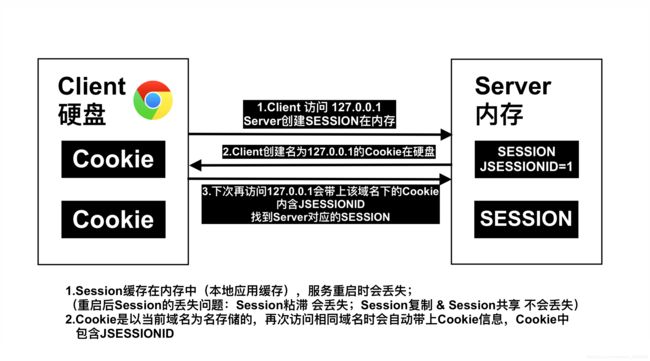
例子:健身房为了识别顾客身份,必须办健身卡和把顾客信息存入电脑;
健身房 - 服务端(服务端)
电脑中的信息 - Session
健身卡 - Cookie(客户端;通过Cookie能查到Session)
Cookie通过JSESSIONID到服务器内存中匹配相应的Session;
Session是个利器,但Session的许多问题我们不得不去面对…
提问:为什么负载均衡下Session会不一致?


Chrome下查看Cookie:
https://blog.csdn.net/weixin_42915286/article/details/85677312
提问:如何解决Session(会话)一致性的问题?
(2019年6月更新:K8S部署有分离的文件存储功能,即不论业务部署在哪些机器上,存储的文件都往同一地方)
总结:
Session 粘滞:配置简单,无入侵,存在单点故障问题;
Session 复制:较小分布式环境首选(Tomcat服务器小于10个时),无入侵,健壮无单点故障问题;
Session 共享:大型分布式环境首选,可拓展性强,健壮;
————————————————————————————
- 1.Session 粘滞 (已淘汰)(
IPHash算法即是如此)
在负载均衡时,把来自同一个IP的所有请求都保持到同一台服务器上;
(就像胶水一样,把所有同一IP的请求都放在同一台负载均衡的服务器上)
配置非常简单,加一句话就可以了;且便于服务器水平扩展,随便加几台都没事(反正请求都只到某一台服务器,新加入服务器后,iphash才会重新计算一次,指定某台服务器);
但从容器化的角度来看不应该这么做,因没法最大化平均地利用服务器资源;且 单节点故障 就会让状态丢失;业务节点本身应是无状态比较好;还有单点负载过高的风险;
服务器重启会导致Session丢失(本地应用缓存);
(比如,他把所有请求都放在一台服务器:8081,而另一台服务器8081完全访问不到,或者后面有几百台服务器,也用不到)
upstream tomcatserver1 {
    ip_hash,
    server 127.0.0.1:8081
    server 127.0.0.1:8082
}
————————————————————————————
-
2.Session 复制 (常用)
利用Tomcat自身特性,把某一台Tomcat服务器上的Session复制到其他Tomcat服务器上(服务器都在Tomcat集群内);
请求通过nginx分发到各服务器上,服务器之间互相同步,确保请求会复制到各服务器上; -
优点:
不侵入应用;便于服务器水平扩展(在nginx中配上访问的地址,就能达到目的);
能使用各种负载均衡策略(轮询、加权…);
服务器重启或宕机不会造成Session的丢失(某台服务器关闭后,其他服务器依然能顺利完成任务;若打开刚刚关闭的服务器,这台服务器依然能自动继续工作); -
缺点:
性能低(复制Session会把其复制到集群中所有服务器,当集群中服务器越来越多,涉及到额外的开销就越来越多);
内存消耗大;
代码考虑(确保应用程序中数据都是可序列化的;考虑会话大小,开发人员要把会话大小保持在一个合理的范围);
实现步骤:
1.在Tomcat的server.xml,
(cluster只用于Session复制!若用Session共享就不要他!)
2.应用程序中,web.xml内增加节点
重点在于:
1.Cluster className 使用的类是:SimpleTcpCluster(组播使用TCP协议)
2.这一大段;这个Channel管道做了三件事:
   (1).McastService 组托服务,创建一个小组出来;
      通过address和port形成了一个组播网络
      注:组播成员都要配上此address和port!!
   (2).成员接收数据:NioReceiver
   (3).发送数据:NIO中的一个连接池

【要改动的地方】是:NioReceiver的port!!!!!!!!!!!!!!!
若要在【单机】中实现此配置?
要在不同TOMCAT中把此port改成不一样的!!!!!!!
第2步:在web.xml中添加如下节点
专业的开发人员必须了解:深层次的Session复制原理(亦是面试必备)
页面搜索:Session复制的原理分析
————————————————————————————
- 3.Session 共享 (常用)
既然Session的本质是一个缓存(Session生命周期跟用户在线时间匹配),为什么不把Session交给专业的缓存中间件处理呢?
利用第三方管理Session,让服务器共享Session;
可以用Redis帮我们实现Session共享!!
请求传递,通过nginx分发到各Server;Server从Redis中获取Session,不再从本地业务缓存中获取了;
(使用Redis替代内存中的Session操作)
-
优点:
1.能适应各种负载均衡策略;
2.Server重启或宕机时不会造成Session丢失;
3.扩展能力强
4.适合集群数量大时使用; -
缺点:
1.对应用有入侵,需增加相关配置(意思就是要针对Redis写代码/文件);
2.序列化反序列化会消耗CPU性能(这点消耗其实是可以忽略不计的);
Spring Boot 中的实现步骤:(非常简单)
1.POM
2.properties.yml
3.启动类上添加@EnableRedisHttpSession注解
注意:nginx不需要配置!!!!!!!!!!!!
启动时,两个TOMCAT要跑起来,记得Redis也要跑;
1.POM
    org.springframework.boot
    spring-boot-starter-data-redis


    org.springframework.session
    spring-session-data-redis
2.application.yml
spring:
	redis:
	  host: 127.0.0.1
	  port: 6379
	  timeout: 1000
	  #集群时,填写下列代码;单机不需要
	  pool:
	   max-active: 8
	   min-idle: 0
	   max-idle: 8
	   max-wait: -1
	   password:  # 在启动Redis-cli时需要输入(启动客户端好观察操作结果)
  application:
    name: spring-boot-redis
或.properties
spring.redis.database=0  #Redis数据库索引(默认为0)
spring.redis.host=127.0.0.1  #Redis服务器地址
spring.redis.port=6379  #Redis服务器连接端口
spring.redis.password=   #Redis服务器连接密码(默认为空)

还可以添加如下:
spring.redis.pool.max-active=8  #连接池最大连接数(使用负值表示没有限制)
spring.redis.pool.max-wait=-1   #连接池最大阻塞等待时间(使用负值表示没有限制)
spring.redis.pool.max-idle=8   #连接池中的最大空闲连接
spring.redis.pool.min-idle=0   #连接池中的最小空闲连接
spring.redis.timeout=1000   #连接超时时间(毫秒)
3.启动类上添加@EnableRedisHttpSession注解
实验过程:
把TOMCAT、Redis都跑起来,网页登录几个负载均衡服务器都成功后
查看Redis-cli:keys *
里面出现了内容:(存储在Redis中的信息)
1) "spring:session:expirations:152xxxxxxxxxx"
2) "spring:session:session:expires:633e9273-40cc-4553-aa99-31b15bba8e0c"
3) "spring:session:index:org.springframework.session.FindByIndexNameSessionRepository.PRINCIPAL_INDEX_NAME:user"
4) "spring:session:sessions:633e9273-40cc-4553-aa99-31b15bba8e0c"
若想分析这段代码,可以参考Redis源码:(同时参考上面我做的那张图)
就从@EnableRedisHttpSession入手;
官网中对于这句话的功能描述是:此注解会在项目中创建一个Filter,用SpringSession替代HTTPSession发挥作用;
此注解import了一个RedisHttpSessionConfiguration.class
其中定义了很多属性,如maxInactiveIntervalInSeconds = 1800; Redis的Session超时时间默认:30min
进入此类的父类SpringHttpSessionConfiguration:
此类就能找到官网描述的那个Filter了:springSessionRepositoryFilter;(Spring Session最核心的部分)他中间有一些核心方法,如包装类:getSession,就是他替代了HttpRequest自带的getSession方法:
他的逻辑:查看当前有没有Session会话,有的话就return;无的话就createSession;
1) "spring:session:expirations:152xxxxxxxxxx"
2) "spring:session:session:expires:633e9273-40cc-4553-aa99-31b15bba8e0c"
// 2) 这是超时时间
3)"spring:session:index:org.springframework.session.FindByIndexNameSessionRepository.PRINCIPAL_INDEX_NAME:user"
// 3) 这是SessionID
4) "spring:session:sessions:633e9273-40cc-4553-aa99-31b15bba8e0c"
查看Session中存储的是什么东西?
type spring:session:sessions:633e9273-40cc-4553-aa99-31b15bba8e0c
返回:hash
那么其中一定有很多Key,查看他们:
hkeys spring:session:sessions:633e9273-40cc-4553-aa99-31b15bba8e0c
返回 比如:"sessionAttr:userName"
这是因为在代码中放了一对username和值(值为:luffy)
如何查看对应的Value?
hget spring:session:sessions:633e9273-40cc-4553-aa99-31b15bba8e0c sessionAttr:userName
返回:/xac/xed/x00/x05t/x00/x05luffy(luffy前面内容是序列化的内容,可以改变序列化方式来去掉前面这些内容)
查看失效时间?
ttl spring:session:session:expires:633e9273-40cc-4553-aa99-31b15bba8e0c
返回:(integer) 1665 还有1665秒(默认总时间1800秒)
另外:
做APP时,可以用Redis替代Session,超时时间可选择一天或多天超时;
因为大多数普通APP上,登录后1800秒就超时不合理;
Session复制的原理分析
网络中有三种通讯模式:单播、广播、组播(多播);
广播
每一台服务器都要无条件接收消息;
比如:有线电视网络;

组播(多播)
Pub/Sub是组播
通过一个组播地址(IP地址),将数据在同一时间以高效的形式(TCP协议)发往网络上多个接收者;
(组播:一般指IP组播)
组播是实现SESSION复制的根本;
比如:微信同学大群中,有人喊人打篮球,那么接受响应的人们就会自己创建一个小群,交流信息;

nginx.conf
/usr/local/etc/nginx/nginx.conf
默认文档:
#user  nobody;
worker_processes  1;  # 工作进程的数量

#error_log  logs/error.log;
#error_log  logs/error.log  notice;
#error_log  logs/error.log  info;

#pid        logs/nginx.pid;


events {
    worker_connections  1024;
}


http {
    include       mime.types;
    default_type  application/octet-stream;

    #log_format  main  '$remote_addr - $remote_user [$time_local] "$request" '
    #                  '$status $body_bytes_sent "$http_referer" '
    #                  '"$http_user_agent" "$http_x_forwarded_for"';

    #access_log  logs/access.log  main;

    sendfile        on;  # 开启高效文件传输模式
    #tcp_nopush     on;

    #keepalive_timeout  0;
    keepalive_timeout  65;

    #gzip  on;

    server {         # 配置虚拟主机
        listen       80;    # 默认监听端口:80;意思是浏览器输入下面的servername,nginx就会自动加载这个端口名,不需再手动输入
        server_name  localhost;

        #charset koi8-r;

        #access_log  logs/host.access.log  main;

        location / {
            root   html;
            index  index.html index.htm;
            # 个人新增 proxy_pass http://127.0.0.1... 意思是如果监听到浏览器输入的端口和域名和上面listen和server_name写的匹配,那么就会自动转发到proxy_pass这个URL
        }

        #error_page  404              /404.html;

        # redirect server error pages to the static page /50x.html
        #
        error_page   500 502 503 504  /50x.html;
        location = /50x.html {
            root   html;
        }

        # proxy the PHP scripts to Apache listening on 127.0.0.1:80
        #
        #location ~ \.php$ {
        #    proxy_pass   http://127.0.0.1;
        #}

        # pass the PHP scripts to FastCGI server listening on 127.0.0.1:9000
        #
        #location ~ \.php$ {
        #    root           html;
        #    fastcgi_pass   127.0.0.1:9000;
        #    fastcgi_index  index.php;
        #    fastcgi_param  SCRIPT_FILENAME  /scripts$fastcgi_script_name;
        #    include        fastcgi_params;
        #}

        # deny access to .htaccess files, if Apache's document root
        # concurs with nginx's one
        #
        #location ~ /\.ht {
        #    deny  all;
        #}
    }


    # another virtual host using mix of IP-, name-, and port-based configuration
    #
    #server {
    #    listen       8000;
    #    listen       somename:8080;
    #    server_name  somename  alias  another.alias;

    #    location / {
    #        root   html;
    #        index  index.html index.htm;
    #    }
    #}


    # HTTPS server
    #
    #server {
    #    listen       443 ssl;
    #    server_name  localhost;

    #    ssl_certificate      cert.pem;
    #    ssl_certificate_key  cert.key;

    #    ssl_session_cache    shared:SSL:1m;
    #    ssl_session_timeout  5m;

    #    ssl_ciphers  HIGH:!aNULL:!MD5;
    #    ssl_prefer_server_ciphers  on;

    #    location / {
    #        root   html;
    #        index  index.html index.htm;
    #    }
    #}
    include servers/*;
}
报错
nginx: [emerg] unexpected end of file, expecting "}" in /usr/local/etc/nginx/nginx.conf:85
若在启动nginx时报这个错误,是因为刚刚修改了nginx.conf,其中少写了一个花括号,仔细检查一下;
下载
brew install nginx
/usr/local/etc/nginx/nginx.conf (配置文件路径)
/usr/local/var/www (服务器默认路径)
/usr/local/Cellar/nginx/1.8.0 (安装路径)
A CA file has been bootstrapped using certificates from the SystemRoots
keychain. To add additional certificates (e.g. the certificates added in
the System keychain), place .pem files in
  /usr/local/etc/openssl/certs

and run
  /usr/local/opt/openssl/bin/c_rehash

openssl is keg-only, which means it was not symlinked into /usr/local,
because Apple has deprecated use of OpenSSL in favor of its own TLS and crypto libraries.

If you need to have openssl first in your PATH run:
  echo 'export PATH="/usr/local/opt/openssl/bin:$PATH"' >> ~/.bash_profile

For compilers to find openssl you may need to set:
  export LDFLAGS="-L/usr/local/opt/openssl/lib"
  export CPPFLAGS="-I/usr/local/opt/openssl/include"

==> nginx
Docroot is: /usr/local/var/www

The default port has been set in /usr/local/etc/nginx/nginx.conf to 8080 so that
nginx can run without sudo.

nginx will load all files in /usr/local/etc/nginx/servers/.

To have launchd start nginx now and restart at login:
  brew services start nginx
Or, if you don't want/need a background service you can just run:
  nginx
-MacBook-Air:~ xxxx$ brew services start nginx
默认端口:http://localhost:8080/
Nginx默认安装端口为8080;
端口修改方式:打开/usr/local/etc/nginx 发现里面有一个nginx.conf文件,更改默认的listen:8080为新端口号,重启nginx即可;
nginx.conf:
#user  nobody;
worker_processes  1;

#error_log  logs/error.log;
#error_log  logs/error.log  notice;
#error_log  logs/error.log  info;

#pid        logs/nginx.pid;


events {
    worker_connections  1024;
}


http {
    include       mime.types;
    default_type  application/octet-stream;

    #log_format  main  '$remote_addr - $remote_user [$time_local] "$request" '
    #                  '$status $body_bytes_sent "$http_referer" '
    #                  '"$http_user_agent" "$http_x_forwarded_for"';

    #access_log  logs/access.log  main;

    sendfile        on;
    #tcp_nopush     on;

    #keepalive_timeout  0;
    keepalive_timeout  65;

    #gzip  on;

    server {
        listen       8080;
        server_name  localhost;

        #charset koi8-r;

        #access_log  logs/host.access.log  main;

        location / {
            root   html;
            index  index.html index.htm;
        }

        #error_page  404              /404.html;

        # redirect server error pages to the static page /50x.html
        #
        error_page   500 502 503 504  /50x.html;
        location = /50x.html {
            root   html;
        }

        # proxy the PHP scripts to Apache listening on 127.0.0.1:80
        #
        #location ~ \.php$ {
        #    proxy_pass   http://127.0.0.1;
        #}

        # pass the PHP scripts to FastCGI server listening on 127.0.0.1:9000
        #
        #location ~ \.php$ {
        #    root           html;
        #    fastcgi_pass   127.0.0.1:9000;
        #    fastcgi_index  index.php;
        #    fastcgi_param  SCRIPT_FILENAME  /scripts$fastcgi_script_name;
        #    include        fastcgi_params;
        #}

        # deny access to .htaccess files, if Apache's document root
        # concurs with nginx's one
        #
        #location ~ /\.ht {
        #    deny  all;
        #}
    }


    # another virtual host using mix of IP-, name-, and port-based configuration
    #
    #server {
    #    listen       8000;
    #    listen       somename:8080;
    #    server_name  somename  alias  another.alias;

    #    location / {
    #        root   html;
    #        index  index.html index.htm;
    #    }
    #}


    # HTTPS server
    #
    #server {
    #    listen       443 ssl;
    #    server_name  localhost;

    #    ssl_certificate      cert.pem;
    #    ssl_certificate_key  cert.key;

    #    ssl_session_cache    shared:SSL:1m;
    #    ssl_session_timeout  5m;

    #    ssl_ciphers  HIGH:!aNULL:!MD5;
    #    ssl_prefer_server_ciphers  on;

    #    location / {
    #        root   html;
    #        index  index.html index.htm;
    #    }
    #}
    include servers/*;
}
nginx upstream模块:负载均衡
upstream模块相关说明
1、upstream模块应放于nginx.conf配置的http{}标签内
2、upstream模块默认算法是wrr (权重轮询 weighted round-robin)
一、分配方式
Nginx的upstream支持5种分配方式,下面将会详细介绍,其中前三种为Nginx原生支持的分配方式,后两种为第三方支持的分配方式。
1、轮询(原生)
轮询是upstream的默认分配方式,即每个请求按照时间顺序轮流分配到不同的后端服务器,如果某个后端服务器down掉后,能自动剔除。
upstream backend {
    server 192.168.1.101:8888;
    server 192.168.1.102:8888;
    server 192.168.1.103:8888;
}
2、权重值 weight(原生)
轮询的加强版,即可以指定轮询比率,weight和访问几率成正比,主要应用于后端服务器异质的场景下;
weight数是一个比例问题,单个数字大小不是关键;比如,若weight设置成1、2或者4、8,都是同一个意思;
upstream backend {
    server 192.168.1.101 weight=1;
    server 192.168.1.102 weight=2;
    server 192.168.1.103 weight=3;
}
3、ip_hash (原生)
每个请求按照访问ip(即Nginx的前置服务器或者客户端IP)的hash结果分配,这样每个访客会固定访问一个后端服务器,可以解决session一致问题。
upstream backend {
    ip_hash;
    server 192.168.1.101:7777;
    server 192.168.1.102:8888;
    server 192.168.1.103:9999;
}
注意:
1、当负载调度算法为ip_hash时,后端服务器在负载均衡调度中的状态不能是weight和backup。
2、导致负载不均衡。
4、fair(第三方支持)
fair顾名思义,公平地按照后端服务器的响应时间(rt)来分配请求,响应时间短即rt小的后端服务器优先分配请求。如果需要使用这种调度算法,必须下载Nginx的upstr_fair模块。
upstream backend {
    server 192.168.1.101;
    server 192.168.1.102;
    server 192.168.1.103;
    fair;
}
5、url_hash,目前用consistent_hash替代url_hash(第三方支持)
与ip_hash类似,但是按照访问url的hash结果来分配请求,使得每个url定向到同一个后端服务器,主要应用于后端服务器为缓存时的场景下。
upstream backend {
    server 192.168.1.101;
    server 192.168.1.102;
    server 192.168.1.103;
    hash $request_uri;
    hash_method crc32;
}
其中,hash_method为使用的hash算法,需要注意的是:此时,server语句中不能加weight等参数。
提示:url_hash用途cache服务业务,memcached,squid,varnish。特点:每个rs都是不同的。


