scrapy爬取图片并保存在不同的文件夹下
文章目录
- 1、爬取的网站
- 2、创建项目和爬虫模块
- 3、settings.py配置爬虫的配置信息
- 4、animal.py主要是通过xpath获取页面的信息
- 5、items.py定义属性字段
- 6、pipelines.py模块,处理animal.py传递过来的信息,将信息和图片保存在对应的位置
- 7、在项目的根目录下创建批处理文件animal.bat,方便快速执行命令
- 8、在项目的根目录中执行批处理文件
1、爬取的网站
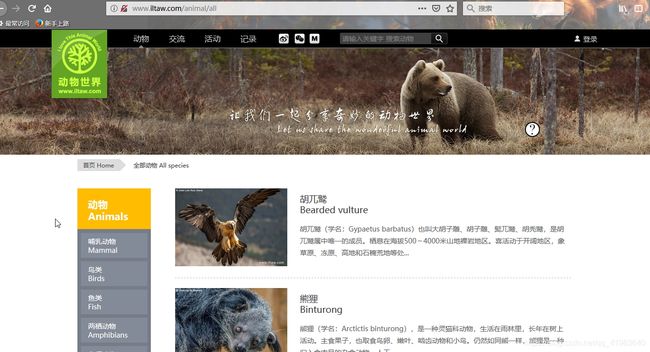
http://www.iltaw.com/animal/all

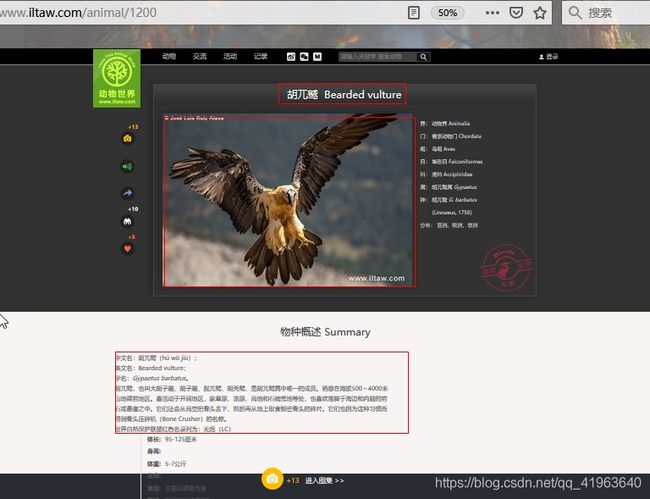
 这里主要爬取的是动物详情页的信息,有三个信息字段,动物名、动物图片、动物概述
第一层页面主要是获取动物详情页的链接
2、创建项目和爬虫模块
创建项目
scrapy startproject animalspider
创建爬虫模块
scrapy genspider animal http://www.iltaw.com
3、settings.py配置爬虫的配置信息
# -*- coding: utf-8 -*-

# Scrapy settings for animalspider project
#
# For simplicity, this file contains only settings considered important or
# commonly used. You can find more settings consulting the documentation:
#
#     https://doc.scrapy.org/en/latest/topics/settings.html
#     https://doc.scrapy.org/en/latest/topics/downloader-middleware.html
#     https://doc.scrapy.org/en/latest/topics/spider-middleware.html

BOT_NAME = 'animalspider'

SPIDER_MODULES = ['animalspider.spiders']
NEWSPIDER_MODULE = 'animalspider.spiders'


# Crawl responsibly by identifying yourself (and your website) on the user-agent
#USER_AGENT = 'animalspider (+http://www.yourdomain.com)'

# Obey robots.txt rules
# 不遵守robots协议
ROBOTSTXT_OBEY = False

# Configure maximum concurrent requests performed by Scrapy (default: 16)
#CONCURRENT_REQUESTS = 32

# Configure a delay for requests for the same website (default: 0)
# See https://doc.scrapy.org/en/latest/topics/settings.html#download-delay
# See also autothrottle settings and docs
# 爬取时间间隔
DOWNLOAD_DELAY = 2
# The download delay setting will honor only one of:
#CONCURRENT_REQUESTS_PER_DOMAIN = 16
#CONCURRENT_REQUESTS_PER_IP = 16

# Disable cookies (enabled by default)
#COOKIES_ENABLED = False

# Disable Telnet Console (enabled by default)
#TELNETCONSOLE_ENABLED = False

# Override the default request headers:
# 定义headers的基础信息
# 防止服务器不让访问
DEFAULT_REQUEST_HEADERS = {
    # 'Accept': 'text/html,application/xhtml+xml,application/xml;q=0.9,*/*;q=0.8',
    # 'Accept-Language': 'en',
    'User-agent': 'Mozilla/5.0 (Linux; U; Android 2.3.7; en-us; Nexus One Build/FRF91) AppleWebKit/533.1 (KHTML, like Gecko) Version/4.0 Mobile Safari/533.1',
}

# Enable or disable spider middlewares
# See https://doc.scrapy.org/en/latest/topics/spider-middleware.html
#SPIDER_MIDDLEWARES = {
#    'animalspider.middlewares.AnimalspiderSpiderMiddleware': 543,
#}

# Enable or disable downloader middlewares
# See https://doc.scrapy.org/en/latest/topics/downloader-middleware.html
#DOWNLOADER_MIDDLEWARES = {
#    'animalspider.middlewares.AnimalspiderDownloaderMiddleware': 543,
#}

# Enable or disable extensions
# See https://doc.scrapy.org/en/latest/topics/extensions.html
#EXTENSIONS = {
#    'scrapy.extensions.telnet.TelnetConsole': None,
#}

# Configure item pipelines
# See https://doc.scrapy.org/en/latest/topics/item-pipeline.html
# item管道模块执行
ITEM_PIPELINES = {
   'animalspider.pipelines.AnimalspiderPipeline': 300,
   'animalspider.pipelines.ImagesspiderPipeline': 400,
}


# # 定义图片的保存路径
IMAGES_STORE = 'animal'
# 定义接受图片的变量
IMAGES_URLS_FIELD = 'img_url'

# Enable and configure the AutoThrottle extension (disabled by default)
# See https://doc.scrapy.org/en/latest/topics/autothrottle.html
#AUTOTHROTTLE_ENABLED = True
# The initial download delay
#AUTOTHROTTLE_START_DELAY = 5
# The maximum download delay to be set in case of high latencies
#AUTOTHROTTLE_MAX_DELAY = 60
# The average number of requests Scrapy should be sending in parallel to
# each remote server
#AUTOTHROTTLE_TARGET_CONCURRENCY = 1.0
# Enable showing throttling stats for every response received:
#AUTOTHROTTLE_DEBUG = False

# Enable and configure HTTP caching (disabled by default)
# See https://doc.scrapy.org/en/latest/topics/downloader-middleware.html#httpcache-middleware-settings
#HTTPCACHE_ENABLED = True
#HTTPCACHE_EXPIRATION_SECS = 0
#HTTPCACHE_DIR = 'httpcache'
#HTTPCACHE_IGNORE_HTTP_CODES = []
#HTTPCACHE_STORAGE = 'scrapy.extensions.httpcache.FilesystemCacheStorage'
4、animal.py主要是通过xpath获取页面的信息
# -*- coding: utf-8 -*-
import scrapy
from scrapy import Request
from scrapy.linkextractors import LinkExtractor
from scrapy.spiders import CrawlSpider, Rule

from ..items import AnimalspiderItem


class AnimalSpider(CrawlSpider):
    name = 'animal'
    allowed_domains = ['www.iltaw.com']
    start_urls = ['http://www.iltaw.com/animal/all']

    # 先调用scrapy的爬虫框架模板,获取所有分页的页面,后续的页面交给回调函数处理
    rules = (
        Rule(LinkExtractor(allow=r'page'), callback='my_parse', follow=True),
    )

    # 获取第一层页面的所有等物链接,
    def my_parse(self, response):
        # print("++++++++++++++++++", response.url)
        selsectList = response.xpath('/html/body/div[1]/div/div[3]/div/div[2]/ul/li/div[2]/h3/a/@href')

        for url in selsectList.extract():
            yield Request(url, callback=self.parse_animal)

    # 第二层页面处理,获取想要的信息
    def parse_animal(self, response):
        # 调用items()的类
        animal = AnimalspiderItem()
        name = response.xpath('/html/body/div[1]/div/div[2]/div/div[2]/h3/text()').extract()[0]
        img_url = response.xpath('//div[@class="img"]/img/@data-url').extract()[0]
        xixin = "".join(response.xpath('/html/body/div[1]/div/div[4]/div/div[2]/text()').extract())
        # print("+++++++++++++++++++",name,img_url,xixin)
        animal['name'] = name
        animal['img_url'] = img_url
        animal['xixin'] = xixin
        return animal
5、items.py定义属性字段
# -*- coding: utf-8 -*-

import scrapy


class AnimalspiderItem(scrapy.Item):

    # 动物名
    name = scrapy.Field()
    # 动物图片链接
    img_url = scrapy.Field()
    # 动物介绍
    xixin = scrapy.Field()
6、pipelines.py模块,处理animal.py传递过来的信息,将信息和图片保存在对应的位置
# -*- coding: utf-8 -*-

# Define your item pipelines here
#
# Don't forget to add your pipeline to the ITEM_PIPELINES setting
# See: https://doc.scrapy.org/en/latest/topics/item-pipeline.html
import os
from scrapy.pipelines.images import ImagesPipeline # 下载图片的管道
from scrapy.spiders import Request
class AnimalspiderPipeline(object):

    def create_dir(self, path):
        '''
        创建文件夹
        :return:
        '''
        # 去除首位空格
        path = path.strip()
        # 去除尾部 \ 符号
        path = path.rstrip("\\")
        # 判断路径是否存在
        isExists = os.path.exists(path)
        # 判断结果
        if not isExists:
            # 如果不存在则创建目录
            # 创建目录操作函数
            os.makedirs(path)
            print(path + ' 创建成功')
            return True
        else:
            # 如果目录存在则不创建,并提示目录已存在
            print(path + ' 目录已存在')
            return False

    def process_item(self, item, spider):
        '''将不同的动物保存成不同的文件夹'''

        # 动物名字的文件夹
        apath = "./animal/" + item["name"]
        # 动物名字的文件
        wenjian = apath + "/" + item["name"] + '.txt'

        self.create_dir(apath)
        with open(wenjian, 'wb') as file:
            file.write((item['name'] + "," + item['xixin'] + '\n').encode('utf-8'))
        return item

class ImagesspiderPipeline(ImagesPipeline):

    def get_media_requests(self, item, info):
        '''获取图片的url,通过Request方法,保存图片'''

        # 这里meta={'item': item},目的事件item传递到file_path中
        return Request(item['img_url'], meta={'item': item})

    def file_path(self, request, response=None, info=None):
        '''图片保存的路径'''
        item = request.meta['item']
        #
        apath = "./" + item["name"]
        img_name= item["name"]
        path = apath + '/' + img_name + '.jpg'
        print("图片路径+++++++++++++", path)
        return path
7、在项目的根目录下创建批处理文件animal.bat,方便快速执行命令
scrapy crawl animal

