Android Material Design 系列之 DrawerLayout + NavigationView 使用详解
前言
DrawerLayout 是 Support Library 包中实现了侧滑菜单效果的控件,可以说 DrawerLayout 是因为第三方控件如 MenuDrawer 等的出现之后,google 借鉴而出现的产物。DrawerLayout 分为侧边菜单和主内容区两部分,侧边菜单可以根据手势展开与隐藏(DrawerLayout 自身特性),主内容区的内容可以随着菜单的点击而变化。
一、DrawerLayout 基础使用
DrawerLayout 其实是一个布局控件,继承 ViewGroup,与 LinearLayout 等控件是一种东西,属于同级控件。但是 DrawerLayout 带有滑动的功能。只要按照 DrawerLayout 的规定布局方式写完布局,就能有侧滑的效果。
DrawerLayout 最简单的使用方式,添加 2 个子布局,分别代表 APP 主页面和侧滑菜单页面。
<androidx.drawerlayout.widget.DrawerLayout xmlns:android="http://schemas.android.com/apk/res/android"
    xmlns:app="http://schemas.android.com/apk/res-auto"
    xmlns:tools="http://schemas.android.com/tools"
    android:id="@+id/drawerLayout"
    android:layout_width="match_parent"
    android:layout_height="match_parent">

    <ImageView
        android:layout_width="match_parent"
        android:layout_height="match_parent"
        android:scaleType="centerCrop"
        android:src="@mipmap/meizi_2" />

    <ImageView
        android:layout_width="match_parent"
        android:layout_height="match_parent"
        android:scaleType="centerCrop"
        android:src="@mipmap/pangzi" />
androidx.drawerlayout.widget.DrawerLayout>
完成上面的布局文件,就可以实现如下效果:
二、DrawerLayout + ToolBar 使用
日常开发中,每个界面都会有一个 ToolBar,并且侧滑出来的内容都会在 ToolBar 的底部。最常见的就是 ToolBar 左侧会有一个小图标(号称三道杠),在侧滑菜单展示时,会加载一个动画变成返回按钮,完成这个效果不需要在 ToolBar 上自己添加 Icon,只需要借助 ActionBarDrawerToggle 类就可实现。
ActionBarDrawerToggle 效果就是一个“三“ 然后点击变”←“
ActionBarDrawerToggle 的作用:
- 改变 android.R.id.home 返回图标
- DrawerLayout 拉出、隐藏,带有 android.R.id.home 动画效果
- 监听 DrawerLayout 拉出、隐藏
因为要实现侧滑菜单在 ToolBar 底部,修改 XML 文件,将 ToolBar 放在 DrawerLayout 布局外层。
<LinearLayout xmlns:android="http://schemas.android.com/apk/res/android"
    xmlns:app="http://schemas.android.com/apk/res-auto"
    xmlns:tools="http://schemas.android.com/tools"
    android:layout_width="match_parent"
    android:layout_height="match_parent"
    android:orientation="vertical">

    <androidx.appcompat.widget.Toolbar
        android:id="@+id/toolbar"
        android:layout_width="match_parent"
        android:layout_height="?attr/actionBarSize"
        android:background="?attr/colorPrimary"
        app:layout_scrollFlags="scroll|enterAlways"
        app:title="DrawerLayout"
        tools:ignore="MissingConstraints" />

    <androidx.drawerlayout.widget.DrawerLayout
        android:id="@+id/drawerLayout"
        android:layout_width="match_parent"
        android:layout_height="match_parent">

        <ImageView
            android:layout_width="match_parent"
            android:layout_height="match_parent"
            android:scaleType="centerCrop"
            android:src="@mipmap/meizi_2" />

        <ImageView
            android:layout_width="match_parent"
            android:layout_height="match_parent"
            android:scaleType="centerCrop"
            android:src="@mipmap/pangzi" />

    androidx.drawerlayout.widget.DrawerLayout>
LinearLayout>
// 设置左上角图标["三" —— "←"]效果
ActionBarDrawerToggle actionBarDrawerToggle = new ActionBarDrawerToggle(this, drawerLayout, toolbar, R.string.drawer_open, R.string.drawer_close);
actionBarDrawerToggle.syncState();
drawerLayout.addDrawerListener(actionBarDrawerToggle);
三、NavigationView 介绍
NavigationView 是 Google 在侧滑的 Material Design 的一种规范,所以提出了一个新的空间,用来规范侧滑菜单的基本样式。
对于抽屉式菜单界面很多 APP 都有应用,此前写抽屉式界面都需要自定义。现在谷歌提供的导航视图 NavigationView + DrawerLayout 结合使用,能提供很好的侧滑交互体验。
四、NavigationView 常用方法
| 方法 | 介绍 |
|---|---|
| addHeaderView(View view) | 将视图添加为导航菜单的标题 |
| getHeaderCount() | 获取此 NavigationView 中标头的数量 |
| getHeaderView(int index) | 获取指定位置的标题视图 |
| getMenu() | 返回 Menu 与此导航视图关联的实例 |
| inflateMenu(int resId) | 在此导航视图中添加菜单资源 |
| removeHeaderView(View view) | 删除先前添加的标题视图 |
| setItemBackgroundResource(int resId) | 将菜单项的背景设置为给定资源 |
| setItemIconSize(int iconSize) | 设置用于菜单项图标的大小(以像素为单位) |
| setItemTextAppearance(int resId) | 将菜单项的文本外观设置为给定资源 |
| setItemTextColor(ColorStateList textColor) | 设置要在菜单项上使用的文本颜色 |
| setItemIconTintList(ColorStateList tint) | 设置菜单项上使用 Icon 的颜色 |
| setNavigationItemSelectedListener(NavigationView listener) | 设置一个侦听器,当选择菜单项时将用来通知该侦听器 |
五、NavigationView 基础使用
DrawerLayout + NavigationView + ToolBar 结合使用是项目中最常见的效果,通常有 2 种效果:
侧滑菜单在 ToolBar 底部
侧滑菜单沉浸式覆盖 ToolBar 展示
第一种效果实际上就是在 XML 布局中,将 ToolBar 布局放到 DrawerLayout 外部,第二种效果是将 ToolBar 放到 DrawerLayout 内部主页面布局里面,然后实现沉浸式效果。本文源码中有沉浸式实现的工具类,感兴趣的朋友可以下载源码参考。
1、XML 布局文件
<androidx.drawerlayout.widget.DrawerLayout xmlns:android="http://schemas.android.com/apk/res/android"
    xmlns:app="http://schemas.android.com/apk/res-auto"
    xmlns:tools="http://schemas.android.com/tools"
    android:id="@+id/drawerLayout"
    android:layout_width="match_parent"
    android:layout_height="match_parent"
    android:fitsSystemWindows="true">

    <LinearLayout
        android:layout_width="match_parent"
        android:layout_height="match_parent"
        android:orientation="vertical">

        <androidx.appcompat.widget.Toolbar
            android:id="@+id/toolbar"
            android:layout_width="match_parent"
            android:layout_height="?attr/actionBarSize"
            android:background="?attr/colorPrimary"
            app:layout_scrollFlags="scroll|enterAlways"
            app:title="DrawerLayout"
            app:titleTextColor="#FFF"
            tools:ignore="MissingConstraints" />

        <ImageView
            android:layout_width="match_parent"
            android:layout_height="match_parent"
            android:scaleType="centerCrop"
            android:src="@mipmap/meizi_2" />

    LinearLayout>

    <com.google.android.material.navigation.NavigationView
        android:id="@+id/navigationView"
        android:layout_width="wrap_content"
        android:layout_height="match_parent"
        android:layout_gravity="start"
        app:headerLayout="@layout/nav_header_main"
        app:insetForeground="@android:color/transparent"
        app:menu="@menu/activity_main_drawer" />

androidx.drawerlayout.widget.DrawerLayout>
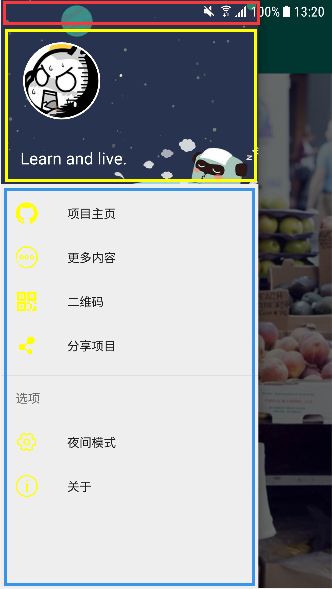
只需在 DrawerLayout 中添加 NavigationView 控件即可,其中介绍两个属性(也就是上图中红黄蓝三个位置效果):
-
app:insetForeground="@android:color/transparent"NavigationView 沉浸式展示 -
app:headerLayout="@layout/nav_header_main"在 NavigationView 上添加一个 Header 布局 -
app:menu="@menu/activity_main_drawer"NavigationView 添加标签 Item 的菜单
2、HeaderLayout 布局文件
<FrameLayout xmlns:android="http://schemas.android.com/apk/res/android"
    xmlns:app="http://schemas.android.com/apk/res-auto"
    android:layout_width="match_parent"
    android:layout_height="200dp"
    android:background="?attr/colorPrimary"
    android:gravity="bottom"
    android:theme="@style/ThemeOverlay.AppCompat.Dark">

    <com.caobo.slideviewdemo.drawerlayout.MovingImageView
        android:id="@+id/movingImageView"
        android:layout_width="match_parent"
        android:layout_height="250dp"
        android:scaleType="centerCrop"
        android:src="@mipmap/menu_header_background"
        app:miv_load_on_create="false"
        app:miv_max_relative_size="3.0"
        app:miv_min_relative_offset="0.2"
        app:miv_repetitions="-1"
        app:miv_speed="100"
        app:miv_start_delay="100" />

    <de.hdodenhof.circleimageview.CircleImageView
        android:layout_width="100dp"
        android:layout_height="100dp"
        android:layout_marginLeft="16dp"
        android:layout_marginTop="30dp"
        android:paddingTop="16dp"
        android:src="@mipmap/header_icon"
        app:civ_border_color="@color/colorWhite"
        app:civ_border_width="2dp" />

    <TextView
        android:id="@+id/tv_nick"
        android:layout_width="match_parent"
        android:layout_height="wrap_content"
        android:layout_gravity="bottom"
        android:layout_marginLeft="16dp"
        android:layout_marginTop="10dp"
        android:layout_marginBottom="16dp"
        android:paddingLeft="5dp"
        android:text="Learn and live."
        android:textAppearance="@style/TextAppearance.AppCompat.Body1"
        android:textSize="18sp" />
FrameLayout>
3、Menu 菜单文件
这里的 icon 图标全部使用 vector 矢量图展示,如果还不会使用 Vector 矢量图的朋友,可以参考:
Android Material Design Icon Genenerator 插件为个人开发者提供 Icon 图标大全
<menu xmlns:android="http://schemas.android.com/apk/res/android">
    <group android:checkableBehavior="single">
        <item
            android:id="@+id/group_item_github"
            android:icon="@drawable/ic_vector_github_grey"
            android:title="项目主页" />
        <item
            android:id="@+id/group_item_more"
            android:icon="@drawable/ic_vector_more"
            android:title="更多内容" />
        <item
            android:id="@+id/group_item_qr_code"
            android:icon="@drawable/ic_vector_qr_code"
            android:title="二维码" />
        <item
            android:id="@+id/group_item_share_project"
            android:icon="@drawable/ic_vector_share"
            android:title="分享项目" />
    group>
    <item android:title="选项">
        <menu>
            <item
                android:id="@+id/item_model"
                android:icon="@drawable/ic_vetor_setting"
                android:title="夜间模式" />
            <item
                android:id="@+id/item_about"
                android:icon="@drawable/ic_vector_about"
                android:title="关于" />
        menu>
    item>
menu>
4、Activity 代码实现
NavigationView 的使用基本上都是 XML 文件中完成的,Activity 中不需要做太多处理,只需要 Activity 中添加 Menu 的监听。本项目中使用了一个带动画的 ImageView,所以侧滑菜单后,底部图片会有动画效果,感兴趣的可以在底部下载源码学习。
public class DrawerLayoutActivity extends BaseActivity {

    @BindView(R.id.toolbar)
    Toolbar toolbar;
    @BindView(R.id.drawerLayout)
    DrawerLayout drawerLayout;
    @BindView(R.id.navigationView)
    NavigationView navigationView;
    MovingImageView movingImageView;
    private ActionBarDrawerToggle actionBarDrawerToggle;

    @Override
    protected void initView() {
        movingImageView = navigationView.getHeaderView(0).findViewById(R.id.movingImageView);
        // 设置左上角图标["三" —— "←"]效果
        actionBarDrawerToggle = new ActionBarDrawerToggle(this, drawerLayout, toolbar, R.string.drawer_open, R.string.drawer_close);
        actionBarDrawerToggle.syncState();
        drawerLayout.addDrawerListener(actionBarDrawerToggle);

        // 设置不允许 NavigationMenuView 滚动
        NavigationMenuView navigationMenuView = (NavigationMenuView) navigationView.getChildAt(0);
        if (navigationMenuView != null) {
            navigationMenuView.setVerticalScrollBarEnabled(false);
        }
        // NavigationView 监听
        navigationView.setNavigationItemSelectedListener(new NavigationView.OnNavigationItemSelectedListener() {
            @Override
            public boolean onNavigationItemSelected(@NonNull MenuItem item) {
                switch (item.getItemId()) {
                    case R.id.group_item_github:
                        Toast.makeText(DrawerLayoutActivity.this,"项目主页",Toast.LENGTH_SHORT).show();
                        break;
                    case R.id.group_item_more:
                        Toast.makeText(DrawerLayoutActivity.this,"更多内容",Toast.LENGTH_SHORT).show();
                        break;
                    case R.id.group_item_qr_code:
                        Toast.makeText(DrawerLayoutActivity.this,"二维码",Toast.LENGTH_SHORT).show();
                        break;
                    case R.id.group_item_share_project:
                        Toast.makeText(DrawerLayoutActivity.this,"分享项目",Toast.LENGTH_SHORT).show();
                        break;
                    case R.id.item_model:
                        Toast.makeText(DrawerLayoutActivity.this,"夜间模式",Toast.LENGTH_SHORT).show();
                        break;
                    case R.id.item_about:
                        Toast.makeText(DrawerLayoutActivity.this,"关于",Toast.LENGTH_SHORT).show();
                        break;
                }
                item.setCheckable(false);
                drawerLayout.closeDrawer(GravityCompat.START);
                return true;
            }
        });
    }

    @Override
    protected int getLayoutResID() {
        return R.layout.activity_drawerlayout;
    }
}
六、NavigationView 全屏效果
1、设置全屏显示
NavigationView 设置 android:layout_width="match_parent" 发现仍然无法实现全屏展示效果,如果想要 NavigationView 实现全屏展示,代码中按照如下设置:
ViewGroup.LayoutParams mLayoutParams = navigationView.getLayoutParams();
int width = getResources().getDisplayMetrics().widthPixels;
mLayoutParams.width = width;
navigationView.setLayoutParams(mLayoutParams);
2、仿 QQ 侧滑菜单效果
根据 NavigationView 全屏效果,模仿 QQ 个人中心侧滑菜单效果,其实我们发现 QQ 这么牛逼的软件,也是使用 Google 原生控件实现,可想而知 Material Design 系列控件之强大。QQ 侧滑菜单实现由以下两点组成:
- QQ 侧滑菜单铺满全屏
- 主页面跟随菜单一起滑动
第一点我们已经实现,只需要上面 4 行代码就可以设置 NavigationView 全屏效果,接下来只需要将主页面跟随菜单一起滑动就可以实现效果,我们回想前面讲到的 DrawerLayout.addDrawerListener() 方法,可以监听事件,其中有 4 个回调方法:
-
onDrawerSlide(View drawerView, float slideOffset) 当抽屉的位置改变时调用
-
onDrawerOpened(View drawerView) 打开侧滑界面触发
-
onDrawerClosed(View drawerView) 关闭侧滑界面触发
-
onDrawerStateChanged(int newState) 状态改变时触发
根据上面 4 个回调方法,要实现 QQ 效果,需要在 onDrawerSlide(View drawerView, float slideOffset) 方法中进行处理,其中 slideOffset 返回的是抽屉菜单从隐藏到打开的偏移,取值 0~1,drawerView 就是侧边菜单布局,具体实现代码如下:
<androidx.drawerlayout.widget.DrawerLayout xmlns:android="http://schemas.android.com/apk/res/android"
    xmlns:app="http://schemas.android.com/apk/res-auto"
    android:id="@+id/drawerLayout"
    android:layout_width="match_parent"
    android:layout_height="match_parent">

    <ImageView
        android:layout_width="match_parent"
        android:layout_height="match_parent"
        android:scaleType="centerCrop"
        android:src="@mipmap/qq_1" />

    <com.google.android.material.navigation.NavigationView
        android:id="@+id/navigationView"
        android:layout_width="match_parent"
        android:layout_height="match_parent"
        android:layout_gravity="start"
        app:headerLayout="@layout/nav_header_main"
        app:insetForeground="@android:color/transparent"
        app:menu="@menu/activity_main_drawer" />

androidx.drawerlayout.widget.DrawerLayout>
drawerLayout.addDrawerListener(new DrawerLayout.DrawerListener() {
      @Override
      public void onDrawerSlide(@NonNull View drawerView, float slideOffset) {
          // 主页内容
          View contentView = drawerLayout.getChildAt(0);
          // 侧边栏
          View menuView = drawerView;
          // slideOffset 值默认是0~1
          contentView.setTranslationX(menuView.getMeasuredWidth() * slideOffset);
      }

      @Override
      public void onDrawerOpened(@NonNull View drawerView) {}

      @Override
      public void onDrawerClosed(@NonNull View drawerView) {}

      @Override
      public void onDrawerStateChanged(int newState) {}
  });
提示:仿 QQ 侧滑菜单效果,这里没有使用 ToolBar,直接截取了 2 张图片展示。
七、手动控制菜单
默认手势侧滑就可以 Open 菜单,点击空白处 Close。但是避免需要点击事件触发菜单状态,DrawerLayout 设计非常人性化,提供了以下方法来实现:
-
openDrawer(View drawerView)打开指定的折叠项视图,将其动画到视图中。
-
closeDrawer(View drawerView)关闭指定的折叠项视图,将其动画到视图中。
-
closeDrawers()关闭所有当前打开的抽屉视图,通过动画他们的视野。
使用举例:
// 打开左边菜单
mDrawerLayout.openDrawer(GravityCompat.START);
// 打开右边菜单
mDrawerLayout.openDrawer(GravityCompat.END);
// 关闭左边菜单6
mDrawerLayout.closeDrawer(GravityCompat.START);
// 关闭所有菜单
mDrawerLayout.closeDrawers();
源码下载 源码包含 Material Design 系列控件集合,定时更新,敬请期待!
八、总结
Android Material Design Library 推出了很长时间,越来越多的 APP 使用了符合 Library 包的控件,DrawerLayout 绝对是热门之一,Material Design 定义了一个抽屉导航应该有何种外观和感受,统一了侧滑菜单和样式。在 Android 原生手机上对 DrawerLayout+NavigationView 更是使用到了极致。
我的微信:Jaynm888
欢迎点评,
诚邀 Android 程序员加入微信交流群,公众号回复加群或者加我微信邀请入群。
![]()
