NDK之FFmpeg视频解码播放
前言
代码github地址https://github.com/ccj659/NDK-FFmpeg-master
FFmpeg库简介
- avcodec:编解码,包含
- avformate: 封装格式处理
- avfilter:滤镜特效处理
- avdevice:输入输出设备
- avutil:工具库
- swresample:音频采样处理
- swscale:视频像素格式转换,缩放等
FFmpeg解码流程
- av_register_all(); //注册所有组件。
- AVFormatContext //获取上下文等信息//是封装格式上下文结构体,统领全局,保存视频文件的封装格式信息
- avformat_open_input(&pFormCtx,input_cstr,NULL,NULL) //打开输入文件
- avformat_find_stream_info(pFormCtx,NULL)获取文件信息,
- AVStream,AVCodecContext获取流索引位置
- avcodec_find_decoder(avCodeCtx->codec_id)查找解码器。
- avcodec_open2(avCodeCtx,avCode,NULL)//打开解码器。
- AVPacket,AVFrame//获取帧数据,申请空间
- av_malloc(avpicture_get_size(AV_PIX_FMT_YUV420P, pCodeCtx->width, pCodeCtx->height))//缓冲区分配内存
- avpicture_fill((AVPicture *)yuvFrame, out_buffer, AV_PIX_FMT_YUV420P, pCodeCtx->width, pCodeCtx->height);//初始化缓冲区
- while(av_read_frame(pFormatCtx,packet)//一阵一阵读取压缩的视频数据AVPacket
- avcodec_decode_video2(pCodeCtx, frame, &got_frame, packet)//解码AVPacket->AVFrame
- sws_scale//转为指定的YUV420P像素帧
- fwrite(yuvFrame->data[0], 1, y_size, fp_yuv);/向YUV文件保存解码之后的帧数据//AVFrame->YUV//一个像素包含一个Y
- 释放相关内存av_free_packet,fclose,av_frame_free,avcodec_close...
FFmpeg解码的数据结构(主要的namespace)
-
AVFormatContext 封装格式上下文结构体,也是统领全局的结构体,保存了视频文件封装
格式相关信息。- iformat:输入视频的AVInputFormat
- nb_streams :输入视频的AVStream 个数
- streams :输入视频的AVStream []数组
- duration :输入视频的时长(以微秒为单位)
- bit_rate :输入视频的码率
-
AVInputFormat 每种封装格式(例如FLV, MKV, MP4, AVI)对应一个该结构体。
- name:封装格式名称
- long_name:封装格式的长名称
- extensions:封装格式的扩展名
- id:封装格式ID
- 一些封装格式处理的接口函数
- FFmpeg数据结构分析
-
AVStream 视频文件中每个视频(音频)流对应一个该结构体。
- id:序号
- codec:该流对应的AVCodecContext
- time_base:该流的时基
- r_frame_rate:该流的帧率
-
AVCodecContext编码器上下文结构体,保存了视频(音频)编解码相关信息。
- codec:编解码器的AVCodec
- width, height:图像的宽高(只针对视频)
- pix_fmt:像素格式(只针对视频)
- sample_rate:采样率(只针对音频)
- channels:声道数(只针对音频)
- sample_fmt:采样格式(只针对音频)
-
AVCodec 每种视频(音频)编解码器(例如H.264解码器)对应一个该结构体。
- name:编解码器名称
- long_name:编解码器长名称
- type:编解码器类型
- id:编解码器ID
- 一些编解码的接口函数
-
AVPacket 存储一帧压缩编码数据。
- pts:显示时间戳
- dts :解码时间戳
- data :压缩编码数据
- size :压缩编码数据大小
- stream_index :所属的AVStream
-
AVFrame存储一帧解码后像素(采样)数据。
- data:解码后的图像像素数据(音频采样数据)。
- linesize:对视频来说是图像中一行像素的大小;对音频来说是音频帧的大小。
- width, height:图像的宽高(只针对视频)。
- key_frame:是否为关键帧(只针对视频) 。
- pict_type:帧类型(只针对视频) 。例如I,P,B。
FFmpeg解码参照
- 开发过程中可参考 ffmpeg-2.6.9\doc\examples中的例子.
- 在该例子文件夹下中 有音视频的读写, 过滤处理,转码等相关例子,大家可以进行参考学习.
FFmpeg的NDK视频解码播放实践
在本例中 以视频解码播放为例,在下手之前,请搞懂 FFmpeg解码的数据结构中的命名空间相关的属性以及作用.
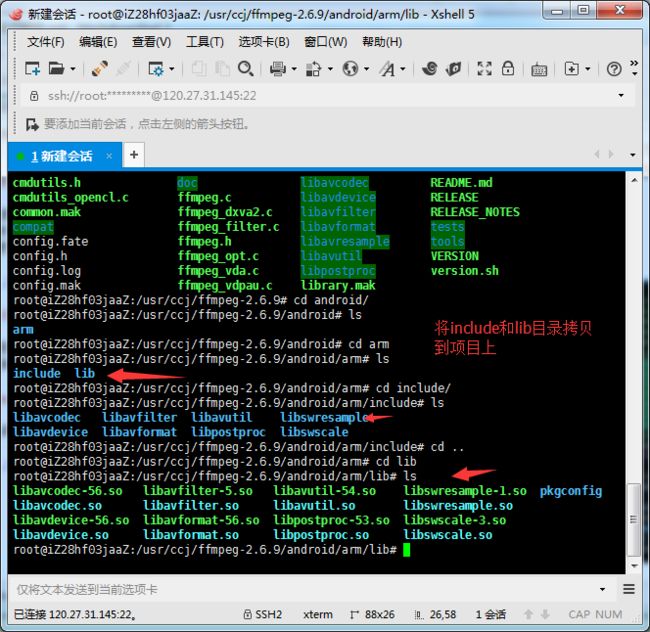
1.编译ffmpeg成so库
在linux中编译ffmpeg
1.编写shell脚本文件
2.配置configuration
3.给文件权限:chmod 777 android_build.sh
4.执行 ./android_build.sh
2.编译libyuv库
1.下载libyuv的库,大家克隆即可https://chromium.googlesource.com/external/libyuv
2.执行ndk-build(linux需要提前配置ndk环境)
3.新建工程,导入库
4.配置工程环境
1.add native support.请参考 eclipse搭建NDK开发环境
2.配置Android.mk application.mk 请参考项目ffmpeg-palyer
3.编写本地方法,并实现C代码,生成so.
1.用自定义的SurfaceView 作为视频渲染载体.
2.编写本地方法,实现代码.
public class CcjPlayer {
    //视频
    public native void render(String input,Object surface);
    //音频
    public native void sound(String input,String output);

    //注意加载库的顺序
    static{
        System.loadLibrary("avutil-54");
        System.loadLibrary("swresample-1");
        System.loadLibrary("avcodec-56");
        System.loadLibrary("avformat-56");
        System.loadLibrary("swscale-3");
        System.loadLibrary("postproc-53");
        System.loadLibrary("avfilter-5");
        System.loadLibrary("avdevice-56");
        System.loadLibrary("myffmpeg");
    }
}
3.生成头文件,并实现方法(实现思路和流程请参考FFmpeg解码流程).
/*
 * Class:     com_ccj_ffmpeg_CcjPlayer
 * Method:    render
 * Signature: (Ljava/lang/String;Ljava/lang/Object;)V
 */
JNIEXPORT void JNICALL Java_com_ccj_ffmpeg_CcjPlayer_render
(JNIEnv *env, jobject jobj, jstring input_jstr, jobject surface){
    const char* input_cstr = (*env)->GetStringUTFChars(env,input_jstr,NULL);
    //1.注册组件
    av_register_all();

    //封装格式上下文
    AVFormatContext *pFormatCtx = avformat_alloc_context();

    //2.打开输入视频文件
    if(avformat_open_input(&pFormatCtx,input_cstr,NULL,NULL) != 0){
        LOGE("%s","打开输入视频文件失败");
        return;
    }
    //3.获取视频信息
    if(avformat_find_stream_info(pFormatCtx,NULL) < 0){
        LOGE("%s","获取视频信息失败");
        return;
    }

    //视频解码,需要找到视频对应的AVStream所在pFormatCtx->streams的索引位置
    int video_stream_idx = -1;
    int i = 0;
    for(; i < pFormatCtx->nb_streams;i++){
        //根据类型判断,是否是视频流
        if(pFormatCtx->streams[i]->codec->codec_type == AVMEDIA_TYPE_VIDEO){
            video_stream_idx = i;
            break;
        }
    }

    //4.获取视频解码器
    AVCodecContext *pCodeCtx = pFormatCtx->streams[video_stream_idx]->codec;
    AVCodec *pCodec = avcodec_find_decoder(pCodeCtx->codec_id);
    if(pCodec == NULL){
        LOGE("%s","无法解码");
        return;
    }

    //5.打开解码器
    if(avcodec_open2(pCodeCtx,pCodec,NULL) < 0){
        LOGE("%s","解码器无法打开");
        return;
    }

    //编码数据
    AVPacket *packet = (AVPacket *)av_malloc(sizeof(AVPacket));

    //像素数据(解码数据)
    AVFrame *yuv_frame = av_frame_alloc();
    AVFrame *rgb_frame = av_frame_alloc();

    /*//ScaleImg視頻縮放
    if(ScaleImg(pCodeCtx,yuv_frame,rgb_frame,pCodeCtx->width/6,pCodeCtx->width/6)!=1){
        LOGE("%s","縮放失敗");
        return;
    }*/

    //native绘制
    //窗体

    ANativeWindow* nativeWindow = ANativeWindow_fromSurface(env,surface);

    //绘制时的缓冲区
    ANativeWindow_Buffer outBuffer;

    int len ,got_frame, framecount = 0;
    //6.一阵一阵读取压缩的视频数据AVPacket
    while(av_read_frame(pFormatCtx,packet) >= 0){
        //解码AVPacket->AVFrame
        len = avcodec_decode_video2(pCodeCtx, yuv_frame, &got_frame, packet);

        //Zero if no frame could be decompressed
        //非零,正在解码
        if(got_frame){
            LOGI("解码%d帧",framecount++);
            //lock
            //设置缓冲区的属性(宽、高、像素格式)
            ANativeWindow_setBuffersGeometry(nativeWindow, pCodeCtx->width, pCodeCtx->height,WINDOW_FORMAT_RGBA_8888);
            ANativeWindow_lock(nativeWindow,&outBuffer,NULL);

            //设置rgb_frame的属性(像素格式、宽高)和缓冲区
            //rgb_frame缓冲区与outBuffer.bits是同一块内存
            avpicture_fill((AVPicture *)rgb_frame, outBuffer.bits, AV_PIX_FMT_RGBA, pCodeCtx->width, pCodeCtx->height);

            //YUV->RGBA_8888
            I420ToARGB(yuv_frame->data[0],yuv_frame->linesize[0],
                    yuv_frame->data[2],yuv_frame->linesize[2],
                    yuv_frame->data[1],yuv_frame->linesize[1],
                    rgb_frame->data[0], rgb_frame->linesize[0],
                    pCodeCtx->width,pCodeCtx->height);

            //unlock
            ANativeWindow_unlockAndPost(nativeWindow);

            usleep(1000 * 16);

        }

        av_free_packet(packet);
    }

    ANativeWindow_release(nativeWindow);
    av_frame_free(&yuv_frame);
    avcodec_close(pCodeCtx);
    avformat_free_context(pFormatCtx);

    (*env)->ReleaseStringUTFChars(env,input_jstr,input_cstr);
}
3.生成头文件,并实现方法(实现思路和流程请参考FFmpeg解码流程).
/**
* 万能解码器,播放视频器
* @author ccj
*
*/
public class MainActivity extends Activity {
private CcjPlayer player;
private VideoView videoView;
private Spinner sp_video;
@Override
protected void onCreate(Bundle savedInstanceState) {
super.onCreate(savedInstanceState);
setContentView(R.layout.activity_main);
videoView = (VideoView) findViewById(R.id.video_view);
sp_video = (Spinner) findViewById(R.id.sp_video);
player = new CcjPlayer();
//选择 - input.mp4
- 音频
String[] videoArray = getResources().getStringArray(R.array.video_list);
ArrayAdapter adapter = new ArrayAdapter(this,
android.R.layout.simple_list_item_1,
android.R.id.text1, videoArray);
sp_video.setAdapter(adapter);
}
public void mPlay(View btn){
String video = sp_video.getSelectedItem().toString();
if("音频".equals(video)){
String input = new File(Environment.getExternalStorageDirectory(),"Live.mp3").getAbsolutePath();
String output = new File(Environment.getExternalStorageDirectory(),"Live.pcm").getAbsolutePath();
player.sound(input, output);
}else{
String input = new File(Environment.getExternalStorageDirectory(),video).getAbsolutePath();
//Surface传入到Native函数中,用于绘制
Surface surface = videoView.getHolder().getSurface();
player.render(input, surface);
}
}
}
4. 导入input.mp4到指定位置.播放即可.
log信息
解码器播放效果
4.不足和待改进
1.由于绘制过程在主线程,所以会出现ANR,后期再处理
2.本项目是学习的一次实践,后期会继续补充
总结
目前市面上的音视频解码播放器,大多都是基于ffmpeg的代码的,例如腾讯影音,暴风影音等等.在此,感谢jason老师,致敬ffmpeg雷霄骅的博客.
路漫漫其修远兮,吾将上下而求索.
关于我
1.github地址https://github.com/ccj659/NDK-FFmpeg-master
2.CSDN博客http://blog.csdn.net/ccj659/
3.简书地址http://www.jianshu.com/users/94423b4ef5cf/latest_articles
4.QQ : 569948231


