Spring学习
1、Spring Hello
1、Hello 对象由谁创建?
hello对象由Spring创建。
2、Hello对象的属性怎么设置?
hello对象的属性由Spring容器设置。
-
XML架子:为了以后方便使用
-
  <beans xmlns="http://www.springframework.org/schema/beans"
         xmlns:xsi="http://www.w3.org/2001/XMLSchema-instance"
         xsi:schemaLocation="http://www.springframework.org/schema/beans
  		http://www.springframework.org/schema/beans/spring-beans.xsd">
      ...

  beans>
3、这个过程就叫控制反转:
控制:谁来控制对象的创建,传统应用程序的对象是由程序本身控制创建的,使用Spring后,对象是由Spring来创建的.
反转:程序本身不创建对象,而变成被动的接收对象. 依赖注入:就是利用set方法来进行注入的.
4、IOC是一种编程思想,由主动的编程变成被动的接收.
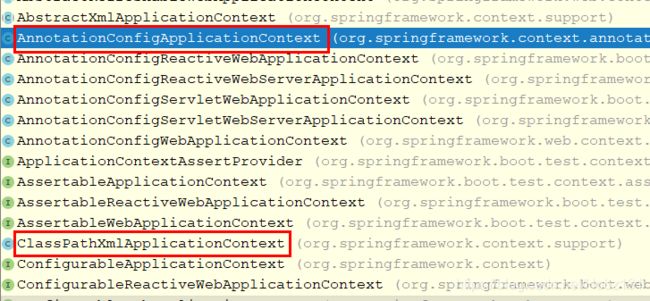
5、可以通过new ClassPathXmlApplicationContext去浏览一下底层源码.
ApplicationContext context = new ClassPathXmlApplicationContext("beans.xml");
2、IOC创建对象的方式
(一)创建Bean
1.使用无参构造创建对象,默认;
2.假设我们使用有参构造创建对象;
1)通过下标创建
2)通过类型创建(不建议使用)
<bean id="exampleBean" class="examples.ExampleBean">
 <constructor-arg type="int" value="7500000"/>
 <constructor-arg type="java.lang.String" value="42"/>
bean>
3)通过参数名设置
<bean id="exampleBean" class="examples.ExampleBean">
      <constructor-arg name="years" value="7500000"/>
      <constructor-arg name="ultimateAnswer" value="42"/>
bean>
3、总结:在配置文件加载的时候,容器中管理的对象就已经初始化了!
(二)Spring配置
1、 别名
<bean id="user" class="com.hubz.pojo.User" >
	<constructor-arg type="java.lang.String" value="鸡蛋"/>
bean>

<alias name="user" alias="userNew"/>
2、Bean配置
<bean id="user" class="com.hubz.pojo.User" name="u1 u2,u3;u4" >
	<constructor-arg type="java.lang.String" value="鸡蛋"/>
bean>
3、import
- 这个import一般用于团队开发使用,他可以将多个配置文件,导入合并为一个;
- 假设,现在项目中有多个人开发,这三个人复制不同的类开发,不同的类需要注册在不同的Bean中,我们可以利用import将所有人的bean.xml合并为一个总的。
- 张三
- 李四
- 王五
- applicationContext.xml
<beans xmlns="http://www.springframework.org/schema/beans"
       xmlns:xsi="http://www.w3.org/2001/XMLSchema-instance"
       xsi:schemaLocation="http://www.springframework.org/schema/beans
		http://www.springframework.org/schema/beans/spring-beans.xsd">

    <import resource="beans.xml"/>
    <import resource="beans2.xml"/>


beans>
使用的时候直接使用总的就可以了,别名以及其他也会合并
(三) 依赖注入
1、构造器注入
public class UserServiceImpl implents UserService{
    private UserDao userDao;

    @Autowire
    public UserServiceImpl(UserDao userDao){
        this.userDao = userDao;
    }
}
2、Set注入
public class UserServiceImpl implents UserService{
    private UserDao userDao;

    @Autowire
    public serUserDao(UserDao userDao){
        this.userDao = userDao;
    }
}
- 依赖注入:Set注入
- 依赖:bean对象的创建依赖于容器;
- 注入:bean对象的所有属性,由容器来注入;
3、基于字段的注入
【环境搭建】
-
复杂类型
-
Student.java
import java.util.*; public class Student { private String name; private Address address; private String[] strings; private List<String> list; private Map<String,String> map; private Set<String> set; private String wife; private Properties info; } -
Address.java
public class Address { private String address; public String getAddress() { return address; } public void setAddress(String address) { this.address = address; } } -
beans.xml
<beans xmlns="http://www.springframework.org/schema/beans"
       xmlns:xsi="http://www.w3.org/2001/XMLSchema-instance"
       xsi:schemaLocation="http://www.springframework.org/schema/beans
		http://www.springframework.org/schema/beans/spring-beans.xsd">

    <bean id="address" class="com.hubz.pojo.Address">
        <property name="address" value="上海" />
    bean>

    <bean id="student" class="com.hubz.pojo.Student">

        <property name="name" value="东方"/>


        <property name="address" ref="address"/>


        <property name="books" >
            <array>
                <value>三国演义value>
                <value>水浒传value>
                <value>西游记value>
                <value>红楼梦value>
            array>
        property>

        <property name="list">
            <list>
                <value>看书value>
                <value>写作value>
            list>
        property>

        <property name="map">
            <map>
                <entry key="身份证" value="47864512165"/>
                <entry key="考号" value="325453156452"/>
            map>
        property>

        <property name="set">
            <set>
                <value>hahahvalue>
                <value>Testvalue>
            set>
        property>

        <property name="wife">
            <null/>
        property>

        <property name="info">
            <props>
                <prop key="driver">Driverprop>
                <prop key="url">小明prop>
                <prop key="root">郝仁prop>
                <prop key="password">123456prop>
            props>
        property>
    bean>
beans>
-
-
真实测试对象
-
测试类
import com.hubz.pojo.Student;
import org.springframework.context.ApplicationContext;
import org.springframework.context.support.ClassPathXmlApplicationContext;

public class MyTest {
    public static void main(String[] args) {
        ApplicationContext context = new
            ClassPathXmlApplicationContext("beans.xml");
        Student student = (Student) context.getBean("student");
        System.out.println(student.getName());
    }
}
4、拓展方式注入
-
p命名空间:添加
xmlns:p="http://www.springframework.org/schema/p" -
c命名空间:添加
xmlns:c="http://www.springframework.org/schema/c" -
使用
-
User.java
public class User { private String name; private int age; public User(String name, int age) { this.name = name; this.age = age; } public User() {} ... @Override public String toString() { return "User{" + "name='" + name + '\'' + ", age=" + age + '}'; } } -
userbeans.xml
<beans xmlns="http://www.springframework.org/schema/beans" xmlns:xsi="http://www.w3.org/2001/XMLSchema-instance" xmlns:p="http://www.springframework.org/schema/p" xmlns:c="http://www.springframework.org/schema/c" xsi:schemaLocation="http://www.springframework.org/schema/beans http://www.springframework.org/schema/beans/spring-beans.xsd"> <bean id="user" class="com.hubz.pojo.User" p:name="东方" p:age="20"/> <bean id="user2" class="com.hubz.pojo.User" c:name="狂神" c:age="18"/> beans> -
MyTest.java
import com.hubz.pojo.Student; import com.hubz.pojo.User; import org.junit.Test; import org.springframework.context.ApplicationContext; import org.springframework.context.support.ClassPathXmlApplicationContext; public class MyTest { @Test public void test2(){ ApplicationContext context = new ClassPathXmlApplicationContext("userbeans.xml"); User user = context.getBean("user",User.class); System.out.println(user.toString()); User user2 = context.getBean("user2",User.class); System.out.println(user2.toString()); } } -
注意点:p命名空间和c命名空间不能直接使用,需要导入xml约束
-
(四) Bean作用域
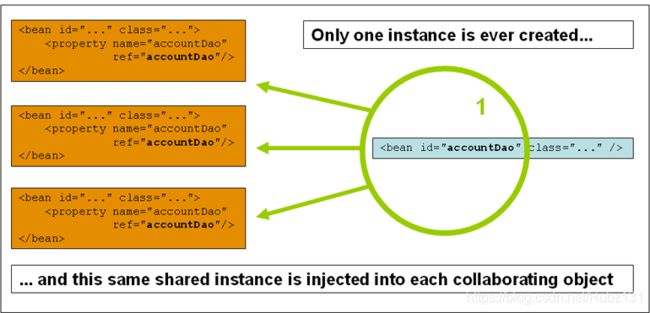
1、单例模式
- 示意图:
-
写法:(Spring 默认机制)
<bean id="user2" class="com.hubz.pojo.User"
      c:name="狂神" c:age="18"
      scope="singleton"
/>
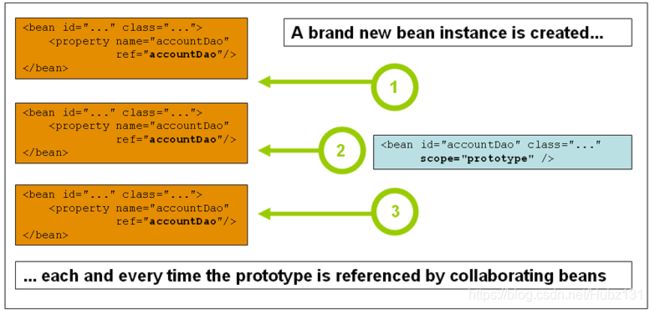
2、原型模式
- 示意图
-
写法:(每次从容器中get时都会产生一个新对象)
<bean id="user2" class="com.hubz.pojo.User"
      c:name="狂神" c:age="18"
      scope="prototype"
/>
3、其余模式
其余的request、session、application这些只能在web开发中用到
(五) Bean的自动装配
- 自动装配是Spring满足Bean依赖的一种方式;
- Spring会在上下文中自动寻找,并自动给Bean装配属性;
Spring有三种装配的方式
- 在xml中显式的装配
- 在Java中显式的装配
- 隐式的自动装配【重要】
1、测试
环境搭建:一个人有两个宠物
2、自动装配
-
byName
<bean id="cat" class="com.hubz.pojo.Cat"/> <bean id="dog" class="com.hubz.pojo.Dog"/> <bean id="people" class="com.hubz.pojo.People" autowire="byName"> <property name="name" value="张亮"/> bean> -
byType
<bean id="cat" class="com.hubz.pojo.Cat"/> <bean class="com.hubz.pojo.Dog"/> <bean id="people" class="com.hubz.pojo.People" autowire="byType"> <property name="name" value="张亮"/> bean> -
小结
- byName的时候,需要保证所有的bean的id唯一,并且这个bean需要和自动注入的属性的set方法的值一致。
- byType的时候,需要保证所有bean的class唯一,并且这个bean需要和自动注入的属性的类型值一致。
3、使用注解实现自动装配
jdk1.5支持的注解,Spring2.5就支持注解了!
The introduction of annotation-based configurations raised the question of whether this approach is ‘better’ than XML.
使用注解须知:
-
导入约束:
xmlns:context="http://www.springframework.org/schema/context" -
配置注解的支持:
<context:annotation-config/>
<beans xmlns="http://www.springframework.org/schema/beans"
	xmlns:xsi="http://www.w3.org/2001/XMLSchema-instance"
	xmlns:context="http://www.springframework.org/schema/context"
	xsi:schemaLocation="http://www.springframework.org/schema/beans
		http://www.springframework.org/schema/beans/spring-beans.xsd
		http://www.springframework.org/schema/context
		http://www.springframework.org/schema/context/spring-context.xsd">

	<context:annotation-config/>

beans>
@Autowired
public class People {
    @Autowired
    private Dog dog;

    private Cat cat;
    private String name;

    public Dog getDog() {
        return dog;
    }

    public void setDog(Dog dog) {
        this.dog = dog;
    }

    public Cat getCat() {
        return cat;
    }

    @Autowired
    public void setCat(Cat cat) {
        this.cat = cat;
    }

    public String getName() {
        return name;
    }

    public void setName(String name) {
        this.name = name;
    }

    @Override
    public String toString() {
        return "People{" +
                "dog=" + dog +
                ", cat=" + cat +
                ", name='" + name + '\'' +
                '}';
    }
}
- 直接在属性上使用即可!也可在set方式上使用!
- 使用@Autowired我们不用编写Set方法了,前提是你这个自动装配的属性在IOC(Spring)容器中存在,且符合名字byName;
科普:
@Nullable //字段标记了这个注解,说明这个字段可以为null
public class People {
    @Autowired
    private Dog dog;

    @Autowired
    //在有多个配置的情况下,不使用这个会发生找不到的情况
    //作用就是唯一指定
    @Qualifier(value="cat111")
    private Cat cat;
    private String name;

    //参数可以为空,而不报错
    public People(@Nullable Cat cat) {
        this.cat = cat;
    }
}
如果@Autowired自动装配环境比较复杂,自动装配无法通过一个注解【@Autowired】完成的时候,我们可以使用@Qualifier(value=“xxx”)去配置@Autowired的使用,指定一个唯一的Bean对象注入。
<bean id="dog111" class="com.hubz.pojo.Dog"/>
<bean id="dog11" class="com.hubz.pojo.Dog"/>
@Resource
public class People {
    @Resource
    private Dog dog;

    /**
     * @Resource:
     *  先找和变量名字一样的,有则注入;
     *  没有则按照类型查找:
     *      如果只有一个同类型,注入;
     *      如果有多个同类型,报错;
     *  都没找到:
     *      报错
     *
     * 可以指定查找:指定查找也只能有一个,不知为何?
     */
    @Resource(name = "cat1")
    private Cat cat;
}
4、小结:
@Resource和@Autowired的区别
- 都是用来自动装配,都可以放在属性字段上。
- @ Autowired 通过byType的方式实现,而且必须要求这个对现存在!【常用】
- @ Resource 默认通过byName的方式实现,如果找不到名字,则通过byType实现!如果两个都找不到的情况下,就报错!
- 执行顺序不同:
- @Resource : 默认通过byName的方式实现
- @Autowired:通过byType的方式实现
(六) Spring 注解开发
在Spring4之后,要使用注解开发,必须要保证aop的包导入了

使用注解需要注解的支持
<beans xmlns="http://www.springframework.org/schema/beans"
	xmlns:xsi="http://www.w3.org/2001/XMLSchema-instance"
	xmlns:context="http://www.springframework.org/schema/context"
	xsi:schemaLocation="http://www.springframework.org/schema/beans
		http://www.springframework.org/schema/beans/spring-beans.xsd
		http://www.springframework.org/schema/context
		http://www.springframework.org/schema/context/spring-context.xsd">


    <context:component-scan base-package="com.hubz.pojo"/>

	<context:annotation-config/>

beans>
1、Bean
@Component
该组件放在类上,说明这个类被Spring管理了,就是bean
2、属性如何注入
import org.springframework.beans.factory.annotation.Value;
import org.springframework.stereotype.Component;
// 等价于3、衍生的注解
- @Component有几个衍生注解,我们在Web开发中,会按照MVC三层架构分层
- dao 【@Repository】
- service 【@Service】
- controller 【@Controller】
并且让扫描器扫描全局
<context:component-scan base-package="com.hubz"/>
这四个注解的功能都是一样的,都代表会将某个类注册到Spring中,装配Bean
4、作用域
@Component
@Scope("prototype")  //一般不用,这个注解都少见
public class User {
	public String name;
}
5、小结
xml与注解
- xml更加万能,适用于任何场合,维护起来更加方便;
- 注解,不是自己类使用不了,维护更加复杂
xml与注解最佳实践
-
xml用来管理bean
-
注解只负责完成属性的注入
-
我们在使用的过程中只需要注意一个问题:必须让注解生效,就需要开启注解的支持
<context:component-scan base-package="com.hubz.pojo"/>
<context:annotation-config/>
(七) 使用JavaConfig实现配置
我们现在完全不使用xml,全权交给Java来做!
JavaConfig是Spring的一个子项目,在Spring 4 之后,他成为了一个核心功能!
@Component
public class User {

    @Value("dass")
    public String name;

    public void setName(String name)
    {
        this.name = name;
    }

    public String getName() {
        return name;
    }

    @Override
    public String toString() {
        return "User{" +
                "name='" + name + '\'' +
                '}';
    }
}
//这个注解也是将这个类被Spring托管,注册到容器中,因为他本来就是一个@Component
// @Configuration 代表这是一个配置类,就和我们之前看的beans.xml一样
@Configuration
@ComponentScan("hubz.pojo")
@Import(Config2.class) //引入其他配置类,引成一个类,和beans.xml中的import功能一样
public class HbConfig {

    /**
     * 注册一个bean,就相当于我们之前写的一个bean标签;
     * 这个方法的名字,就相当于bean标签中的id属性
     * 这个方法的返回值,就相当于bean标签中的class属性
     */
    @Bean
    public User getUser(){
        return new User(); //就是返回要注入到bean的对象
    }
}
测试类
import hubz.config.HbConfig;
import hubz.pojo.User;
import org.springframework.context.ApplicationContext;
import org.springframework.context.annotation.AnnotationConfigApplicationContext;

public class MyTest {
    public static void main(String[] args) {
        //如果完全使用了配置类方式去做,我们就只能通过 AnnotationConfig 上下文来获取容器,通过配置类的cLass对象加载!
        ApplicationContext context = new AnnotationConfigApplicationContext(HbConfig.class);
        User user = context.getBean("getUser",User.class);
        System.out.println(user.name);

    }
}
这种纯Java的配置方式,在SpringBoot中随处可见
3、AOP
1、代理模式
为什么要学代理模式?因为这是SpringAOP的底层!【SpringAOP和SpringMVC】
代理模式的分类;
-
静态代理
-
动态代理
1.1、静态代理
-
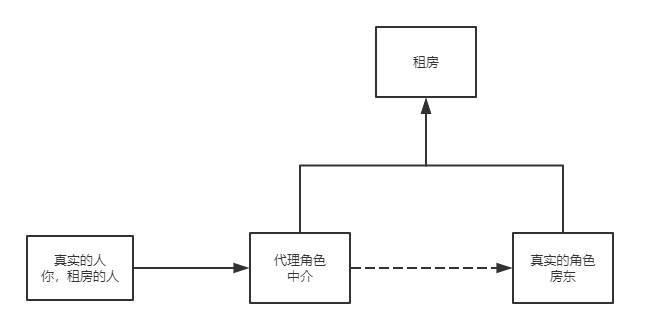
角色分析
- 抽象角色:一般会用接口和抽象类来解决
- 真实角色:被代理的角色
- 代理角色:代理真实角色,代理真实角色后,我们一般会做一些附属操作
- 客户:访问代理对象的人
-
代理模式的好处:
- 可以使真实角色的操作更加纯粹!不用去关注一些公共的业务
- 公共部分也就交给代理角色!实现了业务的分工!
- 公共业务发生扩展的时候,方便集中管理
-
代理模式的缺点:
- 一个真实角色就会产生一个代理角色;代码量会翻倍~开发效率会变低
-
代码步骤:
- 接口
- 真实角色
- 代理角色
- 客户端访问角色
1.2、加深理解
面向对象七大原则:看一看
1.3、动态代理
- 动态代理和静态代理角色一样
- 动态代理的代理类是动态生成的,不是我们直接写好的
- 动态代理分为两大类:基于接口的动态代理,基于类的动态代理
- 基于接口:JDK 动态代理【我们在这里使用】
- 基于类:cglib
- Java字节码实现:javasist
需要了解两个类:Proxy:代理;InvocationHandler:调用处理程序
动态代理的好处:
- 可以使真实角色的操作更加纯粹!不去关注一些公共的业务;
- 公共也就交给代理角色!实现了业务的分工!
- 公共业务发生扩展的时候,方便集中管理;
- 一个动态代理类代理的是一个接口,一般就是对应的一类业务;
2、AOP
2.1、什么是AOP
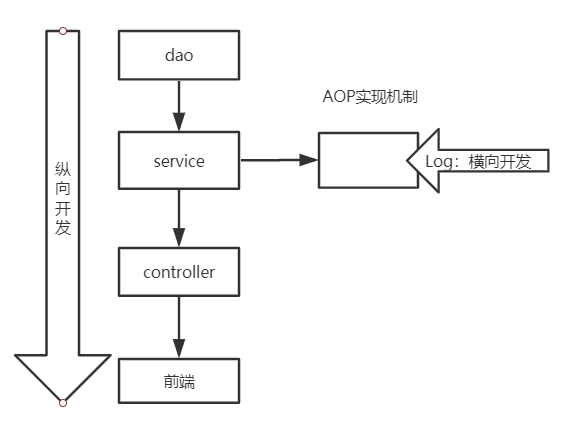
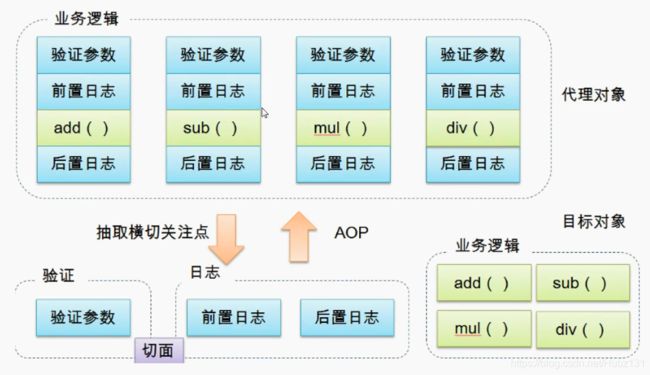
- AOP(Aspect Oriented Programming)意为:面向切面编程,通过预编译方式和运行期动态代理实现程序功能的统一维护的一种技术。AOP是OOP的延续,是软件开发中的一个热点,也是Spring框架的一个重要内容,是函数式编程的一种衍生范型。利用AOP可以对业务逻辑的各个部分进行隔离,从而使得业务逻辑各部分之间的耦合度降低,提高程序的可重用性,同时提高了开发效率。
2.2、AOP在Spring中的作用
提供声明式事务:允许用户自定义切面
- 横切关注点:跨越应用程序多个模块的方法或功能。既是,与我们业务逻辑无关的,但我们需要关注的部分,就是横切关注点。如日志,安全,缓存,事务等等。。。
- 切面(Aspect):横切关注点 被模块化 的特殊对象。即,它是一个类。
- 通知(Advice):切面必须要完成的工作。即,它是类中的一个方法。
- 目标(Target):被通知的对象。
- 代理(Proxy):向目标对象应用通知之后创建的对象。
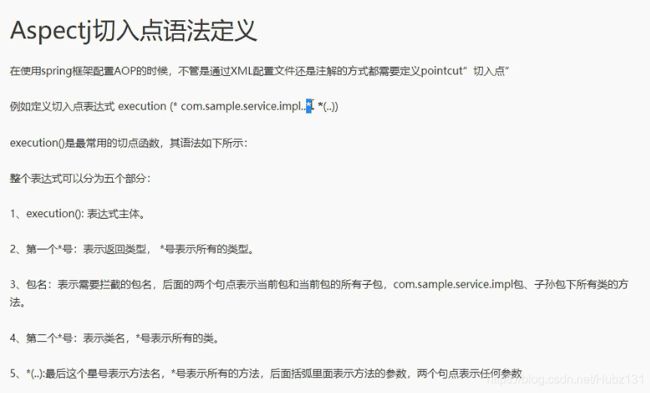
- 切入点(PointCut):切面通知执行的“地点”的定义。
- 连接点(JointPoint):与切入点匹配的执行点。
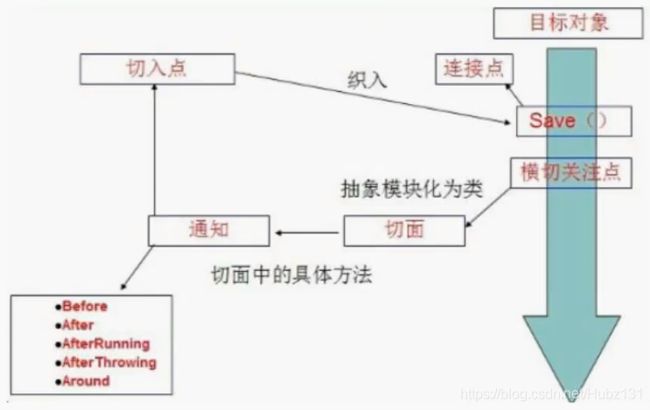
SpringAOP中,通过Advice定义横切逻辑,Spring中支持5中类型的Advice:
| 通知类型 | 连接点 | 实现接口 |
|---|---|---|
| 前置通知 | 方法前 | org.springframework.aop.MethodBeforeAdvice |
| 后置通知 | 方法后 | org.springframework.aop.AfterReturningAdvice |
| 环绕通知 | 方法前后 | org.aoplliance.intercept.MethodInterceptor |
| 异常抛出通知 | 方法抛出异常 | org.springframework.aop.ThrowsAdvice |
| 引介通知 | 类中增加新的方法属性 | org.springframework.aop.IntroductionInterceptor |
即AOP在不改变原有代码的情况下,去增加新的功能。
2.3、使用Spring实现AOP
【重点】使用AOP织入,需要导入一个依赖包
<dependency>
    <groupId>org.aspectjgroupId>
    <artifactId>aspectjweaverartifactId>
    <version>1.9.5version>
dependency>
方式一:使用Spring的API接口【主要SpringAPI接口实现】
方式二:自定义类【主要是切面定义】
方式三:使用注解实现
4、整合MyBatis
步骤:
-
导入相关JAR包
- junit
- mybatis
- mysql数据库
- spring相关的
- aop织入
- mybatis-spring
<dependency> <groupId>junitgroupId> <artifactId>junitartifactId> dependency> <dependency> <groupId>mysqlgroupId> <artifactId>mysql-connector-javaartifactId> <version>5.1.47version> dependency> <dependency> <groupId>org.mybatisgroupId> <artifactId>mybatisartifactId> <version>3.5.2version> dependency> <dependency> <groupId>org.springframeworkgroupId> <artifactId>spring-webmvcartifactId> <version>5.2.1.RELEASEversion> dependency> <dependency> <groupId>org.springframeworkgroupId> <artifactId>spring-jdbcartifactId> <version>5.2.1.RELEASEversion> dependency> <dependency> <groupId>org.aspectjgroupId> <artifactId>aspectjweaverartifactId> <version>1.8.13version> dependency> <dependency> <groupId>org.mybatisgroupId> <artifactId>mybatis-springartifactId> <version>2.0.3version> dependency> <dependency> <groupId>org.projectlombokgroupId> <artifactId>lombokartifactId> <version>1.18.8version> dependency> -
编写配置文件
-
测试
4.1、回忆MyBatis
- 编写实体类
- 编写核心配置文件
- 编写接口【在dao包或者mapper包下,两个包的意义是一样的】
- 编写Mapper.xml
- 测试
4.1.1、核心配置文件
<configuration>

    <typeAliases>
        <package name="com.hubz.pojo"/>
    typeAliases>


    <environments default="development">
        <environment id="development">
            <transactionManager type="JDBC"/>
            <dataSource type="POOLED">
                <property name="driver" value="com.mysql.jdbc.Driver"/>
                <property name="url" value="jdbc:mysql://localhost:3306/shangxuan?serverTimezone=UTC&useUnicode=true&characterEncoding=utf8&useSSL=false"/>
                <property name="username" value="root"/>
                <property name="password" value="123456"/>
            dataSource>
        environment>
    environments>


    <mappers>
        <package name="com.hubz.mapper"/>
    mappers>

configuration>
4.1.2、mapper配置文件
<mapper namespace="com.hubz.mapper.UserMapper">
	...
mapper>
4.1.3、报错
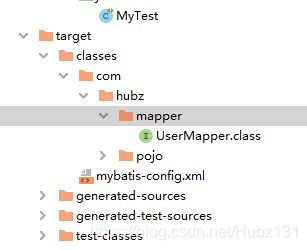
org.apache.ibatis.binding.BindingException: Invalid bound statement (not found):
com.hubz.mapper.UserMapper.selectUser
去class文件中查看mapper.xml文件是否输出进去,发现没有【静态资源过滤问题】
<build>
    <resources>
        <resource>
            <directory>src/main/javadirectory>
            <includes>
                <include>**/*.xmlinclude>
            includes>
            <filtering>truefiltering>
        resource>
    resources>
build>
4.2、MyBatis-Spring
- 编写数据源配置
- sqlSessionFactory
- sqlSessionTemplate
- 需要给接口添加实现类
- 将自己写的实现类注入到Spring中
- 测试使用
4.2.1 spring-dao.xml配置文件
- 【以后基本可以使用这个,改动不会太大】
<beans xmlns="http://www.springframework.org/schema/beans"
       xmlns:xsi="http://www.w3.org/2001/XMLSchema-instance"
       xsi:schemaLocation="http://www.springframework.org/schema/beans
		http://www.springframework.org/schema/beans/spring-beans.xsd">


    <bean id="dataSource" class="org.springframework.jdbc.datasource.DriverManagerDataSource">
        <property name="driverClassName" value="com.mysql.jdbc.Driver"/>
        <property name="url" value="jdbc:mysql://localhost:3306/shangxuan?serverTimezone=UTC&useUnicode=true&characterEncoding=utf8&useSSL=false"/>
        <property name="username" value="root"/>
        <property name="password" value="123456"/>

    bean>


    <bean id="sqlSessionFactory" class="org.mybatis.spring.SqlSessionFactoryBean">
        <property name="dataSource" ref="dataSource"/>

        <property name="configLocation" value="classpath:mybatis-config.xml"/>
        <property name="mapperLocations" value="classpath:com/hubz/mapper/*.xml"/>
    bean>


    <bean id="sqlSession" class="org.mybatis.spring.SqlSessionTemplate">

        <constructor-arg index="0" ref="sqlSessionFactory"/>
    bean>

beans>
然后在applicationContext.xml添加如下配置就可以了
<beans xmlns="http://www.springframework.org/schema/beans"
       xmlns:xsi="http://www.w3.org/2001/XMLSchema-instance"
       xsi:schemaLocation="http://www.springframework.org/schema/beans
		http://www.springframework.org/schema/beans/spring-beans.xsd">

    <import resource="spring-dao.xml"/>

    <bean id="userMapper" class="com.hubz.mapper.UserMapperImpl">
        <property name="sqlSessionTemplate" ref="sqlSession"/>
    bean>

beans>
5、声明式事务
5.1、回顾事务
- 把一组业务当成一个业务来做:要么都成功,要么都失败!
- 事务在项目开发中十分重要,涉及数据的一致性问题,不能马虎!
- 确保数据完整性和一致性
5.2、Spring中的事务管理
- 声明式事务:AOP
- 编程式事务:需要在代码中,进行事务的管理【没啥用】
思考:
为什么需要事务?
- 如果不配置事务,可能存在数据提交不一致问题!
- 如果我们不在Spring中去配置声明式事务,我们就需要在代码中手动配置事务!
- 事务在项目的开发中十分重要,涉及到数据的一致性和完整性问题,不容马虎!
hubz/mapper/*.xml"/>
然后在applicationContext.xml添加如下配置就可以了
<beans xmlns="http://www.springframework.org/schema/beans"
       xmlns:xsi="http://www.w3.org/2001/XMLSchema-instance"
       xsi:schemaLocation="http://www.springframework.org/schema/beans
		http://www.springframework.org/schema/beans/spring-beans.xsd">

    <import resource="spring-dao.xml"/>

    <bean id="userMapper" class="com.hubz.mapper.UserMapperImpl">
        <property name="sqlSessionTemplate" ref="sqlSession"/>
    bean>

beans>
5、声明式事务
5.1、回顾事务
- 把一组业务当成一个业务来做:要么都成功,要么都失败!
- 事务在项目开发中十分重要,涉及数据的一致性问题,不能马虎!
- 确保数据完整性和一致性
5.2、Spring中的事务管理
- 声明式事务:AOP
- 编程式事务:需要在代码中,进行事务的管理【没啥用】
思考:
为什么需要事务?
- 如果不配置事务,可能存在数据提交不一致问题!
- 如果我们不在Spring中去配置声明式事务,我们就需要在代码中手动配置事务!
- 事务在项目的开发中十分重要,涉及到数据的一致性和完整性问题,不容马虎!

