SpringCloud学习笔记(一)Eureka——服务注册与发现
最近在学习SpringCloud,记录一下学习的过程 也希望一起学习的同学一起学习,给予指导
SpringCloud是基于SpringBoot的微服务架构 ,具体是什么就不讲了度娘可以找到很详细的介绍 直接上正路~
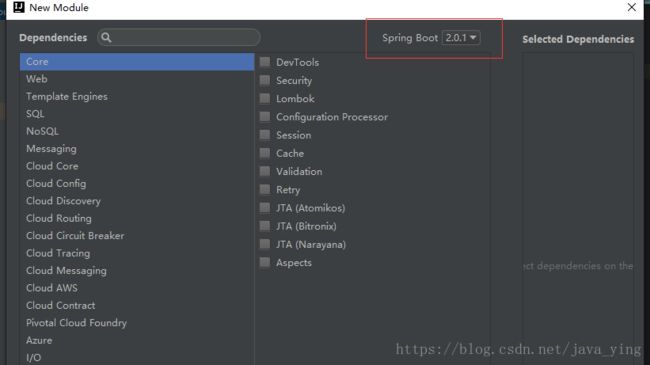
首先创建一个SpringBoot作为主工程,我使用的是1.4.0版本 由于版本不一致的问题有很多 具体请看下图springboot 与springcloud版本对应
具体创建springboot的方法见我其他文章 有详细说明,只做简单说明,不再赘述
我使用的是intellij idea 右键spring initializr next 即可
这里要注意一下 springboot的版本 版本不一致的问题就不要怪我了哈 我使用的是1.4.0 创建之后 再改pom文件也是可以的
不过其他的依赖可能也要跟着更改版本 具体 自己斟酌
创建好主工程之后 我们需要分别创建一个服务端和一个客户端子工程。
首先创建服务端 因为 客户端自己是无法启动的哈~
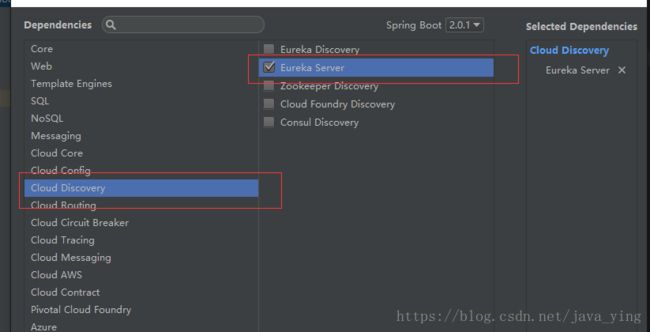
右键创建好的主工程,new Module 创键唯一不同的是依赖选择需要Eureka
其他的都一样哈 创建好之后pom文件是这样的
   4.0.0

   com.cloudserv
   demo
   0.0.1-SNAPSHOT
   jar

   cloudserv
   Demo project for Spring Boot


      org.springframework.boot
      spring-boot-starter-parent
      1.4.0.RELEASE


      UTF-8
      UTF-8
      1.8
      Camden.SR3


         org.springframework.cloud
         spring-cloud-starter-eureka-server


         org.springframework.boot
         spring-boot-starter-test
         test


            org.springframework.cloud
            spring-cloud-dependencies
            ${spring-cloud.version}
            pom
            import


            org.springframework.boot
            spring-boot-maven-plugin
其中
这里就是我们所说的版本对应问题了 ,这里是springcloud版本的选择 根据你的springboot 版本进行具体的对应
创建好之后 打开主类加一个注解@EnableEurekaServer就可以进行配置啦
eureka是一个高可用组件,它没有后端缓存,每一个实例注册之后需要向注册中心发送心跳(所以可以在内存中完成),在默认情况下server也是一个client,必须要制定一个server。就需要配置文件啦~
server.port=8761

eureka.instance.hostname=localhost
#表明自己是一个eureka server
eureka.client.register-with-eureka=false
eureka.client.fetch-registry=false

eureka.client.serviceUrl.defaultZone=http://${eureka.instance.hostname}:${server.port}/eureka/
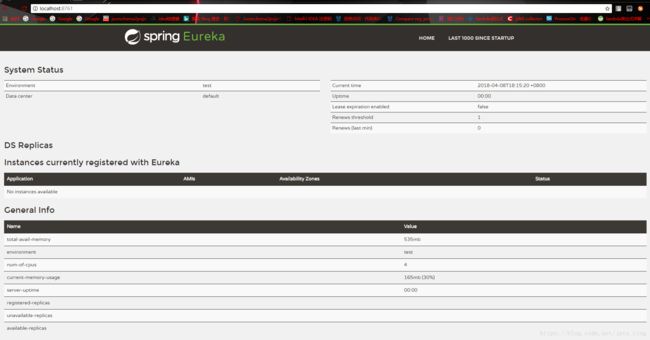
然后就可以启动服务端啦 启动成功后就可以打开界面了呢
地址:http://localhost:8761
大概就是这样的哈 说明你就成功一半了呢
然后我们创建客户端 工程和服务端是一样的 (ps:工程名字一样不一样自己斟酌哈)
主类加注解@EnableEurekaClient表明是一个客户端
然后是properties配置
server.port=8762

eureka.client.serviceUrl.defaultZone=http://localhost:8761/eureka/

spring.application.name=hello
然后我们启动工程
出现这个就说明注册成功了
如果是404就要考虑url问题了,注册丢啦
然后我们刷新之前的页面
是不是多了这个呢 这个名字 就是之前客户端配置的
spring.application.name=hello所以这个是一定要配置的
这样我们就可以在客户端写一些方法去访问了
spring.application.name=hello
package com.cloudclient.demo.controller;

import org.springframework.beans.factory.annotation.Value;
import org.springframework.web.bind.annotation.RequestMapping;
import org.springframework.web.bind.annotation.RequestParam;
import org.springframework.web.bind.annotation.RestController;

/**
 * @author chunying
 */
@RestController
public class DemoController {

    @Value("${server.port}")
    private String port;

    @RequestMapping(value = "/hello")
    public String fun1(@RequestParam String name){
        return "hello," + port + "," + name + "come here";
    }

}
访问http://localhost:8762/hello?name=ying
好了 今天就到这里了呢 敬请等待 我后面的学习笔记哈
spring.application.name=hello


