Kafka请求处理流程
一起来探索 kafka是如何进行高效的保存队列中的请求,来确保Broker的高性能处理
总体流程图
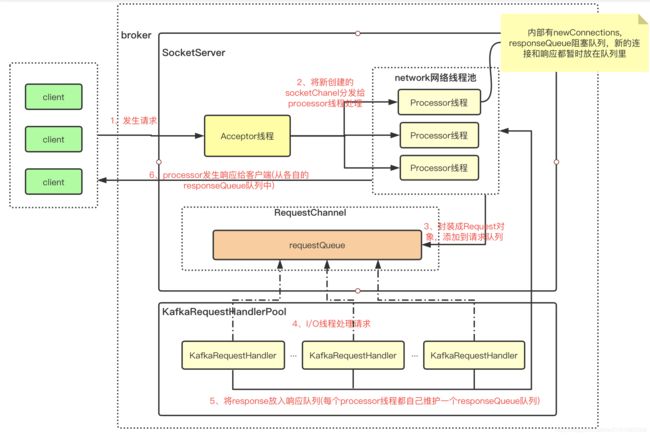
主要涉及几个关键组件:SocketServer、Acceptor、Processor、RequestChannel、KafkaRequestHandler、KafkaApis
SocketServer
此组件是 Kafka 网络通信层中最重要的子模块。它下辖的 Acceptor 线程、Processor 线程和 RequestChannel 等对象,都是实施网络通信的重要组成部分
- Acceptor 线程类: 接收和创建外部 TCP 连接的线程。每个 SocketServer 实例只会创建一个 Acceptor 线程。它的唯一目的就是创建连接,并将接收到的 Request 传递给下游的 Processor 线程处理
- Processor 线程类: 处理单个 TCP 连接上所有请求的线程。每个 SocketServer 实例默认创建若干个(num.network.threads)Processor 线程。Processor 线程负责将接收到的 Request 添加到 RequestChannel 的 Request 队列上,同时还负责将 Response 返还给 Request 发送方
- RequestChannel:其中有一个主要的requestQueue队列,用于处理Request请求
Acceptor
实现了Runnable接口,本质上是一个线程; 主要作用是接收外部请求并分发给下面的实际处理线程
Acceptor主要参数
    /**
      *
      * 这是接收和创建外部 TCP 连接的线程。每个 SocketServer 实例只会创建一个 Acceptor 线程。
      * 它的唯一目的就是创建连接,并将接收到的 Request 传递给下游的 Processor 线程处理
     */
    private[kafka] class Acceptor(val endPoint: EndPoint,
                                  val sendBufferSize: Int, // 设置的是 SocketOptions 的 SO_SNDBUF,即用于设置出站(Outbound)网络 I/O 的底层缓冲区大小
                                  val recvBufferSize: Int, // 它设置的是 SocketOptions 的 SO_RCVBUF,即用于设置入站(Inbound)网络 I/O 的底层缓冲区大小
                                  brokerId: Int,
                                  connectionQuotas: ConnectionQuotas,
                                  metricPrefix: String) extends AbstractServerThread(connectionQuotas) with KafkaMetricsGroup {

      // 创建底层的NIO Selector对象
      // Selector对象负责执行底层实际I/O操作,如监听连接创建请求、读写请求等
      private val nioSelector = NSelector.open()

      // Broker端创建对应的ServerSocketChannel实例
      // 后续把该Channel向上一步的Selector对象注册
      val serverChannel = openServerSocket(endPoint.host, endPoint.port)
      // 创建processors线程池
      private val processors = new ArrayBuffer[Processor]()

其中run 方法是处理 Reactor 模式中分发逻辑的主要实现方法

      def run(): Unit = {
        // 注册OP_ACCEPT事件
        serverChannel.register(nioSelector, SelectionKey.OP_ACCEPT)
        // 等待Acceptor线程启动完成
        startupComplete()
        try {
          var currentProcessorIndex = 0
          while (isRunning) {
            try {
              // 每500毫秒获取一次就绪I/O事件
              val ready = nioSelector.select(500)
              if (ready > 0) {
                val keys = nioSelector.selectedKeys()
                val iter = keys.iterator()
                while (iter.hasNext && isRunning) {
                  try {
                    val key = iter.next
                    iter.remove()

                    // 测试SelectionKey的底层通道是否能够接受新Socket连接
                    if (key.isAcceptable) {
                      accept(key).foreach { socketChannel =>
                        var retriesLeft = synchronized(processors.length)
                        var processor: Processor = null
                        do {
                          retriesLeft -= 1
                          // 指定由哪个Processor线程进行处理
                          processor = synchronized {
                            currentProcessorIndex = currentProcessorIndex % processors.length
                            processors(currentProcessorIndex)
                          }
                          // 更新Processor线程序号
                          currentProcessorIndex += 1
                          // 将新连接添加到processor的newConnections阻塞队列,用于后续转化后向requestQueue队列添加
                        } while (!assignNewConnection(socketChannel, processor, retriesLeft == 0))
                      }
                    } else
                      throw new IllegalStateException("Unrecognized key state for acceptor thread.")
                  } catch {
                    case e: Throwable => error("Error while accepting connection", e)
                  }
                }
              }
            }
            catch {
              case e: ControlThrowable => throw e
              case e: Throwable => error("Error occurred", e)
            }
          }
        } finally {
          debug("Closing server socket and selector.")
          CoreUtils.swallow(serverChannel.close(), this, Level.ERROR)
          CoreUtils.swallow(nioSelector.close(), this, Level.ERROR)
          shutdownComplete()
        }
      }

      //
Acceptor 线程使用 Java NIO 的 Selector + SocketChannel 的方式循环地轮询准备就绪的 I/O 事件。
这里的 I/O 事件,主要是指网络连接创建事件,即代码中的 SelectionKey.OP_ACCEPT。
一旦接收到外部连接请求,Acceptor 就会指定一个 Processor 线程,并将该请求交由它,让它创建真正的网络连接。
Processor
实现了Runnable接口,本质上是一个线程;
Processor线程是真正创建连接以及分发请求的地方。处理单个 TCP 连接上所有请求的线程。每个 SocketServer 实例默认创建若干个(num.network.threads)Processor 线程。
Processor 线程负责将接收到的 Request 添加到 RequestChannel 的 Request 队列上,同时还负责将 Response 返还给 Request 发送方
注意RequestChannel是SocketServer级的,这里只是传入进来做参数,便于后续操作
来看看Processor定义
    private[kafka] class Processor(val id: Int,
                                   time: Time,
                                   maxRequestSize: Int,
                                   requestChannel: RequestChannel,
                                   connectionQuotas: ConnectionQuotas,
                                   connectionsMaxIdleMs: Long,
                                   failedAuthenticationDelayMs: Int,
                                   listenerName: ListenerName,
                                   securityProtocol: SecurityProtocol,
                                   config: KafkaConfig,
                                   metrics: Metrics,
                                   credentialProvider: CredentialProvider,
                                   memoryPool: MemoryPool,
                                   logContext: LogContext,
                                   connectionQueueSize: Int = ConnectionQueueSize) extends AbstractServerThread(connectionQuotas) with KafkaMetricsGroup {
      // 新分配给Processor的连接都会先放在这里
      private val newConnections = new ArrayBlockingQueue[SocketChannel](connectionQueueSize)
      // 严格来说,这是一个临时 Response 队列。当 Processor 线程将 Response 返还给 Request 发送方之后,还要将 Response 放入这个临时队列
      // 为什么需要这个临时队列呢?这是因为,有些 Response 回调逻辑要在 Response 被发送回发送方之后,才能执行,
      // 因此需要暂存在一个临时队列里面。这就是 inflightResponses 存在的意义
      private val inflightResponses = mutable.Map[String, RequestChannel.Response]()
      // 每个 Processor 线程都会维护自己的 Response 队列
      private val responseQueue = new LinkedBlockingDeque[RequestChannel.Response]()

//
//
//
//
//
主要参数:
- newConnections队列: 保存的是要创建的新连接信息,具体来说,就是 SocketChannel 对象。这是一个默认上限是 20 的队列,而且,目前代码中硬编码了队列的长度,无法变更这个队列的长度。每当 Processor 线程接收新的连接请求时,都会将对应的 SocketChannel 放入这个队列。后面在创建连接时(也就是调用 configureNewConnections 时),就从该队列中取出 SocketChannel,然后注册新的连接
- responseQueue队列: 即每个 Processor 线程都会维护自己的 Response 队列
主要工作都是在run方法中去处理
      override def run(): Unit = {
        // 等待Processor线程启动完成
        startupComplete()
        try {
          while (isRunning) {
            try {
              // setup any new connections that have been queued up
              // 将SocketChannel 注册到Selector,后续processCompletedReceives才能获取到Request进行处理
              configureNewConnections()
              // register any new responses for writing
              // 发送Response,并将Response放入到inflightResponses临时队列
              processNewResponses()
              // 执行NIO poll,获取对应SocketChannel上准备就绪的I/O操作
              poll()
              // 将接收到的Request放入Request队列
              processCompletedReceives()
              // 为临时Response队列中的Response执行回调逻辑
              processCompletedSends()
              // 处理因发送失败而导致的连接断开
              processDisconnected()
              // 关闭超过配额限制部分的连接
              closeExcessConnections()
            } catch {
              case e: Throwable => processException("Processor got uncaught exception.", e)
            }
          }
        } finally {
          debug(s"Closing selector - processor $id")
          CoreUtils.swallow(closeAll(), this, Level.ERROR)
          shutdownComplete()
        }
      }

//
RequestChannel
传输 Request/Response 的通道
RequestChannel 类实现了 KafkaMetricsGroup 接口,后者封装了许多实用的指标监控方法,比如,newGauge 方法用于创建数值型的监控指标,newHistogram 方法用于创建直方图型的监控指标
    class RequestChannel(val queueSize: Int, val metricNamePrefix : String) extends KafkaMetricsGroup {
      import RequestChannel._
      val metrics = new RequestChannel.Metrics
      //  存放请求的公用队列
      private val requestQueue = new ArrayBlockingQueue[BaseRequest](queueSize)
      // 相关的processor线程
      private val processors = new ConcurrentHashMap[Int, Processor]()
      val requestQueueSizeMetricName = metricNamePrefix.concat(RequestQueueSizeMetric)
      val responseQueueSizeMetricName = metricNamePrefix.concat(ResponseQueueSizeMetric)

      ......
    }
就 RequestChannel 类本身的主体功能而言,它定义了最核心的 3 个属性
- requestQueue: 每个 RequestChannel 对象实例创建时,会定义一个队列来保存 Broker 接收到的各类请求,这个队列被称为请求队列或 Request 队列。Kafka 使用 Java 提供的阻塞队列 ArrayBlockingQueue 实现这个请求队列,并利用它天然提供的线程安全性来保证多个线程能够并发安全高效地访问请求队列
- queueSize: Request 队列的最大长度。当 Broker 启动时,SocketServer 组件会创建 RequestChannel 对象,并把 Broker 端参数 queued.max.requests 赋值给 queueSize。因此,在默认情况下,每个 RequestChannel 上的队列长度是 500
- processors: 封装的是 RequestChannel 下辖的 Processor 线程池。每个 Processor 线程负责具体的请求处理逻辑;用 Java 的 ConcurrentHashMap 数据结构去保存的。Map 中的 Key 就是processor的序号,而 Value 则对应具体的 Processor 线程对象
Processor 管理
当前 Kafka Broker 端所有网络线程都是在 RequestChannel 中维护的;每当 Broker 启动时,它都会调用 addProcessor 方法,向 RequestChannel 对象添加 num.network.threads 个 Processor 线程
    // RequestChannel.scala
    def addProcessor(processor: Processor): Unit = {
      // 添加Processor到Processor线程池
      if (processors.putIfAbsent(processor.id, processor) != null)
        warn(s"Unexpected processor with processorId ${processor.id}")
        newGauge(responseQueueSizeMetricName,
          () => processor.responseQueueSize,
          // 为给定Processor对象创建对应的监控指标
          Map(ProcessorMetricTag -> processor.id.toString))
    }

    def removeProcessor(processorId: Int): Unit = {
      processors.remove(processorId) // 从Processor线程池中移除给定Processor线程
      removeMetric(responseQueueSizeMetricName, Map(ProcessorMetricTag -> processorId.toString)) // 移除对应Processor的监控指标
    }
处理 Request 和 Response
处理 Request 和 Response,具体表现为收发 Request 和发送 Response; 所谓的发送 Request,仅仅是将 Request 对象放置在 Request 队列中而已,而接收 Request 则是从队列中取出 Request。整个流程构成了一个“生产者 - 消费者”模式,然后依靠 ArrayBlockingQueue 的线程安全性来确保整个过程的线程安全
    def sendRequest(request: RequestChannel.Request): Unit = {
        requestQueue.put(request)
    }
    def receiveRequest(timeout: Long): RequestChannel.BaseRequest =
        requestQueue.poll(timeout, TimeUnit.MILLISECONDS)
    def receiveRequest(): RequestChannel.BaseRequest =
        requestQueue.take()

sendResponse就是将 Response 添加到 Response 队列的过程

    def sendResponse(response: RequestChannel.Response): Unit = {
        if (isTraceEnabled) {  // 构造Trace日志输出字符串
          val requestHeader = response.request.header
          val message = response match {
            case sendResponse: SendResponse =>
              s"Sending ${requestHeader.apiKey} response to client ${requestHeader.clientId} of ${sendResponse.responseSend.size} bytes."
            case _: NoOpResponse =>
              s"Not sending ${requestHeader.apiKey} response to client ${requestHeader.clientId} as it's not required."
            case _: CloseConnectionResponse =>
              s"Closing connection for client ${requestHeader.clientId} due to error during ${requestHeader.apiKey}."
            case _: StartThrottlingResponse =>
              s"Notifying channel throttling has started for client ${requestHeader.clientId} for ${requestHeader.apiKey}"
            case _: EndThrottlingResponse =>
              s"Notifying channel throttling has ended for client ${requestHeader.clientId} for ${requestHeader.apiKey}"
          }
          trace(message)
        }
        // 找出response对应的Processor线程,即request当初是由哪个Processor线程处理的
        val processor = processors.get(response.processor)
        // 将response对象放置到对应Processor线程的Response队列中
        if (processor != null) {
          processor.enqueueResponse(response)
        }
    }
    //
    //
    //
    //
KafkaRequestHandlerPool
即常说的 I/O 线程池,里面定义了若干个 I/O 线程,用于执行真实的请求处理逻辑(将消息信息写入kafka日志等操作)
    // 关键字段说明
    // id: I/O线程序号
    // brokerId:所在Broker序号,即broker.id值
    // totalHandlerThreads:I/O线程池大小
    // requestChannel:请求处理通道
    // apis:KafkaApis类,用于真正实现请求处理逻辑的类
    class KafkaRequestHandler(
      id: Int,
      brokerId: Int,
      val aggregateIdleMeter: Meter,
      val totalHandlerThreads: AtomicInteger,
      val requestChannel: RequestChannel,
      apis: KafkaApis,
      time: Time) extends Runnable with Logging {

    // I/O线程池大小
    private val threadPoolSize: AtomicInteger = new AtomicInteger(numThreads)
    // I/O线程池
    val runnables = new mutable.ArrayBuffer[KafkaRequestHandler](numThreads)

      ......
    }
KafkaRequestHandler
实现了Runnable接口,本质上是一个线程类
    class KafkaRequestHandler(id: Int,
                              brokerId: Int,
                              val aggregateIdleMeter: Meter,
                              val totalHandlerThreads: AtomicInteger, // I/O线程池大小
                              val requestChannel: RequestChannel, // 请求处理通道
                              apis: KafkaApis, // KafkaApis类,用于真正实现请求处理逻辑的类
                              time: Time) extends Runnable with Logging {
      this.logIdent = "[Kafka Request Handler " + id + " on Broker " + brokerId + "], "
      private val shutdownComplete = new CountDownLatch(1)
      @volatile private var stopped = false

      def run(): Unit = {
        while (!stopped) {
          val startSelectTime = time.nanoseconds

          // 从请求队列中获取下一个待处理的请求
          val req = requestChannel.receiveRequest(300)
          val endTime = time.nanoseconds
          // 统计线程空闲时间
          val idleTime = endTime - startSelectTime
          // 更新线程空闲百分比指标
          aggregateIdleMeter.mark(idleTime / totalHandlerThreads.get)

          req match {
            // 关闭线程请求
            case RequestChannel.ShutdownRequest =>
              debug(s"Kafka request handler $id on broker $brokerId received shut down command")
              shutdownComplete.countDown()
              return
            // 普通请求
            case request: RequestChannel.Request =>
              try {
                request.requestDequeueTimeNanos = endTime
                trace(s"Kafka request handler $id on broker $brokerId handling request $request")
                apis.handle(request)
              } catch {
                // 如果出现严重错误,立即关闭线程
                case e: FatalExitError =>
                  shutdownComplete.countDown()
                  Exit.exit(e.statusCode)
                case e: Throwable => error("Exception when handling request", e)
              } finally {
                // 释放请求对象占用的内存缓冲区资源
                request.releaseBuffer()
              }

            case null => // continue
          }
        }
        shutdownComplete.countDown()
      }
//
主要操作
- 从请求队列中获取下一个待处理的请求,同时更新一些相关的统计指标。如果本次循环没取到,那么本轮循环结束,进入到下一轮。
- 如果是 ShutdownRequest 请求,则说明该 Broker 发起了关闭操作
- Broker 关闭时会调用 KafkaRequestHandler 的 shutdown 方法,进而调用 initiateShutdown 方法,以及 RequestChannel 的 sendShutdownRequest 方法,而后者就是将 ShutdownRequest 写入到请求队列
- 一旦从请求队列中获取到 ShutdownRequest,run 方法代码会调用 shutdownComplete 的 countDown 方法,正式完成对 KafkaRequestHandler 线程的关闭操作
- 如果从请求队列中获取的是普通请求,那么,首先更新请求移出队列的时间戳,然后交由 KafkaApis 的 handle 方法执行实际的请求处理逻辑代码
请求处理全流程
第 1 步:Clients 或其他 Broker 发送请求给 Acceptor 线程
    // SocketServer.scala中Acceptor的run方法片段
    // 读取底层通道上准备就绪I/O操作的数量
    val ready = nioSelector.select(500)
    // 如果存在准备就绪的I/O事件
    if (ready > 0) {
      // 获取对应的SelectionKey集合
      val keys = nioSelector.selectedKeys()
      val iter = keys.iterator()
      // 遍历这些SelectionKey
      while (iter.hasNext && isRunning) {
        try {
          val key = iter.next
          iter.remove()
          // 测试SelectionKey的底层通道是否能够接受新Socket连接
          if (key.isAcceptable) {
            // 接受此连接并分配对应的Processor线程
            accept(key).foreach { socketChannel =>
              var processor: Processor = null
              do {
                retriesLeft -= 1
                processor = synchronized {
                  currentProcessorIndex = currentProcessorIndex % processors.length
                  processors(currentProcessorIndex)
                }
                currentProcessorIndex += 1
              // 将新Socket连接加入到Processor线程待处理连接队列
              // 等待Processor线程后续处理
              } while (!assignNewConnection(socketChannel, processor, retriesLeft == 0))
            }
          } else {
            ......
          }
      ......
    }
Acceptor 线程通过调用 accept 方法,创建对应的 SocketChannel,然后将该socketChannel 实例传给 assignNewConnection 方法
assignNewConnection方法的作用是将该socketChannel实例放入processor的newConnection阻塞队列中,待后续processor在run方法中轮询处理 - 将socketChannel注册到每个processor自己维护的selector中,
这样就可以接收每个连接的Request请求,用于后续请求
第2 & 3步:Processor 线程处理请求,并放入requestQueue请求队列
Processor线程内部的newConnection阻塞队列存的是SocketChannel对象,也就是连接;需要将这些socketChannel对象注册到每个processor线程自己维护的selector中,
这样一来,就相当于在client和processor之间通过socketChannel建立起了桥梁,请求信息就可以通过socketChannel获取到
    // SocketServer.scala
    private def processCompletedReceives(): Unit = {
        // 从Selector中提取已接收到的所有请求数据
        selector.completedReceives.asScala.foreach { receive =>
          try {
            // 打开与发送方对应的Socket Channel,如果不存在可用的Channel,抛出异常
            openOrClosingChannel(receive.source) match {
              case Some(channel) =>
                ......
                val header = RequestHeader.parse(receive.payload)
                if (header.apiKey == ApiKeys.SASL_HANDSHAKE && channel.maybeBeginServerReauthentication(receive, nowNanosSupplier))
                  ……
                else {
                  val nowNanos = time.nanoseconds()
                  if (channel.serverAuthenticationSessionExpired(nowNanos)) {
                    ……
                  } else {
                    val connectionId = receive.source
                    val context = new RequestContext(header, connectionId, channel.socketAddress,
                      channel.principal, listenerName, securityProtocol,
                      channel.channelMetadataRegistry.clientInformation)
                    // 根据Channel中获取的Receive对象,构建Request对象
                    val req = new RequestChannel.Request(processor = id, context = context,
                      startTimeNanos = nowNanos, memoryPool, receive.payload, requestChannel.metrics)

                    ……
                    // 将该请求放入请求队列
                    requestChannel.sendRequest(req)
                    ......
                  }
                }
              ……
            }
          } catch {
            ……
          }
        }
      }
第 4 步:I/O 线程处理请求
也就是KafkaRequestHandler线程去处理requestQueue队列中的Request请求信息,信息记录到底层日志文件中
      def run(): Unit = {
        while (!stopped) {
          val startSelectTime = time.nanoseconds

          // 从请求队列中获取下一个待处理的请求
          val req = requestChannel.receiveRequest(300)
          val endTime = time.nanoseconds
          // 统计线程空闲时间
          val idleTime = endTime - startSelectTime
          // 更新线程空闲百分比指标
          aggregateIdleMeter.mark(idleTime / totalHandlerThreads.get)

          req match {
            case RequestChannel.ShutdownRequest =>
              debug(s"Kafka request handler $id on broker $brokerId received shut down command")
              shutdownComplete.countDown()
              return

            case request: RequestChannel.Request =>
              try {
                request.requestDequeueTimeNanos = endTime
                trace(s"Kafka request handler $id on broker $brokerId handling request $request")
                apis.handle(request)
              } catch {
                // 如果出现严重错误,立即关闭线程
                case e: FatalExitError =>
                  shutdownComplete.countDown()
                  Exit.exit(e.statusCode)
                case e: Throwable => error("Exception when handling request", e)
              } finally {
                // 释放请求对象占用的内存缓冲区资源
                request.releaseBuffer()
              }

            case null => // continue
          }
        }
        shutdownComplete.countDown()
      }

//
KafkaRequestHandler 线程循环地从请求队列中获取 Request 实例,然后交由 KafkaApis 的 handle 方法,执行真正的请求处理逻辑
第 5 步:KafkaRequestHandler 线程将 Response 放入 Processor 线程的 responseQueue响应队列
这一步的工作底层是由 KafkaApis 类完成。当然,上层入口依然是由 KafkaRequestHandler 线程来完成的。KafkaApis.scala 中有个 sendResponse 方法,将 Request 的处理结果 Response 发送出去。
实质上,它就是调用了 RequestChannel 的 sendResponse 方法
    // KafkaApis#sendResponse
    private def sendResponse(request: RequestChannel.Request,
                             responseOpt: Option[AbstractResponse],
                             onComplete: Option[Send => Unit]): Unit = {
      responseOpt.foreach(response => requestChannel.updateErrorMetrics(request.header.apiKey, response.errorCounts.asScala))

      val response = responseOpt match {
        case Some(response) =>
          val responseSend = request.context.buildResponse(response)
          val responseString =
            if (RequestChannel.isRequestLoggingEnabled) Some(response.toString(request.context.apiVersion))
            else None
          new RequestChannel.SendResponse(request, responseSend, responseString, onComplete)
        case None =>
          new RequestChannel.NoOpResponse(request)
      }
      // 最终是通过requestChannel来发生response响应信息
      requestChannel.sendResponse(response)
    }

    // RequestChannel#sendResponse
    def sendResponse(response: RequestChannel.Response): Unit = {
      ......
      // 找到这个Request当初是由哪个Processor线程处理的
      val processor = processors.get(response.processor)
      if (processor != null) {
        // 将Response添加到该Processor线程自己维护的responseQueue队列上
        processor.enqueueResponse(response)
      }
    }
第 6 步:Processor 线程发送 Response 给 Request 发送方
Processor 线程取出 responseQueue响应队列中的 Response,返还给 Request 发送方(也就是client)
    // SocketServer.scala
    private def processNewResponses(): Unit = {
        var currentResponse: RequestChannel.Response = null
        while ({currentResponse = dequeueResponse(); currentResponse != null}) { // 循环获取Response队列中的Response
          val channelId = currentResponse.request.context.connectionId
          try {
            currentResponse match {
              case response: NoOpResponse => // 不需要发送Response
                updateRequestMetrics(response)
                trace(s"Socket server received empty response to send, registering for read: $response")
                handleChannelMuteEvent(channelId, ChannelMuteEvent.RESPONSE_SENT)
                tryUnmuteChannel(channelId)

              case response: SendResponse => // 需要发送Response
                sendResponse(response, response.responseSend)
              ......
            }
          }
          ......
        }
      }
小结
请求处理流程:总共分为 6 步
- Clients 或其他 Broker 通过 Selector 机制发起创建连接请求。
- Processor 线程接收请求,并将其转换成可处理的 Request 对象。
- Processor 线程将 Request 对象放入 requestQueue 队列。
- KafkaRequestHandler 线程从 Request 队列中取出待处理请求,并进行处理。
- KafkaRequestHandler 线程将 Response 放回到对应 Processor 线程的 responseQueue 队列。
- Processor 线程发送 Response 给 Request 发送方
其中主要涉及的类有
- SocketServer:client端请求处理入口
- 通过Acceptor线程将请求(socketChannel)分发给Processor线程,processor内部,采用阻塞队列存储socketChannel对象
- Processor线程将 从socketChannel监听到的Request请求信息发送至RequestChannel队列中
- 每个Processor线程自己维护一个responseQueue响应队列,将信息响应给client
- RequestChannel: 共享request信息请求池,相当于作为processor线程和I/O线程的缓冲池
- KafkaRequestHandler:I/O线程,负责从requestChannel处理请求信息,并将response响应信息发送至processor线程的responseQueue队列
- KafkaApis:所有请求信息的处理入口,也就是上面I/O线程接收的request信息,底层也是通过kafkaApis来处理
使用到Selector的地方
- Acceptor线程内的selector负责SelectionKey.OP_ACCEPT接收请求,但新创建的SocketChannel不会注册到此selector上,而是交给Processor线程去处理
- Processor线程内的selector负责SelectionKey.OP_READ读取请求,也就是每个processor线程内部都会维护自己的selector,
然后将分配给自己的SocketChannel对象注册到自己的selector上,就可以监听到请求事件,建立起真正的网络连接,然后进行后续处理。
以上Acceptor线程和Processor线程的设计,可以看到真实的selector轮询处理请求事件已经下沉到具体的processor线程处理,这样的好处在于接收client请求时,
不至于阻塞在某个具体的processor上(即使某个processor阻塞在selector上,其他processor仍然可以接收client的请求)
以上是个人理解,如有问题请指出,谢谢!