SpringBoot中Shiro的实现和基本原理分析
简述
Shiro由Apache开发,是一个轻量级的java安全和权限框架。相较SpringSecurity,Shiro的更加简单且与Spring无直接依赖关系,可以搭配其他的java框架进行开发更加灵活。
功能
-
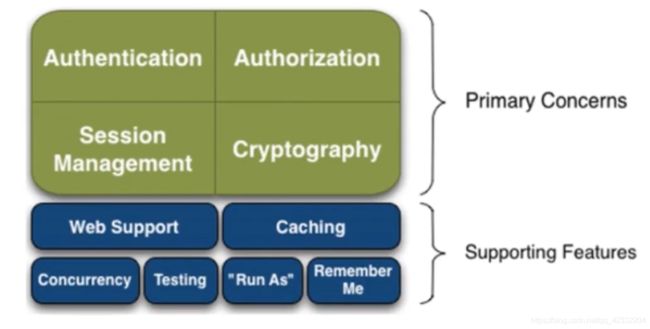
Shiro功能图示
-
Authentication 认证功能
对用户进行身份验证,判断用户是否拥有某个具体存在的用户身份。
-
Authorization 授权功能
授权,对已经认证的用户进行权限验证,判断用户是否拥有权限执行相应的操作。此功能需要在认证以后才能使用。
-
SessionManagement 会话管理功能
会话管理,用户登陆以后即产生一个对话,在用户退出之前,其所有信息都将保存在Session中。通过此功能能对会话进行操作。
-
Cryptography 加密功能
加密,对数据进行加密以保证数据的安全性,如将身份信息加密保存至数据库中。
-
Web Support
Shiro的Web支持,使其能够轻松的集成到Web。
-
Caching
缓存,在用户登录后能够缓存用户信息,不必每次使用时都从数据库读取,降低效率。
-
Concurrency
并发验证,当用户登陆以后又开启了一个线程进行访问,能够将用户的权限迁移至新开启的访问线程。
-
Testing
测试功能,Shiro支持进行测试。
-
Run As
允许用户伪装成为另一个用户身份进行登录。
-
Remember me
记住我,即可以在一次登录以后选择记住,下次登录时使用本次登录用户账号,不用再次进行验证。
Shiro架构
-
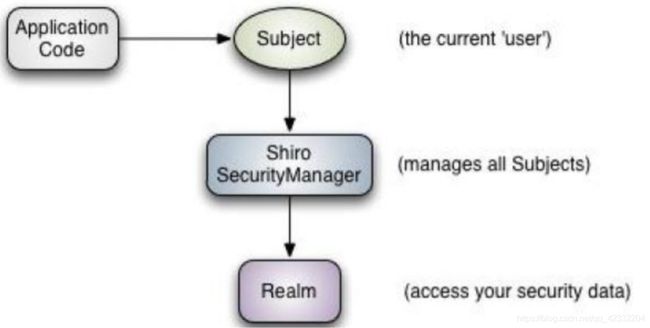
Shiro执行架构图示
-
Subject
当前用户,Shiro中的subject即为当前用户,应用将访问的用户封装为subject交付给SecurityManager进行身份认证权限管理等操作。
-
SecurityManager
安全管理器,所有安全相关操作都在这里边进行。SecurityManager管理所有的subject,其他的Shiro组件都将与其进行交互实现各种功能。SecurityManager类似于Springboot中的Controller层和Service层的集合。
-
Realm
领域,SecurityManager对subject进行安全操作的依据都来源于Realm,比如用户身份信息、权限信息等。这些信息都在Realm中通过访问数据库的方式获取,Realm类似于SpringBoot架构中的数据访问层。
-
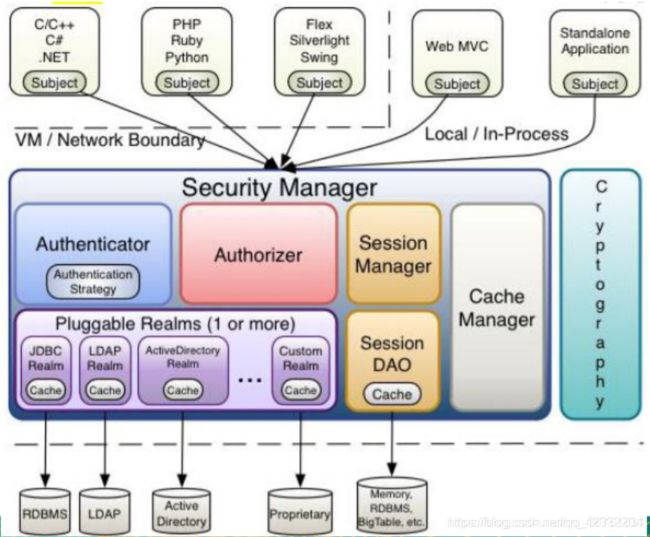
Shiro内部功能架构图示
SpringBoot集成Shiro
maven依赖:
<dependency>
    <groupId>org.apache.shirogroupId>
    <artifactId>shiro-spring-boot-starterartifactId>
dependency>
或
<dependency>
    <groupId>org.apache.shirogroupId>
    <artifactId>shiro-springartifactId>
dependency>
Github源码地址:
https://github.com/apache/shiro
Shiro功能实现
Shiro框架有两个主要的类需要进行实现,Config配置类和Realm类,Config类是对Shiro进行配置,主要功能是设置Shiro需要拦截的url,和一些页面跳转功能,类似于SpringBoot中Controller层的职能,Realm类是获取具体的认证信息和权限信息用于shiro进行安全验证,类似于SpringBoot中数据持久层(DAO、Repository)的职能。
注:Realm可有多个,获取多个Realm时会在ModularRealmAuthenticator类中调用doMultiRealmAuthentication()方法获取多个Realm对应的info对象,否则调用doSingleRealmAuthentication()方法获取单个Realm对应的info,此处即为单个Realm的情况。
-
获取Token
安全验证是基于用户的身份的,因此在进行身份验证之前我们首先需要获取到用户的身份信息。我们需要在Controller中对用户发送的信息进行获取构造出一个token,并通过subject将token传入shiro。
UsernamePasswordToken token = new UsernamePasswordToken(username, password); Subject subject = SecurityUtils.getSubject(); subject.login(token); -
ShiroConfig实现
在ShiroConfig类中实现shiro对项目的权限管理的具体配置。shiro的权限控制是基于url的,因为任何资源的获取都通过url,通过细化url就能够定制权限控制的粒度。
shiro使用过滤器对url进行拦截并加以权限验证。对url的拦截逻辑主要通过getShiroFilterFactoryBean()方法实现,在getShiroFilterFactoryBean()方法中设置一个FilterMap,FilterMap中包含了所有需要进行权限控制的url和对应访问权限,通过bean.setFilterChainDefinitionMap(filterMap)将其加入到ShiroFilterFactoryBean对象中,这样shiro就获取到了需要拦截的url和对应的权限。
package com.watermelon.config; import org.apache.shiro.authc.credential.HashedCredentialsMatcher; import org.apache.shiro.spring.web.ShiroFilterFactoryBean; import org.apache.shiro.web.mgt.DefaultWebSecurityManager; import org.springframework.beans.factory.annotation.Qualifier; import org.springframework.context.annotation.Bean; import org.springframework.context.annotation.Configuration; import java.util.LinkedHashMap; import java.util.Map; @Configuration public class ShiroConfig { //通过Spring对UserRealm对象进行托管 @Bean(name = "userRealm") public UserRealm userRealm() { UserRealm userRealm = new UserRealm(); userRealm.setCredentialsMatcher(hashedCredentialsMatcher()); return userRealm; } //将Realm引入至securityManager中 @Bean(name = "securityManager") public DefaultWebSecurityManager getDefaultWebSecurityManager(@Qualifier("userRealm") UserRealm userRealm) { DefaultWebSecurityManager securityManager = new DefaultWebSecurityManager(); securityManager.setRealm(userRealm); return securityManager; } //将securityManager引入至ShiroFilterFactoryBean @Bean public ShiroFilterFactoryBean getShiroFilterFactoryBean(@Qualifier("securityManager") DefaultWebSecurityManager defaultWebSecurityManager) { ShiroFilterFactoryBean bean = new ShiroFilterFactoryBean(); //设置安全管理器 bean.setSecurityManager(defaultWebSecurityManager); /** * anon: 无需认证即可访问 * authc: 认证以后即可访问 * user: 使用记住我功能后即可访问 * perms: 拥有特定资源的权限后即可访问 * role: 拥有特定角色权限后即可访问 */ Map<String, String> filterMap = new LinkedHashMap<String, String>(); filterMap.put("/user/add", "perms[user:add]"); filterMap.put("/user/update", "perms[user:update]"); //usr路径下的所有页面都进行验证拦截 filterMap.put("/user/*", "authc"); //设置拦截路径和拦截方式,用户访问包含在filterMap中的任何路径都会进行其相应的验证 bean.setFilterChainDefinitionMap(filterMap); //设置登录url,当没有验证时默认跳转至登陆页面 bean.setLoginUrl("/toLogin"); //设置未验证时跳转至noAuth页面 bean.setUnauthorizedUrl("/noAuth"); return bean; } //加密算法设置 @Bean public HashedCredentialsMatcher hashedCredentialsMatcher() { HashedCredentialsMatcher hashedCredentialsMatcher = new HashedCredentialsMatcher(); // 散列算法:这里使用MD5算法; hashedCredentialsMatcher.setHashAlgorithmName("md5"); // 散列的次数,比如散列两次,相当于md5(md5("")); hashedCredentialsMatcher.setHashIterations(1); //表示是否存储散列后的密码为16进制,需要和生成密码时的一样,默认是base64 hashedCredentialsMatcher.setStoredCredentialsHexEncoded(true); return hashedCredentialsMatcher; } } -
Realm实现
Realm的作用是实现具体的认证和授权逻辑,当shiro通过Config的配置,将对应的url拦截下来以后就需要进一步的身份信息验证和权限验证。
认证:
第一步是身份信息认证。shiro通过在controller中获取到的用户登录信息生成一个token,并作为参数传递到doGetAuthenticationInfo()方法中,在这里就需要从后台数据库获取信息进行匹配验证了。具体的验证细节由shiro完成,我们要做的就是为shiro提供数据库的用户信息。此处通过一个service获取到数据库中的user信息,将数据库中获取的用户名和密码放入SimpleAuthenticationInfo对象,shiro会自动根据info对token中的信息进行比对认证。
授权:
认证完成以后,用户就完成了登录,在具体访问页面时就需要进行授权了,授权通过doGetAuthorizationInfo()方法实现。在doGetAuthorizationInfo()方法中我们需要做的也仅是根据用户的token获取从数据库用户的权限,将其打包放入一个SimpleAuthorizationInfo对象中即可,具体的授权shiro会帮我们完成。
package com.watermelon.config;

import com.watermelon.entity.User;
import com.watermelon.service.UserService;
import org.apache.shiro.SecurityUtils;
import org.apache.shiro.authc.*;
import org.apache.shiro.authz.AuthorizationInfo;
import org.apache.shiro.authz.SimpleAuthorizationInfo;
import org.apache.shiro.realm.AuthorizingRealm;
import org.apache.shiro.subject.PrincipalCollection;
import org.apache.shiro.subject.Subject;
import org.springframework.beans.factory.annotation.Autowired;

public class UserRealm extends AuthorizingRealm {

    @Autowired
    private UserService userService;

    //认证
    @Override
    protected AuthenticationInfo doGetAuthenticationInfo(AuthenticationToken token) throws AuthenticationException {
        System.out.println("认证Authentication");
        //获取登录用户的信息
        UsernamePasswordToken userToken = (UsernamePasswordToken) token;
        User user = userService.getUserByName(userToken.getUsername());
        //当用户名不匹配时返回null,shiro自动抛出UnknownAccountException异常
        if (user == null) {
            return null;
        }
        return new SimpleAuthenticationInfo(user, user.getPassword(), getName());
    }

    //授权
    @Override
    protected AuthorizationInfo doGetAuthorizationInfo(PrincipalCollection collection) {
        System.out.println("授权Authorization");

        Subject subject = SecurityUtils.getSubject();
        User user = (User) subject.getPrincipal();

        SimpleAuthorizationInfo info = new SimpleAuthorizationInfo();

        Role role = roleService.getRoleById(user.getRoleId());
        info.addRole(String.valueOf(role));
        for (Permission perms : role.getPermissions()){
            info.addStringPermission(perms.getPerms());
   			}
        return info;
  }
}
Shiro原理
-
验证原理
shiro在认证方法中调用数据源获取用户信息用以验证用户身份,判断用户信息的关键是token,token是一个UsernamePasswordToken对象,其中保存了用户的相关信息,UsernamePasswordToken关键字段和属性如下:
private String username; private char[] password; private boolean rememberMe = false; private String host; public Object getPrincipal() { return getUsername(); } public Object getCredentials() { return getPassword(); } public void clear() { this.username = null; this.host = null; this.rememberMe = false; if (this.password != null) { for (int i = 0; i < password.length; i++) { this.password[i] = 0x00; } this.password = null; } } 其中username和password是在Controller中通过login()方法获取的,而贯穿于整个shiro验证的subject也是在Controller中实例化一个DelegatingSubject实例保存用户信息。
DelegatingSubject的login()方法:
public void login(AuthenticationToken token) throws AuthenticationException { clearRunAsIdentitiesInternal(); Subject subject = securityManager.login(this, token); PrincipalCollection principals; String host = null; if (subject instanceof DelegatingSubject) { DelegatingSubject delegating = (DelegatingSubject) subject; //we have to do this in case there are assumed identities - we don't want to lose the 'real' principals: principals = delegating.principals; host = delegating.host; } else { principals = subject.getPrincipals(); } if (principals == null || principals.isEmpty()) { String msg = "Principals returned from securityManager.login( token ) returned a null or " + "empty value. This value must be non null and populated with one or more elements."; throw new IllegalStateException(msg); } this.principals = principals; this.authenticated = true; if (token instanceof HostAuthenticationToken) { host = ((HostAuthenticationToken) token).getHost(); } if (host != null) { this.host = host; } Session session = subject.getSession(false); if (session != null) { this.session = decorate(session); } else { this.session = null; } } 获取到了token之后,接下来要做的就是根据用户名从数据库获取验证信息保存在一个info对象中用于之后的验证了,而这一步就是我们所写的UserRealm类的doGetAuthenticationInfo()方法完成的。从Realm中获取到了info以后,会返回至AuthenticatingRealm中调用assertCredentialsMatch()方法进入SimpleCredentialsMatcher类根据token和info进行密码验证,实现登录验证功能。
具体认证过程的方法执行路径:
/*Controller中执行login()方法*/ DelegatingSubject.login(AuthenticationToken token) -> DefaultSecurityManager.login(Subject subject, AuthenticationToken token); -> AuthenticatingSecurityManager.authenticate(AuthenticationToken token); -> AbstractAuthenticator.authenticate(AuthenticationToken token); -> ModularRealmAuthenticator.doAuthenticate(AuthenticationToken authenticationToken); -> ModularRealmAuthenticator.doSingleRealmAuthentication(Realm realm, AuthenticationToken token) -> AuthenticatingRealm.getAuthenticationInfo(AuthenticationToken token); /*需要注意的是在此处若使用了缓存,则会进入缓存获取info对象,调用方法为getCachedAuthenticationInfo(AuthenticationToken token),否则会进入我们自己的UserRealm获取info对象*/ -> UserRealm.doGetAuthenticationInfo(); -> /*进入assertCredentialsMatch()方法后获取CredentialsMatcher对象进行info和token的比对*/ AuthenticatingRealm.assertCredentialsMatch(AuthenticationToken token, AuthenticationInfo info) -> HashedCredentialsMatcher.doCredentialsMatch(AuthenticationToken token, AuthenticationInfo info); -> SimpleCredentialsMatcher.equals(Object tokenCredentials, Object accountCredentials); -> /*在此处将token和info中密码作为参数传入并匹配以后层层返回,完成验证的功能*/ MessageDigest.isEqual(byte[] digesta, byte[] digestb); -
授权原理
shiro中的权限分类:
* anon: 无需认证即可访问 * authc: 认证以后即可访问 * user: 使用记住我功能后即可访问 * perms: 拥有特定资源的权限后即可访问 * role: 拥有特定角色权限后即可访问 在Realm中从数据库获取到了用户的权限以后,将权限放入一个SimpleAuthorizationInfo对象中进行保存,并将其返回。
以下为SimpleAuthorizationInfo类的部分关键字段和方法:
protected Set<String> roles; protected Set<String> stringPermissions; protected Set<Permission> objectPermissions; public void addStringPermission(String permission) { if (this.stringPermissions == null) { this.stringPermissions = new HashSet<String>(); } this.stringPermissions.add(permission); } /** * Adds (assigns) multiple permissions to those associated directly with the account. If the account doesn't yet * have any string-based permissions, a new permissions collection (a Set<String>) will be created automatically. * @param permissions the permissions to add to those associated directly with the account. */ public void addStringPermissions(Collection<String> permissions) { if (this.stringPermissions == null) { this.stringPermissions = new HashSet<String>(); } this.stringPermissions.addAll(permissions); } 从Realm获取一个info对象之后之后,权限将进入AuthorizingRealm类中通过isPermitted()方法进行判断,完成授权判断后经过层层返回后跳转至相应的页面。以下是从UserRealm中获取授权信息后到进行授权验证的方法执行路径:
AuthorizingRealm.getAuthorizationInfo(PrincipalCollection principals);
->
AuthorizingRealm.isPermitted(Permission permission, AuthorizationInfo info);
以下为执行授权的isPermitted()方法源码,可以看到授权过程是将info中所有的权限依次与permission进行匹配,匹配成功则返回true,否则返回false。
protected boolean isPermitted(Permission permission, AuthorizationInfo info) {
	Collection<Permission> perms = getPermissions(info);
	if (perms != null && !perms.isEmpty()) {
   		for (Permission perm : perms) {
			if (perm.implies(permission)) {                    			return true;
			}
		 }
	}
	return false;
}
imples是WildcardPermission对象的一个方法,传入一个permission和自身进行匹配,最后返回匹配结果。以下是implies()方法的具体实现:
public boolean implies(Permission p) {
        // By default only supports comparisons with other WildcardPermissions
        if (!(p instanceof WildcardPermission)) {
            return false;
        }

        WildcardPermission wp = (WildcardPermission) p;

        List<Set<String>> otherParts = wp.getParts();

        int i = 0;
        for (Set<String> otherPart : otherParts) {
            // If this permission has less parts than the other permission, everything after the number of parts contained
            // in this permission is automatically implied, so return true
            if (getParts().size() - 1 < i) {
                return true;
            } else {
                Set<String> part = getParts().get(i);
                if (!part.contains(WILDCARD_TOKEN) && !part.containsAll(otherPart)) {
                    return false;
                }
                i++;
            }
        }

        // If this permission has more parts than the other parts, only imply it if all of the other parts are wildcards
        for (; i < getParts().size(); i++) {
            Set<String> part = getParts().get(i);
            if (!part.contains(WILDCARD_TOKEN)) {
                return false;
            }
        }

        return true;
    }
信息加密
-
MD5加密
在ShiroConfig类中加入HashedCredentialsMatcher类。通过HashedCredentialsMatcher对象可以设计加密的方式、加密次数等参数。
@Bean public HashedCredentialsMatcher hashedCredentialsMatcher() { HashedCredentialsMatcher hashedCredentialsMatcher = new HashedCredentialsMatcher(); hashedCredentialsMatcher.setHashAlgorithmName("md5");// 散列算法:这里使用MD5算法; hashedCredentialsMatcher.setHashIterations(1);// 散列的次数,比如散列两次,相当于md5(md5("")); hashedCredentialsMatcher.setStoredCredentialsHexEncoded(true);//表示是否存储散列后的密码为16进制,需要和生成密码时的一样,默认是base64; return hashedCredentialsMatcher; } 在Realm中设置加密类匹配器,根据hashedCredentialsMatcher()方法获取加密类,将其应用在用户验证中。
@Bean(name = "userRealm") public UserRealm userRealm() { UserRealm userRealm = new UserRealm(); userRealm.setCredentialsMatcher(hashedCredentialsMatcher()); return userRealm; } -
MD5盐值加密
用户信息经过MD5加密以后已经较为安全,但是由于MD5通过哈希散列进行加密的特性,若不同用户的密码相同的话,那么加密之后的密文也是相同的,这其中就存在着安全漏洞。
既然不能保证用户的密码不同,那么我们可以引入一个新的变量,将密码和这个变量合并以后再进行加密,这样即便用户密码相同,但是变量不同,也能保证密文不同。这个变量就是盐值,通过盐值加密我们能进一步提升系统安全性。
设置盐值加密以后,在Realm类进行认证时,我们也需要引入盐值信息。根据SimpleAuthenticationInfo类的源码我们可以发现引入盐值时的认证方式就是在构造info对象时加入盐值参数,以下分别是SimpleAuthenticationInfo类不带盐值和带盐值的构造方法:
/** * Constructor that takes in a single 'primary' principal of the account and its corresponding credentials, * associated with the specified realm. * * This is a convenience constructor and will construct a {@link PrincipalCollection PrincipalCollection} based * on the {@code principal} and {@code realmName} argument. * * @param principal the 'primary' principal associated with the specified realm. * @param credentials the credentials that verify the given principal. * @param realmName the realm from where the principal and credentials were acquired. */ //此处为不带盐值时构造info调用的方法 public SimpleAuthenticationInfo(Object principal, Object credentials, String realmName) { this.principals = new SimplePrincipalCollection(principal, realmName); this.credentials = credentials; } /** * Constructor that takes in a single 'primary' principal of the account, its corresponding hashed credentials, * the salt used to hash the credentials, and the name of the realm to associate with the principals. * * This is a convenience constructor and will construct a {@link PrincipalCollection PrincipalCollection} based * on theprincipalandrealmNameargument. * * @param principal the 'primary' principal associated with the specified realm. * @param hashedCredentials the hashed credentials that verify the given principal. * @param credentialsSalt the salt used when hashing the given hashedCredentials * @param realmName the realm from where the principal and credentials were acquired. * @see org.apache.shiro.authc.credential.HashedCredentialsMatcher HashedCredentialsMatcher * @since 1.1 */ //此处为引入盐值时构造info调用的方法,和上面方法的区别在于多了一个由ByteSource编码的盐值参数 public SimpleAuthenticationInfo(Object principal, Object hashedCredentials, ByteSource credentialsSalt, String realmName) { this.principals = new SimplePrincipalCollection(principal, realmName); this.credentials = hashedCredentials; this.credentialsSalt = credentialsSalt; }因以上代码可以如下书写Realm中的doGetAuthenticationInfo()方法引入盐值对密码进行加密验证:
@Override
protected AuthenticationInfo doGetAuthenticationInfo(AuthenticationToken token) throws AuthenticationException {
	System.out.println("认证Authentication");
	UsernamePasswordToken userToken =(UsernamePasswordToken)token;
	User user =userService.getUserByName(userToken.getUsername());
   if (user == null) {
		return null;
   }
	return new SimpleAuthenticationInfo(user, user.getPassword(), ByteSource.Util.bytes(user.getName()), getName());
}


