Alluxio不同存储层(mem,ssd,hdd)的测试
Alluxio是一个基于内存的分布式文件系统,它是架构在底层分布式文件系统和上层分布式计算框架之间的一个中间件,主要职责是以文件形式在内存或其它存储设施中提供数据的存取服务。
1、在ubuntu中安装hadoop2.7.1到/usr/local/hadoop文件夹下,hadoop用户可以通过sbin中start-all.sh启动,通过stop-all.sh来关闭;
2、安装分布式内存文件系统alluxio到/usr/local/alluxio-1.3.0文件夹下,只有root用户可以启动alluxio,通过alluxio-stop.sh all关闭。然后需要通过设置alluxio-site.properties文件中的alluxio.underfs.address=hdfs://localhost:9000/alluxio/data来集成alluxio与hdfs,使得alluxio的底层存储系统设置为hdfs;
3、alluxio不同存储层(mem.ssd,hdd)的测试。
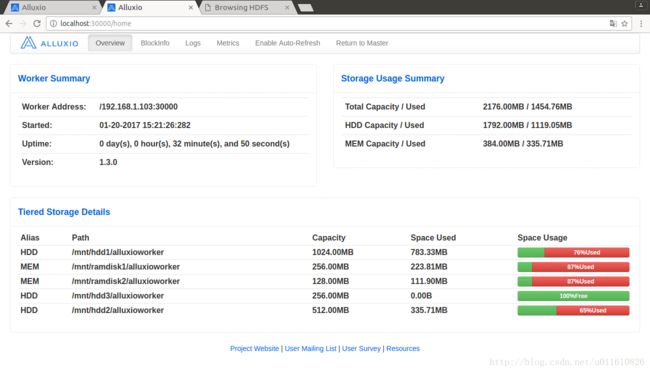
(1)首先,需要通过bin/start-dfs.sh来开启hdfs,然后通过alluxio-start.sh local开启alluxio,可以看到localhost作为master及localhost作为worker的webUI,并通过hdfs的50070端口查看alluxio中底层存储系统中文件;
(2)然后,通过设置alluxio-site.properties中worker和user中相关参数进行学习。
eg:
alluxio.user.file.readtype.default=CACHE_PROMOTE
alluxio.user.file.writetype.default=MUST_CACHE

alluxio.worker.tieredstore.levels=2
alluxio.worker.tieredstore.level0.alias=MEM
alluxio.worker.tieredstore.level0.dirs.path=/mnt/ramdisk1,/mnt/ramdisk2
alluxio.worker.tieredstore.level0.dirs.quota=256MB,128MB
alluxio.worker.tieredstore.level0.reserved.ratio=0.2
alluxio.worker.tieredstore.level1.alias=HDD
alluxio.worker.tieredstore.level1.dirs.path=/mnt/hdd1,/mnt/hdd2,/mnt/hdd3
alluxio.worker.tieredstore.level1.dirs.quota=1GB,512MB,256MB
alluxio.worker.tieredstore.level1.reserved.ratio=0.1
alluxio.worker.allocator.class=alluxio.worker.block.allocator.MaxFreeAllocator
alluxio.worker.evictor.class=alluxio.worker.block.evictor.LRUEvictor通过命令行接口,复制111.7MB的文件到alluxio中,通过webUI观察空间分配情况:
http://localhost:19999 master
http://localhost:30000 worker
http://localhost:50070 底层存储层
通过观察webUI,确定符合符合分配和回收以及读写文件的策略。
终端输出:
root@happy-Lenovo-IdeaPad-Y480:/home/hadoop/database_project# alluxio-start.sh local
/usr/local/alluxio-1.3.0/bin
Killed 1 processes on happy-Lenovo-IdeaPad-Y480
Killed 1 processes on happy-Lenovo-IdeaPad-Y480
Waiting for WORKERS tasks to finish...
root@localhost's password:
root@localhost's password:
root@localhost's password:
All WORKERS tasks finished, please analyze the log at /usr/local/alluxio-1.3.0/logs/task.log.
Starting master @ localhost. Logging to /usr/local/alluxio-1.3.0/logs
ALLUXIO_RAM_FOLDER was not set. Using the default one: /mnt/ramdisk
Formatting RamFS: /mnt/ramdisk (512mb)
Starting worker @ happy-Lenovo-IdeaPad-Y480. Logging to /usr/local/alluxio-1.3.0/logs
root@happy-Lenovo-IdeaPad-Y480:/home/hadoop/database_project# alluxio fs copyFromLocal alluxio-1.3.0-hadoop2.7-bin.tar.gz /test/alluxio-1.3.0
Copied alluxio-1.3.0-hadoop2.7-bin.tar.gz to /test/alluxio-1.3.0
root@happy-Lenovo-IdeaPad-Y480:/home/hadoop/database_project# alluxio fs copyFromLocal alluxio-1.3.0-hadoop2.7-bin.tar.gz /test/alluxio-1.3.0-1
Copied alluxio-1.3.0-hadoop2.7-bin.tar.gz to /test/alluxio-1.3.0-1
root@happy-Lenovo-IdeaPad-Y480:/home/hadoop/database_project# alluxio fs copyFromLocal alluxio-1.3.0-hadoop2.7-bin.tar.gz /test/alluxio-1.3.0-2
Copied alluxio-1.3.0-hadoop2.7-bin.tar.gz to /test/alluxio-1.3.0-2
root@happy-Lenovo-IdeaPad-Y480:/home/hadoop/database_project# alluxio fs pin /test/alluxio-1.3.0
root@happy-Lenovo-IdeaPad-Y480:/home/hadoop/database_project# alluxio fs copyFromLocal alluxio-1.3.0-hadoop2.7-bin.tar.gz /test/alluxio-1.3.0-3
Copied alluxio-1.3.0-hadoop2.7-bin.tar.gz to /test/alluxio-1.3.0-3
root@happy-Lenovo-IdeaPad-Y480:/home/hadoop/database_project# alluxio fs copyToLocal /test/alluxio-1.3.0-3 alluxio-1.3.0-3
Copied /test/alluxio-1.3.0-3 to alluxio-1.3.0-3 读写策略地址:http://www.alluxio.org/docs/master/cn/File-System-API.html
分配回收策略地址: http://www.alluxio.org/docs/master/cn/Tiered-Storage-on-Alluxio.html
(3)学习使用java api对alluxio中文件操作:
需要添加assemply中的jar依赖包alluxio-assemblies-1.3.0-jar-with-dependencies.jar,这里需要使用root启动eclipse,否则会因为权限问题报错,因为alluxio是使用root用户启动的。
实现使用java api读取和写入alluxio中文件。
Writefile.java
          // 获取文件系统客户端FileSystem实例
	    FileSystem fs = FileSystem.Factory.get();
	    // 构造Alluxio路径AlluxioURI实例
	    AlluxioURI path = new AlluxioURI("/test2");
	    // 设置一些操作选项
	    // 设置文件块大小为128M
	    CreateFileOptions options = CreateFileOptions.defaults().setBlockSizeBytes(128 * Constants.MB);
	    // 创建一个文件并获取它的文件输出流FileOutStream实例
	    FileOutStream out;
		try {
			out = fs.createFile(path);
			// 调用文件输出流FileOutStream实例的write()方法写入数据
		    	out.write("testtt".getBytes());
		    	// 关闭文件输出流FileOutStream实例,结束写文件操作
		    	out.close();
		} catch (IOException | AlluxioException e) {
			// TODO Auto-generated catch block
			e.printStackTrace();
		}
readfile.java
	    // 获取文件系统客户端FileSystem实例
	    FileSystem fs = FileSystem.Factory.get();
	    // 构造Alluxio路径AlluxioURI实例
	    AlluxioURI path = new AlluxioURI("/test2");
	    // 打开一个文件,获得文件FileInStream(同时获得一个锁以防止文件被删除)
	    FileInStream in;
		try {
			in = fs.openFile(path);
			 // 调用文件输入流FileInStream实例的read()方法读数据
			byte[] tempbytes = new byte[100];
            		int byteread = 0;
            		// 读入多个字节到字节数组中,byteread为一次读入的字节数
            		while ((byteread = in.read(tempbytes)) != -1) {
                		System.out.write(tempbytes, 0, byteread);
            		}
		    	// 关闭文件FileInStream实例,结束读文件操作(同时释放锁)
		    	in.close();
		} catch (IOException | AlluxioException e) {
			// TODO Auto-generated catch block
			e.printStackTrace();
} 1、在对hadoop和alluxio安装过程中,首先需要学习alluxio与上层hadoop和下层hdfs等的关系,对alluxio的作用有了整体的认识;
2、通过学习alluxio官网资料和alluxio会议视频和ppt对alluxio的作用深入了解,初步学习一些alluxio应用案例,也对大数据的发展方向有了更多的了解。
3、在对alluxio的配置和java api使用过程中,认识到对alluxio的源代码学习对掌握alluxio整体框架的重要性。

