微服务架构实战篇(五):Spring boot2.x + Guava 并使用RateLimiter实现秒杀限流demo
简介
该项目主要利用Spring boot2.x + Guava 实现数据缓存,并使用RateLimiter做秒杀限流示例。
-
Guava是一种基于开源的Java库,其中包含谷歌正在由他们很多项目使用的很多核心库。这个库是为了方便编码,并减少编码错误。这个库提供用于集合,缓存,支持原语,并发性,常见注解,字符串处理,I/O和验证的实用方法。
-
Guava - RateLimiter使用的是一种叫令牌桶的流控算法,RateLimiter会按照一定的频率往桶里扔令牌,线程拿到令牌才能执行。
-
Google guava工具类快速入门指南
-
源码地址
- GitHub:https://github.com/yundianzixun/spring-boot-starter-guava
-
联盟公众号:IT实战联盟
-
我们社区:https://100boot.cn
小工具一枚,欢迎使用和Star支持,如使用过程中碰到问题,可以提出Issue,我会尽力完善该Starter
版本基础
- Spring Boot:2.0.4
- Guava:19.0
操作步骤
第一步:添加maven依赖
            org.springframework.boot
            spring-boot-starter-cache


            com.google.guava
            guava
            19.0
第二步:增加GuavaCacheConfig 配置
GuavaCacheConfig.java
package com.itunion.guava.config;

import com.google.common.cache.CacheBuilder;
import org.springframework.beans.factory.annotation.Autowired;
import org.springframework.boot.context.properties.EnableConfigurationProperties;
import org.springframework.cache.CacheManager;
import org.springframework.cache.annotation.EnableCaching;
import org.springframework.cache.guava.GuavaCacheManager;
import org.springframework.context.annotation.Bean;
import org.springframework.context.annotation.Configuration;
import org.springframework.context.annotation.DependsOn;
import java.util.concurrent.TimeUnit;

/**
* Created by lin on 19/3/14.
*/
@EnableConfigurationProperties(GuavaProperties.class)
@EnableCaching
@Configuration
public class GuavaCacheConfig {
    @Autowired
    private GuavaProperties guavaProperties;
    @Bean
    public CacheBuilder cacheBuilder() {
        long maximumSize = guavaProperties.getMaximumSize();
        long duration = guavaProperties.getExpireAfterAccessDuration();
        if (maximumSize <= 0) {
            maximumSize = 1024;
        }
        if (duration <= 0) {
            duration = 5;
        }
        return CacheBuilder.newBuilder()
                .maximumSize(maximumSize)
                .expireAfterWrite(duration, TimeUnit.SECONDS);
    }

    /**
     * expireAfterAccess: 当缓存项在指定的时间段内没有被读或写就会被回收。
     * expireAfterWrite:当缓存项在指定的时间段内没有更新就会被回收,如果我们认为缓存数据在一段时间后数据不再可用,那么可以使用该种策略。
     * refreshAfterWrite:当缓存项上一次更新操作之后的多久会被刷新。
     * @return
     */
    @DependsOn({"cacheBuilder"})
    @Bean
    public CacheManager cacheManager(CacheBuilder cacheBuilder) {
        GuavaCacheManager cacheManager = new GuavaCacheManager();
        cacheManager.setCacheBuilder(cacheBuilder);
        return cacheManager;
    }
}
备注:duration 缓存项在指定的5秒钟内有效,超过试卷进行回收操作,具体时间根据业务配置;
第三步:增加GuavaProperties配置
GuavaProperties.java
package com.itunion.guava.config;

import org.springframework.boot.context.properties.ConfigurationProperties;

/**
 * Created by lin on 19/3/14.
 */
@ConfigurationProperties(prefix = "guava.cache.config")
public class GuavaProperties {

   private long maximumSize;

   private long maximumWeight;

   private long expireAfterWriteDuration;

   private long expireAfterAccessDuration;

   private long refreshDuration;

   private int initialCapacity;

   private int concurrencyLevel;

    public long getMaximumSize() {
        return maximumSize;
    }

    public void setMaximumSize(long maximumSize) {
        this.maximumSize = maximumSize;
    }

    public long getMaximumWeight() {
        return maximumWeight;
    }

    public void setMaximumWeight(long maximumWeight) {
        this.maximumWeight = maximumWeight;
    }

    public long getExpireAfterWriteDuration() {
        return expireAfterWriteDuration;
    }

    public void setExpireAfterWriteDuration(long expireAfterWriteDuration) {
        this.expireAfterWriteDuration = expireAfterWriteDuration;
    }

    public long getExpireAfterAccessDuration() {
        return expireAfterAccessDuration;
    }

    public void setExpireAfterAccessDuration(long expireAfterAccessDuration) {
        this.expireAfterAccessDuration = expireAfterAccessDuration;
    }

    public long getRefreshDuration() {
        return refreshDuration;
    }

    public void setRefreshDuration(long refreshDuration) {
        this.refreshDuration = refreshDuration;
    }

    public int getInitialCapacity() {
        return initialCapacity;
    }

    public void setInitialCapacity(int initialCapacity) {
        this.initialCapacity = initialCapacity;
    }

    public int getConcurrencyLevel() {
        return concurrencyLevel;
    }

    public void setConcurrencyLevel(int concurrencyLevel) {
        this.concurrencyLevel = concurrencyLevel;
    }
}
第三步:增加测试Guava缓存服务
CacheGuavaServiceImpl.java
@Cacheable(value = "guavacache")
    @Override
    public Map getUserCache() {
        new Thread().start();
        while(true){
            try {
                Map userMap = new HashMap<>();
                userMap.put("name","IT实战联盟");
                userMap.put("url","https://100boot.cn");
                userMap.put("address","上海");
                Thread.sleep(5000);
                return userMap;
            } catch (InterruptedException e) {
                e.printStackTrace();
            }
        }
    }
备注:在请求数据的时候 为了达到大数据的效果,这里设置了睡眠5秒的线程,5秒后返回结果
第四步:访问服务并命中guava缓存
CacheController.java
/**
     * 查询缓存
     */
    @ApiOperation(value = "getByCache", notes = "查询缓存")
    @RequestMapping(value = "getByCache", method = RequestMethod.GET)
    @ResponseBody
    public String getByCache() {
        Long startTime = System.currentTimeMillis();
        Map  map = cacheGuavaService.getUserCache();
        Long endTime = System.currentTimeMillis();
        System.out.println("耗时: " + (endTime - startTime));
        System.out.println(map.toString());
        return map.toString();
    }
第五步:测试效果
如上图所示:第一次请求耗费了5秒,接下来5秒钟内是直接命中guava从缓存里面获取的数据。5秒钟后进行了回收,再一次请求了服务并存储到guava中。
第六步:创建RateLimiter令牌限流服务
GuavaRateLimiterServiceImpl.java
 /**
     * 每秒钟只发出2个令牌,拿到令牌的请求才可以进入下一个业务
     */
    private RateLimiter seckillRateLimiter = RateLimiter.create(2);

    @Override
    public boolean tryAcquireSeckill() {
        return seckillRateLimiter.tryAcquire();
    }
这里为了能够方便测试只设置了2个令牌。
CacheGuavaServiceImpl.java
@Override
    @Transactional
    public String executeSeckill() {
        // 验证是否被限流器限制,如果没有,则继续往下执行业务
        if(guavaRateLimiterService.tryAcquireSeckill()){
            return "哈哈哈,你没有限制住我!啦啦啦啦!";
        }else {
            //被限流器限制
            return "呜呜呜,竟然限制我!!!";
        }
    }
在使用RateLimiter令牌时,进行验证是否被限流器限制,如果没有则继续执行下面业务,如果被限制则直接返回不继续执行。
第六步:调用RateLimiter令牌限流服务
CacheController.java
  /**
     * 测试限流器
     */
    @ApiOperation(value = "getRateLimiter", notes = "测试限流器")
    @RequestMapping(value = "getRateLimiter", method = RequestMethod.GET)
    @ResponseBody
    public String getRateLimiter() {
        String str = cacheGuavaService.executeSeckill();
        System.out.println(str+","+new Date());
        return str;
    }
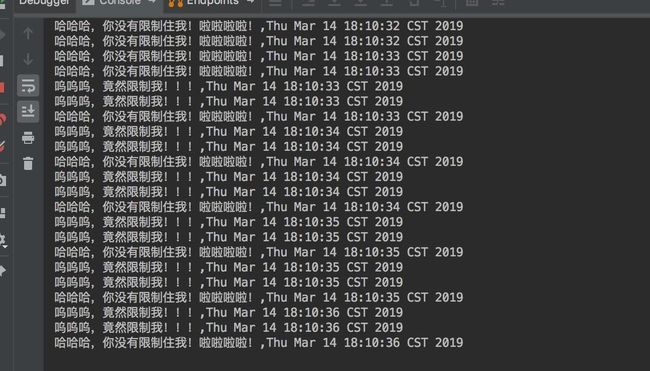
第七步:RateLimiter令牌限流服务测试
备注:由于手速原因可以看到每秒超过令牌个数的直接返回“呜呜呜,竟然限制我!!!”,说明有效果。
贡献者
- IT实战联盟-Line
- IT实战联盟-咖啡
往期回顾
微服务架构实战篇(四):Spring boot2.x + Mybatis +Druid监控数据库访问性能
微服务架构实战篇(三):Spring boot2.x + Mybatis + PageHelper实现增删改查和分页查询功能
微服务架构实战篇(二):Spring boot2.x + Swagger2 让你的API可视化
微服务架构实战篇(一):使用start.spring.io 构建SpringBoot2.x项目
Google guava工具类快速入门指南

