3.6 pipeline syntax 6
needs/include/extends/trigger
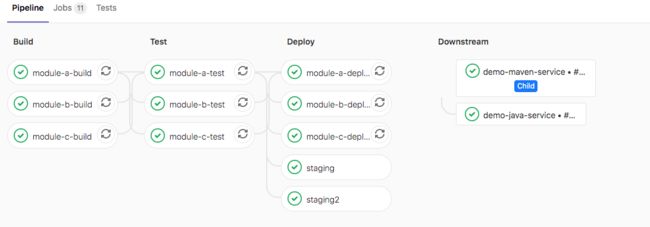
needs 并行阶段
可无序执行作业,无需按照阶段顺序运行某些作业,可以让多个阶段同时运行。
stages:
  - build
  - test
  - deploy

module-a-build:
  stage: build
  script:
    - echo "hello3a"
    - sleep 10

module-b-build:
  stage: build
  script:
    - echo "hello3b"
    - sleep 10

module-a-test:
  stage: test
  script:
    - echo "hello3a"
    - sleep 10
  needs: ["module-a-build"]

module-b-test:
  stage: test
  script:
    - echo "hello3b"
    - sleep 10
  needs: ["module-b-build"]
如果needs:设置为指向因only/except规则而未实例化的作业,或者不存在,则创建管道时会出现YAML错误。
暂时限制了作业在needs:可能需要的最大作业数分配,ci_dag_limit_needs功能标志已启用(默认)分配10个,如果功能被禁用为50。
Feature::disable(:ci_dag_limit_needs)   # 50
Feature::enable(:ci_dag_limit_needs)  #10
制品下载
在使用needs,可通过artifacts: true或artifacts: false来控制工件下载。 默认不指定为true。
module-a-test:
  stage: test
  script:
    - echo "hello3a"
    - sleep 10
  needs:
    - job: "module-a-build"
      artifacts: true
相同项目中的管道制品下载,通过将project关键字设置为当前项目的名称,并指定引用,可以使用needs从当前项目的不同管道中下载工件。在下面的示例中,build_job将使用other-refref下载最新成功的build-1作业的工件:
build_job:
  stage: build
  script:
    - ls -lhR
  needs:
    - project: group/same-project-name
      job: build-1
      ref: other-ref
      artifacts: true
不支持从parallel:运行的作业中下载工件。
include
https://gitlab.com/gitlab-org/gitlab/-/tree/master/lib/gitlab/ci/templates
可以允许引入外部YAML文件,文件具有扩展名.yml或.yaml 。使用合并功能可以自定义和覆盖包含本地定义的CI / CD配置。相同的job会合并,参数值以源文件为准。
local
引入同一存储库中的文件,使用相对于根目录的完整路径进行引用,与配置文件在同一分支上使用。
ci/localci.yml: 定义一个作业用于发布。
stages:
  - deploy

deployjob:
  stage: deploy
  script:
    - echo 'deploy'
.gitlab-ci.yml 引入本地的CI文件’ci/localci.yml’。
include:
  local: 'ci/localci.yml'


stages:
  - build
  - test
  - deploy


buildjob:
  stage: build
  script: ls


testjob:
  stage: test
  script: ls
效果
file
包含来自另一个项目的文件
include:
  - project: demo/demo-java-service
    ref: master
    file: '.gitlab-ci.yml'
template
只能使用官方提供的模板 https://gitlab.com/gitlab-org/gitlab/tree/master/lib/gitlab/ci/templates
include:
  - template: Auto-DevOps.gitlab-ci.yml
remote
用于通过HTTP / HTTPS包含来自其他位置的文件,并使用完整URL进行引用. 远程文件必须可以通过简单的GET请求公开访问,因为不支持远程URL中的身份验证架构。
include:
  - remote: 'https://gitlab.com/awesome-project/raw/master/.gitlab-ci-template.yml'
extends
继承模板作业
stages:
  - test
variables:
  RSPEC: 'test'

.tests:
  script: echo "mvn test"
  stage: test
  only:
    refs:
      - branches

testjob:
  extends: .tests
  script: echo "mvn clean test"
  only:
    variables:
      - $RSPEC
合并后
testjob:
  stage: test
  script: mvn clean test
  only:
    variables:
      - $RSPEC
    refs:
      - branches
extends & include
aa.yml
#stages:
#  - deploy

deployjob:
  stage: deploy
  script:
    - echo 'deploy'
  only:
    - dev

.template:
  stage: build
  script:
    - echo "build"
  only:
    - master
include:
  local: 'ci/localci.yml'

stages:
  - test
  - build
  - deploy

variables:
  RSPEC: 'test'

.tests:
  script: echo "mvn test"
  stage: test
  only:
    refs:
      - branches

testjob:
  extends: .tests
  script: echo "mvn clean test"
  only:
    variables:
      - $RSPEC


newbuildjob:
  script:
    - echo "123"
  extends: .template
这将运行名为useTemplate的作业,该作业运行echo Hello! 如.template作业中所定义,并使用本地作业中所定义的alpine Docker映像.
trigger 管道触发
当GitLab从trigger定义创建的作业启动时,将创建一个下游管道。允许创建多项目管道和子管道。将trigger与when:manual一起使用会导致错误。
多项目管道: 跨多个项目设置流水线,以便一个项目中的管道可以触发另一个项目中的管道。[微服务架构]
父子管道: 在同一项目中管道可以触发一组同时运行的子管道,子管道仍然按照阶段顺序执行其每个作业,但是可以自由地继续执行各个阶段,而不必等待父管道中无关的作业完成。
多项目管道
当前面阶段运行完成后,触发demo/demo-java-service项目master流水线。创建上游管道的用户需要具有对下游项目的访问权限。如果发现下游项目用户没有访问权限以在其中创建管道,则staging作业将被标记为*失败*。
staging:
  variables:
    ENVIRONMENT: staging
  stage: deploy
  trigger:
    project: demo/demo-java-service
    branch: master
    strategy: depend
project关键字,用于指定下游项目的完整路径。该branch关键字指定由指定的项目分支的名称。使用variables关键字将变量传递到下游管道。 全局变量也会传递给下游项目。上游管道优先于下游管道。如果在上游和下游项目中定义了两个具有相同名称的变量,则在上游项目中定义的变量将优先。默认情况下,一旦创建下游管道,trigger作业就会以success状态完成。strategy: depend将自身状态从触发的管道合并到源作业。
在下游项目中查看管道信息
在此示例中,一旦创建了下游管道,该staging将被标记为成功。
父子管道
创建子管道ci/child01.yml
stages:
  - build

child-a-build:
  stage: build
  script:
    - echo "hello3a"
    - sleep 10
在父管道触发子管道
staging2:
  variables:
    ENVIRONMENT: staging
  stage: deploy
  trigger:
    include: ci/child01.yml
    strategy: depend
一起学习呀:


