动态扫描第三方jar包中的bean
介绍
最近在看源码的时候发现一个很有用的用法。现在描述一下某个场景:某个使用Spring构建系统需要动态增加,修改,删除服务。而这个服务是由第三方jar包构成(比如统计服务)。在这些服务中需要使用系统中的bean,利用注解进行自动装配。
这次主要是记录扫描的代码,接下里需要研究研究如何动态注册和自动装配的。
步骤:
- 主要利用classLoader读取jar包,进行类的加载
- 在类中进行静态初始化,将该jar包中的所有bean注册到系统的Spring容器中,并进行自动装配
测试项目构建
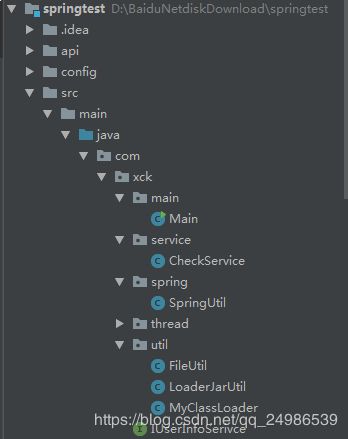
项目结构
构建一个spring主项目,建立一个服务接口,所有服务都实现这接口
public interface IUserInfoSerivce {
    void print();

    void doInit();
}
然后需要一个读取jar包,初始化服务的方法
    public static  T initServices(String path, String jarName){
    T service = null;
        try{
            String sericeName = jarName.split("-")[0];
            String loadURL = "file:" + path + "/" + jarName;
            MyClassLoader classLoader = new MyClassLoader(new URL[]{new URL(loadURL)});
            Thread.currentThread().setContextClassLoader(classLoader);

            Class clz = Class.forName(sericeName, true, classLoader);
            try{
                service = (T)SpringUtil.getApx().getBean(clz);
            }catch (Exception e){
                System.out.println("Spring容器中未找到: " + clz.getName() + "类!");
            }

            if(service == null){
                service = (T) clz.newInstance();
            }
            //如果服务中有定时任务的时候可以使用
//            else {
//                ScheduledAnnotationBeanPostProcessor processor = (ScheduledAnnotationBeanPostProcessor)
//                        SpringUtil.getApx().getBean(AnnotationConfigUtils.SCHEDULED_ANNOTATION_PROCESSOR_BEAN_NAME);
//                if(processor != null){
//                    processor.onApplicationEvent(new ContextRefreshedEvent(SpringUtil.getApx()));
//                }
//            }
        }catch (Exception e){
            System.out.println(e);
        }
        return service;
    }
自定义一个URLClassLoader
public class MyClassLoader extends URLClassLoader {
    public MyClassLoader(){
        super(new URL[0]);
    }

    public MyClassLoader(URL[] urls){
        super(urls);
    }

    public void addJar(URL url){
        this.addURL(url);
    }

    public void loadJar(String strUrl){
        try{
            URL url = new URL(strUrl);
            addUrl(url);
        } catch (Exception e) {
            e.printStackTrace();
        }
    }

    public Class findClass(String name) throws ClassNotFoundException{
        return super.findClass(name);
    }

    public Class loadClass(String name) throws ClassNotFoundException{
        return super.loadClass(name);
    }
}
核心Spring工具类
public class SpringUtil {
    private static ApplicationContext apx = null;

    public static void initClassPathSpring(String configPath){
        apx = new ClassPathXmlApplicationContext(configPath);
    }

    public static void initFileSystemSpring(String configPath){
        apx = new FileSystemXmlApplicationContext("file:" + configPath);
    }

    public static ApplicationContext getApx(){
        return apx;
    }

    public static void scanBean(ClassLoader classLoader, String... basePackages){
        if(classLoader!=null && basePackages != null && apx != null){
            if(apx instanceof ClassPathXmlApplicationContext){
                ClassPathXmlApplicationContext classPathCtx = (ClassPathXmlApplicationContext)apx;
                BeanDefinitionRegistry beanDefinitionRegistry = (BeanDefinitionRegistry) classPathCtx.getBeanFactory();
                new ClassPathBeanDefinitionScanner(beanDefinitionRegistry).scan(basePackages);
                classPathCtx.getBeanFactory().setBeanClassLoader(classLoader);
            }else {
                FileSystemXmlApplicationContext fileSystemCtx = (FileSystemXmlApplicationContext)apx;
                BeanDefinitionRegistry beanDefinitionRegistry = (BeanDefinitionRegistry) fileSystemCtx.getBeanFactory();
                new ClassPathBeanDefinitionScanner(beanDefinitionRegistry).scan(basePackages);
                fileSystemCtx.getBeanFactory().setBeanClassLoader(classLoader);
            }
        }
    }
这里需要注意,beanClassLoader如果不设置,会报错。
最后就是构建一个主系统的测试服务,用于给第三方jar包使用
@Service
public class CheckService {
    public void print(){
        System.out.println("checkService");
    }
}
接下来就是服务项目
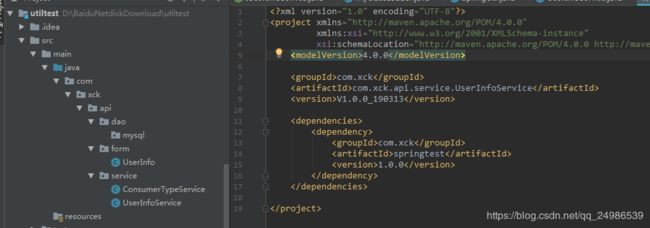
服务项目需要额外建立,然后在IDEA的Project Structure的Models中引入,在maven中依赖系统主包,就可以使用Spring注解了。构建的时候需要先install主包,否则会引用不到。服务包打完后放入主项目的api目录下。
项目结构如下所示:
服务的对外的入口就是UserInfoService,打包的时候也是以这个类的全名为名。
@Service
public class UserInfoService implements IUserInfoSerivce {

    static {
        SpringUtil.scanBean(Thread.currentThread().getContextClassLoader(), "com.xck.api");
    }

    @Autowired
    ConsumerTypeService consumerTypeService;

    @Autowired
    CheckService checkService;

    @Override
    public void print(){
        consumerTypeService.print();
        checkService.print();
    }

    @Override
    public void doInit(){
        System.out.println("UserInfoService init");
    }
}
另外一个服务类似,都是打印类名。需要注意的是上面的这块静态快,扫描该jar包中的bean。
最后就是测试类
public class Main {
    public static void main(String[] args) throws Exception {
        SpringUtil.initClassPathSpring("applicationContext.xml");
        String path = System.getProperty("user.dir") + "/api/";
        IUserInfoSerivce userInfoSerivce userInfoSerivce = LoaderJarUtil.initServices(path,
                "com.xck.api.service.UserInfoService-V1.0.0_190313.jar");
        userInfoSerivce.doInit();
        userInfoSerivce.print();
        userInfoSerivce = LoaderJarUtil.initServices(path,
                "com.xck.api.service.UserInfoService-V1.0.0_190313.jar");
        userInfoSerivce.doInit();
        userInfoSerivce.print();
    }
}
连续调用两次,用于测试重复初始化是否也能成功。
输出如下:
2019-3-15 14:16:25 org.springframework.context.support.AbstractApplicationContext prepareRefresh
信息: Refreshing org.springframework.context.support.ClassPathXmlApplicationContext@7369ca65: startup date [Fri Mar 15 14:16:25 CST 2019]; root of context hierarchy
2019-3-15 14:16:25 org.springframework.beans.factory.xml.XmlBeanDefinitionReader loadBeanDefinitions
信息: Loading XML bean definitions from class path resource [applicationContext.xml]
2019-3-15 14:16:26 org.springframework.beans.factory.support.DefaultListableBeanFactory preInstantiateSingletons
信息: Pre-instantiating singletons in org.springframework.beans.factory.support.DefaultListableBeanFactory@1d766806: defining beans [org.springframework.context.annotation.internalAsyncAnnotationProcessor,org.springframework.context.annotation.internalScheduledAnnotationProcessor,org.springframework.context.annotation.internalConfigurationAnnotationProcessor,org.springframework.context.annotation.internalAutowiredAnnotationProcessor,org.springframework.context.annotation.internalRequiredAnnotationProcessor,org.springframework.context.annotation.internalCommonAnnotationProcessor,checkService,org.springframework.context.annotation.ConfigurationClassPostProcessor$ImportAwareBeanPostProcessor#0]; root of factory hierarchy
UserInfoService init
ConsumerTypeService
checkService
Exception in thread "main" java.lang.NullPointerException
	at com.xck.api.service.UserInfoService.print(UserInfoService.java:25)
	at com.xck.main.Main.main(Main.java:21)
Spring容器中未找到: com.xck.api.service.UserInfoService类!
UserInfoService init
发现如果重复扫描会报错,这时候可以在Spring中加上动态移除方法:
    public static void unRegister(String beanId){
        beanDefinitionRegistry().removeBeanDefinition(beanId);
    }

    private static BeanDefinitionRegistry beanDefinitionRegistry(){
        ClassPathXmlApplicationContext cpApx = (ClassPathXmlApplicationContext) apx;
        return (BeanDefinitionRegistry)cpApx.getBeanFactory();
    }
在扫描之前先将bean移除了就没问题了;

