Android消息机制——Handler分析
前言
Android的消息机制主要是指Handler的运行机制,Handler的运行需要底层的MessageQueue和Looper的支撑。Handler 是Android 消息机制的上层接口,这使得在开发过程中只需要和Handler交互即可。通过Handler 可以将一个任务切换到Handler所在的线程中去执行。
机制组成部分
分析Handler机制原理必然涉及ActivityThread,Handler、MessageQueue,Looper,Message等重要类。对这些类作简要介绍:
- ActivityThread
程序的启动入口,这就是主线程(UI线程)。ActivityThread被创建时就会初始化Looper,这也就是在主线程中默认可以使用Handler的原因。注意:线程默认没有Looper的,如果需要使用Handler就必须为线程创建Looper。 - MessageQueue
消息队列,内部储存了一组消息,以队列的形式对外提供插入和删除的工作。内部存储结构不是真正的队列,采用单链表的数组结构来存储消息列表。 - Looper
消息循环,由于MessageQueue只是一个消息的存储单元,它不能去处理消息,而Looper会以无限循环的形式去查找是否有新消息,如果有就处理消息,否则就一直等待。 - ThreadLocal
它不是线程,作用是可以在每个线程中存储数据。ThreadLocal可以在不同的线程中互不干扰地存储并提供数据,通过ThreadLocal可以获取每个线程的Looper。
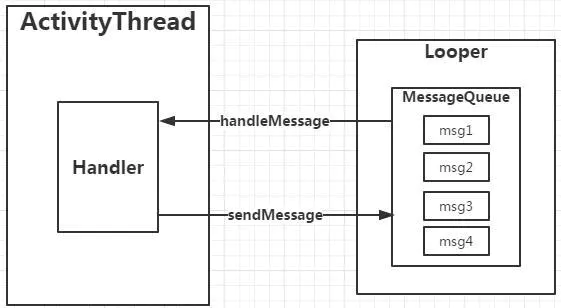
在Android消息机制中,Handler各个部分运行关系,如下图:

ActivityThread
应用程序的入口是在ActivityThread的main方法中,下面是源码分析
public static void main(String[] args) {
    ......
    //1 创建Looper 和 MessageQueue
    Looper.prepareMainLooper();
      //2 建立与AMS的通信
    ActivityThread thread = new ActivityThread();
    thread.attach(false);
    if (sMainThreadHandler == null) {
        sMainThreadHandler = thread.getHandler();
    }
    ......
    //3 无限循环,不断取出消息,向Handler分发
    Looper.loop();

    //可以看出来主线程也是在无限的循环的,
    //异常退出循环的时候会报错.
    throw new RuntimeException("Main thread loop
    unexpectedly exited");
}
我们应该知道,如果程序没有死循环的话,执行完main函数以后就会立马退出了。之所以我们的APP能够一直运行着,就是因为Looper.loop()里面是一个死循环。
Looper 和 ThreadLocal
1.Looper 类分析
public final class Looper {
    // 每个线程都有一个ThreadLocal,用来保存Looper对象
    static final ThreadLocal<Looper> sThreadLocal = new ThreadLocal<Looper>();
    private static Looper sMainLooper;  // guarded by Looper.class
    // 保存消息队列
    final MessageQueue mQueue;
    // 保存线程
    final Thread mThread;
    ......
    public static void prepare() {
        prepare(true);
    }

    //prepare 函数
    private static void prepare(boolean quitAllowed) {
        //判断sThreadLocal.get()是否为空,如果不为空说明已经为该线程设Looper,不能重复设置。
        if (sThreadLocal.get() != null) {
            throw new RuntimeException("Only one Looper may be created per thread");
        }
        //如果sThreadLocal.get()为空,说明还没有为该线程设置Looper,那么创建Looper并设置
        sThreadLocal.set(new Looper(quitAllowed));
    }
    //ActivityThread 调用Looper.prepareMainLooper();该函数调用prepare(false);
    public static void prepareMainLooper() {
        prepare(false);
        synchronized (Looper.class) {
            if (sMainLooper != null) {
                throw new IllegalStateException("The main Looper has already been prepared.");
            }
            sMainLooper = myLooper();
        }
    }
    public static Looper getMainLooper() {
        synchronized (Looper.class) {
            return sMainLooper;
        }
    }
    // 获取当前线程Looper
    public static @Nullable Looper myLooper() {
        return sThreadLocal.get();
    }
    ......
    public static void loop() {
    //得到Looper
    final Looper me = myLooper();
    if (me == null) {
        throw new RuntimeException("No Looper; Looper.prepare() wasn't called on this thread.");
    }
    //得到MessageQueue
    final MessageQueue queue = me.mQueue;
    ......
    for (;;) {//无限循环
        Message msg = queue.next(); // 取下一个Message 可能阻塞在这里
        if (msg == null) {
            //如果队列为空直接return直接结束了该方法,即循环结束
            return;
        }
        ......
        try {
            //分发message (target指handler)
            msg.target.dispatchMessage(msg);
            ......
        } finally {
        }
        ......
    }
}
从源码中可知,在Looper.loop() 方法中会取出内部的MessageQueue,并且迭代消息队列里面的消息,根据消息的target分发消息(会到Handler类中handleMessage方法中)。同时,源码中for()循环是死循环,为什么不会导致应用卡死?
对于线程即是一段可执行的代码,当可执行代码执行完成后,线程生命周期便该终止了,线程退出。而对于主线程,我们是绝不希望会被运行一段时间,自己就退出,那么如何保证能一直存活呢?简单做法就是可执行代码是能一直执行下去的,死循环便能保证不会被退出,例如,binder线程也是采用死循环的方法,通过循环方式不同与Binder驱动进行读写操作,当然并非简单地死循环,无消息时会休眠。
但这里可能又引发了另一个问题,既然是死循环又如何去处理其他事务呢?
通过创建新线程的方式。真正会卡死主线程的操作是在回调方法onCreate/onStart/onResume等操作时间过长,会导致掉帧,甚至发生ANR,looper.loop本身不会导致应用卡死。
主线程的死循环一直运行是不是特别消耗CPU资源呢?
其实不然,这里就涉及到Linux pipe/epoll机制,简单说就是在主线程的MessageQueue没有消息时,便阻塞在loop的queue.next()中的nativePollOnce()方法里,此时主线程会释放CPU资源进入休眠状态,直到下个消息到达或者有事务发生,通过往pipe管道写端写入数据来唤醒主线程工作。这里采用的epoll机制,是一种IO多路复用机制,可以同时监控多个描述符,当某个描述符就绪(读或写就绪),则立刻通知相应程序进行读或写操作,本质同步I/O,即读写是阻塞的。 所以说,主线程大多数时候都是处于休眠状态,并不会消耗大量CPU资源。
2.ThreadLocal 类分析
ThreadLocal是一个线程内部的数据存储类,通过它可以在指定的线程中存储数据,数据存储以后,只有在指定线程中可以获取到存储的数据,对于其他线程来说则无法获取到数据。
public class ThreadLocal<T> {
     ....
      public void set(T value) {
        Thread t = Thread.currentThread();
        ThreadLocalMap map = getMap(t);
        if (map != null)
            map.set(this, value);
        else
            createMap(t, value);
    }

      public T get() {
        Thread t = Thread.currentThread();
        ThreadLocalMap map = getMap(t);
        if (map != null) {
            ThreadLocalMap.Entry e = map.getEntry(this);
            if (e != null) {
                @SuppressWarnings("unchecked")
                T result = (T)e.value;
                return result;
            }
        }
        return setInitialValue();
    }
     ....
}
从ThreadLocal的set和get方法可以看出,它们所操作对象都是当前线程的localValues对象的table数组,因此在不同线程中访问同一个ThreadLocal的set和get方法,他们对ThreadLocal所做的读写操作仅限于各自线程的内部,这就是ThreadLocal可以在多个线程中互不干扰地存储和修改数据。
3.Thread 、ThreadLocal 和Looper 关系
Looper 类源码

static final ThreadLocal<Looper> sThreadLocal = new ThreadLocal<Looper>();
// prepare() 方法中Looper 对象存储到ThreadLocal中
sThreadLocal.set(new Looper(quitAllowed));
-----------------------------------------------------------------------------------
ThreadLocal 类源码

public void set(T value) {
    Thread t = Thread.currentThread();
    ThreadLocalMap map = getMap(t);
    if (map != null)
        map.set(this, value);
    else
        createMap(t, value);
}
//这是ThreadLocal的getMap方法
ThreadLocalMap getMap(Thread t) {
    return t.threadLocals;
}
小结: 从以上源码分析可知,map.set(this, value)通过把自身(ThreadLocal)以及值(Looper)放到了一个Map里面,如果再放一个的话,就会覆盖,因为map不允许键值对中的键是重复的。所以,ThreadLocal通过get()和set()方法就可以绑定Thread和Looper。
MessageQueue
MessageQueue主要包含2个操作:插入和读取。插入和读取对应的方法分别为enqueueMessage和next,其中enqueueMessage的作用是往消息队列中插入一条消息,而next的作用是从消息队列中取出一条消息并将其从消息队列中移除。消息队列的内部实现是通过一个单链表的数据结构来维护消息列表,单链表在插入和删除上比较有优势。
boolean enqueueMessage(Message msg, long when) {
      ......
    synchronized (this) {
       ......
        msg.when = when;
        Message p = mMessages;
        //检测当前头指针是否为空(队列为空)或者没有设置when 或者设置的when比头指针的when要前
        if (p == null || when == 0 || when < p.when) {
            //插入队列头部,并且唤醒线程处理msg
            msg.next = p;
            mMessages = msg;
            needWake = mBlocked;
        } else {
           // 几种情况要唤醒线程处理消息:1)队列是堵塞的 2)barrier,头部结点无target 3)当前msg是堵塞的
            needWake = mBlocked && p.target == null && msg.isAsynchronous();
            Message prev;
            for (;;) {
                prev = p;
                p = p.next;
                if (p == null || when < p.when) {
                    break;
                }
                if (needWake && p.isAsynchronous()) {
                    needWake = false;
                }
            }
            msg.next = p; // 将当前msg插入第一个比其when值大的结点前。
            prev.next = msg;
        }
        //调用Native方法进行底层操作,在这里把那个沉睡的主线程唤醒
        if (needWake) {
            nativeWake(mPtr);
        }
    }
    return true;
}

Message next() {
     .....
     for (;;) {
            if (nextPollTimeoutMillis != 0) {
                Binder.flushPendingCommands();
            }
            nativePollOnce(ptr, nextPollTimeoutMillis);
            synchronized (this) {
                // Try to retrieve the next message.  Return if found.
                final long now = SystemClock.uptimeMillis();
                Message prevMsg = null;
                // 获取当前消息
                Message msg = mMessages;
                //  这里是异步消息
                if (msg != null && msg.target == null) {
                    // Stalled by a barrier.  Find the next asynchronous message in the queue.
                    do {
                        prevMsg = msg;
                        msg = msg.next;
                    } while (msg != null && !msg.isAsynchronous());
                }
                if (msg != null) {
                    if (now < msg.when) {
                        // Next message is not ready.  Set a timeout to wake up when it is ready.
                        nextPollTimeoutMillis = (int) Math.min(msg.when - now, Integer.MAX_VALUE);
                    } else {
                        // 获取消息,并把消息队列移动到下一条消息
                        mBlocked = false;
                        if (prevMsg != null) {
                            prevMsg.next = msg.next;
                        } else {
                            mMessages = msg.next;
                        }
                        msg.next = null;
                        if (DEBUG) Log.v(TAG, "Returning message: " + msg);
                        msg.markInUse();
                        return msg;
                    }
                } else {
                    // No more messages.
                    nextPollTimeoutMillis = -1;
                }
                ......
}
Handler 分析
handler的工作主要包含消息的发送和接收过程。post的一系列方法最终是通过send的一系列方法来实现。handler发消息的过程是向消息队列中插入了一条消息。MessageQueue的next方法就会返回这条消息给Looper,Looper收到消息后就开始处理了,最终消息由Looper交由Handler处理,即Handler 的dispathchMessage方法会被调用,这时handler就进入了处理消息的阶段。
public void dispathchMessage(Message msg){
    // 检查Message的callback是否为null,不为null就通过handleCallback来处理消息
    // Message的callback是一个Runnable对象,实际上就是handler的post方法所传递Runnable参数
    if(msg.callback!=null){
        handleCallback(msg);
    }else{
    // 检查Handler 的mCallback是否为null,不为null就调用mCallback的
    // handleMessage
        if(mCallback!=null){
            if(mCallback.handleMessage(msg))
            return;
        }
        handleMessage(msg);
    }
}
总结
通过handler的post方法将一个Runnable投递到handler 内部的Looper 中去处理,也可以通过handler的send一个消息,这个消息同样会在Looper中去处理。其实post 方法最终也是通过send方法来完成的。当handler的send方法被调用时,它会调用MessageQueue的enqueueMessage 方法将这个消息放入消息队列中,然后Looper发现有新消息到来时,就会处理这个消息,最终消息中的Runnable或者handler的handleMessage 方法就会被调用。注意Looper 是运行在创建Handler 所在的线程中的,这样一来handler中的业务逻辑就被切换到创建handler所在的线程中去执行了。
参考
Android 源码分析之旅3.1–消息机制源码分析
Android 消息机制——你真的了解Handler?
一步一步分析Android的Handler机制