操作系统和Spring Boot中的缓存及实现原理源码解读
文章目录
- 1. 引入
- 1.1 背景
- 1.2 存储设备
- 1.3 局部性原则
- 1.4 CPU 缓存
- 2. 缓存策略
- 2.1 最优替换策略
- 2.2 随机替换策略
- 2.3 先进先出替换策略
- 2.4 最少最近使用替换策略(LRU)
- 2.5 近似LRU
- 3. Spring boot缓存
- 3.1 SimpleCache
- 3.2 原理解读

1. 引入
1.1 背景
不管是CPU的缓存,还是业务系统中所使用的各种缓存策略和缓存中间件,使用缓存的目的都是为了避免多次的访问磁盘或数据库。由于磁盘或是数据库相对于内存来说,读写的性能有着一定的差距,如果将经常访问的热点信息放入到缓存中,那么在整体的访问过程中,系统的性能开销更好,访问的速度更快。
1.2 存储设备
对于数据的存储来说,通常可以选择将其存放到本地或是远程服务器的磁盘,或是搭建好的分布式文件系统中。而系统对于数据的访问有可能直接从内存中获取,也有可能需要访问磁盘或是文件系统,不同的存储系统之间存在着访问性能之间的差异。通常来说,如下所示,从上往下容量越来越大,但是相应的访问速度却越来越慢,上一层可以存放下一层数据的子集,即那些访问频率更高的数据。

1.3 局部性原则
缓存如何决定将存储数据的哪部分作为子集存放到缓存中,所依赖的就是局部性原则。由于CPU往往需要重复的处理相同的某些数据或是指令,那么如果将其放入到缓存中,访问的速度将大幅度提升。而其中所体现的就是局部性原则,局部性原则又可以分为时间局部性(Temporal Localit)和空间局部性(Spatial Locality)
- 时间局部性:假设当前访问的数据在后续的操作中大概率也会被再次访问
- 空间局部性:假设当前访问的数据相邻的数据大概率也会被访问
1.4 CPU 缓存
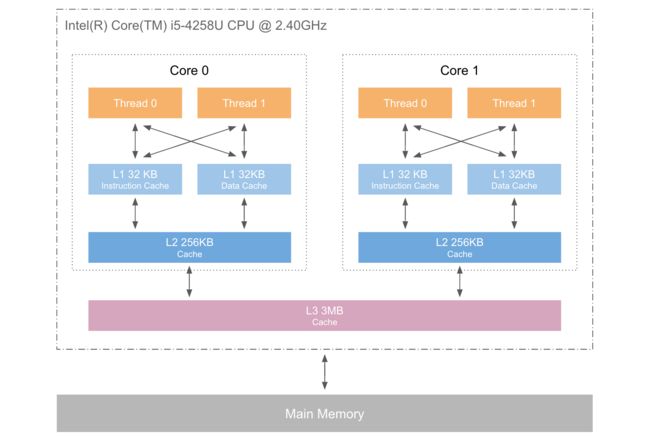
CPU缓存的根本目的是解决CPU运算速度和内存读写速度之间不匹配的矛盾。当CPU发出内存访问请求时,它会首先查看缓存中是否包含想要的数据,如果有则直接返回缓存中的数据即可;如果没有,首先需要访问内存获取数据,将其写入到缓存中,最后在将其返回给CPU使用。
而按照数据读取的顺序和与CPU结构的紧密程度来说,CPU缓存又可以分为一级缓存、二级缓存和三级缓存。每一级缓存中所储存的全部数据都是下一级缓存的一部分,这三种缓存的技术难度和制造成本是相对递减的,所以其容量也是相对递增的。
更多关于CPU三级缓存的内容可浏览 :CPU缓存
2. 缓存策略
缓存虽然可以有效的加快数据的访问,但是由于其容量相对较小,只能存放经常访问的热点数据。这样就涉及到了缓存替换策略问题,即当缓存空间填满时,如何选择淘汰哪些内容,以便为更热的数据腾出空间。缓存策略的使用目的是为了在有限的缓存空间上,提高访问命中的次数,从而减少访问内存的次数。
操作系统中常用的缓存替换策略有如下几种:
- 最优替换策略
- 随机替换策略
- 先进先出替换策略
- 最不经常使用替换策略
- 最少最近使用替换策略
- 近似最少最近使用策略
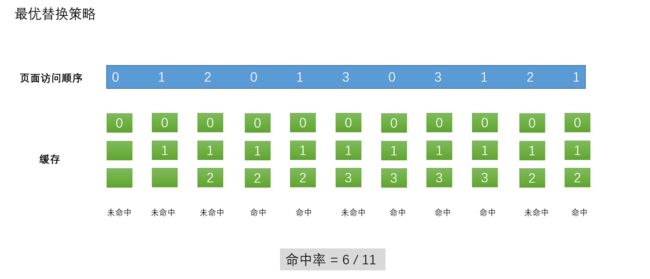
下面通过一个简单的例子来理解一下上述几种重要的策略,假设访问的顺序为0、1、2、0、1、3、0、3、1、2、1,同时假设缓存大小为3。
2.1 最优替换策略
所谓最优替换,即替换掉那些最远将来才会被访问到的页,这样就可以达到最优的访问命中率。但是计算机并不具备真正可以预测未来的能力,因此,这种策略只能作为一种最优基准策略,便于其他策略的对比使用。
2.2 随机替换策略
随机替换策略指的是:当缓存满时,随机的选择一页进行替换,显然随机替换策略的性能好坏就只能依赖于运气的好坏。对于上述的例子来说,随机替换策略的表现可能如下所示:

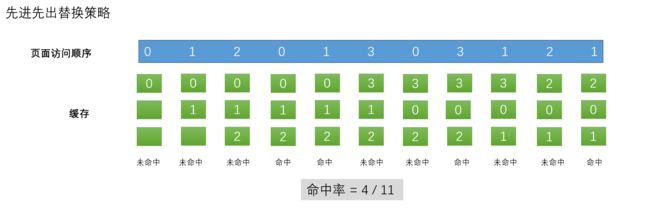
2.3 先进先出替换策略
先进先出策略根据队列的先进先出特性,每次替换都选择最先进入缓存中的数据进行替换。对于上述的例子来说,表现如下所示:
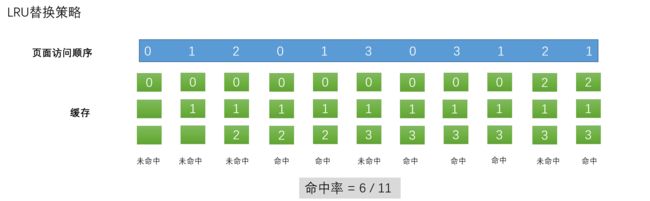
2.4 最少最近使用替换策略(LRU)
前面的几种替换策略都是遵循某种简单的替换原则,它们并没有使用到历史信息。而下面即将介绍的LRU则是利用了历史信息,每次都选择最少最近使用的数据进行替换。
LRU所使用的历史信息就是数据的使用频率,如果数据经常被访问,那么它相对更应该保留在缓存中。另外,使用的历史时间也是一类信息,如果数据近期被访问过,那么它也更应该保留在缓存中。对于上述的例子来说,LRU的表现如下所示:
2.5 近似LRU
LRU相较于其他的替换策略来说,通常可以取得更高的访问命中率。但是,当数据量很大时,遍历历史信息来找到哪个最少最近未使用的数据所带来的额外开销将变的很大,那么它所带来的命中率的提高就显得没有那么突出了。因此,为了缓和这两方面的矛盾,可以使用近似位或是时钟算法来近似的找到最少最近未使用的数据,然后再进行替换。这样既保留了LRU的优势,又减少了寻找过程所带来的开销。
3. Spring boot缓存
既然同样是缓存,那么Spring Boot项目中缓存所起到的作用也是同样相似的。对于Spring Boot项目来说,最基本的业务也无非CRUD,那么它就需要和数据库打交道。用户发出的查询请求需要到数据库中查数据,用户的购买下单等类似的请求需要到数据库中更新记录。如果请求量很小,那么缓存的存在也就无足轻重了。但是。如今各个大型网站的访问量可能在某个固定的时刻会涌入大量的请求,例如电商每年的双11、双12、618,以及高考后查分等。如果将这些请求都交给数据库处理,那么立马就宕机了。
因此,Spring boot项目需要缓存来保留那些热点数据,等到下次用户发从相同的请求时,只需要返回缓存中的结果,而无需查询数据库。这样不仅减轻了数据库自身的压力,也避免了因硬盘IO和网络延迟所带来的额外开销。
在前面的Spring Boot与缓存(默认缓存 + Redis)中已经介绍了Spring Boot中如何使用@Cacheable、@CacheEvict、@Cacheput和@EnableCaching这几个注解来开启Spring Boot本身的缓存支持,以及Spring Boot集成Redis来提供缓存支持。为了内容的连贯性,这里简单的重复一下其中的重要内容,详细的部分可阅读原文。
3.1 SimpleCache
为了介绍如何启用Spring Boot最简单的缓存支持,首先准备一张表,记录如下所示:
mysql> select * from account;
+----+----------+-------+
| id | name     | money |
+----+----------+-------+
|  1 | Forlogen |  1000 |
|  2 | Kobe     |  1000 |
|  3 | James    |  1000 |
+----+----------+-------+
3 rows in set (0.00 sec)
创建Spring Boot项目,引入所需的maven依赖:
<dependency>
    <groupId>org.springframework.bootgroupId>
    <artifactId>spring-boot-starter-cacheartifactId>
dependency>
当然数据库连接、Mybatis等所需的基本依赖也需要引入,这里不再说明。然后需要构建表对应的实体类Account,如下所示:
@NoArgsConstructor
@AllArgsConstructor
@Builder
public class Account {

    @Getter
    @Setter
    private Integer id;

    @Getter
    @Setter
    private String name;

    @Getter
    @Setter
    private Float money;
}
实体类中只包含id、name和money三个字段信息。接着定义持久层mapper,并使用@Mapper注册到容器中。mapper中包含常用的CRUD,如下所示:
@Mapper
public interface AccountMapper {

    @Select("select * from account")
    public List<Account> findAll();

    @Select("select * from account where id=#{id}")
    public Account findById(Integer id);

    @Select("select * from account where name=#{name}")
    public Account findByName(String name);

    @Insert("insert into account(name,money) values (#{name},#{money})")
    public int insertAccount(Account account);

    @Update("update account set name=#{name} where id=#{id}")
    public int updateAccount(Account account);

    @Delete("delete from account where id=#{id}")
    public void deleteAccount(Integer id);
}
编写业务层逻辑,并使用@Service注册到ioc容器中,如下所示:
@Service
public class AccountService {

    @Autowired
    AccountMapper accountMapper;

    @Cacheable(value = "account")
    public List<Account> findALl(){
        System.out.println("service findAll...");
        List<Account> accounts = accountMapper.findAll();
        return accounts;
    }

    @Cacheable(value = "account", key = "#id", condition = "#id > 1")
    public Account findById(Integer id){
        System.out.println("service findById"+id);
        Account account = accountMapper.findById(id);

        return account;
    }

    @CachePut(value = "account", key = "#result.id")
    public Account updateAccount(Account account){
        accountMapper.updateAccount(account);
        return account;

    }

    @CacheEvict(value = "account", key = "#id", beforeInvocation = true)
    public void deleteAccount(Integer id){
        accountMapper.deleteAccount(id);
    }

    @Caching(
            cacheable = {@Cacheable(value = "account", key = "#name")},
            put = {
                    @CachePut(value = "account", key = "#result.id"),
                    @CachePut(value = "account", key = "#result.name")
            }
    )
    public Account findByName(String name){
        Account account = accountMapper.findByName(name);
        return account;
    }
}
最后是表现层的逻辑:
@RestController
public class AccountController {

    @Autowired
    AccountService accountService;

    @GetMapping("/account")
    public List<Account> testFindAll(){
        List<Account> aLl = accountService.findALl();
        return aLl;
    }

    @GetMapping("/account/{id}")
    public Account testFindById(@PathVariable("id") Integer id){
        Account account = accountService.findById(id);
        return account;

    }

    @GetMapping("/delAccount/{id}")
    public String testDeleteAccount(@PathVariable("id") Integer id){
        accountService.deleteAccount(id);
        return "success";
    }

    @GetMapping("/account/name/{name}")
    public Account testFindByName(@PathVariable("name") String name){
        Account byName = accountService.findByName(name);
        return byName;
    }

    @GetMapping("/account/update")
    public Account testUpdateAccount(Account account){
        Account account1 = accountService.updateAccount(account);
        return account1;
    }
}
当然还需要在启动类上使用@EnableCaching开启缓存支持,并使用@MapperScan进行扫描。
@SpringBootApplication
@MapperScan("dyliang.mapper")
@EnableCaching
public class DyliangApplication {

    public static void main(String[] args) {
        SpringApplication.run(DyliangApplication.class, args);
    }
}
详细代码可见:Spring-Boot-2.x-Examples
启动程序在浏览器中输入http://localhost:8080/account,然后多次执行相同的查询继续观察控制台输出,可以发现此时service findAll...只会在首次执行查询时输出,后续相同的操作并不会输出该信息,说明缓存已经生效。至于其他注解的使用规则和效果,可见原文,或者自己跑下程序。
3.2 原理解读
前面说到,要想开启Spring Boot对于缓存的支持,需要使用@EnableCaching注解开启,并且在需要使用缓存的方法上使用另外的几个相关的注解,并且可以自定义缓存的规则。另外,还需要引入spring-boot-starter-cache这个依赖项。最终,项目启动时Sring Boot实际加载的是SimpleCacheConfiguration这个配置项。
SimpleCacheConfiguration matched:
- Cache org.springframework.boot.autoconfigure.cache.SimpleCacheConfiguration automatic cache type (CacheCondition)
- @ConditionalOnMissingBean (types: org.springframework.cache.CacheManager; SearchStrategy: all) did not find any beans (OnBeanCondition)
为了理解其中的实现原理,同样的先找到Spring Boot对于缓存的自动配置类CacheAutoConfiguration。在项目的External Libraries中的/org/springframework/boot/spring-boot-autoconfigure/2.3.1.RELEASE/spring-boot-autoconfigure-2.3.1.RELEASE.jar!/META-INF/spring.factories:39路径下可以看到Spring Boot可自动配置的相关配置类CacheAutoConfiguration,源码实现如下:
@Configuration(proxyBeanMethods = false)
@ConditionalOnClass(CacheManager.class)
@ConditionalOnBean(CacheAspectSupport.class)
@ConditionalOnMissingBean(value = CacheManager.class, name = "cacheResolver")
@EnableConfigurationProperties(CacheProperties.class)
@AutoConfigureAfter({ CouchbaseAutoConfiguration.class, HazelcastAutoConfiguration.class,
		HibernateJpaAutoConfiguration.class, RedisAutoConfiguration.class })
@Import({ CacheConfigurationImportSelector.class, CacheManagerEntityManagerFactoryDependsOnPostProcessor.class })
public class CacheAutoConfiguration {

	@Bean
	@ConditionalOnMissingBean
	public CacheManagerCustomizers cacheManagerCustomizers(ObjectProvider<CacheManagerCustomizer<?>> customizers) {
		return new CacheManagerCustomizers(customizers.orderedStream().collect(Collectors.toList()));
	}

	@Bean
	public CacheManagerValidator cacheAutoConfigurationValidator(CacheProperties cacheProperties,
			ObjectProvider<CacheManager> cacheManager) {
		return new CacheManagerValidator(cacheProperties, cacheManager);
	}

	@ConditionalOnClass(LocalContainerEntityManagerFactoryBean.class)
	@ConditionalOnBean(AbstractEntityManagerFactoryBean.class)
	static class CacheManagerEntityManagerFactoryDependsOnPostProcessor
			extends EntityManagerFactoryDependsOnPostProcessor {

		CacheManagerEntityManagerFactoryDependsOnPostProcessor() {
			super("cacheManager");
		}

	}

	/**
	 * Bean used to validate that a CacheManager exists and provide a more meaningful
	 * exception.
	 */
	static class CacheManagerValidator implements InitializingBean {

		private final CacheProperties cacheProperties;

		private final ObjectProvider<CacheManager> cacheManager;

		CacheManagerValidator(CacheProperties cacheProperties, ObjectProvider<CacheManager> cacheManager) {
			this.cacheProperties = cacheProperties;
			this.cacheManager = cacheManager;
		}

		@Override
		public void afterPropertiesSet() {
			Assert.notNull(this.cacheManager.getIfAvailable(),
					() -> "No cache manager could be auto-configured, check your configuration (caching type is '"
							+ this.cacheProperties.getType() + "')");
		}

	}

	/**
	 * {@link ImportSelector} to add {@link CacheType} configuration classes.
	 */
	static class CacheConfigurationImportSelector implements ImportSelector {

		@Override
		public String[] selectImports(AnnotationMetadata importingClassMetadata) {
			CacheType[] types = CacheType.values();
			String[] imports = new String[types.length];
			for (int i = 0; i < types.length; i++) {
				imports[i] = CacheConfigurations.getConfigurationClass(types[i]);
			}
			return imports;
		}

	}

}
由@ConditionalOnMissingBean的内容和Spring Boot与缓存(默认缓存 + Redis)中讲到的缓存的基本原理可知,最为重要就是要定义CacheManager来实现缓存的一系列过程。而SimpleCacheConfiguration就是在ioc容器中注册了一个管理缓存的CacheManager,源码如下:
@Configuration(proxyBeanMethods = false)
@ConditionalOnMissingBean(CacheManager.class)
@Conditional(CacheCondition.class)
class SimpleCacheConfiguration {

	@Bean
	ConcurrentMapCacheManager cacheManager(CacheProperties cacheProperties,
			CacheManagerCustomizers cacheManagerCustomizers) {
		ConcurrentMapCacheManager cacheManager = new ConcurrentMapCacheManager();
		List<String> cacheNames = cacheProperties.getCacheNames();
		if (!cacheNames.isEmpty()) {
			cacheManager.setCacheNames(cacheNames);
		}
		return cacheManagerCustomizers.customize(cacheManager);
	}

}
通过使用@Bean注解注入的这个CacheManager(缓存管理器),我们可以创建、配置、获取、管理和控制多个唯一命名的Cache。
另外可以看到注册的CacheManager是ConcurrentMapCacheManager类型,源码如下:
public class ConcurrentMapCacheManager implements CacheManager, BeanClassLoaderAware {

	private final ConcurrentMap<String, Cache> cacheMap = new ConcurrentHashMap<>(16);
}
可以看到,缓存底层的支持使用的是一个线程安全的ConcurrentHashMap。当缓存生效时,每次从缓存中取数据时,如果缓存中已经存在,那么直接使用传入的name获取到相应的Cache;如果不存在,那么需要使用synchronized关键字实现线程同步,则新建一个Cache,保存在CacheMap中。
@Override
@Nullable
public Cache getCache(String name) {
    // 首先根据传入的name获取对应的Cache实现
    Cache cache = this.cacheMap.get(name);
    if (cache == null && this.dynamic) {
        // 否则在线程同步前提下
        synchronized (this.cacheMap) {
            cache = this.cacheMap.get(name);
            if (cache == null) {
                // 创建一个ConcurrentMapCache类型的Cache
                cache = createConcurrentMapCache(name);
                // 将其保存在cacheMap中
                this.cacheMap.put(name, cache);
            }
        }
    }
    // 如果有则直接返回
    return cache;
}
最终缓存数据的读写是由Cache接口的实现类完成。Cache源码如下:
public interface Cache {
	String getName();

	Object getNativeCache();

	@Nullable
	ValueWrapper get(Object key);

	@Nullable
	<T> T get(Object key, @Nullable Class<T> type);

	@Nullable
	<T> T get(Object key, Callable<T> valueLoader);

	void put(Object key, @Nullable Object value);

	@Nullable
	default ValueWrapper putIfAbsent(Object key, @Nullable Object value) {
		ValueWrapper existingValue = get(key);
		if (existingValue == null) {
			put(key, value);
		}
		return existingValue;
	}

	void evict(Object key);

	default boolean evictIfPresent(Object key) {
		evict(key);
		return false;
	}

	void clear();

	default boolean invalidate() {
		clear();
		return false;
	}


	@FunctionalInterface
	interface ValueWrapper {
		@Nullable
		Object get();
	}


	@SuppressWarnings("serial")
	class ValueRetrievalException extends RuntimeException {
		@Nullable
		private final Object key;

		public ValueRetrievalException(@Nullable Object key, Callable<?> loader, Throwable ex) {
			super(String.format("Value for key '%s' could not be loaded using '%s'", key, loader), ex);
			this.key = key;
		}

		@Nullable
		public Object getKey() {
			return this.key;
		}
	}
}
它对应的实现类有:

下面重点看一下ConcurrentMapCache这个实现。首先,它使用private final ConcurrentMap定义了一个ConcurrentMap来实现缓存数据的读写结构,着重看一下其中个lookup()和pet()。lookup()的实现如下,它用于从缓存中根据传入的key来找有没有对应的数据:
@Override
@Nullable
protected Object lookup(Object key) {
    return this.store.get(key);
}
put()用于将传入的key和数据保存到缓存对应的ConcurrentMap中,源码如下:
@Override
public void put(Object key, @Nullable Object value) {
	this.store.put(key, toStoreValue(value));
}
其中保存的数据这里需要将其序列化为字节数组形式,调用的就是toStoreValue(),源码如下
@Override
protected Object toStoreValue(@Nullable Object userValue) {
    Object storeValue = super.toStoreValue(userValue);
    if (this.serialization != null) {
        try {
            return this.serialization.serializeToByteArray(storeValue);
        }
        catch (Throwable ex) {
            throw new IllegalArgumentException("Failed to serialize cache value '" + userValue +
                                               "'. Does it implement Serializable?", ex);
        }
    }
    else {
        return storeValue;
    }
}