Android App 专项测试 Monkey 压力测试
- 背景
1.为什么要展开压力测试
2.什么时候展开压力测试 理论
1.手工测试场景
2.自动化测试场景
3.Monkey
4.adb
5.Monkey Script 可以制定重复的操作
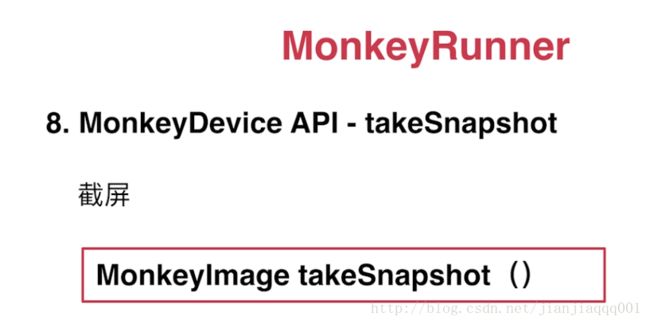
6.MonkeyRunneer 3大api 可以对手机的adb devices 进行控制 同时可以完成Monkey Script无法完成的一些事情 手机截屏
7.压力测试的结果进行的分析
1.什么是Crash
2.什么是ANR
把相关的分析提供给研发
3.实践
1.一个App的压力实践
2.Monkey高级参数的应用
3.crash结果析取
4.ANR结果析取
5.Monkey Script实例
6.MonkeyRunner实例背景
&1.为什么要展开压力测试
1).提高产品的稳定性
有的用户忍受 有的放弃 遇到页面延长时间过长 用户就会放弃
2).提高产品的留存率
提高用户的使用率
& 2.什么时候展开压力测试
1).首轮手工功能测试通过后
2).下班后的夜间进行理论
1.手工测试场景
需求找个辣妹聊天
查找
添加
聊天
2.自动化测试场景
查找 TouchInput – KeyEvent — TouchSearch
添加 TouchName
聊天 TouchFriend 点击用户的头像 –
文字和语音 形成一系列的KeyEvent事件
3.Monkey
发送伪随机事件的工具
在哪里? 就在我们的手机系统里面
手机里面看不见可见的
4.adb
adb 调试应用的一个入口
硬链接 电脑 USB线 手机
软连接 Android Debug Bridge 安卓调试桥 拨号连接成功后5.Monkey Script
Monkey Script 是一组可以被Monkey识别的命令集合
可以完成重复的固定操作6.MonkeyRunner
MonkeyRunner 提供了一系列的api
可以完成模拟事件及截图操作
可以对手机的adb devices 进行控制 同时可以完成Monkey Script无法完成的一些事情 手机截屏两者区别
Monkey 在 adb shell 中生成用户或系统的伪随机事件
MonkeyRunner 通过API定义特定的命令和事件控制
设备
MonkeyRunner APIs
MonkeyRunner 用力连接设备或模拟设备
MonkeyDevice 提供安装、卸载应用,发送模拟事件
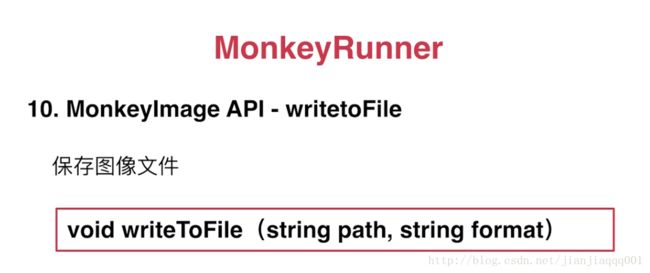
MonkeyImage: 完成图像的保存,及对比的操作
多设备控制 功能测试 回归测试
7.压力测试的结果进行的分析
    1.什么是Crash
    崩溃,应用程序在使用过程中非正常退出
    2.什么是ANR
    Application Not Responding
    等待 确定关闭 要避免用户的影响
    把相关的分析提供给研发
3.实践
1.一个App的压力实践
1).准备Android SDK环境
  会android基本都会
  这些如果不会 利用百度搜索 不在这里介绍
2).准备Python环境
https://www.python.org/downloads/ 下载 相关说明
百度搜索Python环境配置
1@在手机的设置的开发者选项里 将usb调试选上
2@确认连接 adb devices 看到显示
Jiangs-MacBook-Pro:~ jiang$ adb devices
List of devices attached
X2P5T15720001146    device

Jiangs-MacBook-Pro:~ jiang$
3@安装应用包
其中一种
adb install packagename.apk4@ 发送压力测试命令
1000随机操作 截屏 滑屏
adb shell monkey 1000事件完成1000次
Events injected: 10005@ 获取包名
adb logcat | grep START| 竖线的意思是上一个命令的输出就是下一个命令的输入
获取所有app执行过程中的一些信息
包含信息中包含 START的信息
06-21 19:36:37.965  3491  4176 I ActivityManager: START u0 {act=android.intent.action.MAIN cat=[android.intent.category.HOME] flg=0x10000000 cmp=com.huawei.android.launcher/.Launcher} from uid 10043 on display 0
06-21 19:36:43.251  3491  5005 I ActivityManager: START u0 {act=android.intent.action.MAIN cat=[android.intent.category.LAUNCHER] flg=0x10200000 cmp=com.youku.phone/.ActivityWelcome bnds=[12,960][276,1250]} from uid 10040 on display 0
cmp=com.huawei.android.launcher 这就是获取到的应用的包名 com.huawei.android.launcher
这是点击QQ获取到的数据
06-21 19:40:39.325  3491  3819 I ActivityManager: START u0 {act=android.intent.action.MAIN cat=[android.intent.category.HOME] flg=0x10200200 cmp=com.huawei.android.launcher/.Launcher (has extras)} from uid 1000 on display 0
06-21 19:40:46.693  3491  3506 I ActivityManager: START u0 {act=android.intent.action.MAIN cat=[android.intent.category.LAUNCHER] flg=0x10200000 cmp=com.tencent.mobileqq/.activity.SplashActivity bnds=[276,670][540,960]} from uid 10040 on display 0
06-21 19:40:47.196  3491  3965 I ActivityManager: START u0 {flg=0x24000000 cmp=com.tencent.mobileqq/.activity.InstallActivity (has extras)} from uid 10117 on display 0
06-21 19:40:52.686  4122  4122 D wpa_supplicant: wlan0: Event SCAN_STARTED (47) received
拿到腾讯的QQ 包名 com.tencent.mobileqq 我们制定应用进行 1000次测试 。
adb shell monkey -p com.tencent.mobileqq 10001000个指令 瞬间就完成了
2.Monkey高级参数的应用
1@throttle 参数
指定事件的间隔
adb shell monkey --throttle 下面命令就是 每间隔100毫秒 测试1000次
adb shell monkey -p com.tencent.mobileqq --throttle 100 1000这个参数主要用于 延时 因为monkey 随机点击会很快很快
2@高级参数Seed参数
我们使用Monkey发现一个异常时。
由于执行的随机操作,那么步骤就不容易复现。
让Monkey如何执行上一次的操作
Seed 指定随机生成数的Seed值
获取一个指定的随机序列 也就是说Monkey的随机操作是由Seed值指定的。
每一个Seed值都会产生一个唯一的序列
两次Seed值一样,那么随机序列也一样
adb shell monkey -s<seed> <event-count>下面的代码 执行三次 那么每次执行的过程不同
adb shell monkey -p com.tencent.mobileqq 100我们使用Seed参数后,每次执行前把进程杀掉,那么每次执行的结果和步骤一样。 也可以用计算器做实验 算出的值每次都一样
adb shell monkey -p com.tencent.mobileqq -s 100 50如果我们测试时加上的Seed值 那么如果出现问题,第二天找复现的时候也可以复现。
3@触摸事件
设定触摸事件的百分比
比如有一个需求 我们只需要点击事件, 而不需要其他滑动 音量 主导航键等的操作
adb shell monkey -pct-touch
当percent 设置100 就只有点击事件了 实验一下
adb shell monkey -p com.tencent.mobileqq --pct-touch 100 50这时我们并不能看出执行了什么事件,我们加一个 -v
就会打印执行信息 我们看到只有 ACTION_DOWN 按下 ACTION_UP抬起的事件
:Sending Touch (ACTION_DOWN): 0:(969.0,320.0)
:Sending Touch (ACTION_UP): 0:(957.4765,318.39465)
Jiangs-MacBook-Pro:~ jiang$ adb shell monkey -v -p com.tencent.mobileqq --pct-touch 100 10
:Monkey: seed=1498254666789 count=10
:AllowPackage: com.tencent.mobileqq
:IncludeCategory: android.intent.category.LAUNCHER
:IncludeCategory: android.intent.category.MONKEY
// Event percentages:
//   0: 100.0%
//   1: 0.0%
//   2: 0.0%
//   3: 0.0%
//   4: -0.0%
//   5: -0.0%
//   6: 0.0%
//   7: 0.0%
//   8: 0.0%
//   9: 0.0%
//   10: 0.0%
//   11: 0.0%

:Switch: #Intent;action=android.intent.action.MAIN;category=android.intent.category.LAUNCHER;launchFlags=0x10200000;component=com.tencent.mobileqq/.activity.SplashActivity;end
    // Allowing start of Intent { act=android.intent.action.MAIN cat=[android.intent.category.LAUNCHER] cmp=com.tencent.mobileqq/.activity.SplashActivity } in package com.tencent.mobileqq
:Sending Touch (ACTION_DOWN): 0:(969.0,320.0)
:Sending Touch (ACTION_UP): 0:(957.4765,318.39465)
:Sending Touch (ACTION_DOWN): 0:(112.0,916.0)
:Sending Touch (ACTION_UP): 0:(108.27504,901.92584)
:Sending Touch (ACTION_DOWN): 0:(853.0,1318.0)
:Sending Touch (ACTION_UP): 0:(854.844,1327.6807)
:Sending Touch (ACTION_DOWN): 0:(805.0,669.0)
:Sending Touch (ACTION_UP): 0:(815.02014,666.9578)
:Sending Touch (ACTION_DOWN): 0:(336.0,1775.0)
Events injected: 10
:Sending rotation degree=0, persist=false
:Dropped: keys=0 pointers=0 trackballs=0 flips=0 rotations=0
## Network stats: elapsed time=58ms (0ms mobile, 0ms wifi, 58ms not connected)
// Monkey finished
其他事件占比为 0 当我们指定点击事件不为100时 其他事件占比就会提高
Jiangs-MacBook-Pro:~ jiang$ adb shell monkey -v -p com.tencent.mobileqq --pct-touch 80 10
:Monkey: seed=1498156466818 count=10
:AllowPackage: com.tencent.mobileqq
:IncludeCategory: android.intent.category.LAUNCHER
:IncludeCategory: android.intent.category.MONKEY
// Event percentages:
//   0: 80.0%
//   1: 2.3529413%
//   2: 0.47058824%
//   3: 3.5294118%
//   4: -0.0%
//   5: -0.0%
//   6: 5.882353%
//   7: 3.5294118%
//   8: 0.47058824%
//   9: 0.47058824%
//   10: 0.23529412%
//   11: 3.0588236%
:Switch: #Intent;action=android.intent.action.MAIN;category=android.intent.category.LAUNCHER;launchFlags=0x10200000;component=com.tencent.mobileqq/.activity.SplashActivity;end
    // Allowing start of Intent { act=android.intent.action.MAIN cat=[android.intent.category.LAUNCHER] cmp=com.tencent.mobileqq/.activity.SplashActivity } in package com.tencent.mobileqq
:Sending Touch (ACTION_DOWN): 0:(751.0,1238.0)
:Sending Touch (ACTION_UP): 0:(737.0977,1250.9792)
:Sending Touch (ACTION_DOWN): 0:(932.0,279.0)
:Sending Touch (ACTION_UP): 0:(929.68555,280.24063)
:Sending Touch (ACTION_DOWN): 0:(200.0,1033.0)
:Sending Touch (ACTION_UP): 0:(203.98816,1033.2004)
:Sending Touch (ACTION_DOWN): 0:(644.0,1085.0)
Events injected: 10
:Sending rotation degree=0, persist=false
:Dropped: keys=0 pointers=0 trackballs=0 flips=0 rotations=0
## Network stats: elapsed time=56ms (0ms mobile, 0ms wifi, 56ms not connected)
// Monkey finished
其他事件占比 也可以类似的去设置。自己动手实验一下。
-s:指定产生随机事件种子值,相同的种子值产生相同的事件序列。如: -s 200
–throttle:每个事件结束后的间隔时间——降低系统的压力(如不指定,系统会尽快的发送事件序列)。如:–throttle 100
–pct-touch:指定触摸事件的百分比,如:–pct-touch 5% , 相关的还有以下option:
–pct-motion (滑动事件)、
–pct-trackball (轨迹球事件) 、
–pct-nav (导航事件 up/down/left/right)、
–pct-majornav (主要导航事件 back key 、 menu key)、
–pct-syskeys (系统按键事件 Home 、Back 、startCall 、 endCall 、 volumeControl)、
–pct-appswitch (activity之间的切换)、
–pct-anyevent (任意事件)
另一种情况 Monkey在晚上执行的时候,人刚走就执行了一次崩溃。 那么慢慢长夜Monkey就没活干了。
11 。崩溃事件.
忽略崩溃和异常
在Monkey检测到异常时忽略继续跑
adb shell monkey –ignore-crashes
12.超时事件 ANR
忽略超时事件
adb shell monkey –ignore-timeouts
写了一个简单的Demo 其中有一个文本 文本点击后会产生崩溃
包名 为 com.jiang.andfixtest
adb shell monkey -p com.jiang.andfixtest --pct-touch 100 500然后出现崩溃 日志信息如下
// CRASH: com.jiang.andfixtest (pid 23661)
// Short Msg: java.lang.ArithmeticException
// Long Msg: java.lang.ArithmeticException: divide by zero
// Build Label: HUAWEI/GRA-TL00/HWGRA:6.0/HUAWEIGRA-TL00/C01B370:user/release-keys
// Build Changelist: C01B370
// Build Time: 1484084617000
// java.lang.ArithmeticException: divide by zero
//  at com.jiang.andfixtest.MainActivity.test(MainActivity.java:35)
//  at com.jiang.andfixtest.MainActivity$1.onClick(MainActivity.java:24)
//  at android.view.View.performClick(View.java:5264)
//  at android.view.View$PerformClick.run(View.java:21297)
//  at android.os.Handler.handleCallback(Handler.java:743)
//  at android.os.Handler.dispatchMessage(Handler.java:95)
//  at android.os.Looper.loop(Looper.java:150)
//  at android.app.ActivityThread.main(ActivityThread.java:5621)
//  at java.lang.reflect.Method.invoke(Native Method)
//  at com.android.internal.os.ZygoteInit$MethodAndArgsCaller.run(ZygoteInit.java:794)
出现崩溃后就不在执行,当我们想让其继续执行就需要添加忽略崩溃信息 这样我们指定1000次 在400多次崩溃了,也会继续执行到1000次。
来看看如何忽略崩溃信息
adb shell monkey -p com.jiang.andfixtest --pct-touch 100 --ignore-crashes 1000adb shell monkey -p com.jiang.andfixtest --pct-touch 100 --ignore-crashes --ignore-timeouts 5000我们可以观察到执行结果 Events injected: 5000 。 其中崩溃后再次重新启动。 里面出现多次Crash信息
3.crash结果析取
实践过程
1)安装可以引起Crash的APP
2)执行压力命令
3)析取crash得Execption
adb shell monkey -p com.jiang.andfixtest --pct-touch 100 --ignore-crashes --ignore-timeouts 5000得到异常信息
 java.lang.ArithmeticException: divide by zero
//  at com.jiang.andfixtest.MainActivity.test(MainActivity.java:35)
//  at com.jiang.andfixtest.MainActivity$1.onClick(MainActivity.java:24)
//  at android.view.View.performClick(View.java:4848)
//  at android.view.View$PerformClick.run(View.java:20300)
//  at android.os.Handler.handleCallback(Handler.java:815)
//  at android.os.Handler.dispatchMessage(Handler.java:104)
//  at android.os.Looper.loop(Looper.java:210)
//  at android.app.ActivityThread.main(ActivityThread.java:5809)
//  at java.lang.reflect.Method.invoke(Native Method)
//  at java.lang.reflect.Method.invoke(Method.java:372)
//  at com.android.internal.os.ZygoteInit$MethodAndArgsCaller.run(ZygoteInit.java:1113)
//  at com.android.internal.os.ZygoteInit.main(ZygoteInit.java:879)
4.ANR结果析取
类似上面的执行
1.首先有一个能引起ANR的APP
模拟一个ANR
  public void test(){
//        int x = 2/0;
        try {
            Thread.sleep(15000);
        } catch (InterruptedException e) {
            e.printStackTrace();
        }

        Toast.makeText(this, "anr",Toast.LENGTH_SHORT).show();
    }
得到ANR 异常信息
jiang.andfixtest E/**ANR_LOG**: >>> **msg's executing time is too long**
06-22 16:08:28.293 24642-24642/com.jiang.andfixtest E/ANR_LOG: Blocked msg = { when=-15s34ms what=0 target=android.view.ViewRootImpl$ViewRootHandler callback=android.view.View$PerformClick } , cost  = 15034 ms
06-22 16:08:28.293 24642-24642/com.jiang.andfixtest E/ANR_LOG: >>>Current msg List is:
06-22 16:08:28.293 24642-24642/com.jiang.andfixtest E/ANR_LOG: Current msg <1>  = { when=-14s970ms what=0 target=android.view.ViewRootImpl$ViewRootHandler callback=android.view.View$UnsetPressedState }
06-22 16:08:28.293 24642-24642/com.jiang.andfixtest E/ANR_LOG: Current msg <2>  = { when=0 what=0 target=android.os.Handler callback=android.widget.Toast$TN$1 }
Monkey 中 拿到大量的日志信息 这里只列举前面的部分
// NOT RESPONDING: com.jiang.andfixtest (pid 24642)
**ANR in com.jiang.andfixtest (com.jiang.andfixtest/.MainActivity), time=2696681**
Reason: Input dispatching timed out (Waiting to send key event because the focused window has not finished processing all of the input events that were previously delivered to it.  Outbound queue length: 0.  Wait queue length: 20.), happend at time = 2696373@#@24642
Load: 25.57 / 23.85 / 21.71
Android time :[2017-06-22 16:11:03.59] [2709.669]
CPU usage from 9542ms to 3717ms ago:
  79% 11865/com.meelive.ingkee: 63% user + 15% kernel / faults: 5565 minor 9 major
  67% 902/system_server: 45% user + 21% kernel / faults: 9190 minor 22 major
  19% 10466/adbd: 5.6% user + 13% kernel / faults: 3249 minor
  18% 2319/com.wukonglicai.app: 16% user + 2.5% kernel / faults: 9857 minor 5 major
  10% 10597/logcat: 5.1% user + 4.9% kernel / faults: 7 minor
  8.5% 5378/tx_thread: 0% user + 8.5% kernel
  7.3% 88/kswapd0: 0% user + 7.3% kernel
  7.3% 5379/wpa_supplicant: 1.2% user + 6.1% kernel / faults: 81 minor 10 major
  5.4% 1203/com.wukonglicai.app:pushservice: 4.6% user + 0.8% kernel / faults: 2542 minor 1 major
  4.8% 228/mmcqd/0: 0% user + 4.8% kernel
  4.2% 339/surfaceflinger: 2.4% user + 1.8% kernel / faults: 84 minor
  4.1% 392/zygote: 1.7% user + 2.4% kernel / faults: 11095 minor
  3.9% 24642/com.jiang.andfixtest: 2.9% user + 1% kernel / faults: 2272 minor 13 major
  2.5% 360/netd: 0.6% user + 1.8% kernel / faults: 645 minor 1 major
如果我们手动发现了ANR 那么我们可以通过进入手机的命令查看日志信息 执行 adb shell 进入手机内部
Jiangs-MacBook-Pro:~ jiang$ adb shell
shell@R9:/ $
里面是执行 Linux 命令 ls 可以查看所有文件
 ls
acct
cache
charger
config
custom
d
data
default.prop
dev
enableswap.sh
我们执行 adb shell 然后使用 cd data进入 data目录
在cd anr目录 然后ls 查看所有文件
我们看到traces.txt
Jiangs-MacBook-Pro:~ jiang$ adb shell
shell@R9:/ $ cd data/
shell@R9:/data $ cd anr
shell@R9:/data/anr $ ls
SF_RTT
binderinfo
mtk_traces.txt
mtk_traces_1.txt
native2.txt
native3.txt
traces.txt
shell@R9:/data/anr $

traces.txt
shell@R9:/data/anr $ more traces.txt
查看日志
5.Monkey Script实例
adb shell monkey -f
-f 执行我们的脚本文件
-scriptfile 我们的脚本
1.DispatchTrackball命令
轨迹球事件
DispatchTrackball( long downtime, long eventide, int action, float x, float y, float pressure , float size, int metastate, float xprecision, float yprecision , int device, int edgeflags)
downtime 键最初被按下的时间
eventide 事件发生的时间
action 按下、弹起 0代表 按下 1代表弹起
x, y 是当前的焦点
pressure 当前的压力事件大小 范围是0-1
size 触摸的一个计时值 0-1
metastate meta键的按下标识
xprecision, yprecision x,y坐标的精确值
int device, 事件的来源 0-x 0代表不来源于物理设备
int edgeflags 超出设备的边缘
int action, float x, float y, 这三个我们需要设置 其他使用默认值
需要两个这样的命令实现一个点击事件
2.DispatchPointer命令
点击事件
DispatchPointer( long downtime, long eventide, int action, float x, float y, float pressure , float size, int metastate, float xprecision, float yprecision , int device, int edgeflags)
和上面的命令基本相似
int action, float x, float y, 这三个我们需要设置 其他使用默认值
3.DispatchString 命令
输入字符串命令
DispatchString(String text)
4.LaunchActivity命令
启动应用
LaunchActivity(package,Activity)
package包名 Activity是要启动的页面的Activity名
5.UserWait 命令
等待事件
UserWait(1000) 毫秒
6.DispatchPress命令
按下键值
DispatchPress(int keycode) #keycode 66 回车键
实践 : 现在在搜索框输入查询词
1.启动app
2.点击输入框
3.输入查询词
4.点击键盘的回车
5.点击搜索按钮
6.等待结果的出现
7.点击clear按钮
下面是 mook.script 文件
 type= user
count= 49
speed= 1.0
start data >>

LaunchActivity(com.jiang.searchdemo, com.jiang.searchdemo.MainActivity)
UserWait(1000)
DispatchPointer(10,10,0,200,300,1,1,-1,1,1,0,0)
DispatchPointer(10,10,1,200,300,1,1,-1,1,1,0,0)
DispatchString(test)
UserWait(1000)
DispatchPress(66)
UserWait(1000)
DispatchPointer(10,10,0,700,300,1,1,-1,1,1,0,0)
DispatchPointer(10,10,1,700,300,1,1,-1,1,1,0,0)
UserWait(1000)
DispatchPointer(10,10,0,900,300,1,1,-1,1,1,0,0)
DispatchPointer(10,10,1,900,300,1,1,-1,1,1,0,0)
UserWait(1000)
焦点的确定我们需要借助一个工具
原来版本是在 在/android-sdk/tools 的 uiautomatorviewer里面。
最新版本在/android-sdk/tools/bin
Mac 下的命令
./uiautomatorviewer 我们打开这个工具 选择文件夹右边第一如图所示
我们可以选择上面的按钮,就会在右边出现相应的控件属性

向下拖动我们可以看到Bounds [0,210] [540,341] 这分别是控件的左上角,和右下角的顶点。 我们确定我们的点击区域在此区域就可以执行我们想要的点击 0 <’x<’540 210 <’y<’341
文本框的坐标 Bounds [0,210] [540,341] 我们取 200, 300
Search 坐标 Bounds [540,212] [810,341] 我们取 700, 300
Clear 坐标 Bounds [810,212] [1080,341] 我们取 900, 300

我们开始执行脚本
由于脚本在电脑上 我们要 把我们的脚本push 到 手机里面
adb push /Users/jiang/Documents/mook.script /data/local/tmp

/Users/jiang/Documents/mook.script: 1 ...pushed. 0.5 MB/s (975 bytes in 0.002s)
查看手里里面 依次执行下面的命令
adb shell
cd data
cd local
cd temp
ls
Last login: Thu Jun 22 18:07:15 on ttys002
Jiangs-MacBook-Pro:~ jiang$ adb shell
generic_x86:/ $ cd data
generic_x86:/data $ cd local
generic_x86:/data/local $ cd tmp
generic_x86:/data/local/tmp $ ls
dalvik-cache
mook.script
uidump.xml
generic_x86:/data/local/tmp $ 看到手机里面已经存在
Mac 电脑上没实验成功 在Windows上修改后成功
mook.script
type= user
count= 49
speed= 1.0
start data >>

LaunchActivity(com.jiang.searchdemo, com.jiang.searchdemo.MainActivity)
UserWait(1000)
DispatchPointer(10,10,0,200,300,1,1,-1,1,1,0,0)
DispatchPointer(10,10,1,200,300,1,1,-1,1,1,0,0)
DispatchString(test)
UserWait(1000)
DispatchPress(66)
UserWait(1000)
DispatchPointer(10,10,0,700,300,1,1,-1,1,1,0,0)
DispatchPointer(10,10,1,700,300,1,1,-1,1,1,0,0)
UserWait(1000)
DispatchPointer(10,10,0,900,300,1,1,-1,1,1,0,0)
DispatchPointer(10,10,1,900,300,1,1,-1,1,1,0,0)
UserWait(1000)C:\Users\Administrator>adb push C:\Users\Administrator\Desktop\mook.script /sdcard执行命令
C:\Users\Administrator>adb shell monkey -f /sdcard/mook.script 20结果
C:\Users\Administrator>adb shell monkey -f /sdcard/mook.script 20
 // Shell command input text test status was 0
    // activityResuming(com.qihoo.appstore)
    // activityResuming(com.qihoo.appstore)
    // activityResuming(com.qihoo.appstore)
    // activityResuming(com.jiang.searchdemo)
// Shell command input text test status was 0
// Shell command input text test status was 0
// Shell command input text test status was 0
// Shell command input text test status was 0
// Shell command input text test status was 0
// Shell command input text test status was 0
// Shell command input text test status was 0
// Shell command input text test status was 0
// Shell command input text test status was 0
// Shell command input text test status was 0
执行了10次搜索。

我们可以自己设计更多更灵活的测试方法
记得要在打开的Activity中添加这样的配置
 <activity android:name=".MainActivity"
            android:exported="true"
            >
如果我们想跑某个Apk 可能进不去。我们单独设一个App占一个界面
我们将其放在一个空白屏幕的左上角, 循环中可设置多次点击左上角的控件,即使app挂掉能再次启动。
C:\Users\Administrator>adb shell monkey --ignore-crashes --ignore-timeouts -f /sdcard/mook.script 20我们加上–ignore-crashes –ignore-timeouts 忽略崩溃和忽略ANR
还有就是mac 上push 有时不正确, 几次测试使用Windows系统 push进去
adb push 路径名 aa.script /sdcrad
使用 adb shell 进入手机 cd sdcard 文件
使用命令 more aa.script 查看文件是否和电脑的一样
exit 是退出 shell 命令
其他灵活使用需要自己多探索。
monkey script 解决了一些控件的重复点击。 但是有些步骤需要自己巧妙的使用命令 先手动多试几遍,用./uiautomatorviewer 工具测量。
有时可能界面会发生变化,这时可以一此循环里面执行A方案后接着执行B方案 应对变化的界面。
再有是确保开始的几个步骤,当Monkey点错时,给设定能恢复初始点击的步骤,确保不会在错误的界面一直出不来等问题。
这个自己多思考,一批难训服的马 一旦驯服能帮你做很多事,这要靠自己多思考多实践了。
type= user
count= 49
speed= 1.0
start data >>

LaunchActivity(com.jiang.phone, .ActivityWelcome)
UserWait(1000)
DispatchPointer(10,10,0,100,110,1,1,-1,1,1,0,0)
DispatchPointer(10,10,1,100,110,1,1,-1,1,1,0,0)
UserWait(5000)
DispatchPointer(10,10,0,100,110,1,1,-1,1,1,0,0)
DispatchPointer(10,10,1,100,110,1,1,-1,1,1,0,0)
UserWait(2000)
DispatchPointer(10,10,0,100,110,1,1,-1,1,1,0,0)
DispatchPointer(10,10,1,100,110,1,1,-1,1,1,0,0)
UserWait(2000)
DispatchPointer(10,10,0,100,110,1,1,-1,1,1,0,0)
DispatchPointer(10,10,1,100,110,1,1,-1,1,1,0,0)
UserWait(1500)
DispatchPointer(10,10,0,800,110,1,1,-1,1,1,0,0)
DispatchPointer(10,10,1,800,110,1,1,-1,1,1,0,0)
UserWait(1500)
DispatchPointer(10,10,0,800,110,1,1,-1,1,1,0,0)
DispatchPointer(10,10,1,800,110,1,1,-1,1,1,0,0)
UserWait(1500)
DispatchPointer(10,10,0,800,110,1,1,-1,1,1,0,0)
DispatchPointer(10,10,1,800,110,1,1,-1,1,1,0,0)
UserWait(1500)
DispatchPointer(10,10,0,800,110,1,1,-1,1,1,0,0)
DispatchPointer(10,10,1,800,110,1,1,-1,1,1,0,0)
UserWait(1500)
DispatchPointer(10,10,0,700,1050,1,1,-1,1,1,0,0)
DispatchPointer(10,10,1,700,1050,1,1,-1,1,1,0,0)
UserWait(1500)
DispatchPointer(10,10,0,100,110,1,1,-1,1,1,0,0)
DispatchPointer(10,10,1,100,110,1,1,-1,1,1,0,0)
UserWait(1500)
DispatchPointer(10,10,0,700,1050,1,1,-1,1,1,0,0)
DispatchPointer(10,10,1,700,1050,1,1,-1,1,1,0,0)
UserWait(1500)
DispatchPointer(10,10,0,100,110,1,1,-1,1,1,0,0)
DispatchPointer(10,10,1,100,110,1,1,-1,1,1,0,0)
UserWait(1500)
DispatchPointer(10,10,0,700,1050,1,1,-1,1,1,0,0)
DispatchPointer(10,10,1,700,1050,1,1,-1,1,1,0,0)
UserWait(1500)
DispatchPointer(10,10,0,100,110,1,1,-1,1,1,0,0)
DispatchPointer(10,10,1,100,110,1,1,-1,1,1,0,0)
UserWait(1500)
UserWait(1000)
DispatchPointer(10,10,0,100,110,1,1,-1,1,1,0,0)
DispatchPointer(10,10,1,100,110,1,1,-1,1,1,0,0)
UserWait(4000)
DispatchPointer(10,10,0,100,110,1,1,-1,1,1,0,0)
DispatchPointer(10,10,1,100,110,1,1,-1,1,1,0,0)
UserWait(2000)
DispatchPointer(10,10,0,100,110,1,1,-1,1,1,0,0)
DispatchPointer(10,10,1,100,110,1,1,-1,1,1,0,0)
UserWait(2000)
DispatchPointer(10,10,0,100,110,1,1,-1,1,1,0,0)
DispatchPointer(10,10,1,100,110,1,1,-1,1,1,0,0)
UserWait(1500)
DispatchPointer(10,10,0,800,110,1,1,-1,1,1,0,0)
DispatchPointer(10,10,1,800,110,1,1,-1,1,1,0,0)
UserWait(1500)
DispatchPointer(10,10,0,800,110,1,1,-1,1,1,0,0)
DispatchPointer(10,10,1,800,110,1,1,-1,1,1,0,0)
UserWait(1500)
DispatchPointer(10,10,0,800,110,1,1,-1,1,1,0,0)
DispatchPointer(10,10,1,800,110,1,1,-1,1,1,0,0)
UserWait(1500)
DispatchPointer(10,10,0,800,110,1,1,-1,1,1,0,0)
DispatchPointer(10,10,1,800,110,1,1,-1,1,1,0,0)
UserWait(2000)
DispatchPointer(10,10,0,650,110,1,1,-1,1,1,0,0)
DispatchPointer(10,10,1,650,110,1,1,-1,1,1,0,0)
UserWait(1500)
DispatchPointer(10,10,0,700,1050,1,1,-1,1,1,0,0)
DispatchPointer(10,10,1,700,1050,1,1,-1,1,1,0,0)
UserWait(1500)
DispatchPointer(10,10,0,100,110,1,1,-1,1,1,0,0)
DispatchPointer(10,10,1,100,110,1,1,-1,1,1,0,0)
UserWait(1500)
DispatchPointer(10,10,0,700,1050,1,1,-1,1,1,0,0)
DispatchPointer(10,10,1,700,1050,1,1,-1,1,1,0,0)
UserWait(1500)
DispatchPointer(10,10,0,100,110,1,1,-1,1,1,0,0)
DispatchPointer(10,10,1,100,110,1,1,-1,1,1,0,0)
UserWait(1500)
DispatchPointer(10,10,0,700,1050,1,1,-1,1,1,0,0)
DispatchPointer(10,10,1,700,1050,1,1,-1,1,1,0,0)
UserWait(1500)
DispatchPointer(10,10,0,100,110,1,1,-1,1,1,0,0)
DispatchPointer(10,10,1,100,110,1,1,-1,1,1,0,0)
UserWait(1500)
6.MonkeyRunner实例
monkeyscipt 有些功能还不能满足,譬如截屏功能等。
那么还有更加强大的工具 MonkeyRunner工具
三大模块
1。MonkeyRunner API alert
警告框

我们使用已经安装好的Python 编写这样的脚本
#/usr/local/bin/python
#-*-UTF-8-*-

from com.android.monkeyrunner import MonkeyRunner
MonkeyRunner.alert('Hello mook friend','This is Title', 'OK')
随便命名 我在这里命名为first.py 拷贝到目录下
我们去到sdk/tools/bin目录下面
老版本在sdk/tools目录下面
找到自己sdk路径 sdk/tools/bin 下 到调用./monkeyrunner first.py
Jiangs-MacBook-Pro:~ jiang$ cd Library/
Jiangs-MacBook-Pro:Library jiang$ cd Android/
Jiangs-MacBook-Pro:Android jiang$ cd sdk/
Jiangs-MacBook-Pro:sdk jiang$ cd tools/
Jiangs-MacBook-Pro:tools jiang$ cd bin
Jiangs-MacBook-Pro:bin jiang$ ls
archquery       jobb            screenshot2
avdmanager      lint            sdkmanager
first.py        monkeyrunner        uiautomatorviewer
Jiangs-MacBook-Pro:bin jiang$ ./monkeyrunner first.py
如果不拷贝 执行全路径
./monkeyrunner /Users/jiang/Documents/first.py 配置了monkeyrunner 环境变量可以直接执行 不用到根目录下去执行

执行结果如图 把我们写的python代码执行


先测试一下手机是否能够打开
MonkeyRunner.waitForConnection(3,”Q8DM5HJJSW55PR8P”)
连接次数 和 手机名称
可以用 adb devices 查看连接设备名称
#/usr/local/bin/python
#-*-UTF-8-*-

from com.android.monkeyrunner import MonkeyRunner

device = MonkeyRunner.waitForConnection(3,"Q8DM5HJJSW55PR8P")

device.startActivity(component="com.xxx.phone/.ActivityWelcome")
monkey 日志保存 如下
补充
C:\Users\Administrator>adb shell monkey -v --ignore-crashes --ignore-native-crashes --ignore-timeout
s -f /sdcard/mook.script 2 >d:\xxx.txt
开启Activity时 可以开启任意Activity
前面为手机主程序包名
后面可以跟SDK中Activity的路径,即使和主程序包名不一样 只要是全路径名即可
monkeyscript 和 monkeyrunner都是这样的形式
monkeyscript 中打开主Activity
LaunchActivity(com.jiang.phone, .ActivityWelcome)
LaunchActivity(com.jiang.phone, com.jiang.phone.ActivityWelcome)
打开其他Activity
LaunchActivity(com.jiang.phone, com.jiang.live.ActivityLive)
monkeyrunner中打开主Activity
device.startActivity(component=”com.jiang.phone/.ActivityWelcome”)
device.startActivity(component=”com.jiang.phone/com.jiang.phone.ActivityWelcome”)
打开其他Activity
device.startActivity(component=”com.jiang.phone/com.jiang.live.ActivityLive”)
DispatchPointer 第三个参数 0代表Down 1代表Up
资料上没有显示2代表Move 自己做实验发现2代表Move
那么我们就可以模拟滑动事件
UserWait(1000)
DispatchPointer(10,10,0,900,1600,1,1,-1,1,1,0,0)
UserWait(100)
DispatchPointer(10,10,2,300,1600,1,1,-1,1,1,0,0)
UserWait(100)
DispatchPointer(10,10,1,300,1600,1,1,-1,1,1,0,0)