PyQt5快速入门教程5-信号与槽简单解析
PyQt5快速入门教程5-信号与槽简单解析
1、概念
GUI应用程序是事件驱动的。 事件主要由应用程序的用户生成。 但它们也可以通过其他手段产生,例如:网络连接,窗口管理器或定时器。 当我们调用应用程序的exec_()方法时,应用程序进入主循环。 主循环获取事件并将其发送到对象。
在事件模型中,有三个参与者:
- 事件来源
- 事件对象
- 事件目标
事件源是其状态更改的对象。 它会生成事件。 事件对象(event)将状态更改封装在事件源中。 事件目标是要通知的对象。 事件源对象将处理事件的任务委托给事件目标。
PyQt5具有独特的信号和插槽机制来处理事件。 信号和槽用于对象之间的通信。 发生特定事件时发出信号。 槽可以是任何Python可调用的函数。 当发射连接的信号时会调用一个槽。所以说,信号与槽的概念非常重要,我们接下来探讨以下内容:
- 信号与槽如何建立连接
- 如何重写或者自定义槽函数
- 如何获取事件发送者信息
- 如何发出自定义信号
2、简单的信号与槽示例(了解信号与槽如何建立连接)
代码如下:
#coding=utf-8
import sys
from PyQt5.QtWidgets import QWidget, QLCDNumber, QDial, QApplication

class Example(QWidget):
    def __init__(self):
        super().__init__()
        self.initUi()

    def initUi(self):
        lcd = QLCDNumber(self)
        dial = QDial(self)

        self.setGeometry(300, 300, 350, 250)
        self.setWindowTitle('PyQt5快速入门教程')

        lcd.setGeometry(100,50,150,60)
        dial.setGeometry(120,120,100,100)

        dial.valueChanged.connect(lcd.display)

        self.show()

if __name__ == '__main__':
    app = QApplication(sys.argv)
    ex = Example()
    sys.exit(app.exec_())
运行结果:
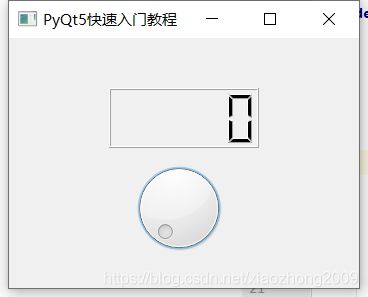
在这个例子我们展示了一个QtGui.QLCDNumber和一个QtGui.QDial这个两个小部件,当我们拨动QDial这个小部件的时候,LCD屏幕就会显示出此时Dial小部件的值。
dial.valueChanged.connect(lcd.display)这里我们将QDial这个小部件的一个valueChanged信号连接到lcd数字的显示槽。QDial对象发送信号。 QLCDNumber接收信号的。 槽是对信号作出反应的方法。
3、重新实现事件处理程序(如何重写或者自定义槽函数)
代码如下:
#coding=utf-8

import sys
from PyQt5.QtCore import Qt
from PyQt5.QtWidgets import (QWidget, QApplication, QLabel)

class Example(QWidget):
    def __init__(self):
        super().__init__()
        self.initUi()
    def initUi(self):
        self.setGeometry(300, 300, 350, 250)
        self.setWindowTitle('PyQt5快速入门教程')

        self.lab = QLabel('方向',self)

        self.lab.setGeometry(150,100,50,50)

        self.show()

    def keyPressEvent(self, e):

        if e.key() == Qt.Key_Up:
            self.lab.setText('↑')
        elif e.key() == Qt.Key_Down:
            self.lab.setText('↓')
        elif e.key() == Qt.Key_Left:
            self.lab.setText('←')
        else:
            self.lab.setText('→')

if __name__ == '__main__':
    app = QApplication(sys.argv)
    ex = Example()
    sys.exit(app.exec_())
运行结果:
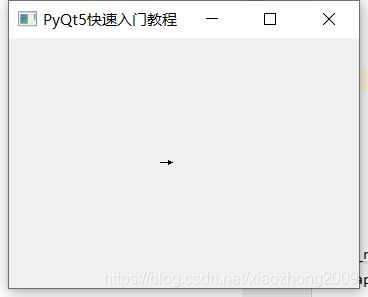
本例实现的功能是,当按下上下左右按键的时候,窗口会显示对应的方向。当按下键盘时候会发送一个对应的信号,然后调用keyPressEvent()事件处理函数。
    def keyPressEvent(self, e):

        if e.key() == Qt.Key_Up:
            self.lab.setText('↑')
        elif e.key() == Qt.Key_Down:
            self.lab.setText('↓')
        elif e.key() == Qt.Key_Left:
            self.lab.setText('←')
        else:
            self.lab.setText('→')
在我们的例子中,我们重新实现了keyPressEvent()事件处理程序。当我们按住上、下、左、右方向键的时候,窗口中依次会出现对应方位。
4、事件发送者(如何获取事件发送者信息)
有时,知道哪个窗口小部件是信号的发送者非常有用。 为此,PyQt5具有sender()方法。例如下面这个例子,我们实现了简单的石头、剪刀、布的小游戏。
#coding=utf-8
import sys
from PyQt5.QtWidgets import (QApplication, QMessageBox, QWidget, QPushButton)
from random import randint

class Example(QWidget):

    def __init__(self):
        super().__init__()
        self.initUI()
    def initUI(self):
        self.setGeometry(200, 200, 300, 300)
        self.setWindowTitle('PyQt5快速入门教程')

        bt1 = QPushButton('剪刀',self)
        bt1.setGeometry(30,180,50,50)

        bt2 = QPushButton('石头',self)
        bt2.setGeometry(100,180,50,50)

        bt3 = QPushButton('布',self)
        bt3.setGeometry(170,180,50,50)

        bt1.clicked.connect(self.buttonclicked)
        bt2.clicked.connect(self.buttonclicked)
        bt3.clicked.connect(self.buttonclicked)

        self.show()

    def buttonclicked(self):
        computer = randint(1,3)
        player = 0
        sender = self.sender()
        if sender.text() == '剪刀':
            player = 1
        elif sender.text() == '石头':
            player = 2
        else:
            player = 3

        if player == computer:
            QMessageBox.about(self, '结果', '平手')
        elif player == 1 and computer == 2:
            QMessageBox.about(self, '结果', '电脑:石头,电脑赢了!')
        elif player == 2 and computer == 3:
            QMessageBox.about(self, '结果', '电脑:布,电脑赢了!')
        elif player == 3 and computer == 1:
            QMessageBox.about(self,'结果','电脑:剪刀,电脑赢了!')
        elif computer == 1 and player == 2:
            QMessageBox.about(self,'结果','电脑:剪刀,玩家赢了!')
        elif computer == 2 and player == 3:
            QMessageBox.about(self,'结果','电脑:石头,玩家赢了!')
        elif computer == 3 and player == 1:
            QMessageBox.about(self,'结果','电脑:布,玩家赢了!')

if __name__ == '__main__':
    app = QApplication(sys.argv)
    ex = Example()
    sys.exit(app.exec_())
运行结果:
我们在我们的例子中有三个按钮,分别代表石头、剪刀、布。 在buttonClicked()方法中,我们通过调用sender()方法来确定我们点击了哪个按钮。
bt1.clicked.connect(self.buttonclicked)
bt2.clicked.connect(self.buttonclicked)
bt3.clicked.connect(self.buttonclicked)
三个按钮的clicked信号都连接到同一个槽buttonclicked()
sender = self.sender()我们通过调用sender()方法来确定信号源,根据信号源确定玩家究竟选择了石头、剪刀、布中的哪一个。 从而与电脑随机给出的数字进行比较,判断输赢。
5、发出自定义信号(如何发出自定义信号)
代码如下:
#coding=utf-8

import sys
from PyQt5.QtWidgets import (QApplication, QWidget, QMessageBox)
from PyQt5.QtCore import (pyqtSignal, QObject)

class Signal(QObject):
    showmouse = pyqtSignal()

class Example(QWidget):

    def __init__(self):
        super().__init__()
        self.initUI()
    def initUI(self):
        self.setGeometry(200, 200, 500, 300)
        self.setWindowTitle('PyQt5快速入门教程')

        self.s = Signal()
        self.s.showmouse.connect(self.about)

        self.show()
    def about(self):
        QMessageBox.about(self,'鼠标','你点鼠标了吧!')

    def mousePressEvent(self, e):
        self.s.showmouse.emit()

if __name__ == '__main__':
    app = QApplication(sys.argv)
    ex = Example()
    sys.exit(app.exec_())
运行结果:
我们创建一个名为showmouse的新信号。 该信号在鼠标按压事件期间发出。 该信号连接到QMainWindow的about()的槽。
class Signal(QObject):
    showmouse = pyqtSignal()
自定义showmouse信号连接到QMainWindow的about()的槽。
def mousePressEvent(self, e):
    self.s.showmouse.emit()
当我们用鼠标指针点击窗口时,会发出showmouse信号,调用相应的槽函数。


