Linux CentOS系统MySQL的安装
linux环境:使用CentOS7
使用RPM包进行安装
1、下载mysql安装包,版本为5.6.26
地址:
http://dev.mysql.com/get/Downloads/MySQL-5.6/MySQL-5.6.26-1.linux_glibc2.5.x86_64.rpm-bundle.tar
2、将下载后的包上传到安装好CentOS虚拟机上去,然后将包解压出来
[root@locahost]# tar xvf MySQL-5.6.26-1.linux_glibc2.5.x86_64.rpm-bundle.tar
MySQL-server-5.6.26-1.linux_glibc2.5.x86_64.rpm
MySQL-shared-5.6.26-1.linux_glibc2.5.x86_64.rpm
MySQL-devel-5.6.26-1.linux_glibc2.5.x86_64.rpm
MySQL-client-5.6.26-1.linux_glibc2.5.x86_64.rpm
MySQL-shared-compat-5.6.26-1.linux_glibc2.5.x86_64.rpm
MySQL-embedded-5.6.26-1.linux_glibc2.5.x86_64.rpm
MySQL-test-5.6.26-1.linux_glibc2.5.x86_64.rpm
3、先看下当前服务器是否含有默认mariadb,cenos7貌似默认自带了mariadb,要先将其卸载掉在进行安装,如果grep没有的话则略过;
[root@localhost ]# rpm -qa | grep mariadb
mariadb-libs-5.5.41-2.el7_0.x86_64
[root@localhost ]# rpm -e --nodeps mariadb-libs-5.5.41-2.el7_0.x86_64
4、开始安装(解压出来有很多rpm包,可以选择一次性全部安装,也可以只安装server和client),这里进行全部安装
[root@localhost~]# rpm -ivh MySQL-*.rpm
warning: MySQL-client-5.6.26-1.linux_glibc2.5.x86_64.rpm: Header V3 DSA/SHA1 Signature, key ID 5072e1f5: NOKEY
Preparing...                          ################################# [100%]
Updating / installing...
   1:MySQL-devel-5.6.26-1.linux_glibc2################################# [ 14%]
   2:MySQL-client-5.6.26-1.linux_glibc################################# [ 29%]
   3:MySQL-test-5.6.26-1.linux_glibc2.################################# [ 43%]
   4:MySQL-embedded-5.6.26-1.linux_gli################################# [ 57%]
   5:MySQL-shared-compat-5.6.26-1.linu################################# [ 71%]
   6:MySQL-shared-5.6.26-1.linux_glibc################################# [ 86%]
   7:MySQL-server-5.6.26-1.linux_glibc################################# [100%]
warning: user mysql does not exist - using root
warning: group mysql does not exist - using root
FATAL ERROR: please install the following Perl modules before executing /usr/bin/mysql_install_db:
Data::Dumper
这里报了两个警告和一个错误,其中警告是提示本机不存在mysql账户和mysql用户组
错误则是提示初始化数据错误
这里我们建立mysql用户,提示都已经存在了,看来在上面警告的时候就已经帮我们安装好了,也可以在开始安装之前就提前安装好,这样就不会警告了
[root@localhost ~]# groupadd mysql
groupadd: group 'mysql' already exists
[root@localhost ~]# useradd -r -g mysql mysql
useradd: user 'mysql' already exists
解决:FATAL ERROR: please install the following Perl modules before executing /usr/bin/mysql_install_db:
Data::Dumper
这个错误暂时不知道什么,不过既然提示安装perl modules,那就进行安装,安装好了在进行初始化
[root@localhost ~]# yum install -y perl-Module-Install.noarch
Loaded plugins: fastestmirror, langpacks
base                                                                                                                                                                    ...中间非常多, 省略
5、修改配置文件
修改配置文件路径
[root@localhost~]# cp /usr/share/mysql/my-default.cnf /etc/my.cnf
在配置文件中增加一下配置项
[root@localhost~]# vim /etc/my.cnf
[mysqld]
default-storage-engine = innodb
innodb_file_per_table
collation-server = utf8_general_ci
init-connect = 'SET NAMES utf8'
character-set-server = utf8
6、初始化数据库,在上面解决掉"FATAL ERROR"即可进行初始化了
[root@localhost~]# /usr/bin/mysql_install_db
Installing MySQL system tables...2016-09-24 16:28:49 0 [Warning] TIMESTAMP with implicit DEFAULT value is deprecated. Please use --explicit_defaults_for_timestamp server option (see documentation for more details).
2016-09-24 16:28:49 0 [Note] /usr/sbin/mysqld (mysqld 5.6.26) starting as process 7938 ...
2016-09-24 16:28:49 7938 [Note] InnoDB: Using atomics to ref count buffer pool pages
...中间省略
The latest information about MySQL is available on the web at

  http://www.mysql.com

Support MySQL by buying support/licenses at http://shop.mysql.com

New default config file was created as /usr/my.cnf and
will be used by default by the server when you start it.
You may edit this file to change server settings

WARNING: Default config file /etc/my.cnf exists on the system
This file will be read by default by the MySQL server
If you do not want to use this, either remove it, or use the
--defaults-file argument to mysqld_safe when starting the server
7、启动mysql服务
[root@localhost~]# service mysql start
Starting MySQL.. ERROR! The server quit without updating PID file (/var/lib/mysql/xxx.pid).
进入到mysql所在的目录可以看到一个.err结尾的问价可以看到具体的错误信息
[root@hadoop3 ~]# cd /var/lib/mysql/
打开之前前几行就看到错误信息
160924 16:44:34 mysqld_safe Starting mysqld daemon with databases from /var/lib/mysql
2016-09-24 16:44:34 0 [Warning] TIMESTAMP with implicit DEFAULT value is deprecated. Please use --explicit_defaults_for_timestamp server option (see documentation for more details).
2016-09-24 16:44:34 0 [Note] /usr/sbin/mysqld (mysqld 5.6.26) starting as process 9816 ...
2016-09-24 16:44:34 9816 [Note] Plugin 'FEDERATED' is disabled.
^G/usr/sbin/mysqld: Can't find file: './mysql/plugin.frm' (errno: 13 - Permission denied)
2016-09-24 16:44:34 9816 [ERROR] Can't open the mysql.plugin table. Please run mysql_upgrade to create it.
2016-09-24 16:44:34 9816 [Note] InnoDB: Using atomics to ref count buffer pool pages...
有可能是权限的关系进入到/var/lib/mysql/mysql下把所有文件改为mysql用户的所属,再次启动成功
[root@localhost mysql]# chown mysql *
[root@localhost mysql]# service mysql start
Starting MySQL. SUCCESS!
设置开机启动
[root@localhost mysql]# chkconfig mysql on
8、登录mysql并且修改密码,首次登录没有密码
[root@localhost~]# mysql -uroot
Welcome to the MySQL monitor.  Commands end with ; or \g.
Your MySQL connection id is 2
Server version: 5.6.26 MySQL Community Server (GPL)

Copyright (c) 2000, 2015, Oracle and/or its affiliates. All rights reserved.

Oracle is a registered trademark of Oracle Corporation and/or its
affiliates. Other names may be trademarks of their respective
owners.

Type 'help;' or '\h' for help. Type '\c' to clear the current input statement.

mysql>
mysql> select host,user,password from user;
+-----------+------+----------+
| host      | user | password |
+-----------+------+----------+
| localhost | root |          |
| 127.0.0.1 | root |          |
| ::1       | root |          |
| localhost |      |          |
+-----------+------+----------+
6 rows in set (0.00 sec)
修改用户密码
mysql> update user set password=password("123456") where user='root';
Query OK, 4 rows affected (0.00 sec)
Rows matched: 4  Changed: 4  Warnings: 0
mysql>  flush privileges;
Query OK, 0 rows affected (0.00 sec)
退出重新登录
[root@localhost~]# mysql -uroot -p
Enter password:  [输入刚刚set的密码即可]
9、设置mysql允许远程登录
mysql> update user set host='%' where user='root' and host='localhost';
Query OK, 1 row affected (0.00 sec)
Rows matched: 1  Changed: 1  Warnings: 0

mysql> flush privileges;
Query OK, 0 rows affected (0.00 sec)
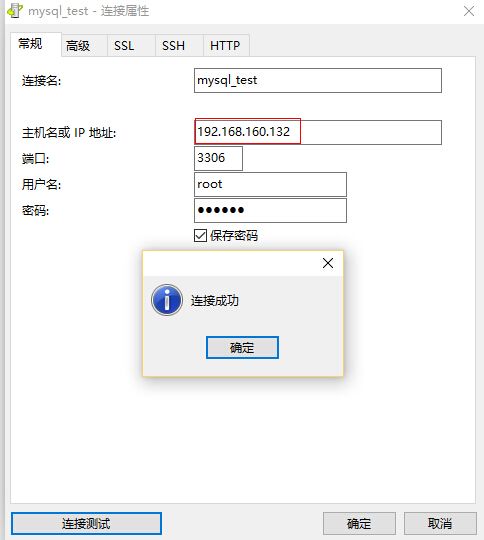
打开本地的navicat for mysql,然后添加新的连接,输入用户名root和刚刚设置的密码,其中ip填写虚拟机地址,然后连接测试连接成功!!!!
