【IOS学习】Core Graphics 框架学习笔记,以及demo
Core Graphics是基于C的API,可以用于一切绘图操作
Core Graphics 和Quartz 2D的区别
quartz是一个通用的术语,用于描述在IOS和MAC OS X ZHONG 整个媒体层用到的多种技术 包括图形、动画、音频、适配。
Quart 2D 是一组二位绘图和渲染API,Core Graphic会使用到这组API
Quartz Core 专指Core Animation用到的动画相关的库、API和类
点和像素的对比
系统拥有坐标系,如320*480 硬件有retain屏幕和非retain屏:如320*480、640*960
Core Graphics 使用的是系统的坐标系来绘制图片。在分辨率为640*960手机上绘制图片时,实际上Core Graphics 的坐标是320*480。这个时候每个坐标系上的点,实际上拥有两个像素。
图形上下文
Core Graphics 使用图形上下文进行工作,这个上下文的作用像画家的画布一样。
在图形上下文之外是无法绘图的,我们可以自己创建一个上下文,但是性能和内存的使用上,效率是非常低得。
我们可以通过派生一个UIView的子类,获得它的上下文。在UIView中调用drawRect:方法时,会自动准备好一个图形上下文,可以通过调用
UIGraphicsGetCurrentContext()来获取。 因为它是运行期间绘制图片,我们可以动态的做一些额外的操作
Core Graphics的优点
快速、高效,减小应用的文件大小。同时可以自由地使用动态的、高质量的图形图像。 使用Core Graphics,可以创建直线、路径、渐变、文字与图像等内容,并可以做变形处理。
绘制自定义视图
drawRect:是系统的方法,不要从代码里面直接调用 drawRect:,而应该使用setNeedsDisplay重绘.
需要知道的术语
- 路径 path
- 阴影 shadow
- 笔画 stroke
- 剪裁路径 Clip Path
- 线条粗细 Line Width
- 混合模式 Blend Mode
- 填充色 Fill Color
- 当前形变矩阵 Current Transform Matrix
- 线条图案 Line Dash
图形上下文栈
一个图形上下文好比是画布上的一副扁平的图画 执行绘画动作,这些动作是在同一个图层上完成的。 图形上下文不允许将内容分不到多个图层中,如果有需求在不同图层上画,可以考虑使用视图层次结构,创建多个UIView,并将他们作为父视图的子视图
图形上下文栈可以把图形上下文的当前状态保存下来,并在执行一些动作后再次恢复回来
CGContextSaveGState();
CGContextStoreGState();
路径、渐变、文字和图像
1. 使用UIBezierPath创建路径
2. 手动创建路径 moveToPoint addLineToPoint addArcWithCenter addCurveToPoint
渐变,渐变可以在指定方向上,以可变的比率在一系列颜色之间转化
线性渐变:沿着一条定义好了起点和重点的直线方向,呈线性变化。如果这条线有一定角度,线性渐变也会沿相同路径变化
放射渐变:颜色顺着两个原型之间的方向线性变化,这两个园为起始圆和终止圆,每隔圆都有自己的圆心和班级
文字
darwAtPoint
drawInRect
图像
Core Graphics 不会保持图像的长宽比例,Core Graphics会将图像的边界设置为CGrect,不管图片是否变形 darwAtPoint drawInRect
生成自定义的视图
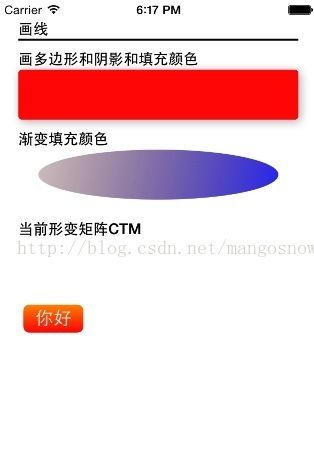
- (void)drawRect:(CGRect)rect
{


    CGContextRef context = UIGraphicsGetCurrentContext();
    CGContextSetStrokeColorWithColor(context, [UIColor whiteColor].CGColor);

    NSString *str1 = @"画线";
    [self drawText:str1 atPoint:CGPointMake(20.0, 20.0) FontSize:15];
    [self drawLineOnContext:context FromPoint:CGPointMake(20.0, 40.0)  toPoint:CGPointMake(300.0, 40.0)];

    NSString *str2 = @"画多边形和阴影和填充颜色";
    [self drawText:str2 atPoint:CGPointMake(20.0, 50.0) FontSize:15];

    UIBezierPath *btnPath = [UIBezierPath bezierPathWithRoundedRect:CGRectMake(20.0, 70.0, 280.0, 50) cornerRadius:4];

    do {
        CGContextSaveGState(context);
        //CGContextSetFillColorWithColor(context, [UIColor whiteColor].CGColor);
        CGContextSetShadowWithColor(context, CGSizeMake(-1, -1), 3.0, [UIColor whiteColor].CGColor);
        CGContextAddPath(context, btnPath.CGPath);
        CGContextFillPath(context);
        CGContextRestoreGState(context);
    } while (0);

    //设置阴影
    CGContextSetShadow(context, CGSizeMake(2, 2), 10);
    //添加高亮效果
    CGContextSetFillColorWithColor(context, [UIColor redColor].CGColor);
    //开始描边
    [[UIColor blackColor]setStroke];
    //[btnPath stroke];
    //开始填充颜色
    [btnPath fill];

    NSString *str3 = @"渐变填充颜色";
    //去除阴影
    CGContextSetShadow(context, CGSizeMake(0, 0), 0);
    [self drawText:str3 atPoint:CGPointMake(20.0, 130.0) FontSize:15];


    CGContextSaveGState(context);
    CGRect newRect = CGRectMake(40.0, 150, 240, 50);
    UIBezierPath *newPath = [UIBezierPath bezierPathWithOvalInRect:newRect];
    //CGContextAddRect(context, newRect);
    [newPath addClip];

    CGColorSpaceRef colorSpace = CGColorSpaceCreateDeviceRGB();
    NSArray *colors = @[(__bridge id)[UIColor colorWithRed:0.3 green:0.0 blue:0.0 alpha:0.2].CGColor,
                        (__bridge id)[UIColor colorWithRed:0.0 green:0.0 blue:1.0 alpha:0.8].CGColor];
    const CGFloat locations[] = {0.0, 1.0};
    CGGradientRef gradient = CGGradientCreateWithColors(colorSpace, (__bridge CFArrayRef)colors, locations);
    CGContextDrawLinearGradient(context, gradient, CGPointMake(40.0, 150.0), CGPointMake(280.0, 200.0), 0);

    CGContextRestoreGState(context);


    NSString *str4 = @"当前形变矩阵CTM";
    [self drawText:str4 atPoint:CGPointMake(20.0, 220.0) FontSize:15];

    CGContextTranslateCTM(context, 0, rect.size.height);
    CGContextScaleCTM(context, 1.0, -1.0);
    // http://www.cnblogs.com/delonchen/archive/2011/08/03/iostransform.html

    CFRelease(colorSpace);
    CFRelease(gradient);
}
效果图如下
有助于Core Graphics 的第三方工具:
有代码工具 PaintCode 可以生成相应的 Core Graphics 代码,可以大大加快我们的开发效率。如下图
Demo 下载地址:https://github.com/caigee/iosdev_sample
下的DemoCoreGraphics
厚吾(http://blog.csdn.net/mangosnow)
本文遵循“署名-非商业用途-保持一致”创作公用协议

