Centos下nfs+rpcbind实现服务器之间的文件共享
这里服务器环境为Centos6.8 64位,并关闭了防火墙。
NFS(Network File System)即网络文件系统,是FreeBSD支持的文件系统中的一种,它允许网络中的计算机之间通过TCP/IP网络共享资源。在NFS的应用中,本地NFS的客户端应用可以透明地读写位于远端NFS服务器上的文件,就像访问本地文件一样。
【1】安装nfs和rpcbind
① 检测是否已经安装
[root@localhost softinstall]# rpm -aq | grep nfs
[root@localhost softinstall]# rpm -aq | grep rpcbind
② 安装nfs和rpcbind
yum -y install nfs-utils rpcbind
[root@localhost softinstall]# rpm -aq | grep rpcbind
rpcbind-0.2.0-16.el6.x86_64
[root@localhost softinstall]# rpm -aq | grep nfs
nfs-utils-lib-1.1.5-13.el6.x86_64
nfs-utils-1.2.3-78.el6_10.1.x86_64
【2】配置nfs服务机
① 创建需要共享的目录
这里使用/mnt/app目录:
mkdir -p /mnt/app
② 配置nfs的配置文件
命令:
vim /etc/exports
在这个文件中添加需要输出的目录,如:
/mnt/app 192.168.73.130(rw)
/mnt/app 192.168.73.131(rw,sync,no_root_squash,no_subtree_check)

#/mnt/app:表示的是nfs服务器需要共享给其他客户端服务器的文件夹
#192.168.73.130: 表示可以挂载服务器目录的客户端ip
#(rw):表示该客户端对共享的文件具有读写权限
关于其他权限说明:
- rw:可读写的权限;
- ro:只读的权限;
- no_root_squash:登入到NFS主机的用户如果是root,该用户即拥有root权限;(不添加此选项ROOT只有RO权限)
- root_squash:登入NFS主机的用户如果是root,该用户权限将被限定为匿名使用者nobody;
- all_squash:不管登陆NFS主机的用户是何权限都会被重新设定为匿名使用者nobody。
- anonuid:将登入NFS主机的用户都设定成指定的user id,此ID必须存在于/etc/passwd中。
- anongid:同anonuid,但是变成group ID就是了!
- sync:资料同步写入存储器中。
- async:资料会先暂时存放在内存中,不会直接写入硬盘。
- insecure:允许从这台机器过来的非授权访问。
刷新配置立即生效
exportfs -r
③ 启动服务检测服务状态
设置开机启动
chkconfig nfs on
chkconfig rpcbind on
启动rpcbind 服务
service rpcbind start
启动nsf服务
service nfs start
[root@localhost mnt]# rpcinfo -p localhost
   program vers proto   port  service
    100000    4   tcp    111  portmapper
    100000    3   tcp    111  portmapper
    100000    2   tcp    111  portmapper
    100000    4   udp    111  portmapper
    100000    3   udp    111  portmapper
    100000    2   udp    111  portmapper
    100011    1   udp    875  rquotad
    100011    2   udp    875  rquotad
    100011    1   tcp    875  rquotad
    100011    2   tcp    875  rquotad
    100005    1   udp  52791  mountd
    100005    1   tcp  42294  mountd
    100005    2   udp  55511  mountd
    100005    2   tcp  54774  mountd
    100005    3   udp  50872  mountd
    100005    3   tcp  36770  mountd
    100003    2   tcp   2049  nfs
    100003    3   tcp   2049  nfs
    100003    4   tcp   2049  nfs
    100227    2   tcp   2049  nfs_acl
    100227    3   tcp   2049  nfs_acl
    100003    2   udp   2049  nfs
    100003    3   udp   2049  nfs
    100003    4   udp   2049  nfs
    100227    2   udp   2049  nfs_acl
    100227    3   udp   2049  nfs_acl
    100021    1   udp  46920  nlockmgr
    100021    3   udp  46920  nlockmgr
    100021    4   udp  46920  nlockmgr
    100021    1   tcp  39362  nlockmgr
    100021    3   tcp  39362  nlockmgr
    100021    4   tcp  39362  nlockmgr
检测服务状态
service nfs status
service rpcbind status
查看服务开机启动状态
[root@localhost mnt]# chkconfig --list |grep nfs
nfs             0:off   1:off   2:off   3:off   4:off   5:off   6:off
nfs-rdma        0:off   1:off   2:off   3:off   4:off   5:off   6:off
nfslock         0:off   1:off   2:off   3:on    4:on    5:on    6:off

[root@localhost mnt]# chkconfig --list |grep rpcbind
rpcbind         0:off   1:off   2:on    3:on    4:on    5:on    6:off
可以手动设置服务运行级别,如下实例:
[root@localhost mnt]# chkconfig --level 2345 nfs on

[root@localhost mnt]# chkconfig --list |grep nfs
nfs             0:off   1:off   2:on    3:on    4:on    5:on    6:off
nfs-rdma        0:off   1:off   2:off   3:off   4:off   5:off   6:off
nfslock         0:off   1:off   2:off   3:on    4:on    5:on    6:off
④ 检测配置文件
如下所示,打印配置文件内容:
[root@localhost mnt]#  showmount -e
Export list for localhost.localdomain:
/mnt/app 192.168.73.130
注意:在执行这个命令的时候如果出现错误,说明DNS不能解析当前的服务器,那就是hosts文件没有配置。
【3】客户端挂载NFS中共享的目录
① 创建本地路径(也就是挂载点)
mkdir /mnt/app
② 安装并启动nfs与rpcbind服务
yum -y  install nfs-utils rpcbind
chkconfig nfs on
chkconfig rpcbind on
service nfs start
service rpcbind start
③ 查看服务器抛出的共享目录信息
[root@localhost ~]# showmount -e 192.168.73.129
Export list for 192.168.73.129:
/mnt/app 192.168.73.130
④ 挂载目录
为了提高NFS的稳定性,使用TCP协议挂载,NFS默认用UDP协议
mount -t nfs -o vers=3 192.168.73.129:/mnt/app /mnt/app -o proto=tcp -o nolock

#服务器IP:服务器共享路径 本机挂载点
#192.168.73.129:/mount/app /mount/app
服务器(192.168.73.129)创建文件:
cd /mnt/app
touch test.txt
客户机验证:
cd /mnt/app
ll
客户机执行命令
umount /mnt/app
这里可以联想服务器挂载磁盘,设置开机挂载、取消挂载同样操作。
⑦ 查看挂载的状态
命令:
mount | grep nfs
实例:
[root@localhost app]# mount | grep nfs
sunrpc on /var/lib/nfs/rpc_pipefs type rpc_pipefs (rw)
nfsd on /proc/fs/nfsd type nfsd (rw)
192.168.73.129:/mnt/app on /mnt/app type nfs (rw,vers=3,proto=tcp,nolock,addr=192.168.73.129)
【4】固定nfs服务端口
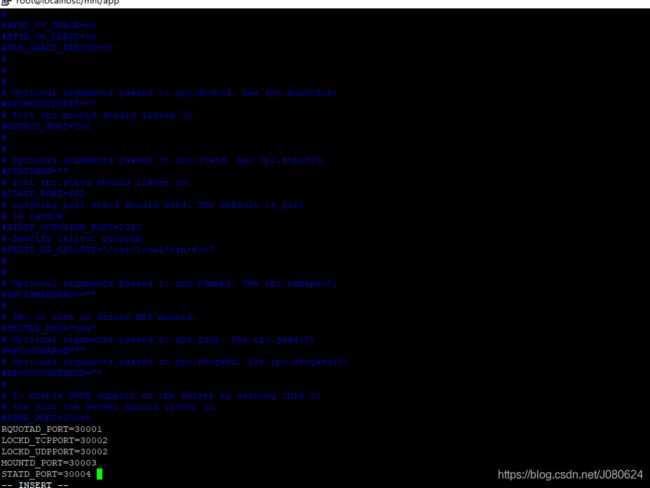
NFS启动时会随机启动多个端口并向RPC注册,这样如果使用防火墙对NFS端口进行限制就会有点麻烦,可以更改配置文件固定NFS服务相关端口。
分配端口,编辑配置文件:
[root@localhost app]# vim /etc/sysconfig/nfs
添加如下(或者可以直接从配置文件里面修改):
RQUOTAD_PORT=30001
LOCKD_TCPPORT=30002
LOCKD_UDPPORT=30002
MOUNTD_PORT=30003
STATD_PORT=30004
[root@localhost app]# service nfs restart
Shutting down NFS daemon:                                  [  OK  ]
Shutting down NFS mountd:                                  [  OK  ]
Shutting down NFS quotas:                                  [  OK  ]
Shutting down NFS services:                                [  OK  ]
Shutting down RPC idmapd:                                  [  OK  ]
Starting NFS services:                                     [  OK  ]
Starting NFS quotas:                                       [  OK  ]
Starting NFS mountd:                                       [  OK  ]
Starting NFS daemon:                                       [  OK  ]
Starting RPC idmapd:                                       [  OK  ]
查看服务注册状态
[root@localhost app]# rpcinfo -p localhost
   program vers proto   port  service
    100000    4   tcp    111  portmapper
    100000    3   tcp    111  portmapper
    100000    2   tcp    111  portmapper
    100000    4   udp    111  portmapper
    100000    3   udp    111  portmapper
    100000    2   udp    111  portmapper
    100011    1   udp  30001  rquotad
    100011    2   udp  30001  rquotad
    100011    1   tcp  30001  rquotad
    100011    2   tcp  30001  rquotad
    100005    1   udp  30003  mountd
    100005    1   tcp  30003  mountd
    100005    2   udp  30003  mountd
    100005    2   tcp  30003  mountd
    100005    3   udp  30003  mountd
    100005    3   tcp  30003  mountd
    100003    2   tcp   2049  nfs
    100003    3   tcp   2049  nfs
    100003    4   tcp   2049  nfs
    100227    2   tcp   2049  nfs_acl
    100227    3   tcp   2049  nfs_acl
    100003    2   udp   2049  nfs
    100003    3   udp   2049  nfs
    100003    4   udp   2049  nfs
    100227    2   udp   2049  nfs_acl
    100227    3   udp   2049  nfs_acl
    100021    1   udp  30002  nlockmgr
    100021    3   udp  30002  nlockmgr
    100021    4   udp  30002  nlockmgr
    100021    1   tcp  30002  nlockmgr
    100021    3   tcp  30002  nlockmgr
    100021    4   tcp  30002  nlockmgr
【5】客户机设置系统开机挂载磁盘
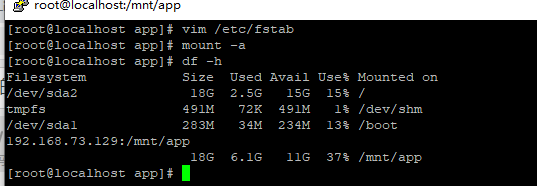
通过修改/etc/fstab实现挂载,添加完成后执行mount –a 即刻生效。
vim /etc/fstab

#添加配置如下
192.168.73.129:/mnt/app /mnt/app                nfs     defaults        0 0
参考博文:
Linux服务管理与chkconfig命令
Linux添加硬盘并进行分区、格式化、挂载及卸载


