深度学习主机环境搭建:Ubuntu LTS 16.04 + Nvidia GTX 1080
1.安装Ubuntu LTS 16.04
在官网下载Ubuntu LTS 16.04镜像,使用U盘工具,制作启动盘。安装过程中若出现黑屏,按‘e’进入启动设置,将Boot Options ed boot=...initrd=/casper/initrd.lz quiet splash ---
Boot Options ed boot=... initrd=/casper/initrd.lz quietsplash -nomodeset
sudo vim /etc/default/grub
#The resolution used on graphical terminal
# note that you can use only modes which your graphic card supports via VBE
# you can see them in real GRUB with the command 'vbeinfo'
# GRUB_GFXMODE=640x480
将 GRUB_GFXMODE=640x480 改为 GRUB_GFXMODE=1024x768
然后用下面命令更新:
sudo update-grub
2.安装SSH Server
用如下命令安装SSHServer,这样可以远程ssh访问这台GTX1080主机:
sudo apt-get install openssh-server
3.更新Ubuntu LTS 16.04源,此处用的是中科大的源
cd /etc/apt/
sudo cp sources.list sources.list.bak
sudo vi sources.list
把下面的这些源添加到source.list文件头部:
deb http://mirrors.ustc.edu.cn/ubuntu/ xenial main restricted universe multiverse
deb http://mirrors.ustc.edu.cn/ubuntu/ xenial-security main restricted universe multiverse
deb http://mirrors.ustc.edu.cn/ubuntu/ xenial-updates main restricted universe multiverse
deb http://mirrors.ustc.edu.cn/ubuntu/ xenial-proposed main restricted universe multiverse
deb http://mirrors.ustc.edu.cn/ubuntu/ xenial-backports main restricted universe multiverse
deb-src http://mirrors.ustc.edu.cn/ubuntu/ xenial main restricted universe multiverse
deb-src http://mirrors.ustc.edu.cn/ubuntu/ xenial-security main restricted universe multiverse
deb-src http://mirrors.ustc.edu.cn/ubuntu/ xenial-updates main restricted universe multiverse
deb-src http://mirrors.ustc.edu.cn/ubuntu/ xenial-proposed main restricted universe multiverse
deb-src http://mirrors.ustc.edu.cn/ubuntu/ xenial-backports main restricted universe multiverse
最后更新源和更新已安装的包:
sudo apt-get update
sudo apt-get upgrade
4.安装NVIDIA驱动
这是整个过程中最困难的一步,首先去NVIDIA官网下载相应的驱动NVIDIA-Linux-x86_64-375.82.run放在/home/its/目录下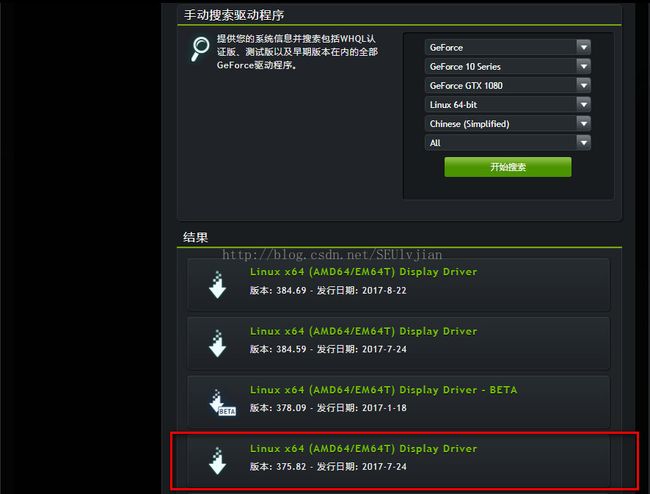
(1)Ctrl+alt+F1进入字符界面,关闭图形界面
sudo service lightdm stop
(2)安装NVIDIA驱动
改变驱动的可执行权限后安装NVIDIA驱动:sudo chmod a+x NVIDIA-Linux-x86_64-375.82.run
sudo sh ./ NVIDIA-Linux-x86_64-375.82.run
选择accept之后继续,会弹出nouveau错误,错误显示必须禁用系统自带的nouveau模块,在/etc/modprobe.d/blacklist.conf文件中,将nouveau模块加入。在blacklist.conf文件的末尾加上
blacklist nouveau
如果加入黑名单后nouveau模块还存在的话,可以直接将这个内核模块挪走,命令为:
sudo rm /lib/modules/4.8.0-36-generic/kernel/drivers/gpu/drm/nouveau/nouveau.ko
sudo rm /lib/modules/4.8.0-41-generic/kernel/drivers/gpu/drm/nouveau/nouveau.ko
sudo update-initramfs -u #注意:使用tab键补全命令行,具体环境具体分析
sudo service lightdm start # 退出字符界面
sudo reboot # 重启之后画质很粗糙,说明nouveau模块已经被移除了
(3)回到第一步,继续安装
accept之后会弹出“would you like to runthenvidia-xconfig utility to automatically update your configurtionfile so thatthe nvidia driver will be used when you restartX?....”
选择“yes” 启用nvidia的配置文件,以便在下次重启后即使得nvidia的驱动生效。
(4)重启NVIDIA驱动
sudo service lightdm start
(5)查看是否安装成功
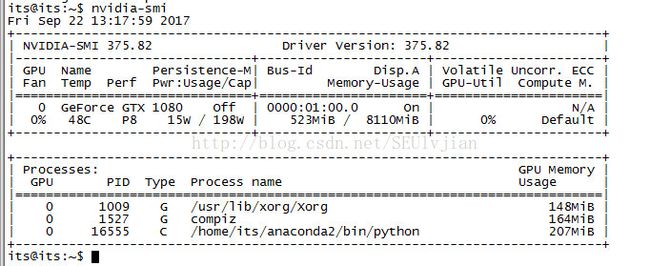
安装成功后,输入如下命令查看NVIDIA驱动是否安装成功,出现如下图所示的界面表示安装成功nvidia-smi
6.安装Cuda 8.0
在官网页面下载cuda 8.0,选择如下图所示的版本,然后将下载的文件拷贝至/home/its/下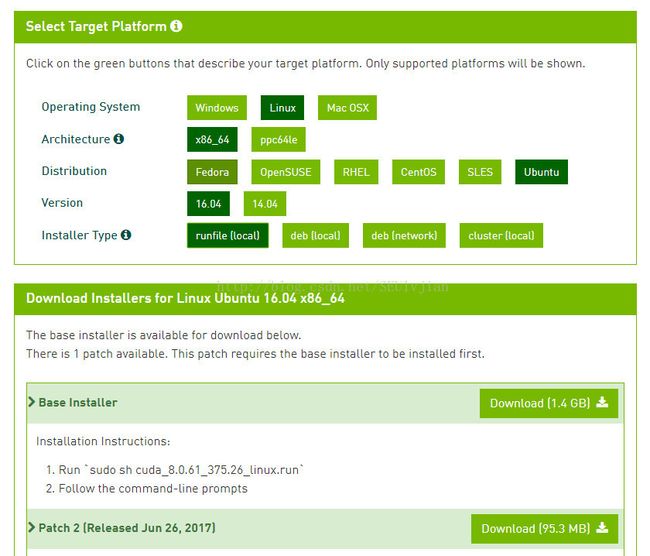
(1)按照NVIDIA官方给出的方法安装cuda 8.0:
sudo sh cuda_8.0.61_375.26_linux.run
然后出现一系列提示,其中如下图红色字体表示缺少某些库文件:
Do you accept the previously read EULA?
accept/decline/quit: accept
Install NVIDIA Accelerated Graphics Driver for Linux-x86_64 361.62?
(y)es/(n)o/(q)uit: n(备注:一定要选择n)
Install the CUDA 8.0 Toolkit?
(y)es/(n)o/(q)uit: y
Enter Toolkit Location
[ default is /usr/local/cuda-8.0 ]:
Do you want to install a symbolic link at /usr/local/cuda?
(y)es/(n)o/(q)uit: y
Install the CUDA 8.0 Samples?
(y)es/(n)o/(q)uit: y
Enter CUDA Samples Location
[ default is /home/its ]:
Installing the CUDA Toolkit in /usr/local/cuda-8.0 …
Missing recommended library: libGLU.so
Missing recommended library: libX11.so
Missing recommended library: libXi.so
Missing recommended library: libXmu.so
Installing the CUDA Samples in /home/its …
Copying samples to /home/its/NVIDIA_CUDA-8.0_Samples now…
Finished copying samples.
===========
= Summary =
===========
Driver: Not Selected
Toolkit: Installed in /usr/local/cuda-8.0
Samples: Installed in /home/its, but missing recommended libraries
Please make sure that
- PATH includes /usr/local/cuda-8.0/bin
- LD_LIBRARY_PATH includes /usr/local/cuda-8.0/lib64, or, add /usr/local/cuda-8.0/lib64 to /etc/ld.so.conf and run ldconfig as root
To uninstall the CUDA Toolkit, run the uninstall script in /usr/local/cuda-8.0/bin
Please see CUDA_Installation_Guide_Linux.pdf in /usr/local/cuda-8.0/doc/pdf for detailed information on setting up CUDA.
***WARNING: Incomplete installation! This installation did not install the CUDA Driver. A driver of version at least 361.00 is required for CUDA 8.0 functionality to work.
To install the driver using this installer, run the following command, replacing with the name of this run file:
sudo .run -silent -driver
Logfile is /tmp/cuda_install_2961.log
(2)安装缺少的库
输入如下命令安装缺少的库:sudo apt-get install freeglut3-dev build-essential libx11-dev libxmu-dev libxi-devlibgl1-mesa-glx libglu1
(3)设置环境变量
在终端输入这两句:export PATH=/usr/local/cuda-8.0/bin:$PATH
export LD_LIBRARY_PATH=/usr/local/cuda-8.0/lib64:$LD_LIBRARY_PATH
然后输入如下命令是环境变量生效
sudo gedit /etc/profile
sudo ldconfig //环境变量立即生效
7.cudnn安装
具体的cudnn安装如下,就是把文件拷贝到cuda目录,改变一下权限。
tar xvzf cudnn-8.0-linux-x64-v5.1.tgz # 这里是的版本,需要解压下载的对应版本的文件 #解压后的文件夹名字是cuda
sudo cp cuda/include/cudnn.h /usr/local/cuda/include
sudo cp cuda/lib64/libcudnn* /usr/local/cuda/lib64
sudo chmod a+r /usr/local/cuda/include/cudnn.h /usr/local/cuda/lib64/libcudnn*
8.安装Anaconda
去anaconda官网下载需要版本的anaconda,下载完后执行如下命令: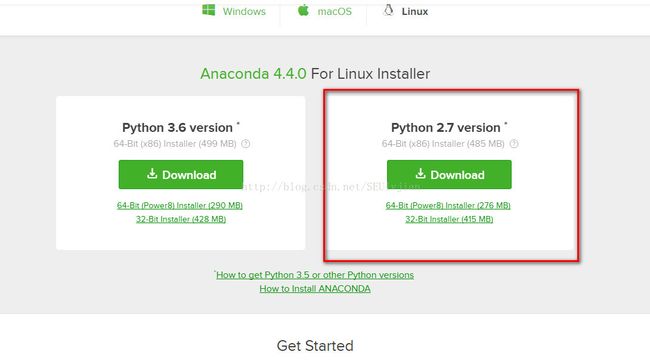
sudo bash Anaconda2-4.4.0-Linux-x86_64.sh
source ~/.bashrc
9.安装TensorFlow
这里用anaconda自带的pip命令安装TensorFlow,首先在终端输入:cd /home/its/anaconda2/bin
sudo ./pip install https://storage.googleapis.com/tensorflow/linux/gpu/tensorflow_gpu-1.0.0-cp27-none-linux_x86_64.whl
import tensorflow as tf
出现引用cuda库的说明,说明TensorFlow的gpu版安装成功。