Vue从入门到不能放弃 ------ 基础篇
文章目录
- 1. 模板语法
- 2. v-text与v-html指令
- 3. v-show指令
- 4. v-if与v-else指令
- 5. 数据驱动
- 6. v-bind指令
- 7. v-on指令
- 8. v-for指令
- 9. 轮播图实现
- 10. Vue中使用AJAX
- 11. 音乐播放器实现
- 12. 侦听器watch
- 13. 计算属性computed
- 14. this指向问题
- 15. v-model的双向数据绑定
- 16. 子组件的使用
- 17. 注册组件
- 18. slot内容分发
1. 模板语法
使用双花括号作为模板,模板中可以是变量、常量以及表达式:
<html lang="en">
<head>
    <meta charset="UTF-8">
    <meta name="viewport"
          content="width=device-width, user-scalable=no, initial-scale=1.0, maximum-scale=1.0, minimum-scale=1.0">
    <meta http-equiv="X-UA-Compatible" content="ie=edge">
    <title>Documenttitle>

    <script src="vue.js">script>
head>
<body>
<div id="name">
    <div>name:{{msg}}div>

    <div>age:{{23}}div>
    <div>email:{{'[email protected]'}}div>
    <div>运算:{{123+456}}div>
    <div>对象:{{ {'name':'thanlon'} }}div>
    <div>喜欢:{{person.name}}div>
    <div>三元运算:{{1>2?true:false}}div>
    <div>字符串反转:{{msgs.split('').reverse().join('')}}div>
div>
<script>
    //实例化对象
    new Vue({
        el: '#name',
        data: {
            // 声明数据属性
            msg: 'thanlon',
            person: {
                name: 'Aurora'
            },
            //字符串split方法把字符串转换为数组,数组reverse方法反转数组元素,再使用数组join方法转换为字符串
            msgs: 'hello world!'
        }
    })
script>
body>
html>
<html lang="en">
<head>
    <meta charset="UTF-8">
    <meta name="viewport"
          content="width=device-width, user-scalable=no, initial-scale=1.0, maximum-scale=1.0, minimum-scale=1.0">
    <meta http-equiv="X-UA-Compatible" content="ie=edge">
    <title>Documenttitle>
head>
<body>
<div id="content">
    {{add(123,456)}}
div>
body>
<script src="vue.js">script>
<script>
    //{key:value}是对象
    new Vue({
        el: '#content', //会在body中找
        data() {
            return {
                msg: ''
            }
        },
        //函数在methods中,methods中也是一个对象
        methods: {
            add(x, y) {
                //return x + y; // 如果没有返回值,什么也不返回,也不会报错
                return x + y;
            }
        }
    })
script>
html>
2. v-text与v-html指令
PS:data部分可以有两种写法!
new Vue({
        el:'#content',
        data:function () {
            return{
                msg:''
            }
        }
    })
 new Vue({
        el: '#content',
        data() {
            return {
                msg: ''
            }
        }
    })
一般使用第二种写法就可以的,可以少写关键字function!
v-text相当于innerText,v-html相当于innerHtml,通过例子来提现它们的区别:
<div id="content">
    <div>name:{{msg}}div>
    v-text:<span v-text="msg">span><br>
    v-html:<span v-html="msg">span>
div>
<script src="vue.js">script>
<script>
    new Vue({
        el: '#content', //会在body中找
        data() {
        //data是一个函数,函数中return一个对象,可以是空对象,但是不能不return
            return {
                msg: 'thanlon'
            }
        }
    })
script>
3. v-show指令
v-show 相当于 style.display,true是显示,false是不显示的。通过一个例子来提现:
<html lang="en">
<head>
    <meta charset="UTF-8">
    <meta name="viewport"
          content="width=device-width, user-scalable=no, initial-scale=1.0, maximum-scale=1.0, minimum-scale=1.0">
    <meta http-equiv="X-UA-Compatible" content="ie=edge">
    <title>Documenttitle>
    <style>
        .box {
            width: 100px;
            height: 100px;
            background-color: green;
        }
    style>
    <script src="//cdn.jsdelivr.net/npm/vue/dist/vue.js">script>
head>
<body>
<div id="content">
    <div class="box" v-show="is_show">div>
    <button v-on:click="handler_click()">隐藏button>
div>
body>
<script src="vue.js">script>
<script>
    //el、data是vue的属性,msg、num是自己定义的属性,自己提供的属性会用$
    //{key:value}是对象
    new Vue({
        el: '#content', //会在body中找
        data() {
            return {//数据
                // is_show: false
                is_show: 1 == 1
            }
        },
        //函数在methods中,methods中也是一个对象
        methods: {
            handler_click() {
                //数据驱动,改了属性,自己去dom操作
                // console.log(this);
                // this.is_show = false;
                this.is_show = !this.is_show;//驱动:更改数据操作;数据驱动是更改数据驱动视图,更改完数据后改变视图
            }
        }
    })
script>
html>
v-if 与 v-show 的对比:v-if是“真正”的条件渲染,因为它会确保在切换过程中条件块内的事件监听器和子组件适当地被销毁和重建;v-if 也是惰性的,如果在初始渲染时条件为假,则什么也不做 直到条件第一次变为真时才会开始渲染条件块。相比之下,v-show 就简单得多,不管初始条件是什么,元素总是会被渲染,并且只是简单地基于 CSS 进行切换。一般来说,v-if 有更高的切换开销,而 v-show 有更高的初始渲染开销。因此,如果需要非常频繁地切换,则使用v-show较好;如果在运行时条件很少改变,则使用v-if较好。
4. v-if与v-else指令
v-if 和 v-else的组合使用:
<body>
<div id="content">
    <div v-if="Math.random()>0.5">
        v-if
    div>
    <div v-else>
        v-else
    div>
div>
body>
<script src="vue.js">script>
<script>
    new Vue({
        el: '#content'
    })
script>
5. 数据驱动
数据驱动通过更改视图中数据的方式改变视图,驱动就是更改数据操作。数据模式驱动遵循的设计模式是MVVM,即Model、View和ViewModel。Model指的是data中定义的数据,View指各种html标签,ViewModel指的是指令系统、模板语法,使用这些来实现数据渲染。
6. v-bind指令
v-bind 可以用来绑定元素的属性,用来改变元素的值,可以使用冒号简写。实例如下:
<html lang="en">
<head>
    <meta charset="UTF-8">
    <title>Titletitle>
    <style>
        .active {
            color: red;
        }
    style>
head>
<body>
<div id="app">
    <button @click="handleChange">切换字体颜色button>
    <div :class="{active:isActive}">改变我的颜色吧!div>
div>
body>
<script src="//cdn.jsdelivr.net/npm/vue/dist/vue.js">script>
<script>
    //数据驱动视图,MVVM:Model、view、ViewMode
    new Vue({
        el: '#app',
        data() {
            //data是一个函数,函数中return一个对象,可以是空对象,但不能不return
            return {
                isActive: true
            }
        },
        methods: {
            handleChange() {
                this.isActive = !this.isActive;
            }
        }
    })
script>
html>
7. v-on指令
在 v-bind 部分其实已经使用了v-on,v-on是用来定义元素事件的,可以使用@符号简写:
<html lang="en">
<head>
    <meta charset="UTF-8">
    <title>Titletitle>
    <style>
        .active {
            color: red;
        }
    style>
head>
<body>
<div id="app">
    <button @mouseenter="handleEnter" @mouseleave="handleCLeave">切换字体颜色button>
    <div :class="{active:isActive}">改变我的颜色吧!div>
div>
body>
<script src="//cdn.jsdelivr.net/npm/vue/dist/vue.js">script>
<script>
    //数据驱动视图,MVVM:Model、view、ViewMode
    new Vue({
        el: '#app',
        data() {
            //data是一个函数,函数中return一个对象,可以是空对象,但不能不return
            return {
                isActive: true
            }
        },
        methods: {
            handleEnter() {
                // this.isActive = !this.isActive;
                this.isActive = false;
            },
            handleCLeave() {
                this.isActive = true;
            }
        }
    })
script>
html>
8. v-for指令
我们可以用 v-for 指令基于一个数组来渲染一个列表。v-for 指令需要使用 item in items 形式的特殊语法,其中 items 是源数据数组,而 item 则是被迭代的数组元素的别名:
<html lang="en">
<head>
    <meta charset="UTF-8">
    <title>Titletitle>
head>
<body>
<div id="app">
    <ul v-if="data.status === 'ok'">
        <li v-for="(item,index) in data.users" :key="item.id">{{item.id}}--{{item.name}}--{{item.age}}li>
    ul>
    <div v-for="(value,key) in person">
        {{key}}--{{value}}
    div>
div>
body>
<script src="//cdn.jsdelivr.net/npm/vue/dist/vue.js">script>
<script>
    new Vue({
        el: '#app',
        data() {
            //data是一个函数,函数中return一个对象,可以是空对象,但不能不return
            return {
                data: {
                    status: 'ok',
                    users: [
                        {id: 1, name: 'erics', age: 23},
                        {id: 2, name: 'thanlon', age: 24},
                    ]
                },
                person:{
                    name:'erics'
                }
            }
        }
    })
script>
html>
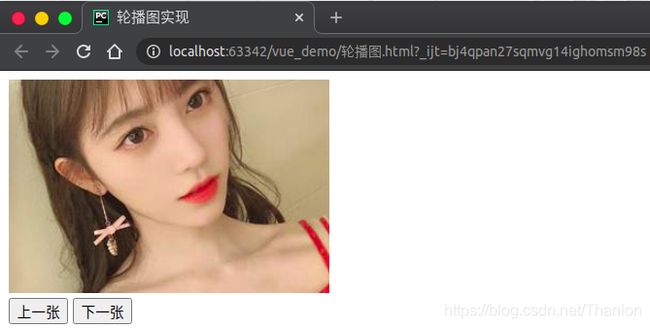
9. 轮播图实现
<html lang="en">
<head>
    <meta charset="UTF-8">
    <title>Titletitle>
    <script src="//cdn.jsdelivr.net/npm/vue/dist/vue.js">script>
head>
<body>
<div id="app">
    <img :src="images[currentIndex].imgSrc" alt="">
    <br>
    <button @click="prevHandler">上一张button>
    <button @click="nextHandler">下一张button>
div>
<script>
    let vm = new Vue({
        el: '#app',
        data() {
            return {
                images: [
                    {
                        id: 1,
                        imgSrc: 'https://ss2.bdstatic.com/70cFvnSh_Q1YnxGkpoWK1HF6hhy/it/u=2040525207,1848335555&fm=26&gp=0.jpg'
                    },
                    {
                        id: 2,
                        imgSrc: 'https://ss0.bdstatic.com/70cFuHSh_Q1YnxGkpoWK1HF6hhy/it/u=625783906,2390041116&fm=11&gp=0.jpg'
                    },
                    {
                        id: 3,
                        imgSrc: 'https://ss1.bdstatic.com/70cFuXSh_Q1YnxGkpoWK1HF6hhy/it/u=3472372044,2573289519&fm=11&gp=0.jpg'
                    },
                ],
                currentIndex: 0
            }
        },
        methods: {
            prevHandler() {
                this.currentIndex--;
                if (this.currentIndex === -1) {
                    this.currentIndex = 2
                }
            },
            nextHandler() {
                this.currentIndex++;
                if (this.currentIndex === 3) {
                    this.currentIndex = 0
                }
            }
        }
    })
script>
body>
html>

methods中的函数的参数中其实省略了e,使用e.target可以知道调用当前事件的元素:
<html lang="en">
<head>
<meta charset="UTF-8">
<title>轮播图实现title>
<script src="//cdn.jsdelivr.net/npm/vue/dist/vue.js">script>
head>
<body>
<div id="app">
<img :src="images[currentIndex].imgSrc" alt="" @click="imgHandler">
<br>
<button @click="prevHandler">上一张button>
<button @click="nextHandler">下一张button>
div>
<script>
let vm = new Vue({
el: '#app',
data() {
return {
images: [
{
id: 1,
imgSrc: 'https://ss2.bdstatic.com/70cFvnSh_Q1YnxGkpoWK1HF6hhy/it/u=2040525207,1848335555&fm=26&gp=0.jpg'
},
{
id: 2,
imgSrc: 'https://ss0.bdstatic.com/70cFuHSh_Q1YnxGkpoWK1HF6hhy/it/u=625783906,2390041116&fm=11&gp=0.jpg'
},
{
id: 3,
imgSrc: 'https://ss1.bdstatic.com/70cFuXSh_Q1YnxGkpoWK1HF6hhy/it/u=3472372044,2573289519&fm=11&gp=0.jpg'
},
],
currentIndex: 0
}
},
methods: {
prevHandler(e) {
this.currentIndex--;
if (this.currentIndex === -1) {
this.currentIndex = 2
}
},
nextHandler(e) {
console.log(e.target)//
this.currentIndex++;
if (this.currentIndex === 3) {
this.currentIndex = 0
}
},
imgHandler(e) {
console.log(e)//MouseEvent{isTrusted: true, screenX: 231, screenY: 125, clientX: 210, clientY: 22, …}
console.log(e.target)// console.log(this)//Vue{_uid: 0, _isVue: true, $options: {…}, _renderProxy: Proxy, _self: Vue, …}
}
}
})
script>
body>
html>
本例中可以使用定时器轮播图片,这里需要使用到 created函数,即组件创建完成后执行的函数。在created函数中定时器方法setInteval中的this并不指向vue实例:
<html lang="en">
<head>
<meta charset="UTF-8">
<title>轮播图实现title>
<script src="//cdn.jsdelivr.net/npm/vue/dist/vue.js">script>
head>
<body>
<div id="app">
<img :src="images[currentIndex].imgSrc" alt="" @click="imgHandler">
<br>
<button @click="prevHandler">上一张button>
<button @click="nextHandler">下一张button>
div>
<script>
let vm = new Vue({
el: '#app',
data() {
return {
images: [
{
id: 1,
imgSrc: 'https://ss2.bdstatic.com/70cFvnSh_Q1YnxGkpoWK1HF6hhy/it/u=2040525207,1848335555&fm=26&gp=0.jpg'
},
{
id: 2,
imgSrc: 'https://ss0.bdstatic.com/70cFuHSh_Q1YnxGkpoWK1HF6hhy/it/u=625783906,2390041116&fm=11&gp=0.jpg'
},
{
id: 3,
imgSrc: 'https://ss1.bdstatic.com/70cFuXSh_Q1YnxGkpoWK1HF6hhy/it/u=3472372044,2573289519&fm=11&gp=0.jpg'
},
],
currentIndex: 0
}
},
methods: {
prevHandler(e) {
this.currentIndex--;
if (this.currentIndex === -1) {
this.currentIndex = 2
}
},
nextHandler(e) {
console.log(e.target)//
this.currentIndex++;
if (this.currentIndex === 3) {
this.currentIndex = 0
}
},
imgHandler(e) {
console.log(e)//MouseEvent{isTrusted: true, screenX: 231, screenY: 125, clientX: 210, clientY: 22, …}
console.log(e.target)// console.log(this)//Vue{_uid: 0, _isVue: true, $options: {…}, _renderProxy: Proxy, _self: Vue, …}
},
},
created() {
setInterval(function () {
console.log(this);//Window{parent: Window, opener: null, top: Window, length: 0, frames: Window,…}
}, 2000)
}
})
script>
body>
html>

所以需要使用到箭头函数,或者在setInterval方法外定义this变量(这个this指向vue实例):
<html lang="en">
<head>
<meta charset="UTF-8">
<title>轮播图实现title>
<script src="//cdn.jsdelivr.net/npm/vue/dist/vue.js">script>
head>
<body>
<div id="app">
<img :src="images[currentIndex].imgSrc" alt="" @click="imgHandler">
<br>
<button @click="prevHandler">上一张button>
<button @click="nextHandler">下一张button>
div>
<script>
let vm = new Vue({
el: '#app',
data() {
return {
images: [
{
id: 1,
imgSrc: 'https://ss2.bdstatic.com/70cFvnSh_Q1YnxGkpoWK1HF6hhy/it/u=2040525207,1848335555&fm=26&gp=0.jpg'
},
{
id: 2,
imgSrc: 'https://ss0.bdstatic.com/70cFuHSh_Q1YnxGkpoWK1HF6hhy/it/u=625783906,2390041116&fm=11&gp=0.jpg'
},
{
id: 3,
imgSrc: 'https://ss1.bdstatic.com/70cFuXSh_Q1YnxGkpoWK1HF6hhy/it/u=3472372044,2573289519&fm=11&gp=0.jpg'
},
],
currentIndex: 0
}
},
methods: {
prevHandler(e) {
this.currentIndex--;
if (this.currentIndex === -1) {
this.currentIndex = 2
}
},
nextHandler(e) {
console.log(e.target)//
this.currentIndex++;
if (this.currentIndex === 3) {
this.currentIndex = 0
}
},
imgHandler(e) {
console.log(e)//MouseEvent{isTrusted: true, screenX: 231, screenY: 125, clientX: 210, clientY: 22, …}
console.log(e.target)// console.log(this)//Vue{_uid: 0, _isVue: true, $options: {…}, _renderProxy: Proxy, _self: Vue, …}
},
},
created() {
//方法1
console.log(this);//Vue{_uid: 0, _isVue: true, $options: {…}, _renderProxy: Proxy, _self: Vue,…}
let _this = this
setInterval(function () {
console.log(_this)//Vue{_uid: 0, _isVue: true, $options: {…}, _renderProxy: Proxy, _self: Vue,…}
}, 5000)
//方法二
setInterval(() => {
console.log(_this)
},5000)
}
})
script>
body>
html>
能用箭头函数就不要用匿名函数!
综上现在就可以使用定时器轮播图片了:
<html lang="en">
<head>
<meta charset="UTF-8">
<title>轮播图实现title>
<script src="//cdn.jsdelivr.net/npm/vue/dist/vue.js">script>
head>
<body>
<div id="app">
<img :src="images[currentIndex].imgSrc" alt="" @click="imgHandler">
<br>
<button @click="prevHandler">上一张button>
<button @click="nextHandler">下一张button>
div>
<script>
let vm = new Vue({
el: '#app',
data() {
return {
images: [
{
id: 1,
imgSrc: 'https://ss2.bdstatic.com/70cFvnSh_Q1YnxGkpoWK1HF6hhy/it/u=2040525207,1848335555&fm=26&gp=0.jpg'
},
{
id: 2,
imgSrc: 'https://ss0.bdstatic.com/70cFuHSh_Q1YnxGkpoWK1HF6hhy/it/u=625783906,2390041116&fm=11&gp=0.jpg'
},
{
id: 3,
imgSrc: 'https://ss1.bdstatic.com/70cFuXSh_Q1YnxGkpoWK1HF6hhy/it/u=3472372044,2573289519&fm=11&gp=0.jpg'
},
],
currentIndex: 0
}
},
methods: {
prevHandler(e) {
this.currentIndex--;
if (this.currentIndex === -1) {
this.currentIndex = 2
}
},
nextHandler(e) {
console.log(e.target)//
this.currentIndex++;
if (this.currentIndex === 3) {
this.currentIndex = 0
}
},
imgHandler(e) {
console.log(e)//MouseEvent{isTrusted: true, screenX: 231, screenY: 125, clientX: 210, clientY: 22, …}
console.log(e.target)// console.log(this)//Vue{_uid: 0, _isVue: true, $options: {…}, _renderProxy: Proxy, _self: Vue, …}
},
},
created() {
setInterval(() => {
this.currentIndex++;
if (this.currentIndex === 3) {
this.currentIndex = 0
}
}, 5000)
}
})
script>
body>
html>
10. Vue中使用AJAX
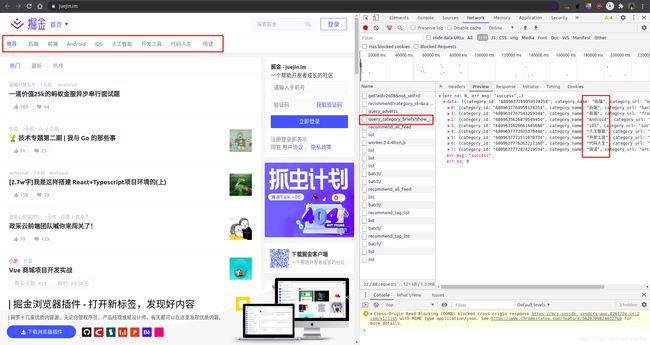
组件创建完成后,可以在 created 中写 AJAX 获取后端数据。后端数据接口是我从“掘金”上找的,

接口地址是:https://apinew.juejin.im/tag_api/v1/query_category_briefs?show_type=0
获取的数据:
{
    "err_no": 0,
    "err_msg": "success",
    "data": [
        {
            "category_id": "6809637769959178254",
            "category_name": "后端",
            "category_url": "backend",
            "rank": 1,
            "ctime": 1457483880,
            "mtime": 1432503193,
            "show_type": 3
        },
        {
            "category_id": "6809637767543259144",
            "category_name": "前端",
            "category_url": "frontend",
            "rank": 2,
            "ctime": 1457483942,
            "mtime": 1432503190,
            "show_type": 3
        },
        {
            "category_id": "6809635626879549454",
            "category_name": "Android",
            "category_url": "android",
            "rank": 3,
            "ctime": 1461266353,
            "mtime": 1432503184,
            "show_type": 3
        },
        {
            "category_id": "6809635626661445640",
            "category_name": "iOS",
            "category_url": "ios",
            "rank": 4,
            "ctime": 1461266350,
            "mtime": 1432503174,
            "show_type": 3
        },
        {
            "category_id": "6809637773935378440",
            "category_name": "人工智能",
            "category_url": "ai",
            "rank": 5,
            "ctime": 1500876664,
            "mtime": 1500876667,
            "show_type": 3
        },
        {
            "category_id": "6809637771511070734",
            "category_name": "开发工具",
            "category_url": "freebie",
            "rank": 6,
            "ctime": 1457483920,
            "mtime": 1432503202,
            "show_type": 3
        },
        {
            "category_id": "6809637776263217160",
            "category_name": "代码人生",
            "category_url": "career",
            "rank": 7,
            "ctime": 1553759544,
            "mtime": 1553759548,
            "show_type": 3
        },
        {
            "category_id": "6809637772874219534",
            "category_name": "阅读",
            "category_url": "article",
            "rank": 8,
            "ctime": 1457483895,
            "mtime": 1432503208,
            "show_type": 3
        }
    ]
}
参考代码:
<!DOCTYPE html>
<html lang="en">
<head>
    <meta charset="UTF-8">
    <title>Vue中使用AJAX</title>
    <style>
        .active {
            color: rebeccapurple;
        }
    </style>
</head>
<body>
<div id="app">
    <div>
        <span v-for="(category,index) in categoryList" :key="category.id" :class="{active:currentIndex===index}"
              @click="handlerClick(index)">{{category.category_name}} </span>
    </div>
</div>
</body>
<script src="https://cdn.bootcdn.net/ajax/libs/jquery/3.5.1/jquery.js"></script>
<script src="//cdn.jsdelivr.net/npm/vue/dist/vue.js"></script>
<script>
    new Vue({
        el: '#app',
        data() {
            return {
                categoryList: [],
                currentIndex: 0
            }
        },
        methods: {
            handlerClick(index,id) {
                this.currentIndex = index
                /**
                 $.ajax({
                    url: `http://apinew.juejin.im/tag_api/v1/query_category_briefs?show_type=0?id=${id}}`,
                    type: 'GET',
                    success: (data, status, xhr) => {
                        if (data.err_no === 0) {
                            let data = data.data
                            console.log(data)
                        }
                    }
                })
                 **/
            }
        },
        created() {
            $.ajax({
                url: 'http://apinew.juejin.im/tag_api/v1/query_category_briefs?show_type=0',
                type: 'GET',
                success: (data, status, xhr) => {
                    // console.log(data);
                    // console.log(status);
                    // console.log(xhr);
                    if (data.err_no === 0) {
                        let data = data.data
                        let obj = {
                            category_name: '全部',
                        }
                        this.categoryList = data
                        this.categoryList.unshift(obj)
                    }
                }
            })
        }
    })
</script>
</html>
observer,也就是观察者发现category改变后,就会更改视图上的数据。
11. 音乐播放器实现
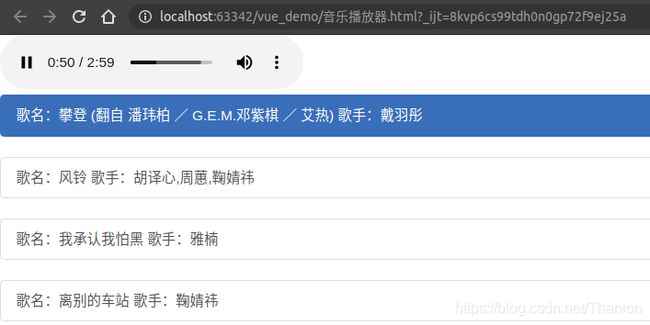
音乐播放器简单示例:
<html lang="en">
<head>
    <meta charset="UTF-8">
    <title>音乐播放器title>
    <link rel="stylesheet" href="https://cdn.jsdelivr.net/npm/[email protected]/dist/css/bootstrap.min.css"
          integrity="sha384-BVYiiSIFeK1dGmJRAkycuHAHRg32OmUcww7on3RYdg4Va+PmSTsz/K68vbdEjh4u" crossorigin="anonymous">
head>
<body>
<div id="music">
    <div>

        <audio :src="musicData[currentIndex].songSrc" controls autoplay @ended="nextHandler">audio>
    div>

    <div class="list-group" @click="songHandler(index)" v-for="(item,index) in musicData" :key="item.id">
        <button type="button" class="list-group-item" :class="{active:index===currentIndex}">
            <span>歌名:{{ item.name }}span>
            <span>歌手:{{ item.author }}span>
        button>
    div>
div>
body>
<script src="//cdn.jsdelivr.net/npm/vue/dist/vue.js">script>
<script>
    let musicData = [
        {
            id: 1,
            name: '攀登 (翻自 潘玮柏 / G.E.M.邓紫棋 / 艾热)',
            author: '戴羽彤',
            songSrc: './static/mp3/戴羽彤 - 攀登 (翻自 潘玮柏 / G.E.M.邓紫棋 / 艾热).mp3'
        },
        {
            id: 2,
            name: '风铃',
            author: '胡译心,周蕙,鞠婧祎', songSrc: './static/mp3/胡译心,周蕙,鞠婧祎 - 风铃 (Live).mp3'
        },
        {
            id: 3,
            name: '我承认我怕黑',
            author: '雅楠',
            songSrc: './static/mp3/雅楠 - 我承认我怕黑.mp3'
        },
        {
            id: 4,
            name: '离别的车站',
            author: '鞠婧祎',
            songSrc: './static/mp3/鞠婧祎 - 离别的车站.mp3'
        },
    ]
    new Vue({
        el: '#music',
        data() {
            return {
                musicData: musicData,
                currentIndex: 0,
                isActive: false
            }
        },
        methods: {
            songHandler(index) {
                /**
                 * 点击所要播放的歌曲
                 * index:歌曲的id
                 */
                this.currentIndex = index;
                this.isActive = true
            },
            nextHandler(e) {
                /**
                 * 自动播放下一首
                 */
                console.log(e) // Event {isTrusted: true, type: "ended", target: audio, currentTarget: audio, eventPhase: 2, …}
                this.currentIndex++;
                // 这里暂且设置:最后一首播放完成后自动播放第一首
                if (this.currentIndex === musicData.length) {
                    this.currentIndex = 0
                }
            }
        }
    })
script>
html>
12. 侦听器watch
watch 侦听器可以侦听单个属性,如果想要侦听多个属性,则需要 声明多个属性的监听,watch 侦听器的简单使用:
<html lang="en">
<head>
    <meta charset="UTF-8">
    <title>Titletitle>
head>
<body>
<div id="app">
    <p>{{msg}}p>
    <button @click='clickHandler'>更改button>
    <p>{{attention}}p>
div>
body>
<script src="//cdn.jsdelivr.net/npm/vue/dist/vue.js">script>
<script>
    let vm = new Vue({
        el: '#app',
        data() {
            return {
                msg: 'thanlon',
                attention: ''
            }
        },
        methods: {
            clickHandler() {
                this.msg = 'erics'
            }
        },
        watch: {
            'msg': function (value) {
                if (value === 'erics') {
                    this.msg = 'erics'
                    this.attention = 'watch侦听器侦听到你做了更改!'
                }
            }
        }
    })
script>
html>
侦听器不怎么会用到!
13. 计算属性computed
模板内的表达式非常便利,但是设计它们的初衷是用于简单运算的。在模板中放入太多的逻辑会让模板过重且难以维护。例如:
<div id="example">
  {{ message.split('').reverse().join('') }}
div>
计算属性默认只有 getter 方法,一个简单的示例:
<html lang="en">
<head>
    <meta charset="UTF-8">
    <title>Titletitle>
head>
<body>
<div id="app">
    <p>{{ myMsg }}p>
    <button @click='clickHandler'>更改button>
div>
body>
<script src="//cdn.jsdelivr.net/npm/vue/dist/vue.js">script>
<script>
    let vm = new Vue({
        el: '#app',
        data() {
            return {
                name: 'thanlon',
                age: 18
            }
        },
        methods: {
            clickHandler() {
                this.name = 'erics'
                this.age = 23
            }
        },
        watch: {
            'msg': function (value) {
                if (value === 'erics') {
                    this.msg = 'erics'
                    this.attention = 'watch侦听器侦听到你做了更改!'
                }
            }
        },
        computed: {
            myMsg: function () {
                //业务逻辑
                //计算属性只有getter方法
                return `My name is ${this.name}, my age is ${this.age} years old.`
            }
        }
    })
script>
html>
对于任何复杂逻辑,都应当使用计算属性。
把计算属性应用到“音乐播放器”中:
<audio :src="musicData[currentIndex].songSrc" controls autoplay @ended="nextHandler">audio>
更改:
<audio :src="currentSong" controls autoplay @ended="nextHandler">audio>
新增computed:
computed: {
	currentSong() {
    	return this.musicData[this.currentIndex].songSrc
    }
},
14. this指向问题
以下情况下指向当前对象:
<html lang="en">
<head>
    <meta charset="UTF-8">
    <title>this指向问题title>
head>
<body>
<script src="//cdn.jsdelivr.net/npm/vue/dist/vue.js">script>
<script>
    // this指向当前对象,这里使用es6,es6使用单体模式
    let person = {
        name: 'erics',
        age: '23',
        /**
         fav(){
            console.log(this) // {name: "erics", age: "23", fav: ƒ}
        },
         **/
        //与注释中的方法等价
        fav: function () {
            console.log(this) // {name: "erics", age: "23", fav: ƒ}
        }
    }
    person.fav()
script>
body>
html>
methods: {
        // clickHandler() {
        //     this.name = 'erics'
        //     this.age = 23
        // },
        //与上面等价
        clickHandler: function () {
            console.log(this) // 当前vue对象:Vue {_uid: 0, _isVue: true, $options: {…}, _renderProxy: Proxy, _self: Vue, …}
            },
},
created() {
        // 定时器
        setInterval(function () {
            console.log(this) // Window {parent: Window, opener: null, top: Window, length: 0, frames: Window, …}
        }, 2000)
}
以下情况下指向父级对象:
<html lang="en">
<head>
    <meta charset="UTF-8">
    <title>this指向问题title>
head>
<body>
<script src="//cdn.jsdelivr.net/npm/vue/dist/vue.js">script>
<script>
    // 使用箭头函数,this指向发生改变,this指向了定义person的父级对象
    let person = {
        name: 'erics',
        age: '23',
        fav: () => {
            console.log(this) // Window {parent: Window, opener: null, top: Window, length: 0, frames: Window, …}
        }
    }
    person.fav()
script>
body>
html>
methods: {
        // clickHandler() {
        //     this.name = 'erics'
        //     this.age = 23
        // },
        //与上面等价
        clickHandler: function () {
            console.log(this) // 当前vue对象:Vue {_uid: 0, _isVue: true, $options: {…}, _renderProxy: Proxy, _self: Vue, …}
            },
            // 下面的会覆盖上面的clickHandler
        clickHandler: () => {
            console.log(this) // 父级对象:Window {parent: Window, opener: null, top: Window, length: 0, frames: Window, …}
        }
},
created() {
       // 定时器
       setInterval(() => {
           console.log(this) // Vue {_uid: 0, _isVue: true, $options: {…}, _renderProxy: Proxy, _self: Vue, …}
       }, 2000)
}
methods和created中this都指向当前vue实例。
15. v-model的双向数据绑定
双向绑定即先是数据层到视图层,再是视图层到数据层。v-model指令只能应用 input,textarea,slect 等表单便签元素上。先来看个 input 的例子:
<html lang="en">
<head>
    <meta charset="UTF-8">
    <title>Titletitle>
head>
<body>
<div id="app">
    <input type="text" v-model="msg">
    <p>{{msg}}p>
div>
body>
<script src="//cdn.jsdelivr.net/npm/vue/dist/vue.js">script>
<script>
    let vm = new Vue({
        el: '#app',
        data: function () {
            return {
                msg: 'erics'
            }
        }
    })
script>
html>
vue中input中value会被忽略。
v-model等价于:
<html lang="en">
<head>
    <meta charset="UTF-8">
    <title>Titletitle>
head>
<body>
<div id="app">
    <input type="text" :value="msg" @input="changeHandler">

    <p>{{msg}}p>
div>
body>
<script src="//cdn.jsdelivr.net/npm/vue/dist/vue.js">script>
<script>
    let vm = new Vue({
        el: '#app',
        data: function () {
            return {
                msg: 'erics'
            }
        },
        methods: {
            changeHandler(e) {
                this.msg = e.target.value
            }
        }
    })
script>
html>
再看 select 的使用:
<html lang="en">
<head>
    <meta charset="UTF-8">
    <title>Titletitle>
head>
<body>
<div id="app">
    <select v-model="selected">
        <option disabled value="">请选择option>
        <option>Aoption>
        <option>Boption>
        <option>Coption>
    select>
    <span>您选择的是:{{selected}}span>
div>
body>
<script src="//cdn.jsdelivr.net/npm/vue/dist/vue.js">script>
<script>
    let vm = new Vue({
        el: '#app',
        data: function () {
            selected: '',//这里是可以设置默认值的
                //selected: 'A'
        },
    })
script>
html>
<html lang="en">
<head>
    <meta charset="UTF-8">
    <title>Titletitle>
head>
<body>
<div id="app">

    <input v-model.lazy="msg">

    <input v-model.number="msg" type="number">

    <input v-model.trim="msg">
    <p>{{msg}}p>
div>
body>
<script src="//cdn.jsdelivr.net/npm/vue/dist/vue.js">script>
<script>
    let vm = new Vue({
        el: '#app',
        data: function () {
            return {
                msg: 'erics'
            }
        }
    })
script>
html>
16. 子组件的使用
如果实例化vue对象中既有 el,又有 template,template 中定义了模板的内容,那么 template 模板的优先级要大于el:
<html lang="en">
<head>
    <meta charset="UTF-8">
    <title>子组件的使用title>
head>
<body>
<div id="app">
    <div>{{msg}}div>
div>
body>
<script src="//cdn.jsdelivr.net/npm/vue/dist/vue.js">script>
<script>
    let vm = new Vue({
        el: '#app',
        data() {
            return {
                msg: 'erics'
            }
        },
        template: `

            thanlon

        `
    })
script>
html>
第一步:声明子组件,组件的名字首字母要大写,与标签进行区分(其实只要可以区分就可以,大小写没所谓)组建中的 data 必须是一个函数,一定要有返回值。
// 第一步:声明子组件,组件的名字首字母要大写,与标签进行区分(其实只要可以区分就可以,大小写没所谓)组建中的data必须是一个函数,一定要有返回值。
let App = {
	data() {
            return {
                text: '我是erics'
            }
        },
        template: `

                {{ text }}

        `
}
组件模板中的内容要使用一个单独的标签封闭起来。
第二步:挂载子组件,如果 key 和 value 相同,则可以只写一个
components: {
	// 2.挂载子组件,如果key和value相同,则可以只写一个
	App
}
第三步:使用子组件
// 3.使用子组件
template: `
综合实例:
<html lang="en">
<head>
<meta charset="UTF-8">
<title>子组件的使用title>
head>
<body>
<div id="app">
<div>{{msg}}div>
div>
body>
<script src="//cdn.jsdelivr.net/npm/vue/dist/vue.js">script>
<script>
// 1.声明子组件,组件的名字首字母要大写,与标签进行区分(其实只要可以区分就可以,大小写没所谓)组建中的data必须是一个函数,一定要有返回值。
// App:header aside content
let App = {
data() {
return {
text: 'I am Erics.'
}
},
// 注意组件模板要使用一个单独的标签封闭起来
template: `
    {{ text }}
    {{ text }}
`,
methods:{
}
}
let vm = new Vue({
el: '#app',
data() {
return {
msg: 'I am Thanlon.'
}
},
// 3.使用子组件
template: `
组件模板要使用一个单独的标签封闭起来,如
template: `
{{ text }}
{{ text }}
`,
17. 注册组件
使用该注册组件的方式相对于15不需要执行第二步挂载组件操作,注册后直接使用:
<html lang="en">
<head>
<meta charset="UTF-8">
<title>子组件的使用title>
head>
<body>
<div id="app">
<div>{{msg}}div>
div>
body>
<script src="//cdn.jsdelivr.net/npm/vue/dist/vue.js">script>
<script>
// 1.声明子组件,组件的名字首字母要大写,与标签进行区分(其实只要可以区分就可以,大小写没所谓)组建中的data必须是一个函数,一定要有返回值。
// App:header aside content
// 第一个参数是组件的名字,第二个参数是 options ,这是个全局组件
Vue.component('VBtn', {
data() {
return {
btnValue: '按钮'
}
},
template: `
`
}
);
let App = {
data() {
return {
text: 'I am Erics.'
}
},
// 注意组件模板要使用一个单独的标签封闭起来
template: `
{{ text }}
{{ text }}
如果在中加入内容是不显示的。
18. slot内容分发
slot 是 vue 中提供的内容组件,它可以分发内容(使用组件的时候替换掉slot):
<!DOCTYPE html>
<html lang="en">
<head>
    <meta charset="UTF-8">
    <title>子组件的使用</title>
</head>
<body>
<div id="app">
    <div>{{msg}}</div>
</div>
</body>
<script src="//cdn.jsdelivr.net/npm/vue/dist/vue.js"></script>
<script>
    // 1.声明子组件,组件的名字首字母要大写,与标签进行区分(其实只要可以区分就可以,大小写没所谓)组建中的data必须是一个函数,一定要有返回值。
    // App:header aside content
    // 第一个参数是组件的名字,第二个参数是 options 全局
    Vue.component('VBtn', {
            data() {
                return {}
            },
            template: `
                <button>
                    <slot></slot>
                </button>
            `
        }
    );
    let App = {
        data() {
            return {
                text: 'I am Erics.'
            }
        },
        // 注意组件模板要使用一个单独的标签封闭起来,这里使用到了内容分发
        template: `
            <div>
                <h3>{{ text }}</h3>
                <h3>{{ text }}</h3>
                <VBtn>登录</VBtn>
            </div>
        `,
        methods: {}
    };
    let vm = new Vue({
        el: '#app',
        data() {
            return {
                msg: 'I am Thanlon.'
            }
        },
        // 3.使用子组件
        template: `
            <div class="app">
                <VBtn>注册</VBtn>
                <App></App>
            </div>
        `,
        components: {
            //2.挂载子组件,如果key和value相同,则可以只写一个
            App // App:App
        }
    });
</script>
</html>


