Keras:LSTM layer的return_sequences和return_state参数详解
先放上参考: Understand the Difference Between Return Sequences and Return States for LSTMs in Keras
本文是基于上面博客做的实践,以验证LSTM的两个参数的使用。
这是本文对应的jypyter notebook:Github:Keras:LSTM layer的return_sequences和return_state参数详解.ipynb
先回顾一下LSTM
这里默认大家有RNN和LSTM的基础,不了解的可以参考这篇文章:Understanding LSTM Networks

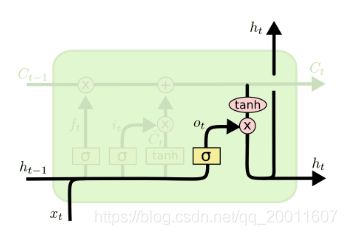
上图是LSTM 的cell 单元,其中:
- h t h_{t} ht 表示第 t t t 步的 hidden state,是 t t t 时刻的数据被编码后的向量,也是LSTM对外的输出。
- C t C_{t} Ct 表示第 t t t 步的 cell state,是 t t t 时刻数据的记忆向量,代表LSTM内在的记忆,通常只在内部流动,不对外输出。cell state 是实现LSTM的关键。
通常我们只需拿到 hidden state 作为输LSTM的输出就够了,而不需要访问cell state,但是当想要设计复杂一点的网络的话,就需要用到cell state,比如encoder-decoder模型和Attention机制。
Keras 的 LSTM layer
keras.layers.LSTM()函数中,获取 hidden state 和 cell state 就需要以下两个重要的参数:
- return_sequences: 是否返回全部时间步的 hidden state. False返回最后那步的,True返回全部。默认False
- return_state: 是否返回最后一步的 cell state。 默认False,即不返回 cell state,只返回 hidden state
两种参数的实验
0. 载入包
from keras.models import Model
from keras.layers import Input,LSTM
import numpy as np
1.return_sequences = False && return_state = False
设置lstm = LSTM(1)
Keras API 中,return_sequences和return_state默认就是false。此时只会返回一个hidden state 值。如果input 数据包含多个时间步,则这个hidden state 是最后一个时间步的结果
# define model
inputs = Input(shape = (3,1))
lstm = LSTM(1)(inputs)   # return_sequences = True & return_state = False
model = Model(inputs = inputs,outputs = lstm)

# define data and predict
data = np.array([0.1,0.2,0.3]).reshape([1,3,1])
print(model.predict(data))
输出结果:
array([[-0.13695435]], dtype=float32) # 最后一个时间步对应的 hidden state
2.return_sequences=True && return_state=False
设置 LSTM(1,return_sequences = True)
输出所有时间步的hidden state。
# define model
inputs = Input(shape = (3,1))
lstm = LSTM(1,return_sequences = True)(inputs)   # return_sequences = True & return_state = False
model = Model(inputs = inputs,outputs = lstm)

# define data and predict
data = np.array([0.1,0.2,0.3]).reshape([1,3,1])
print(model.predict(data))
结果:
array([[[-0.01409399],                   # 第一步对应的 hidden state
        [-0.03686725], 					 # 第二步对应的 hidden state
        [-0.06507621]]], dtype=float32)  # 第三步对应的 hidden state
3.return_sequences=False && return_state=True
设置lstm, state_h, state_c = LSTM(1,return_state = True)
lstm 和 state_h 结果都是 hidden state。在这种参数设定下,它们俩的值相同,都是最后一个时间步的 hidden state。 state_c 是最后一个时间步 cell state结果。
# define model
inputs = Input(shape = (3,1))
lstm, state_h, state_c = LSTM(1,return_state = True)(inputs)   # return_sequences = False & return_state = Ture
model = Model(inputs = inputs,outputs = [lstm, state_h, state_c])

# define data and predict
data = np.array([0.1,0.2,0.3]).reshape([1,3,1])
print(model.predict(data))
结果:
[array([[0.15450114]], dtype=float32),     # lstm:     最后时间步对应的 hidden state
 array([[0.15450114]], dtype=float32),       # state_h: 最后时间步的 hidden state
 array([[0.2794191]], dtype=float32)]        # state_c: 最后时间步的 cell state
4.return_sequences=True && return_state=True
lstm, state_h, state_c = LSTM(1,return_sequences = True, return_state = True)
此时,既输出全部时间步的 hidden state ,又输出 cell state:
- lstm 存放的就是全部时间步的 hidden state。
- state_h 存放的是最后一个时间步的 hidden state
- state_c 存放的是最后一个时间步的 cell state
结果:
[array([[[0.02849635],
         [0.08156213],
         [0.15450114]]], dtype=float32),     # lstm:   三个时间步对应的 hidden state
 array([[0.15450114]], dtype=float32),       # state_h: 最后时间步的 hidden state
 array([[0.2794191]], dtype=float32)]        # state_c: 最后时间步的 cell state
可以看到state_h 的值和 lstm 的最后一个时间步的值相同。
总结
return_sequences:返回每个时间步的hidden state
return_state :返回最后一个时间步的hidden state 和cell state
return_sequences 和 return_state :可同时使用,三者都输出