深度学习环境配置 (Ubuntu18.04 + CUDA10.0 + cuDNN7.6.5 + TensorFlow2.0)
@ Bergen, Norway
第一次安装 CUDA 的过程简直抓狂,中间出现了很多次莫名其妙的 bug,踩了很多坑。比如装好了 CUDA 重启后进不去桌面系统了,直接黑屏、比如鼠标键盘都不 work 了、再比如装好了却安装不了 TensorFlow-GPU......看了一圈网上的安装教程,发现还是官方指南真香了~
新年第一篇,分享一下我的 Ubuntu 18.04 + CUDA 10.0 + cuDNN 7.6.5 + TensorFlow 2.0 安装笔记,希望可以帮助大家少踩坑。
整个安装流程大致是:安装显卡驱动 -> 安装 CUDA[1] -> 安装 cuDNN[2] -> 安装 tensorflow-gpu 并测试。
全文目录:
Ubuntu安装与更新
安装显卡驱动
安装CUDA
安装cuDNN
安装TensorFlow2.0 GPU及测试
1. Ubuntu安装和更新
先进行Ubuntu18.04系统一些基本的安装和更新,具体的操作系统安装过程省略,比较容易,大家可自行百度,有很多教程。
sudo apt-get update # 更新源
sudo apt-get upgrade # 更新已安装的包
sudo apt-get install vim
2. 安装显卡驱动
2.1 禁用 Nouveau 驱动
注意:Linux 系统下有两种方案安装 CUDA:一种是 Package Manager Installation (.deb),另一种是 Runfile Installation (.run)。本文采取的是第一种(也是官方推荐的方式)。如果使用deb方式安装CUDA可以忽略此步,本人测试OK。如果使用 runfile 安装CUDA需要手动禁用系统自带的 Nouveau 驱动:
lsmod | grep nouveau # 要确保这条命令无输出
vim /etc/modprobe.d/blacklist-nouveau.conf
# 添加下面两行:
#######################################################
blacklist nouveau
options nouveau modeset=0
#######################################################
# 保存后重启:
sudo update-initramfs -u
sudo reboot
# 再次输入以下命令,无输出就表示设置成功了
lsmod | grep nouveau
2.2 安装合适的显卡驱动[3]
# 先清空现有的显卡驱动及依赖并重启
sudo apt-get remove --purge nvidia*
sudo apt autoremove
sudo reboot
# 添加ppa源并安装最新的驱动
sudo add-apt-repository ppa:graphics-drivers/ppa
sudo apt update
ubuntu-drivers devices
sudo apt install nvidia-driver-440
# 为了防止自动更新驱动导致的兼容性问题,我们还可以锁定驱动版本:
sudo apt-mark hold nvidia-driver-440
# nvidia-driver-440 set on hold.
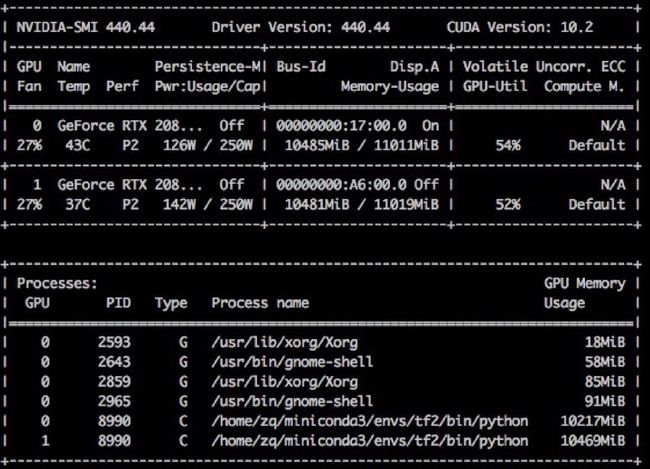
并在【软件和更新】菜单中的附加驱动列表中,可以找到刚刚安装的nvidia-driver-440,选定即可。输入sudo reboot重启后,输入nvidia-smi,显示下图信息,这样表示显卡驱动已经 ready:
lsmod | grep nvidia # 看到下面的输出则为安装成功,如果无输出,表示有问题
也可以手动去官网下载对应的安装程序安装显卡[4]
# 动态监测显卡使用的方式:
watch -n 1 nvidia-smi # 1表示每1秒刷新一次
watch -n 0.01 nvidia-smi # 也可改成0.01s刷新一次
# 也可以用gpustat
pip install gpustat
gpustat -i 1 -P
3. 安装 CUDA
百度百科:CUDA(Compute Unified Device Architecture),是显卡厂商NVIDIA[5]推出的运算平台。CUDA 是一种由 NVIDIA 推出的通用并行计算[6]架构,该架构使GPU[7]能够解决复杂的计算问题。
Linux 系统下有两种方案安装 CUDA:一种是 Package Manager Installation (.deb),另一种是 Runfile Installation (.run)。本文采取的是第一种(也是官方推荐的方式)。
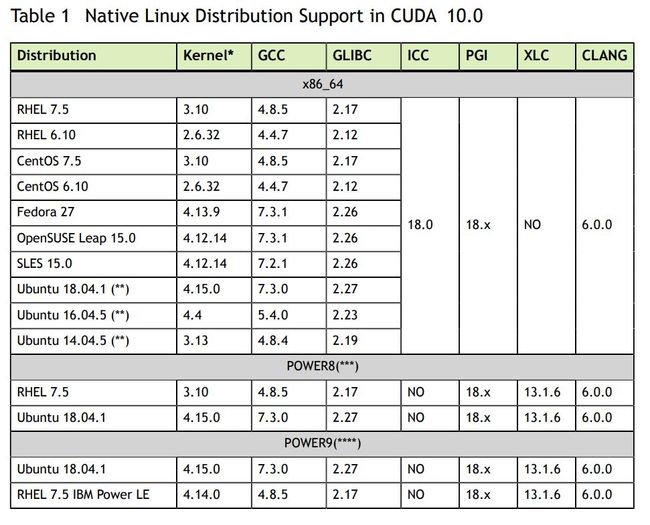
另外,CUDA 对于系统环境有严格的依赖,比如对于 CUDA10.0 有如下的要求。其他的版本可查看对应的Online Documentation[8]。
3.1 安装前的准备
在安装 CUDA 之前需要先确定环境是 ready 的,以免出现乱七八糟的 bug 无从下手。直接引用官网的说明:
Some actions must be taken before the CUDA Toolkit and Driver can be installed on Linux:
Verify the system has a CUDA-capable GPU.
Verify the system is running a supported version of Linux.
Verify the system has gcc installed.
Verify the system has the correct kernel headers and development packages installed.
Download the NVIDIA CUDA Toolkit.
Handle conflicting installation methods.
3.1.1 确认你有支持 CUDA 的 GPU
lspci | grep -i nvidia | grep VGA
3.1.2 确认你的 linux 版本
uname -m && cat /etc/*release
uname -a
# The x86_64 line indicates you are running on a 64-bit system.
3.1.3 确认 gcc 版本
gcc --version
# gcc (Ubuntu 7.4.0-1ubuntu1~18.04.1) 7.4.0
3.1.4 安装对应内核版本的头文件
查看 kernel 的版本:
uname -r
# 5.0.0-37-generic
This is the version of the kernel headers and development packages that must be installed prior to installing the CUDA Drivers.
安装对应内核版本的头文件:
sudo apt-get install linux-headers-$(uname -r)
3.1.5 选择安装方式
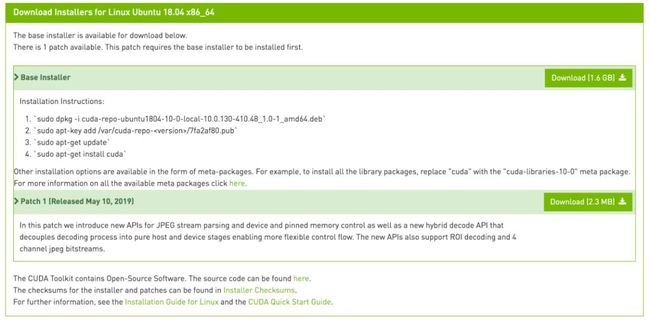
下载对应的安装包(以官方推荐的 Deb packages 安装方式为例)[9]
The CUDA Toolkit can be installed using either of two different installation mechanisms: distribution-specific packages (RPM and Deb packages), or a distribution-independent package (runfile packages).
(1) The distribution-independent package has the advantage of working across a wider set of Linux distributions, but does not update the distribution's native package management system.
(2) The distribution-specific packages interface with the distribution's native package management system. It is recommended to use the distribution-specific packages, where possible.
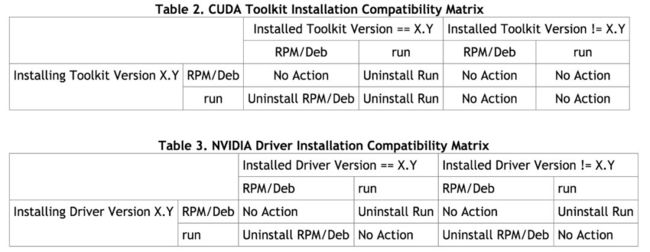
3.1.6 彻底卸载之前安装过的相关应用,避免冲突
如果是全新的 ubuntu,可忽略此部分,执行 3.2 部分即可。
如果 ubuntu 下用 RPM/Deb 安装的:
sudo apt-get --purge remove
sudo apt autoremove
如果是 runfile 安装的:
sudo /usr/bin/nvidia-uninstall
sudo /usr/local/cuda-X.Y/bin/uninstall_cuda_X.Y.pl
3.2 安装
首先确保已经下载好对应的.deb 文件,然后执行:
sudo dpkg -i cuda-repo-ubuntu1804-10-0-local-10.0.130-410.48_1.0-1_amd64.deb
sudo apt-key add /var/cuda-repo-/7fa2af80.pub # 根据执行完第一步的提示输入,比如我是:
# sudo apt-key add /var/cuda-repo-10-0-local-10.0.130-410.48/7fa2af80.pub
sudo apt-get update
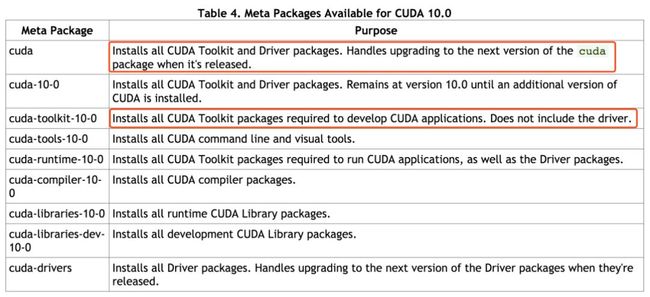
sudo apt-get install cuda-toolkit-10-0 # 注意不是cuda,因为在第二步中装过驱动了,此过程安装cuda-toolkit-10-0即可
3.3 安装后
安装之后需要手动进行一些设置才能使 CUDA 正常的工作。
export PATH=/usr/local/cuda-10.0/bin${PATH:+:${PATH}}
nvcc -V # 检查CUDA是否安装成功
# OUTPUT:
nvcc: NVIDIA (R) Cuda compiler driver
Copyright (c) 2005-2018 NVIDIA Corporation
Built on Sat_Aug_25_21:08:01_CDT_2018
Cuda compilation tools, release 10.0, V10.0.130
最好关闭系统的自动更新,防止安装好的环境突然 bug:
sudo vi /etc/apt/apt.conf.d/10periodic

# 修改为:
APT::Periodic::Update-Package-Lists "0";
APT::Periodic::Download-Upgradeable-Packages "0";
APT::Periodic::AutocleanInterval "0";
也可以通过桌面设置:System Settings => Software&Updates => updates
4. 安装 cuDNN[10]
NVIDIA cuDNN 是用于深度神经网络的 GPU 加速库。首先需要注册下载对应 CUDA 版本号的 cuDNN 安装包: 链接[11]。
比如对应 CUDA10.0,我下载的是:tar -zxvf cudnn-10.0-linux-x64-v7.6.5.32.tgz
tar -zxvf cudnn-10.0-linux-x64-v7.6.5.32.tgz
sudo cp cuda/include/cudnn.h /usr/local/cuda/include
sudo cp cuda/lib64/libcudnn* /usr/local/cuda/lib64
sudo chmod a+r /usr/local/cuda/include/cudnn.h /usr/local/cuda/lib64/libcudnn*
验证是否安装成功:
cat /usr/local/cuda/include/cudnn.h | grep CUDNN_MAJOR -A 2
# 输出
"""
#define CUDNN_MAJOR 7
#define CUDNN_MINOR 6
#define CUDNN_PATCHLEVEL 5
--
#define CUDNN_VERSION (CUDNN_MAJOR * 1000 + CUDNN_MINOR * 100 + CUDNN_PATCHLEVEL)
#include "driver_types.h"
"""
更推荐使用 Debian File 去安装,因为可以通过里面的样例去验证 cuDNN 是否成功安装。首先下载下面三个文件:
# 分别下载
sudo dpkg -i libcudnn7_7.6.5.32-1+cuda10.0_amd64.deb
sudo dpkg -i libcudnn7-dev_7.6.5.32-1+cuda10.0_amd64.deb
sudo dpkg -i libcudnn7-doc_7.6.5.32-1+cuda10.0_amd64.deb
# 安装完验证:
cp -r /usr/src/cudnn_samples_v7/ $HOME
cd  $HOME/cudnn_samples_v7/mnistCUDNN
make clean && make
./mnistCUDNN
# Test passed!
另外也可以用 conda 来安装 cudatoolkit 和 cuDNN,但要保证驱动是 ready 的。
conda install cudatoolkit=10.0
conda install -c anaconda cudnn
5. 安装 TensorFlow2.0 GPU及测试
# 安装conda
wget https://repo.continuum.io/miniconda/Miniconda3-latest-Linux-x86_64.sh && bash Miniconda3-latest-Linux-x86_64.sh
source ~/.bashrc
conda create -y -n tf2 python=3.7
conda activate tf2
pip install --upgrade pip
pip config set global.index-url https://pypi.tuna.tsinghua.edu.cn/simple
pip install tensorflow-gpu
pip install catboost
测试:
import tensorflow as tf
print(tf.__version__)
print("Num GPUs Available: ", len(tf.config.experimental.list_physical_devices('GPU')))
"""
2.0.0
Num GPUs Available:  2
"""
"""
测试程序:
源链接:https://github.com/dragen1860/TensorFlow-2.x-Tutorials/blob/master/08-ResNet/main.py
"""
import os
os.environ["CUDA_VISIBLE_DEVICES"] = "1" # os.environ["CUDA_VISIBLE_DEVICES"] = "0,1"
import tensorflow as tf
import numpy as np
from tensorflow import keras

tf.random.set_seed(22)
np.random.seed(22)
os.environ['TF_CPP_MIN_LOG_LEVEL'] = '2'
assert tf.__version__.startswith('2.')

(x_train, y_train), (x_test, y_test) = keras.datasets.fashion_mnist.load_data()
x_train, x_test = x_train.astype(np.float32) / 255., x_test.astype(
    np.float32) / 255.
# [b, 28, 28] => [b, 28, 28, 1]
x_train, x_test = np.expand_dims(x_train, axis=3), np.expand_dims(x_test,
                                                                  axis=3)
# one hot encode the labels. convert back to numpy as we cannot use a combination of numpy
# and tensors as input to keras
y_train_ohe = tf.one_hot(y_train, depth=10).numpy()
y_test_ohe = tf.one_hot(y_test, depth=10).numpy()

print(x_train.shape, y_train.shape)
print(x_test.shape, y_test.shape)

# 3x3 convolution
def conv3x3(channels, stride=1, kernel=(3, 3)):
    return keras.layers.Conv2D(
        channels,
        kernel,
        strides=stride,
        padding='same',
        use_bias=False,
        kernel_initializer=tf.random_normal_initializer())

class ResnetBlock(keras.Model):
    def __init__(self, channels, strides=1, residual_path=False):
        super(ResnetBlock, self).__init__()
        self.channels = channels
        self.strides = strides
        self.residual_path = residual_path
        self.conv1 = conv3x3(channels, strides)
        self.bn1 = keras.layers.BatchNormalization()
        self.conv2 = conv3x3(channels)
        self.bn2 = keras.layers.BatchNormalization()
        if residual_path:
            self.down_conv = conv3x3(channels, strides, kernel=(1, 1))
            self.down_bn = tf.keras.layers.BatchNormalization()

    def call(self, inputs, training=None):
        residual = inputs
        x = self.bn1(inputs, training=training)
        x = tf.nn.relu(x)
        x = self.conv1(x)
        x = self.bn2(x, training=training)
        x = tf.nn.relu(x)
        x = self.conv2(x)
        # this module can be added into self.
        # however, module in for can not be added.
        if self.residual_path:
            residual = self.down_bn(inputs, training=training)
            residual = tf.nn.relu(residual)
            residual = self.down_conv(residual)
        x = x + residual
        return x

class ResNet(keras.Model):
    def __init__(self, block_list, num_classes, initial_filters=16, **kwargs):
        super(ResNet, self).__init__(**kwargs)
        self.num_blocks = len(block_list)
        self.block_list = block_list
        self.in_channels = initial_filters
        self.out_channels = initial_filters
        self.conv_initial = conv3x3(self.out_channels)
        self.blocks = keras.models.Sequential(name='dynamic-blocks')
        # build all the blocks
        for block_id in range(len(block_list)):
            for layer_id in range(block_list[block_id]):

                if block_id != 0 and layer_id == 0:
                    block = ResnetBlock(self.out_channels,
                                        strides=2,
                                        residual_path=True)
                else:
                    if self.in_channels != self.out_channels:
                        residual_path = True
                    else:
                        residual_path = False
                    block = ResnetBlock(self.out_channels,
                                        residual_path=residual_path)
                self.in_channels = self.out_channels
                self.blocks.add(block)
            self.out_channels *= 2
        self.final_bn = keras.layers.BatchNormalization()
        self.avg_pool = keras.layers.GlobalAveragePooling2D()
        self.fc = keras.layers.Dense(num_classes)

    def call(self, inputs, training=None):
        out = self.conv_initial(inputs)
        out = self.blocks(out, training=training)
        out = self.final_bn(out, training=training)
        out = tf.nn.relu(out)
        out = self.avg_pool(out)
        out = self.fc(out)
        return out

def main():
    num_classes = 10
    batch_size = 128
    epochs = 2
    # build model and optimizer
    model = ResNet([2, 2, 2], num_classes)
    model.compile(optimizer=keras.optimizers.Adam(0.001),
                  loss=keras.losses.CategoricalCrossentropy(from_logits=True),
                  metrics=['accuracy'])
    model.build(input_shape=(None, 28, 28, 1))
    print("Number of variables in the model :", len(model.variables))
    model.summary()
    # train
    model.fit(x_train,
              y_train_ohe,
              batch_size=batch_size,
              epochs=epochs,
              validation_data=(x_test, y_test_ohe),
              verbose=1)

    # evaluate on test set
    scores = model.evaluate(x_test, y_test_ohe, batch_size, verbose=1)
    print("Final test loss and accuracy :", scores)

if __name__ == '__main__':
    main()
监测 GPU 使用:
watch -n 0.01 nvidia-smi
测试 catboost 使用 CPU:
from catboost.datasets import titanic
import numpy as np
from sklearn.model_selection import train_test_split
from catboost import CatBoostClassifier, Pool, cv
from sklearn.metrics import accuracy_score

train_df, test_df = titanic()
null_value_stats = train_df.isnull().sum(axis=0)
null_value_stats[null_value_stats != 0]

train_df.fillna(-999, inplace=True)
test_df.fillna(-999, inplace=True)

X = train_df.drop('Survived', axis=1)
y = train_df.Survived

X_train, X_validation, y_train, y_validation = train_test_split(X, y, train_size=0.75, random_state=42)
X_test = test_df

categorical_features_indices = np.where(X.dtypes != np.float)[0]

model = CatBoostClassifier(
    task_type="GPU",
    custom_metric=['Accuracy'],
    random_seed=666,
    logging_level='Silent'
)

model.fit(
    X_train, y_train,
    cat_features=categorical_features_indices,
    eval_set=(X_validation, y_validation),
    logging_level='Verbose',  # you can comment this for no text output
    plot=True
);
监测 GPU 使用:
watch -n 0.01 nvidia-smi
REFERENCE
[1]
安装CUDA: https://developer.nvidia.com/cuda-toolkit-archive
[2]安装cuDNN: https://developer.nvidia.com/rdp/cudnn-download
[3]安装合适的显卡驱动: http://www.linuxandubuntu.com/home/how-to-install-latest-nvidia-drivers-in-linux
[4]也可以手动去官网下载对应的安装程序安装显卡: https://www.geforce.cn/drivers
[5]NVIDIA: https://baike.baidu.com/item/NVIDIA
[6]并行计算: https://baike.baidu.com/item/并行计算/113443
[7]GPU: https://baike.baidu.com/item/GPU
[8]Online Documentation: https://developer.nvidia.com/cuda-toolkit-archive
[9]下载对应的安装包(以官方推荐的Deb packages安装方式为例): https://developer.nvidia.com/cuda-10.0-download-archive?target_os=Linux&target_arch=x86_64&target_distro=Ubuntu&target_version=1804&target_type=deblocal
[10]安装cuDNN: https://developer.nvidia.com/rdp/cudnn-download
[11]链接: https://developer.nvidia.com/rdp/cudnn-download
[12]官方-NVIDIA CUDA Installation Guide for Linux: https://docs.nvidia.com/cuda/archive/10.0/cuda-installation-guide-linux/index.html
[13]CUDA_Quick_Start_Guide-pdf: https://developer.download.nvidia.com/compute/cuda/10.0/Prod/docs/sidebar/CUDA_Quick_Start_Guide.pdf
[14]CUDA_Installation_Guide_Linux-pdf: https://developer.download.nvidia.com/compute/cuda/10.0/Prod/docs/sidebar/CUDA_Installation_Guide_Linux.pdf
[15]官方-cuDNN安装: https://docs.nvidia.com/deeplearning/sdk/cudnn-install/index.html#install-linux
[16][How To] Install Latest NVIDIA Drivers In Linux: http://www.linuxandubuntu.com/home/how-to-install-latest-nvidia-drivers-in-linux
推荐原创干货阅读:
聊聊近状, 唠十块钱的
【Deep Learning】详细解读LSTM与GRU单元的各个公式和区别
【手把手AI项目】一、安装win10+linux-Ubuntu16.04的双系统(全网最详细)
【Deep Learning】为什么卷积神经网络中的“卷积”不是卷积运算?
【TOOLS】Pandas如何进行内存优化和数据加速读取(附代码详解)
【TOOLS】python3利用SMTP进行邮件Email自主发送
【手把手AI项目】七、MobileNetSSD通过Ncnn前向推理框架在PC端的使用
【时空序列预测第一篇】什么是时空序列问题?这类问题主要应用了哪些模型?主要应用在哪些领域?
公众号:AI蜗牛车
保持谦逊、保持自律、保持进步
![]()
个人微信
备注:昵称+学校/公司+方向
如果没有备注不拉群!
拉你进AI蜗牛车交流群
![]()
点个在看,么么哒!
![]()


