使用虹软SDK实现离线人脸注册,人脸登录(H5-JS前端,java后台)
前言:
一开始找人脸识别的第三方接口,选择了百度,就是发请求给百度的接口,解析人家返回的数据。
但是这样的话,如果没有网络,或者没有外网。程序在局域网中使用的时候,自然就gg了。
人脸识别嘛,大家了解的最多的就是现在手机自带的人脸识别,这个肯定不会说在你没有网络的情况下用不了。
然后就找离线人脸识别吧,就发现虹软这个可以把算法下载到本地……
第一步,获取SDK
首先注册开发者账号,创建一个应用,得到两个东西,用于激活SDK引擎的,SDK key 和 AppID。
百度搜索“虹软”,进入官网,点击右上角开放平台下的人脸识别SDK,如图:
然后进入如下页面点击右上角开发者中心
新建应用,获取SDK之前,还有不可或缺的一步……实名认证
提交完资料一般两个小时之内就有结果了。
-
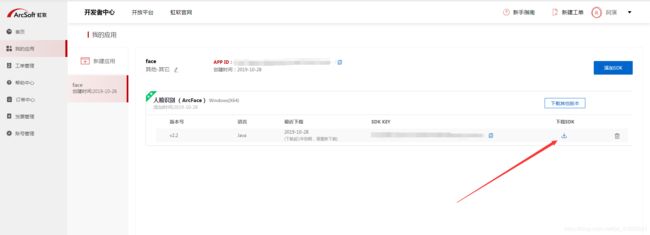
创建完应用点击这个下载按钮把SDK下载到本地,我这里选择的是java版本的,我也不会其他的……
文件夹中的doc文件夹中的一个pdf文档,就是开发者文档了。
文件夹中包括开发者文档、API文档、示例程序、jar包、引擎库dll文件。
文档中有对这个文件夹结构的详细介绍,这里就不重复了。
第二步,写后台
springboot项目,maven管理,项目结构:
把文件夹中的jar包复制到项目中的lib(自己创建的)文件夹下,
依赖这样写:
----我这里用的是SQLserver
	org.springframework.boot
	spring-boot-starter-parent
	2.0.3.RELEASE


		junit
		junit
		3.8.1
		test


		org.springframework.boot
		spring-boot-starter-web


		org.springframework.boot
		spring-boot-starter-test
		test


         org.mybatis.spring.boot
         mybatis-spring-boot-starter
         1.3.5


		com.microsoft.sqlserver
		sqljdbc4
		4.0


		org.springframework.boot
		spring-boot-starter-jdbc


        org.mybatis.spring.boot
        mybatis-spring-boot-starter
        1.3.5


		com.arcsoft.face
		arcsoft-sdk-face
		2.2.0.1
		system
		${basedir}/lib/arcsoft-sdk-face-2.2.0.1.jar


			org.springframework.boot
			spring-boot-maven-plugin

				true


	face
还要创建一个temp文件夹存放临时生成的图片文件。
启动类就不贴了,下面这个是引擎激活类:
我放在了启动包下,这个类要单独运行一遍,用来激活在这个设备的引擎,如果换了设备还要再运行激活一遍
/**
 * 设备引擎激活
* @author zsz
* @version
* @创建时间:2019年10月29日 下午2:51:24
*/
public class FaceActivation{

	public static void main(String[] args) {
        //填自己的AppID和SDKkey
		String appId = "";
        String sdkKey = "";

        //dll文件所在目录
        FaceEngine faceEngine = new FaceEngine("D:\\人脸识别\\ArcSoft_ArcFace_Java_Windows_x64_V2.2\\libs\\WIN64");
        //激活引擎
        int activeCode = faceEngine.activeOnline(appId, sdkKey);


        if (activeCode != ErrorInfo.MOK.getValue() && activeCode != ErrorInfo.MERR_ASF_ALREADY_ACTIVATED.getValue()) {
            System.out.println("引擎激活失败");
        }else {
        	System.out.println("引擎激活成功");
        }
	}
}
Utils包里面是一个base64跟图片互转的工具类,反正不是自己写的……
import java.io.FileInputStream;
import java.io.FileNotFoundException;
import java.io.FileOutputStream;
import java.io.IOException;
import java.io.InputStream;
import java.io.OutputStream;

import sun.misc.BASE64Decoder;
import sun.misc.BASE64Encoder;

public class Base64Utils {
	    /**
	     * 图片转化成base64字符串
	     * @param imgPath
	     * @return
	     */
	    public static String GetImageStr(String imgPath) {// 将图片文件转化为字节数组字符串,并对其进行Base64编码处理
	        String imgFile = imgPath;// 待处理的图片
	        InputStream in = null;
	        byte[] data = null;
	        String encode = null; // 返回Base64编码过的字节数组字符串
	        // 对字节数组Base64编码
	        BASE64Encoder encoder = new BASE64Encoder();
	        try {
	            // 读取图片字节数组
	            in = new FileInputStream(imgFile);
	            data = new byte[in.available()];
	            in.read(data);
	            encode = encoder.encode(data);
	        } catch (IOException e) {
	            e.printStackTrace();
	        } finally {
	            try {
	                in.close();
	            } catch (IOException e) {
	                // TODO Auto-generated catch block
	                e.printStackTrace();
	            }
	        }
	        return encode;
	    }

	    /**
	     * base64字符串转化成图片
	     *
	     * @param imgData
	     *            图片编码
	     * @param imgFilePath
	     *            存放到本地路径
	     * @return
	     * @throws IOException
	     */
	    @SuppressWarnings("finally")
	    public static boolean GenerateImage(String imgData, String imgFilePath) throws IOException { // 对字节数组字符串进行Base64解码并生成图片
	        if (imgData == null) // 图像数据为空
	            return false;
	        BASE64Decoder decoder = new BASE64Decoder();
	        OutputStream out = null;
	        try {
	            out = new FileOutputStream(imgFilePath);
	            // Base64解码
	            byte[] b = decoder.decodeBuffer(imgData);
	            for (int i = 0; i < b.length; ++i) {
	                if (b[i] < 0) {// 调整异常数据
	                    b[i] += 256;
	                }
	            }
	            out.write(b);
	        } catch (FileNotFoundException e) {
	            // TODO Auto-generated catch block
	            e.printStackTrace();
	        } catch (IOException e) {
	            // TODO Auto-generated catch block
	            e.printStackTrace();
	        } finally {
	            out.flush();
	            out.close();
	            return true;
	        }
	    }
	}
实体类包pojo,一个User类,跟数据库的表是对应的,
public class User {

	//用户名
	private String username;
	//用户人脸特征
	private byte[] extract;

	public User(String username, byte[] extract) {
		super();
		this.username = username;
		this.extract = extract;
	}
	public String getUsername() {
		return username;
	}
	public void setUsername(String username) {
		this.username = username;
	}
	public byte[] getExtract() {
		return extract;
	}
	public void setExtract(byte[] extract) {
		this.extract = extract;
	}


}
face包里面有两个类,一个获取人脸特征的,一个人脸特征对比的。
获取人脸特征:
public class MyFaceFeature {

	public byte[] extract(File file,FaceEngine faceEngine) {

		//人脸检测
        ImageInfo imageInfo = getRGBData(file);
        List faceInfoList = new ArrayList();
        int detectCode = faceEngine.detectFaces(imageInfo.getImageData(), imageInfo.getWidth(), imageInfo.getHeight(), ImageFormat.CP_PAF_BGR24, faceInfoList);
        if(faceInfoList == null || faceInfoList.size()==0) {
        	return null;
        }

        //人脸属性检测
        FunctionConfiguration configuration = new FunctionConfiguration();
        configuration.setSupportAge(true);
        configuration.setSupportFace3dAngle(true);
        configuration.setSupportGender(true);
        configuration.setSupportLiveness(true);
        int processCode = faceEngine.process(imageInfo.getImageData(), imageInfo.getWidth(), imageInfo.getHeight(), ImageFormat.CP_PAF_BGR24, faceInfoList, configuration);
        //3D信息检测
        List face3DAngleList = new ArrayList();
        int face3dCode = faceEngine.getFace3DAngle(face3DAngleList);
        if(face3DAngleList == null || face3DAngleList.size() == 0) {
        	return null;
        }
        System.out.println("3D角度:" + face3DAngleList.get(0).getPitch() + "," + face3DAngleList.get(0).getRoll() + "," + face3DAngleList.get(0).getYaw());

        //活体检测
        List livenessInfoList = new ArrayList();
        int livenessCode = faceEngine.getLiveness(livenessInfoList);
        System.out.println("活体:" + livenessInfoList.get(0).getLiveness());

        //只有等于1才是活体,-1是没有人脸,0是非活体(照片之类的),2是多张人脸
        if(livenessInfoList.get(0).getLiveness()!=1) {
        	return null;
        }

        //特征提取
        FaceFeature faceFeature = new FaceFeature();
        int extractCode = faceEngine.extractFaceFeature(imageInfo.getImageData(), imageInfo.getWidth(), imageInfo.getHeight(), ImageFormat.CP_PAF_BGR24, faceInfoList.get(0), faceFeature);

        //返回特征值
		return faceFeature.getFeatureData();
	}
}
人脸特征对比:
public class FaceContrast {

	public float contrast(byte[] face1,byte[] face2,FaceEngine faceEngine) {
		 //特征比对
        FaceFeature targetFaceFeature = new FaceFeature();
        targetFaceFeature.setFeatureData(face1);
        FaceFeature sourceFaceFeature = new FaceFeature();
        sourceFaceFeature.setFeatureData(face2);
        FaceSimilar faceSimilar = new FaceSimilar();
        int compareCode = faceEngine.compareFaceFeature(targetFaceFeature, sourceFaceFeature, faceSimilar);
        //返回相似度
        return faceSimilar.getScore();
	}
}
到这里就剩下controller层service层和dao层了。
controller层:
一个注册一个登录
@RestController
@RequestMapping("face")
@CrossOrigin
public class FaceController {
	FaceEngine faceEngine = new FaceEngine();
	{
		// 引擎配置
		EngineConfiguration engineConfiguration = new EngineConfiguration();

		//检测模式 图片/视频,这里选择的是图片模式
		engineConfiguration.setDetectMode(DetectMode.ASF_DETECT_MODE_IMAGE);

		//人脸检测角度
		engineConfiguration.setDetectFaceOrientPriority(DetectOrient.ASF_OP_0_ONLY);

		// 功能配置
		FunctionConfiguration functionConfiguration = new FunctionConfiguration();
		//是否支持年龄检测
		functionConfiguration.setSupportAge(true);
		//是否支持3D人脸检测
		functionConfiguration.setSupportFace3dAngle(true);
		//是否支持人脸检测
		functionConfiguration.setSupportFaceDetect(true);
		//是否支持人脸识别
		functionConfiguration.setSupportFaceRecognition(true);
		//是否支持性别检测
		functionConfiguration.setSupportGender(true);
		//是否支持RGB活体检测
		functionConfiguration.setSupportLiveness(true);
		//是否支持RGB活体检测
		functionConfiguration.setSupportIRLiveness(true);

		//设置引擎功能配置
		engineConfiguration.setFunctionConfiguration(functionConfiguration);

		// 初始化引擎
		int initCode = faceEngine.init(engineConfiguration);

		if (initCode != ErrorInfo.MOK.getValue()) {
			System.out.println("初始化引擎失败");
		}
	}

	@Autowired
	private FaceService service;

	@RequestMapping("add")
	public String faceAdd(String user_id, String base) {
		// 去掉base64编码中的图片头信息
		String base64 = base.split(",")[1];
		try {
			//base64转图片
			Base64Utils.GenerateImage(base64, "./temp/temp.jpg");
		} catch (IOException e) {
			// TODO Auto-generated catch block
			e.printStackTrace();
		}

		//获取人脸特征
		byte[] extract = new MyFaceFeature().extract(new File("./temp/"+user_id+"temp.jpg"), faceEngine);
		if(extract == null) {
			return "{\"msg\":\"检测人脸失败\"}";
		}

		//把人脸特征报错到数据库
		return service.faceAdd(new User(user_id,extract))?"{\"msg\":\"注册成功\"}":"{\"msg\":\"注册失败\"}";
	}


	@RequestMapping("login")
	public String login(String base) {
		// 去掉base64编码中的图片头信息
		String base64 = base.split(",")[1];
		try {
			Base64Utils.GenerateImage(base64, "./temp/temp.jpg");
		} catch (IOException e) {
			// TODO Auto-generated catch block
			e.printStackTrace();
		}
		//获取当前人脸特征
		byte[] extract = new MyFaceFeature().extract(new File("./temp/temp.jpg"), faceEngine);
		if(extract==null) {
			return null;
		}
		//查询所有人脸 一一对比
		人脸对比对象
		FaceContrast faceContrast = new FaceContrast();
		获取所有注册过的用户
		List userList = service.getAllUserFace();
		循环对比
		for(User user : userList) {
			//如果大于0.8就表示是同一人
			if(faceContrast.contrast(extract, user.getExtract(), faceEngine)>0.8) {
				System.out.println("成功");
				return "{\"user_id\":\""+user.getUsername()+"\"}";
			}
		}
		System.out.println("失败");
		return null;
	}
}
server包 ,service层:
没有业务,直接传给下一层
@Service
public class FaceService {

	@Autowired
	private FaceMapper mapper;

	//注册人脸
	public Boolean faceAdd(User user) {
		return mapper.add(user);
	}
	//查找人脸
	public List getAllUserFace() {
		return mapper.getAllUser();
	}
}
mapper包,dao层
@Mapper
public interface FaceMapper {

	@Insert("insert into user_face values(#{username},#{extract})")
	Boolean add(User user);

	@Select("select * from user_face")
	List getAllUser();
}
后台就是这些,注释写的比较详细了
在启动项目的时候会报错,no libarcsoft_face_engine_jni in java.library.path
见另一个博客:https://blog.csdn.net/qq_41890624/article/details/102812953
接下来就是前端
一个index页面和,两个按钮,跳转到注册和登录
页面:
主页
JS:
document.getElementById("register").onclick = function(){
	window.location.href = "register.html";
}

document.getElementById("login").onclick = function(){
	window.location.href = "login.html";
}
注册页面register
页面:
人脸注册
JS:
//判断浏览器是否支持HTML5 Canvas
window.onload = function() {
	try {
		//动态创建一个canvas元 ,并获取他2Dcontext。如果出现异常则表示不支持
		document.createElement("canvas").getContext("2d");
	} catch(e) {
		document.getElementByIdx("support").innerHTML = "浏览器不支持HTML5 CANVAS";
	}
}

//这段代 主要是获取摄像头的视频流并显示在Video 签中
window.addEventListener("DOMContentLoaded", function() {
	var canvas = document.getElementById("canvas"),
		context = canvas.getContext("2d"),
		img = document.getElementById("img"),
		video = document.getElementById("video"),
		videoObj = {
			"video": true
		},
		errBack = function(error) {
			console.log("Video capture error: ", error.code);
			alert("不支持");
		};

	canvas.width = 450;
	canvas.height = 600;

	var button = document.getElementById("ok");
	button.onclick = function(){
		context.drawImage(video, 0, 0, 450, 600);
		// 把画布的内容转换为base64编码格式的图片
	    var data = canvas.toDataURL( 'image/png', 1 );  //1表示质量(无损压缩)
		var user_id = document.getElementById("user_id").value;
		document.getElementById("msg").innerText = "注册中……";

	    $.ajax({
            url: 'http://172.16.2.207:8080/face/add',
            cache:false,
            type: 'POST',
            data: {
				base : data,
				user_id : user_id
	    	},
            dataType: 'json',
            success : function(rs){
				document.getElementById("msg").innerText = rs.msg;
            },
            error: function(e){
            	console.log(e);
            }

        });
	}

	//请求摄像头权限
	navigator.mediaDevices.getUserMedia(videoObj)
		.then(function(stream){
			//成功回调函数,把流给video标签
			video.srcObject = stream;
			video.play();
		})
		.catch(errBack);

}, false);
登录页面login
页面:
JS:
//判断浏览器是否支持HTML5 Canvas
window.onload = function() {
	try {
		//动态创建一个canvas元 ,并获取他2Dcontext。如果出现异常则表示不支持
		document.createElement("canvas").getContext("2d");
	} catch(e) {
		document.getElementByIdx("support").innerHTML = "浏览器不支持HTML5 CANVAS";
	}
}


//这段代 主要是获取摄像头的视频流并显示在Video 签中
window.addEventListener("DOMContentLoaded", function() {
	var canvas = document.getElementById("canvas"),
		context = canvas.getContext("2d"),
		video = document.getElementById("video"),
		videoObj = {
			"video": true
		},
		errBack = function(error) {
			console.log("Video capture error: ", error.code);
			alert("不支持");
		};

	canvas.width = 450;
	canvas.height = 600;

	//请求摄像头权限
	this.navigator.mediaDevices.getUserMedia(videoObj)
	.then(function(stream){
		video.srcObject = stream;
		video.play();
		//拍照按钮,每0.5秒canvas从video中画到画布,转成base64发给后台
		var login = setInterval(function() {
			context.drawImage(video, 0, 0, 450, 600);
			// 把画布的内容转换为base64编码格式的图片
		    var data = canvas.toDataURL( 'image/png', 1 );  //1表示质量(无损压缩)

			$.ajax({
	            url: 'http://172.16.2.207:8080/face/login',
	            cache:false,
	            type: 'POST',
	            data: {
					base: data
		    	},
	            dataType: 'json',
	            success : function(rs){
	            	if(rs!=null){
            			document.getElementById("msg").innerText = "用户"+rs.user_id+"登录成功";
            			//隐藏控件
            			$("#video").hide();
  						$("#canvas").hide();

						//停止定时发送
            			clearInterval(login);
	            	}
	            },
	            error: function(e){
	            }
	        });

		}, 500);
	})
	.catch(errBack);


}, false);
前端就是这些了,注释也加的很详细了。
后台代码码云地址:https://gitee.com/vhukze/face.git
如果本文帮助到了你,别忘了点赞加关注哦
你点的每个赞,我都认真当成了喜欢


